
Watch Quick Video

Pro Odoo Excel | Google Sheet | Libre Office | Power Bi | Tableau Connector
Pro Odoo Excel | Google Sheet | Libre Office | Power Bi | Tableau Connector
Built for business users and data analysts. It changes the way you extract value from Odoo. It won’t require you to fit into a rigid reporting structure, but instead allows you to dynamically pull the exact fields, sequences and record limits you need. Your external reports are always pulling the latest updates directly from your Odoo ERP using advanced data feeds like OData, custom HTML scripts and secure CSV links. The app does everything from automated background refreshes to intelligently resizing columns. Meaning if you add or remove a field in Odoo your connected dashboards instantly adapt without breaking. Your data is always fully protected as it flows easily to your favourite BI platforms with token-based security and full access logging.
Pro Odoo Excel | Google Sheet | Libre Office | Power Bi | Tableau Connector Features
- Plug and play out of the box to stream Odoo data directly into Microsoft Excel, Power BI, Tableau, Google Sheets and LibreOffice.
- Export data for your specific region. • Full support of Unicode characters for all languages natively supported by Odoo. Records and dynamic column headers are translated perfectly into the exact language specified in your Live Data Feed, while retaining standard Western numerals across all feeds to ensure your analytical formulas never break.
- Set your reporting on autopilot. It supports native built-in background refresh intervals for Microsoft Excel and LibreOffice, automated scheduling for Power BI and Tableau Server, and includes copy-paste-ready Google Apps Scripts for hands-free Google Sheets updates.
- Your data is secure with strict security. Each live feed has an Access Token that can be refreshed. Built-in Access History logs give administrators complete visibility into how data is being consumed, tracking the IP address, user agent, timestamps and frequency of every single data extraction.
- Don't stress over broken spreadsheets. When using the recommended OData feed or our quick-download .odc and .iqy files, if you add, remove, or re-sequence fields in Odoo, your columns automatically update perfectly on the next data pull with zero manual configuration. (Standard CSV or HTML web connections also have built-in setup instructions to do this exact same flexibility.)
- You should extract data accurately. Customise Odoo domain filters, manually order your columns, and enforce strict validated record limits so you pull only the data that matters. Built-in constraints automatically prevent invalid configurations such as negative record limits or intervals.
- Empower users of all technical abilities. Simple one-click .odc and .iqy file downloads for instant local setup, and powerful web connection URLs (OData, CSV, HTML) for advanced cloud dashboarding.
Pro Odoo Excel | Google Sheet | Libre Office | Power Bi | Tableau Connector
To get started, enable the "Allow Live Export" user right in Settings → Users & Companies → Users Check the Allow Live Export box under the Extra Rights tab to grant the user access to the connector, then click the "Live Export" button on any Odoo model to open the creation wizard, where you can select fields, extract specific one2many sub-level data using the "Related Property" column, set record limits, and apply custom filter rules. Once saved, manage your configuration from the Live Data Feeds menu through dedicated tabs: adjust your columns dynamically in the Fields tab, or navigate to platform-specific tabs equipped with built-in setup guides and tailored connection methods. From these tabs, you can use one-click ODC and IQY file downloads exclusively for Microsoft Excel, copy a custom Google Apps Script specifically for Google Sheets, connect using supported OData and CSV URLs for Power BI, utilize a dedicated OData URL for Tableau, or grab CSV and HTML links for LibreOffice. Finally, you can ensure complete security and oversight by tracking every data pull, including IPs, App/user agents, and query frequencies, directly within the Access History tab
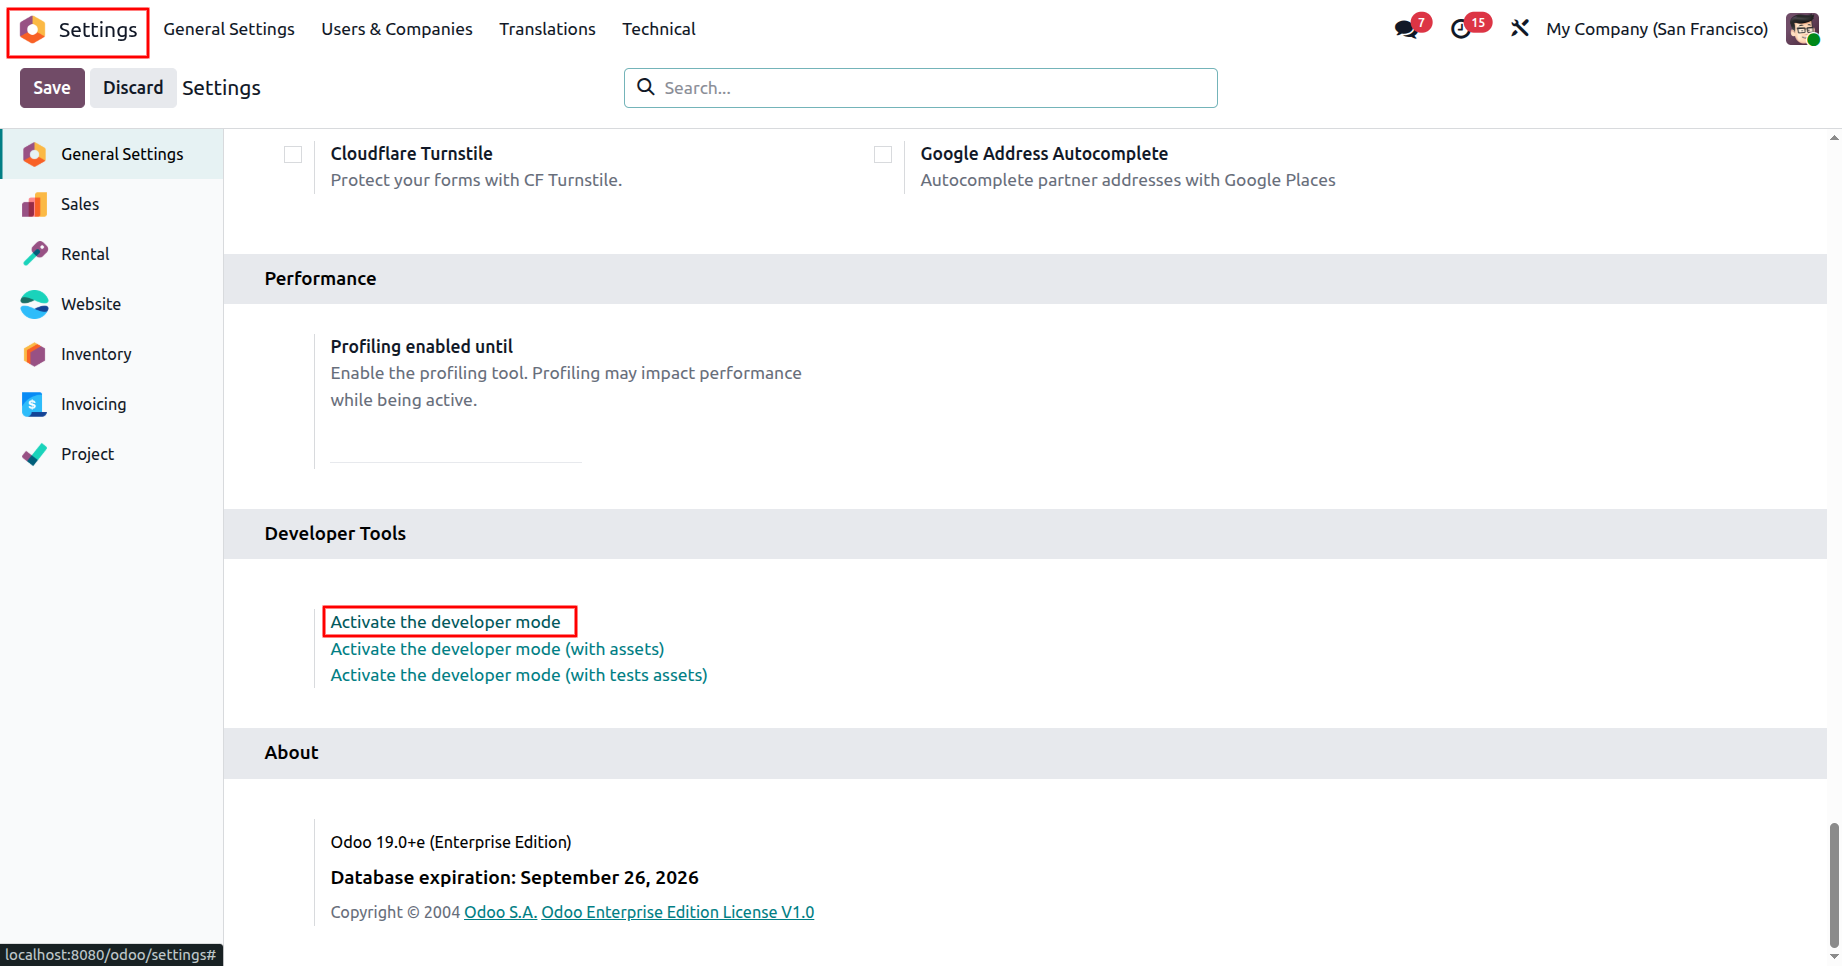
1. Go to Settings -> General Settings -> Developer Tools -> Activate the Developer Mode.
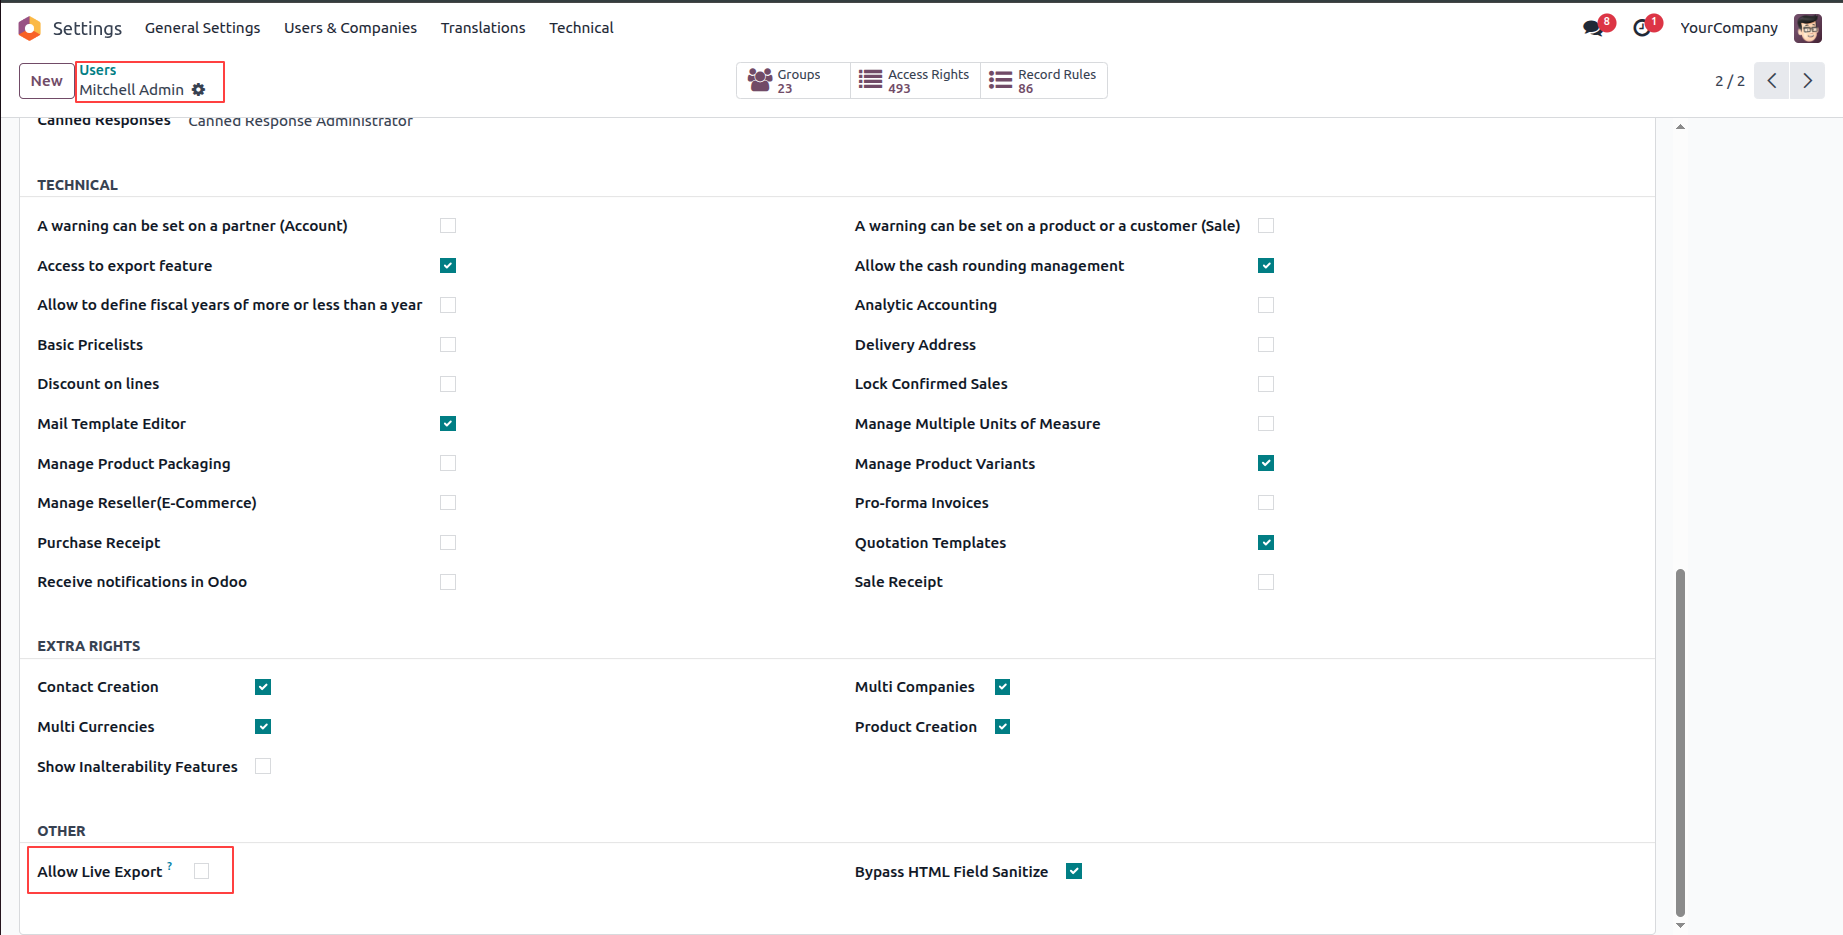
2. Settings -> Users & Companies -> select user (e.g. Mitchell Admin) -> Extra Rights -> check Allow Live Export.
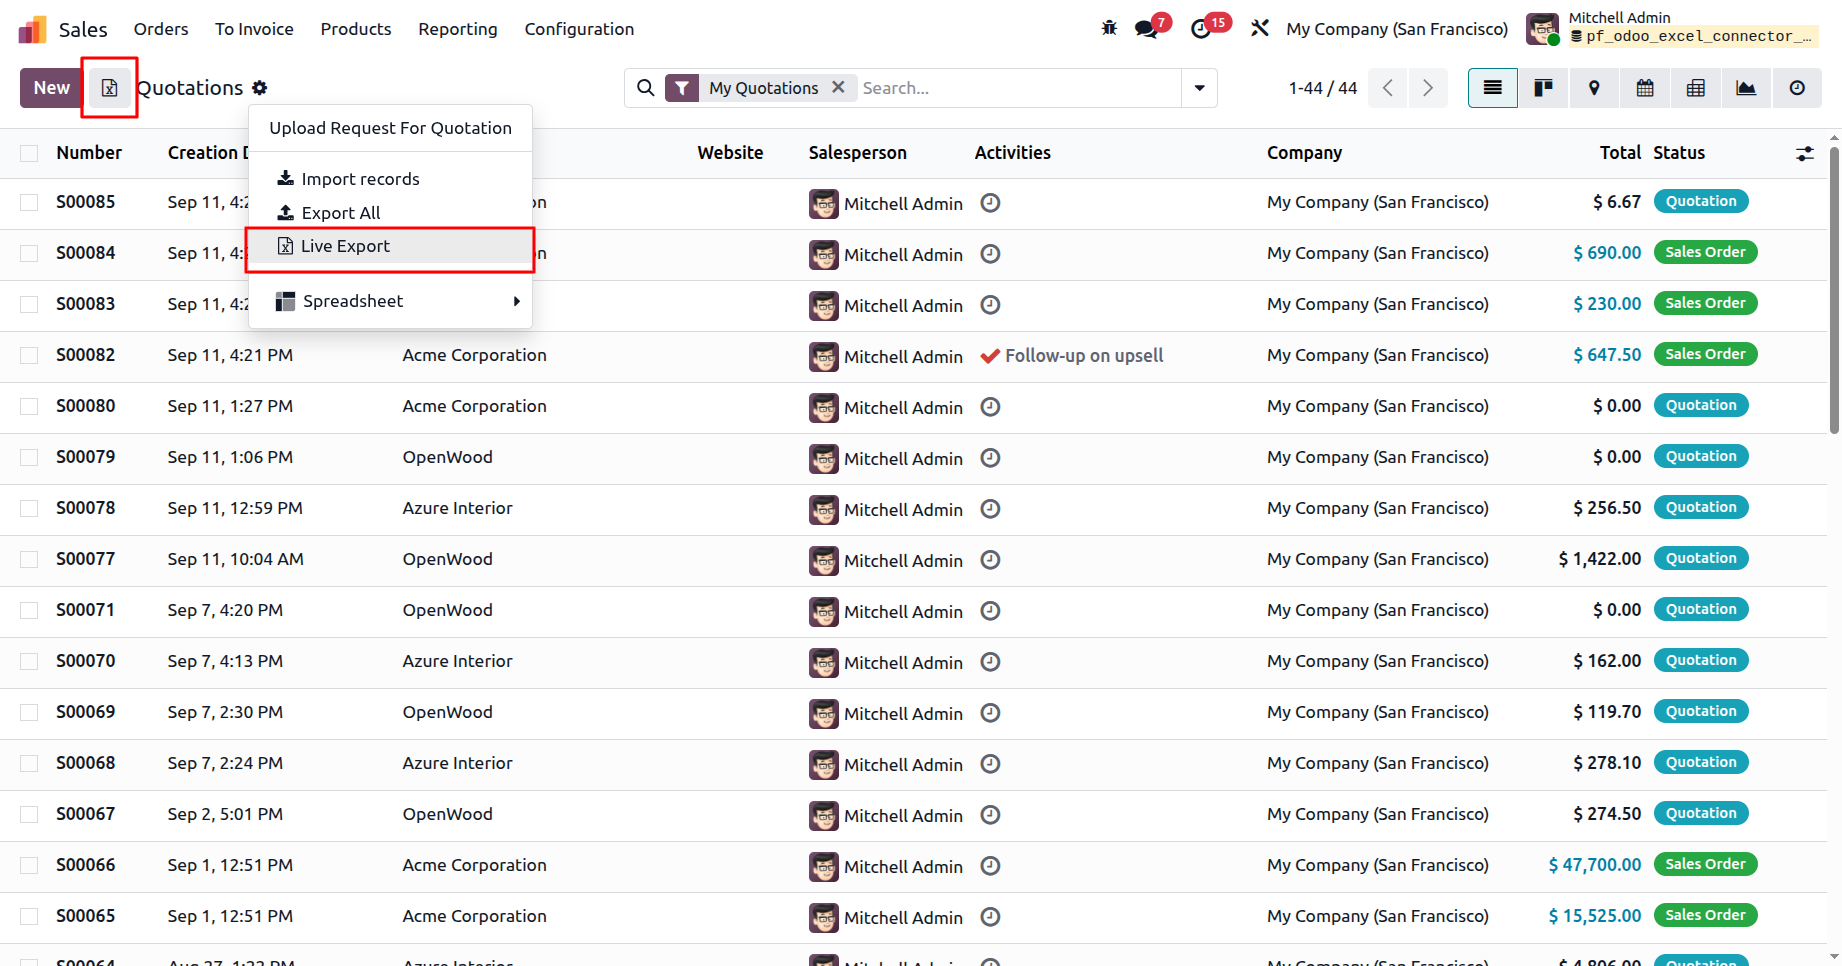
3. Go to Sales, Invoicing, To-Do, Project, Website, or any module. Open the list view and go to Actions to find the Live Export action, or find the button in the header.
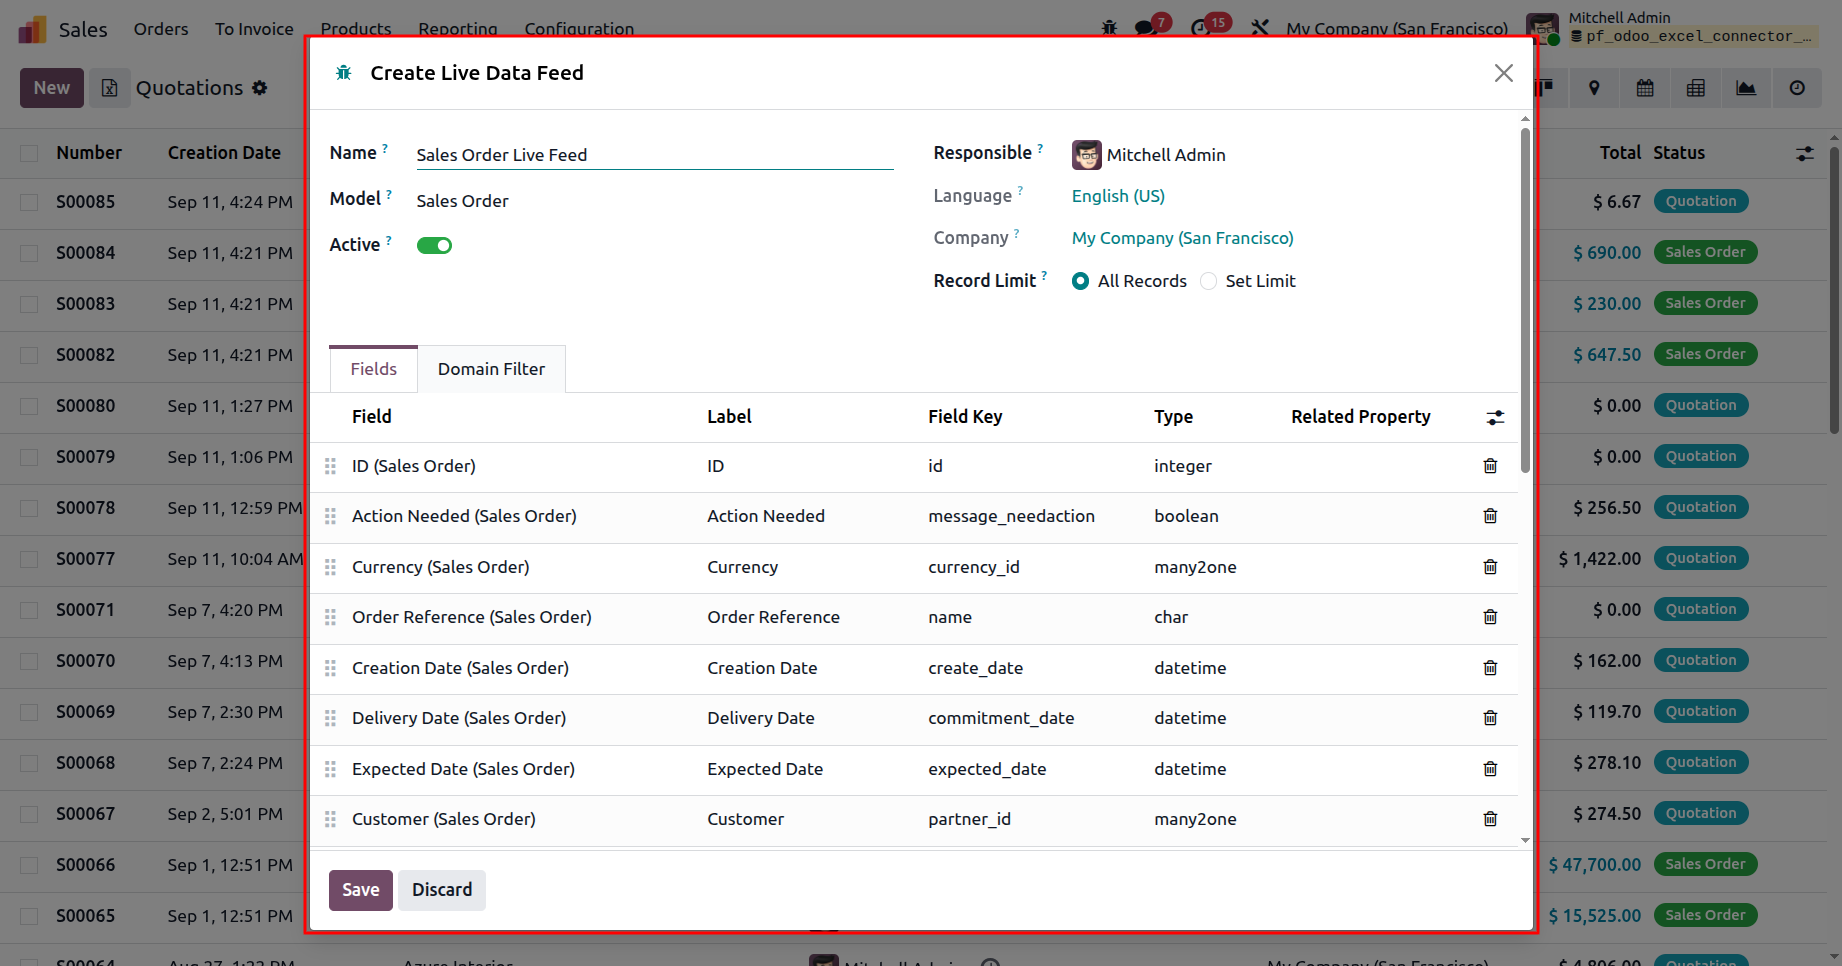
4. Create a Live Data Feed. A wizard will open where you can change values according to your needs and add or remove fields.
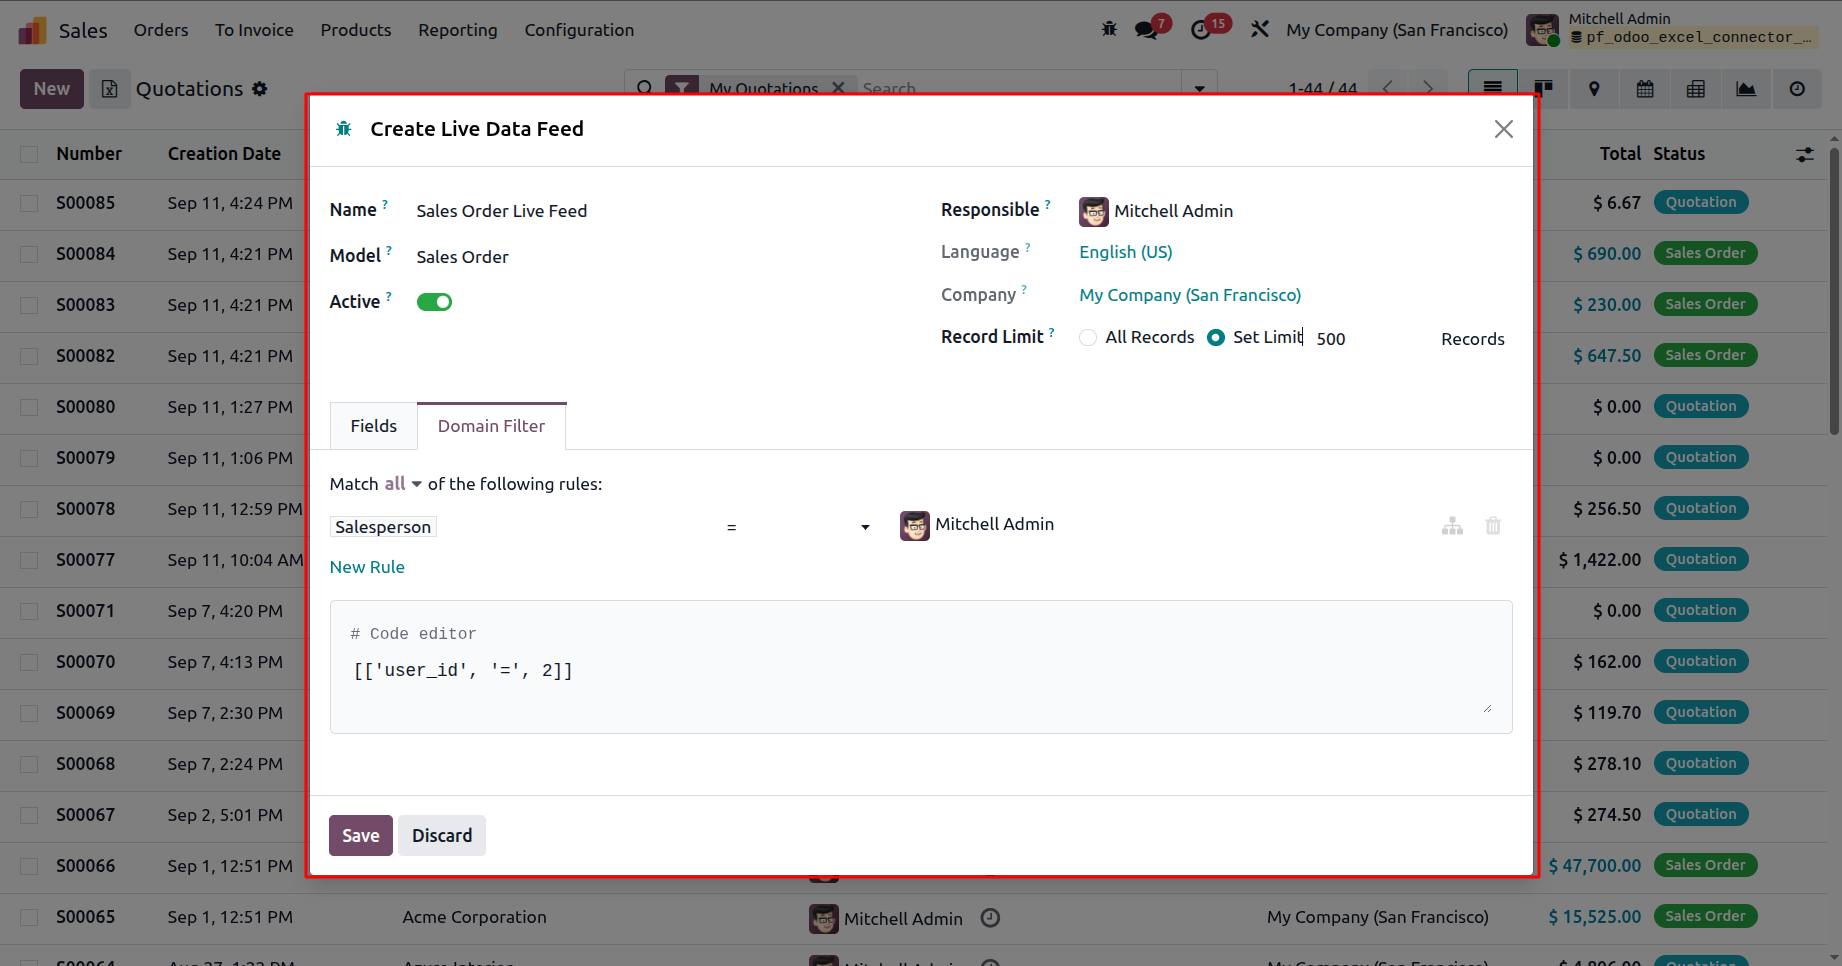
5. In the Domain Filter, you can set rules for data export and set a limit for records, then click on the Save button.
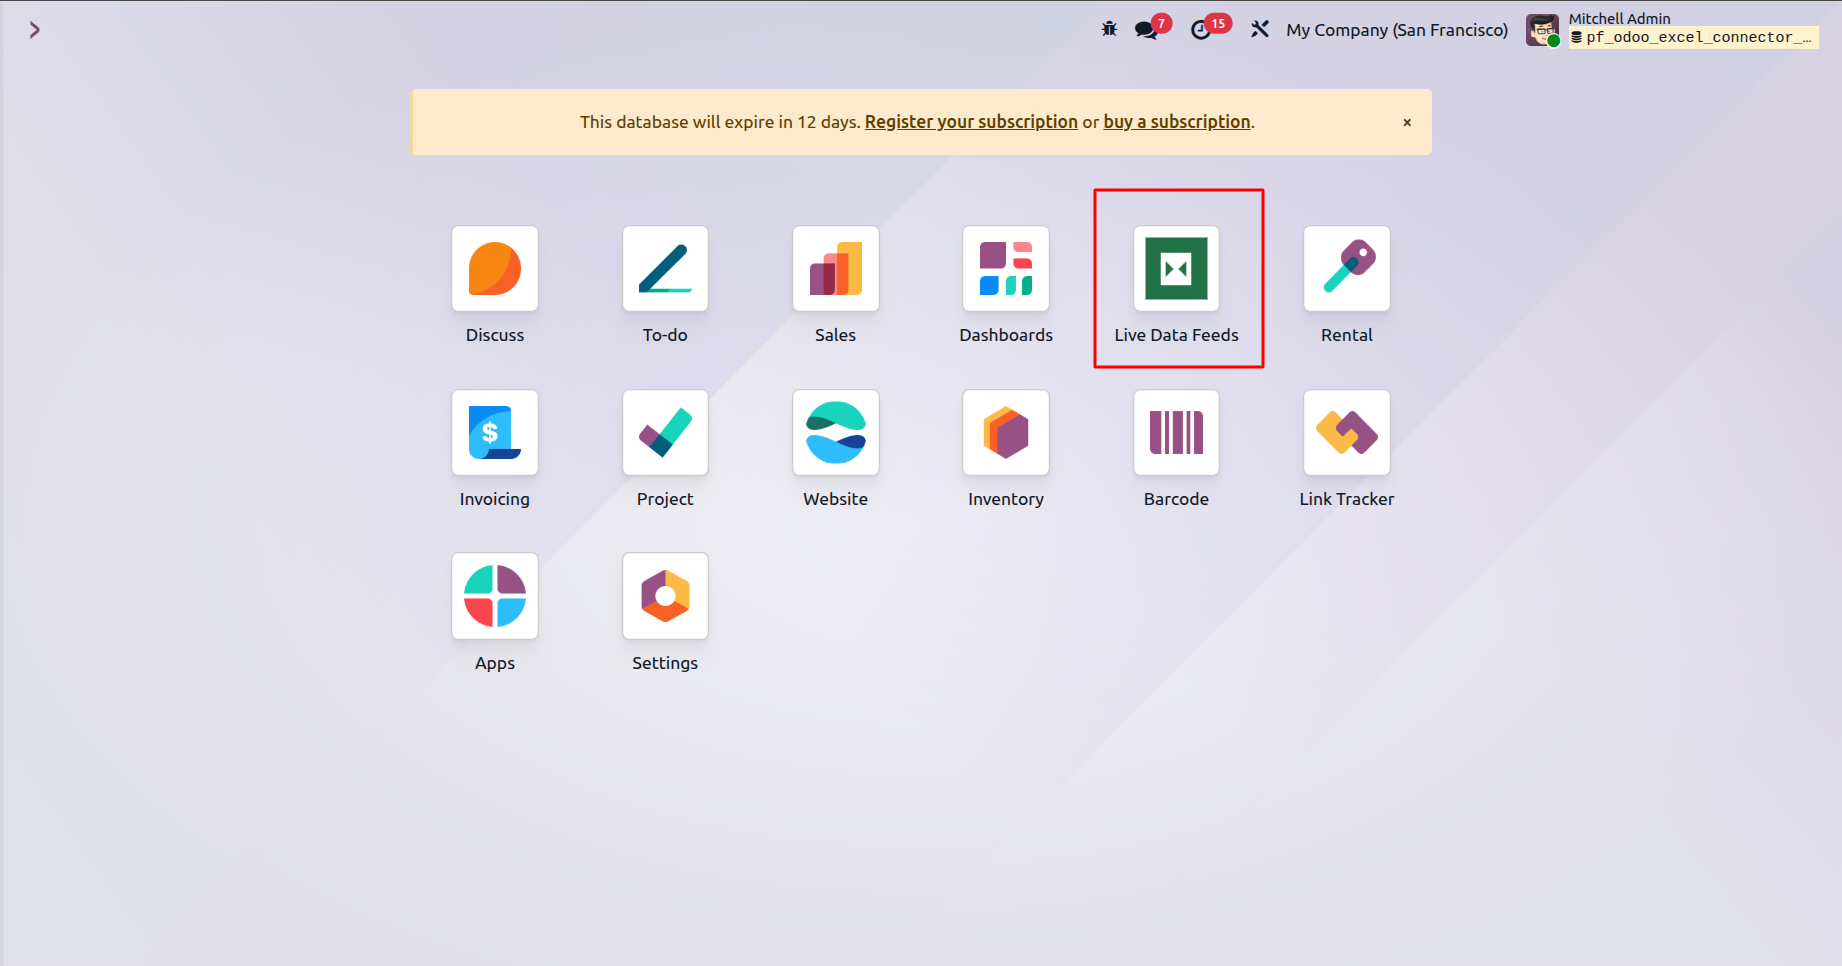
6. Then go to the Live Data Feeds menu.
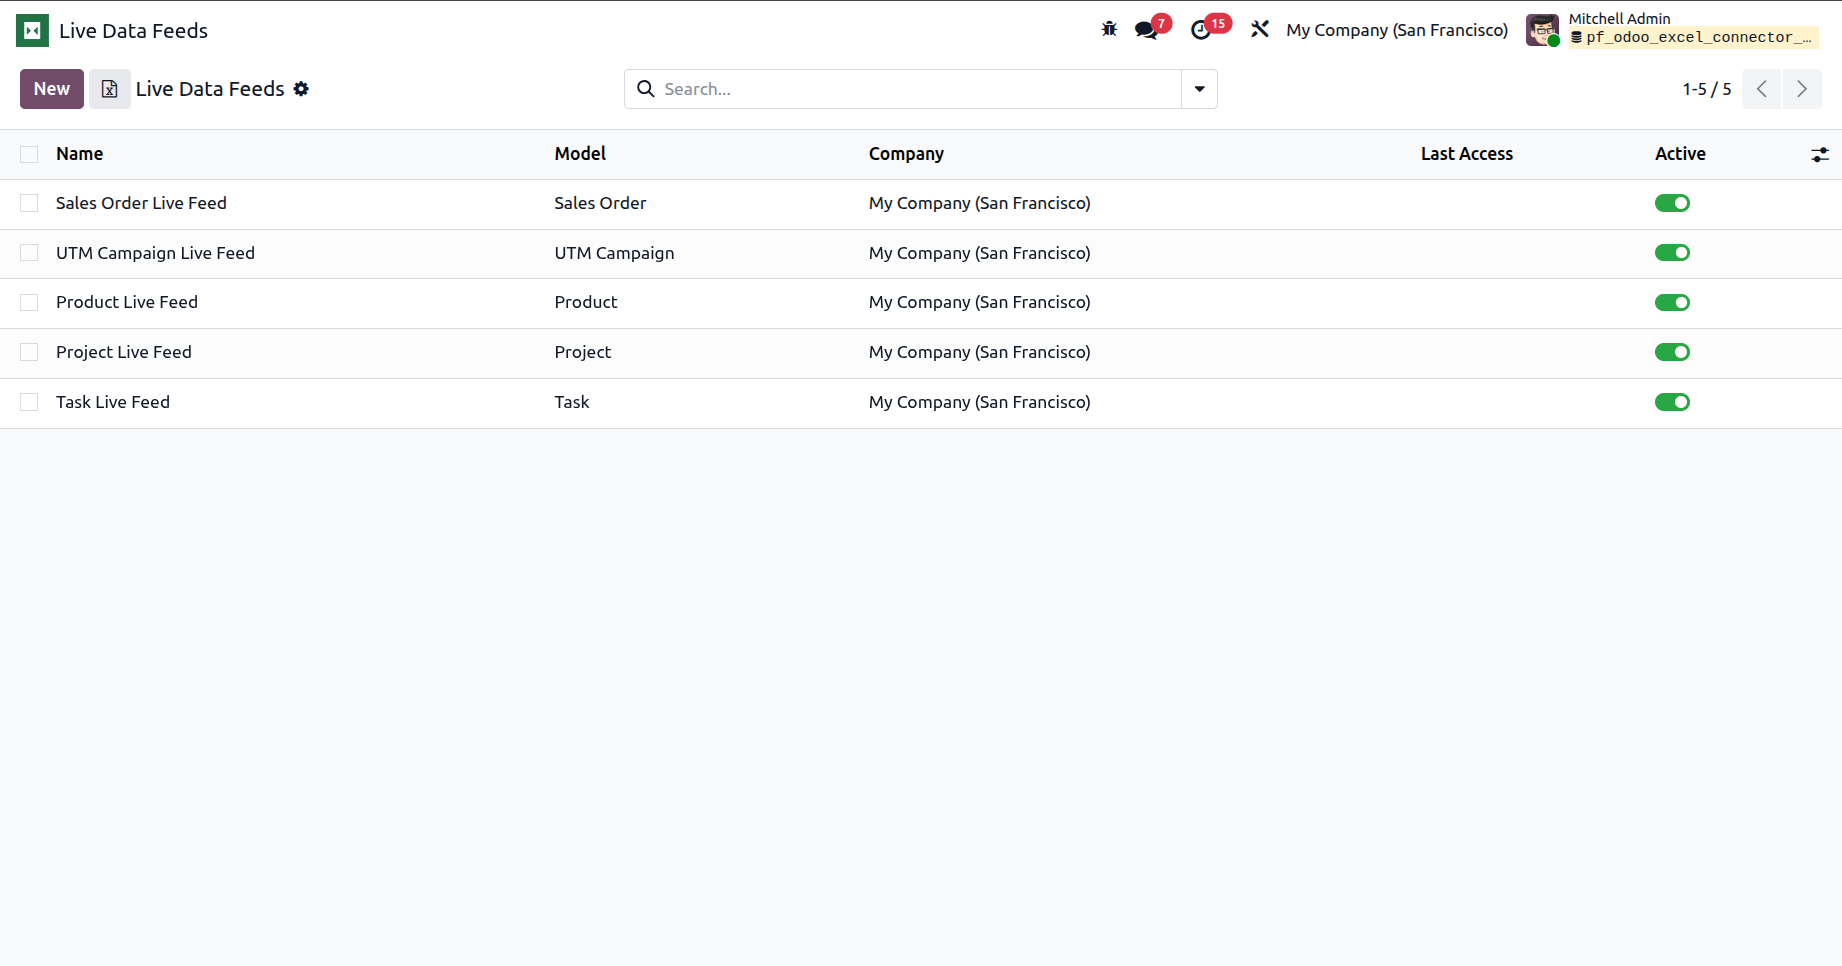
7. There you can find a list of all live data feeds you created for the active company. Select the live data feed you want to use.
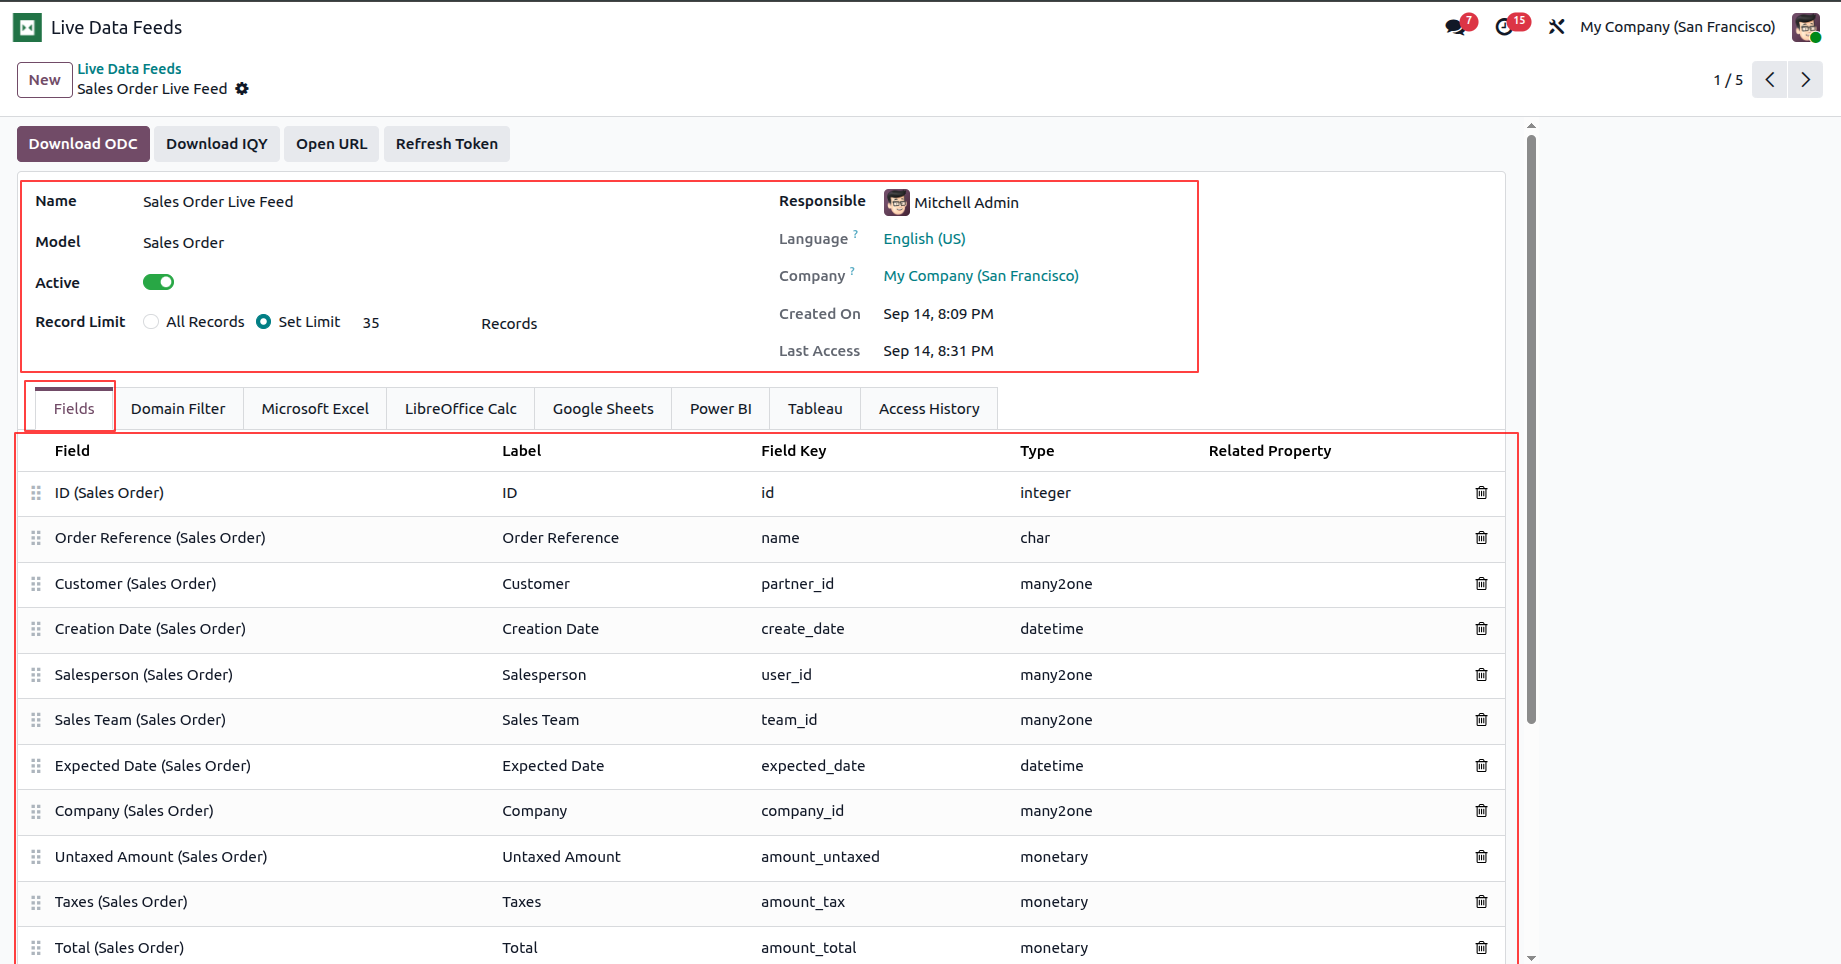
8. You can change the name, model, and record limit. If you are an admin, you can also change the Responsible User and add or remove fields.
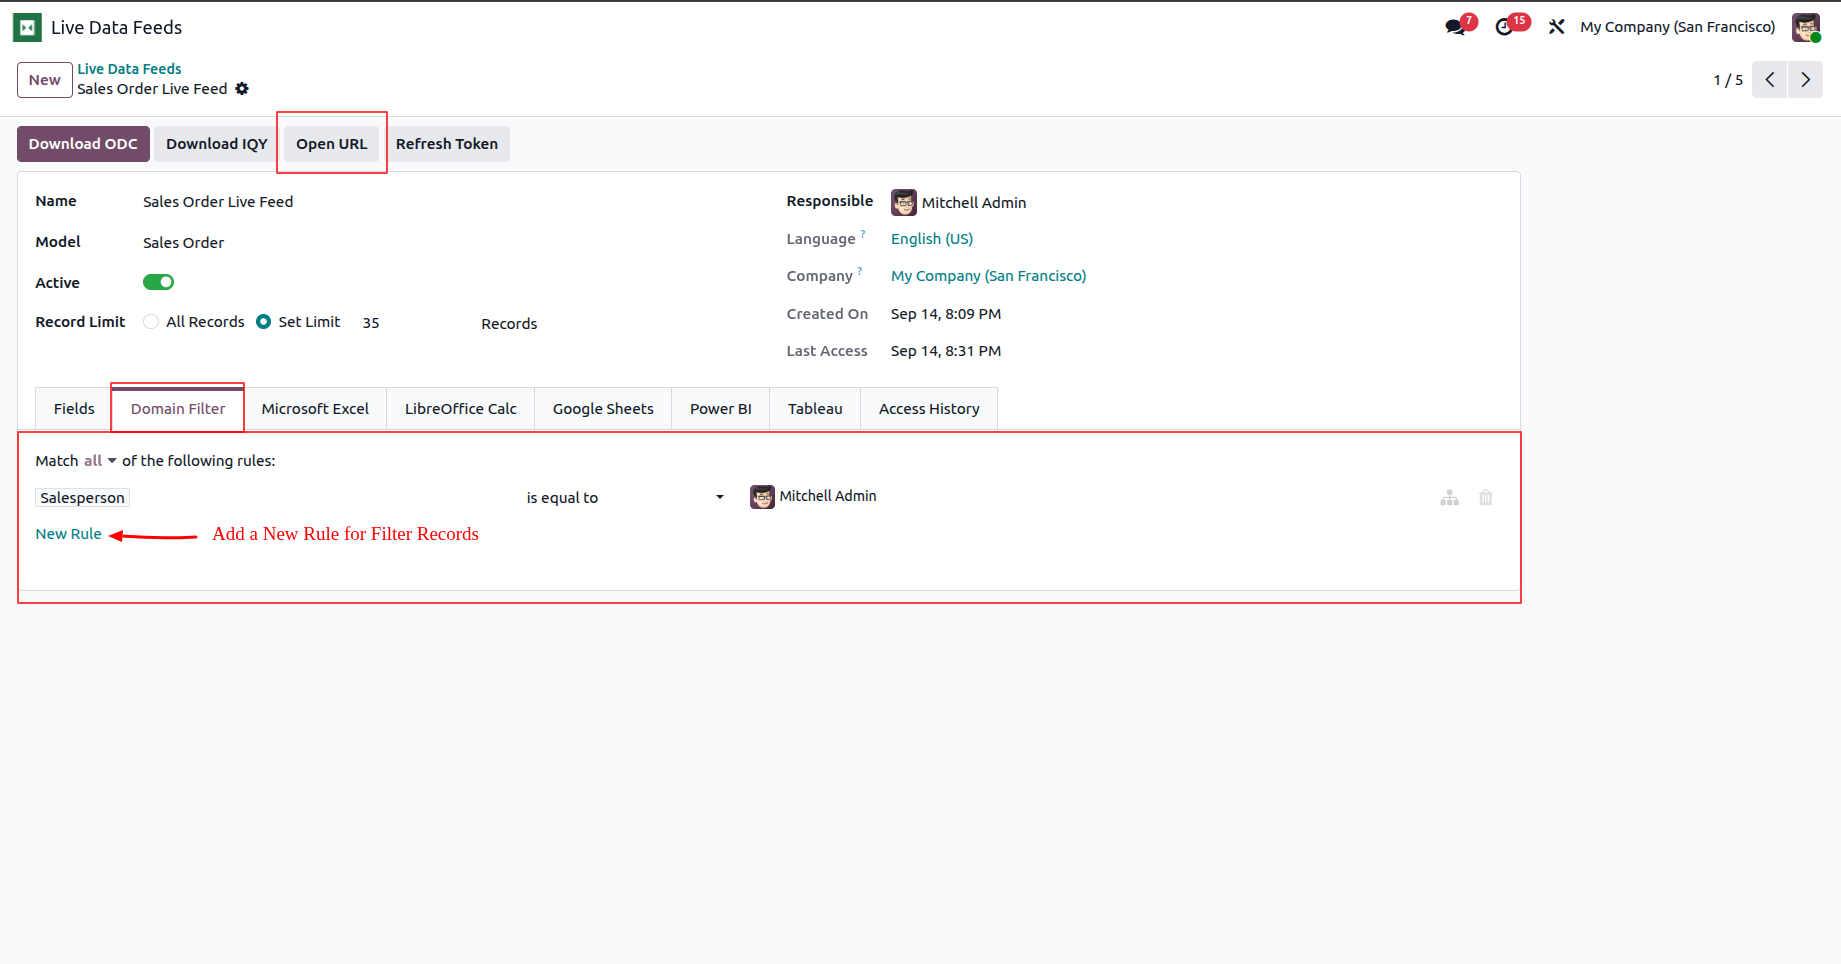
9. You can also set domain filter rules and view records in the browser by clicking the Open URL button.
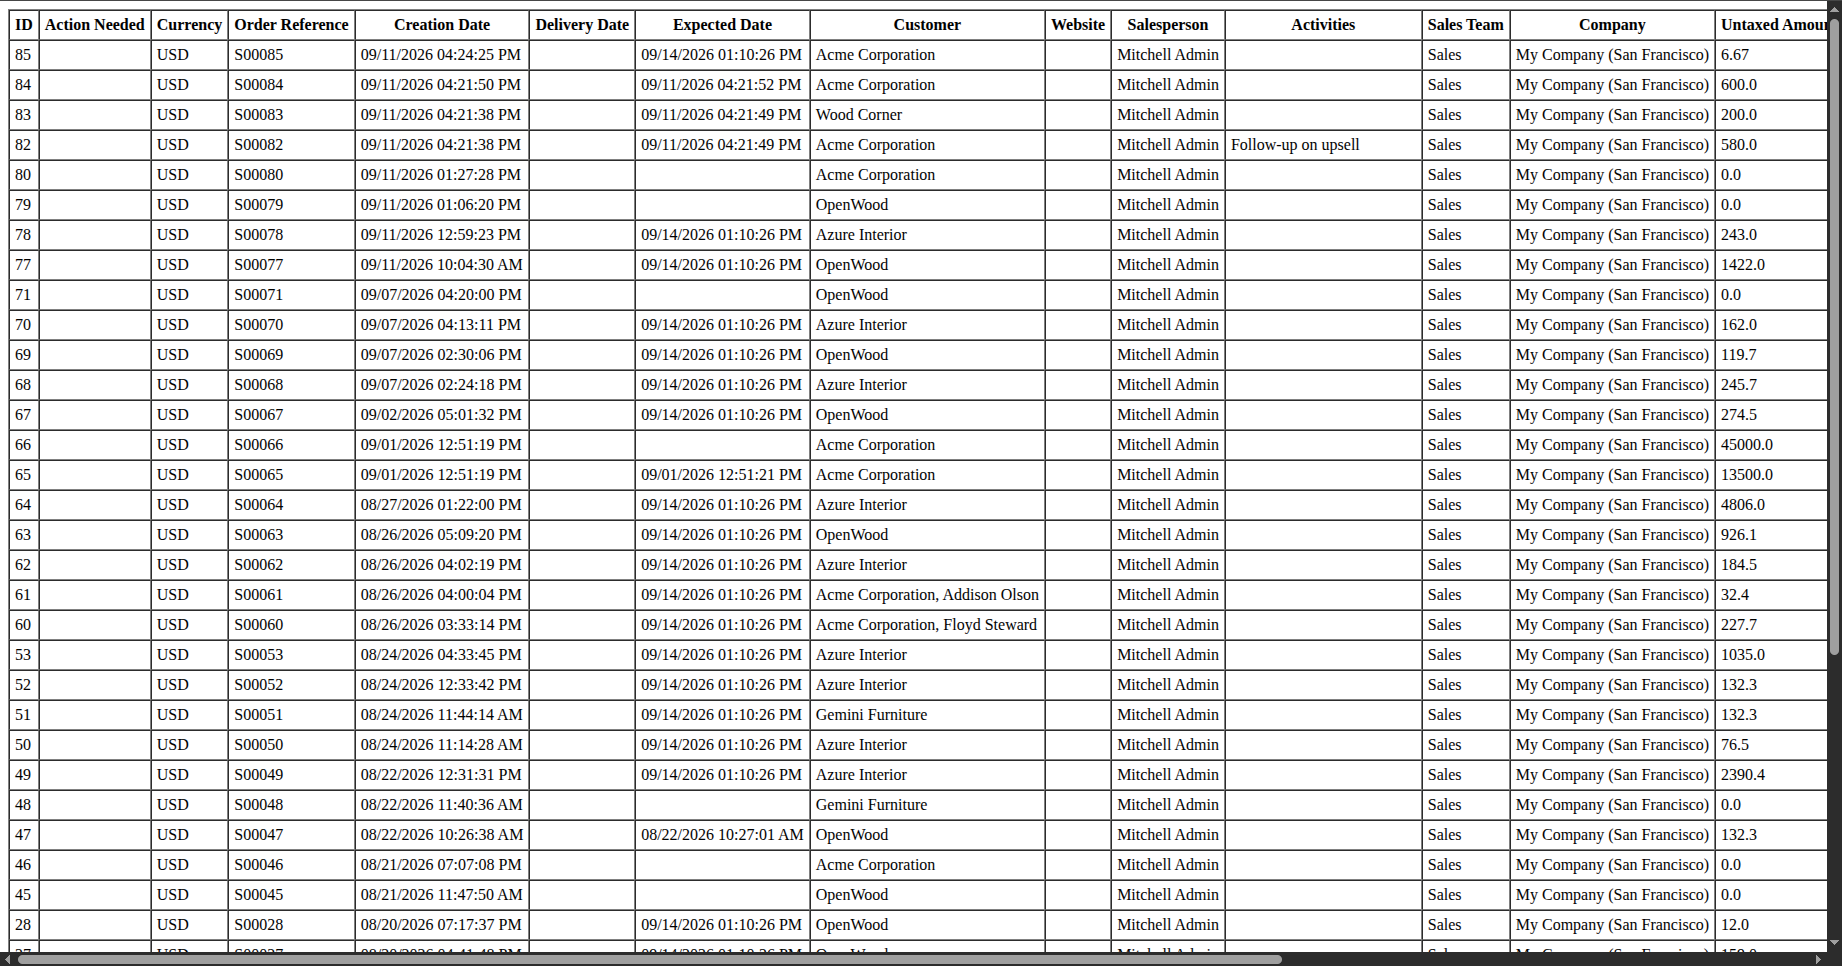
10. Records based on your configuration will show in Browser when you click on Open URL.
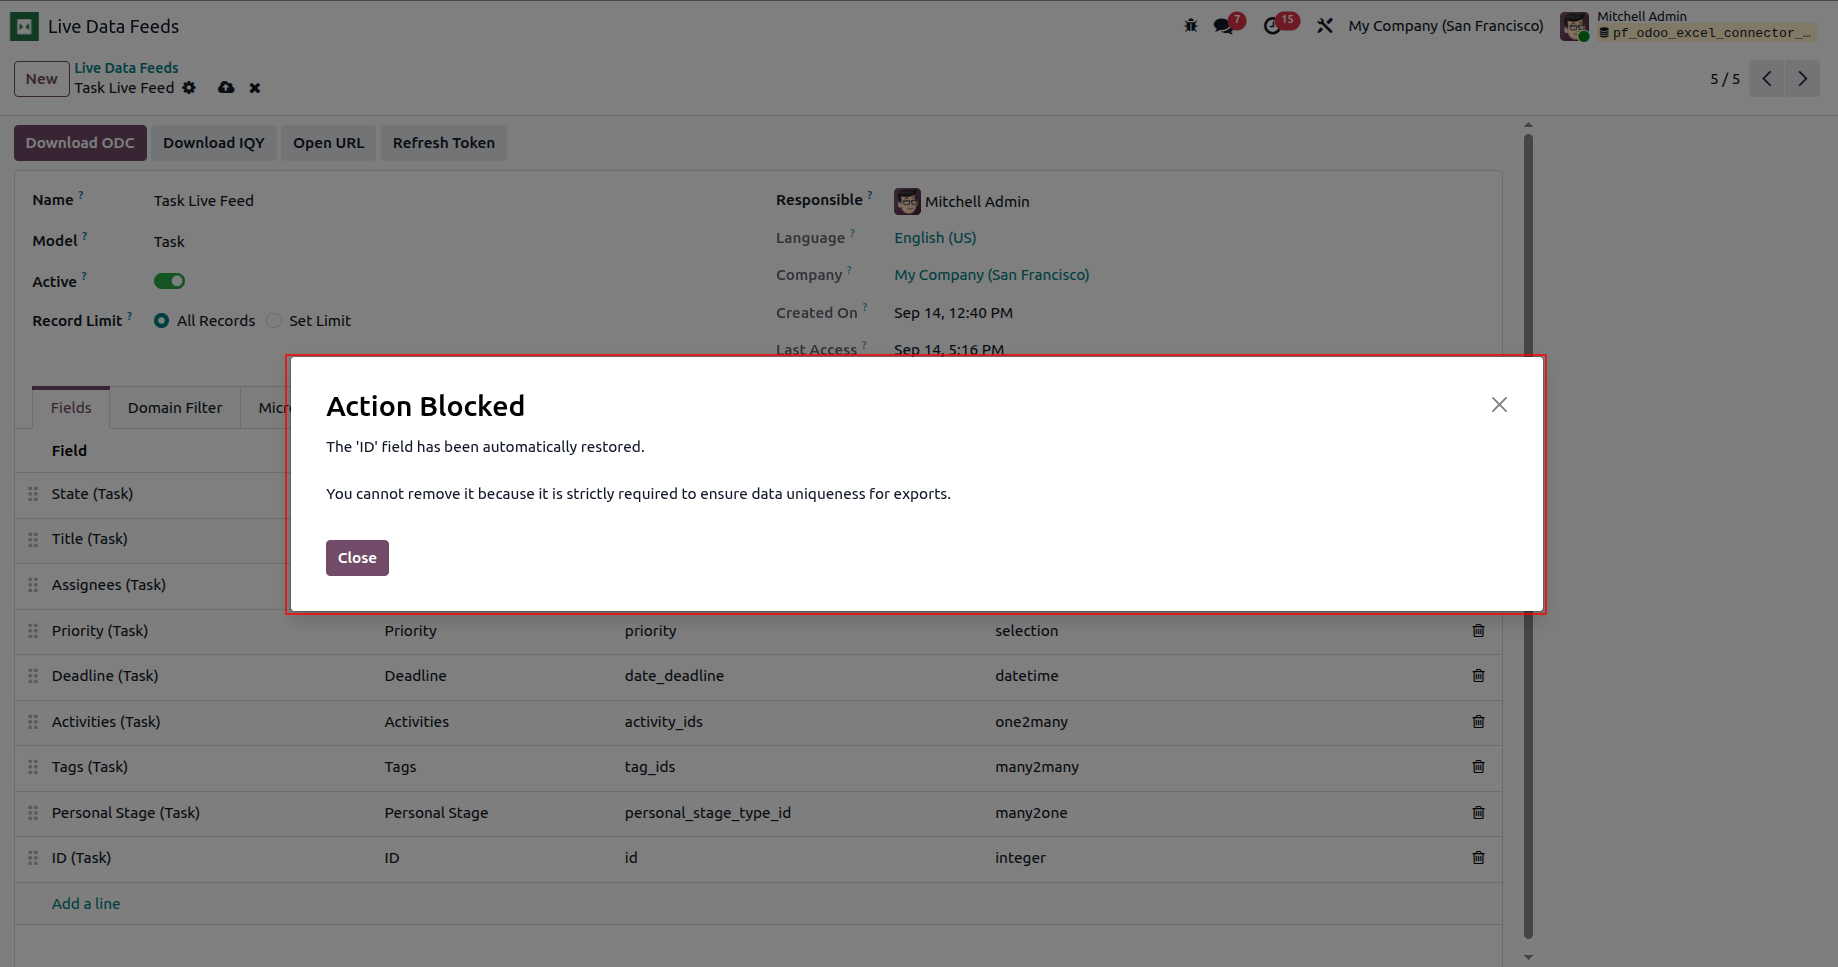
11. But you cannot remove id field because it is strictly required to ensure data uniqueness for exports.
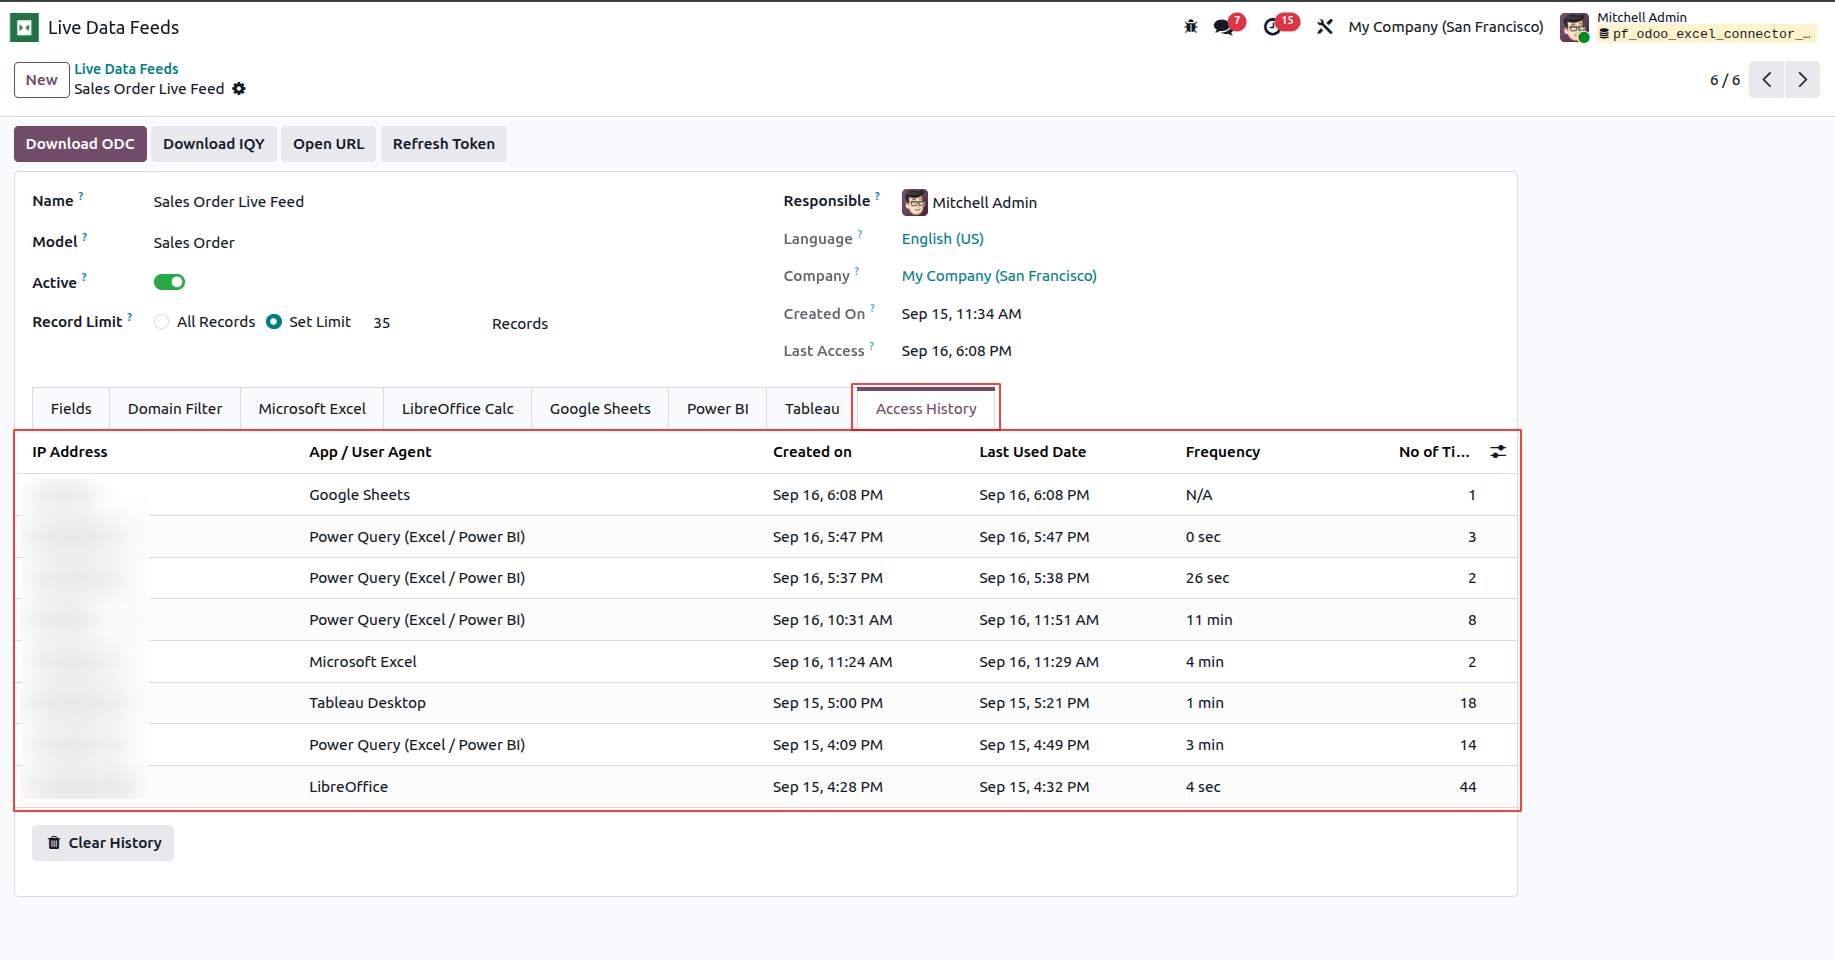
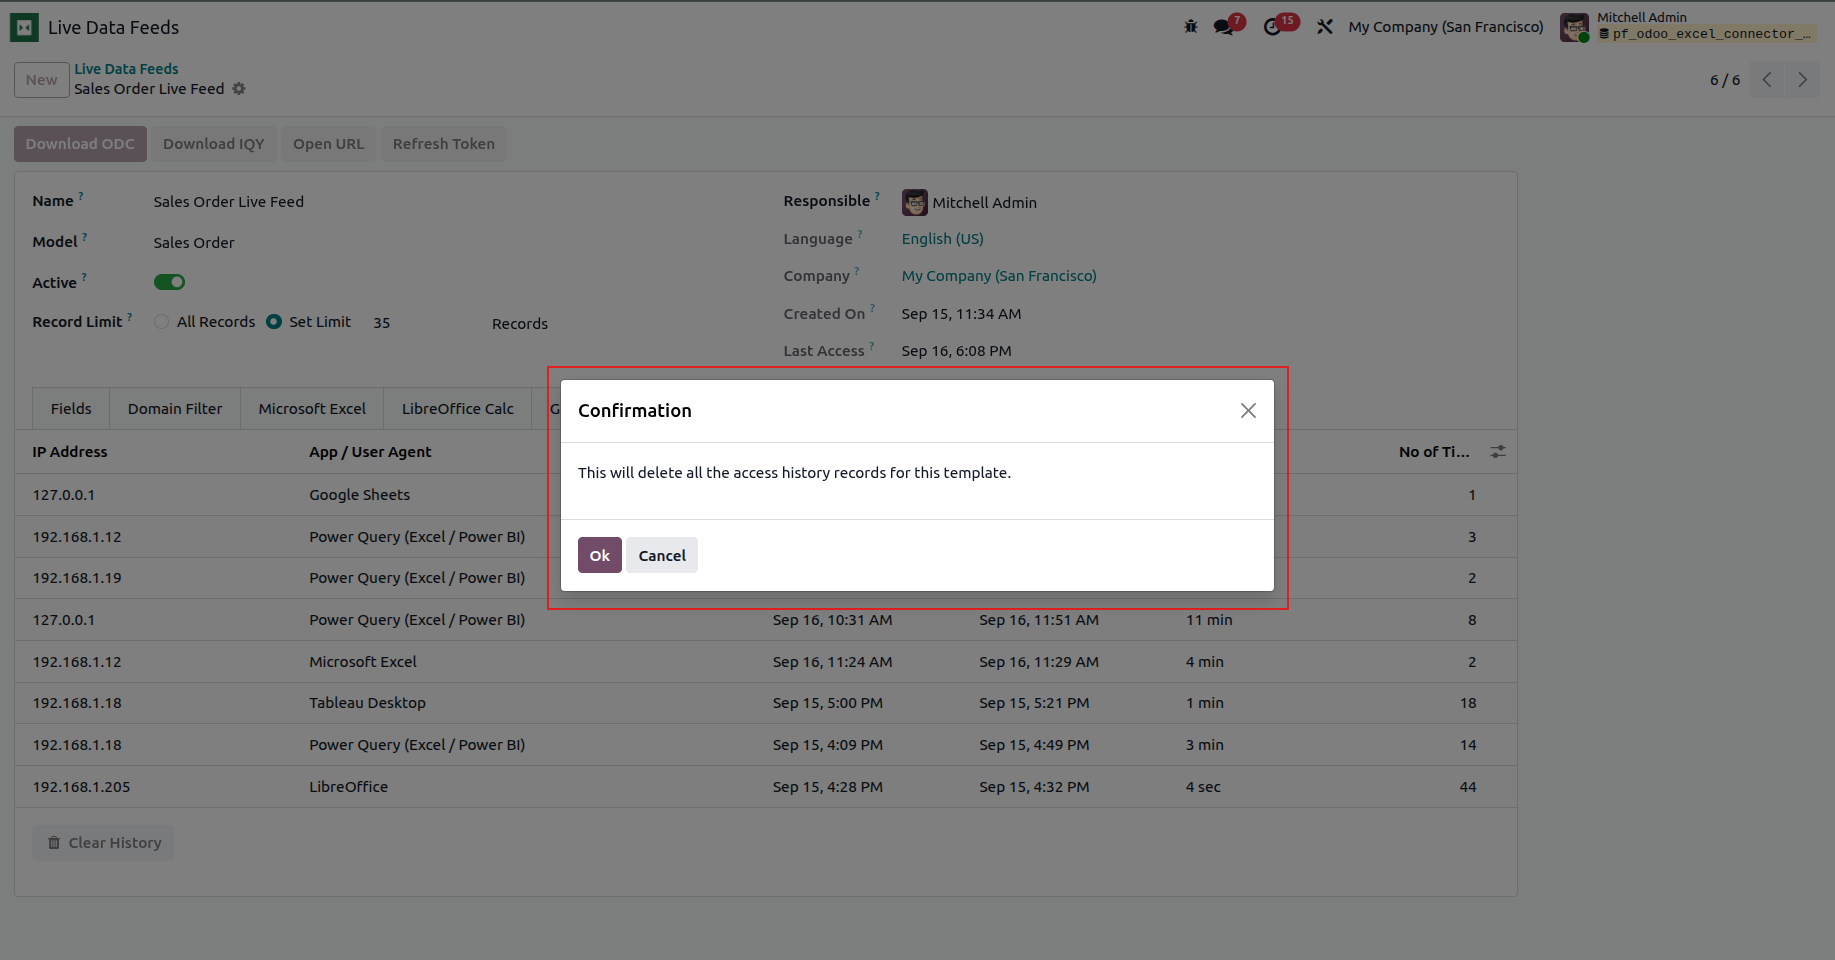
12. Checking access history and delete all the access history.
s_13.png
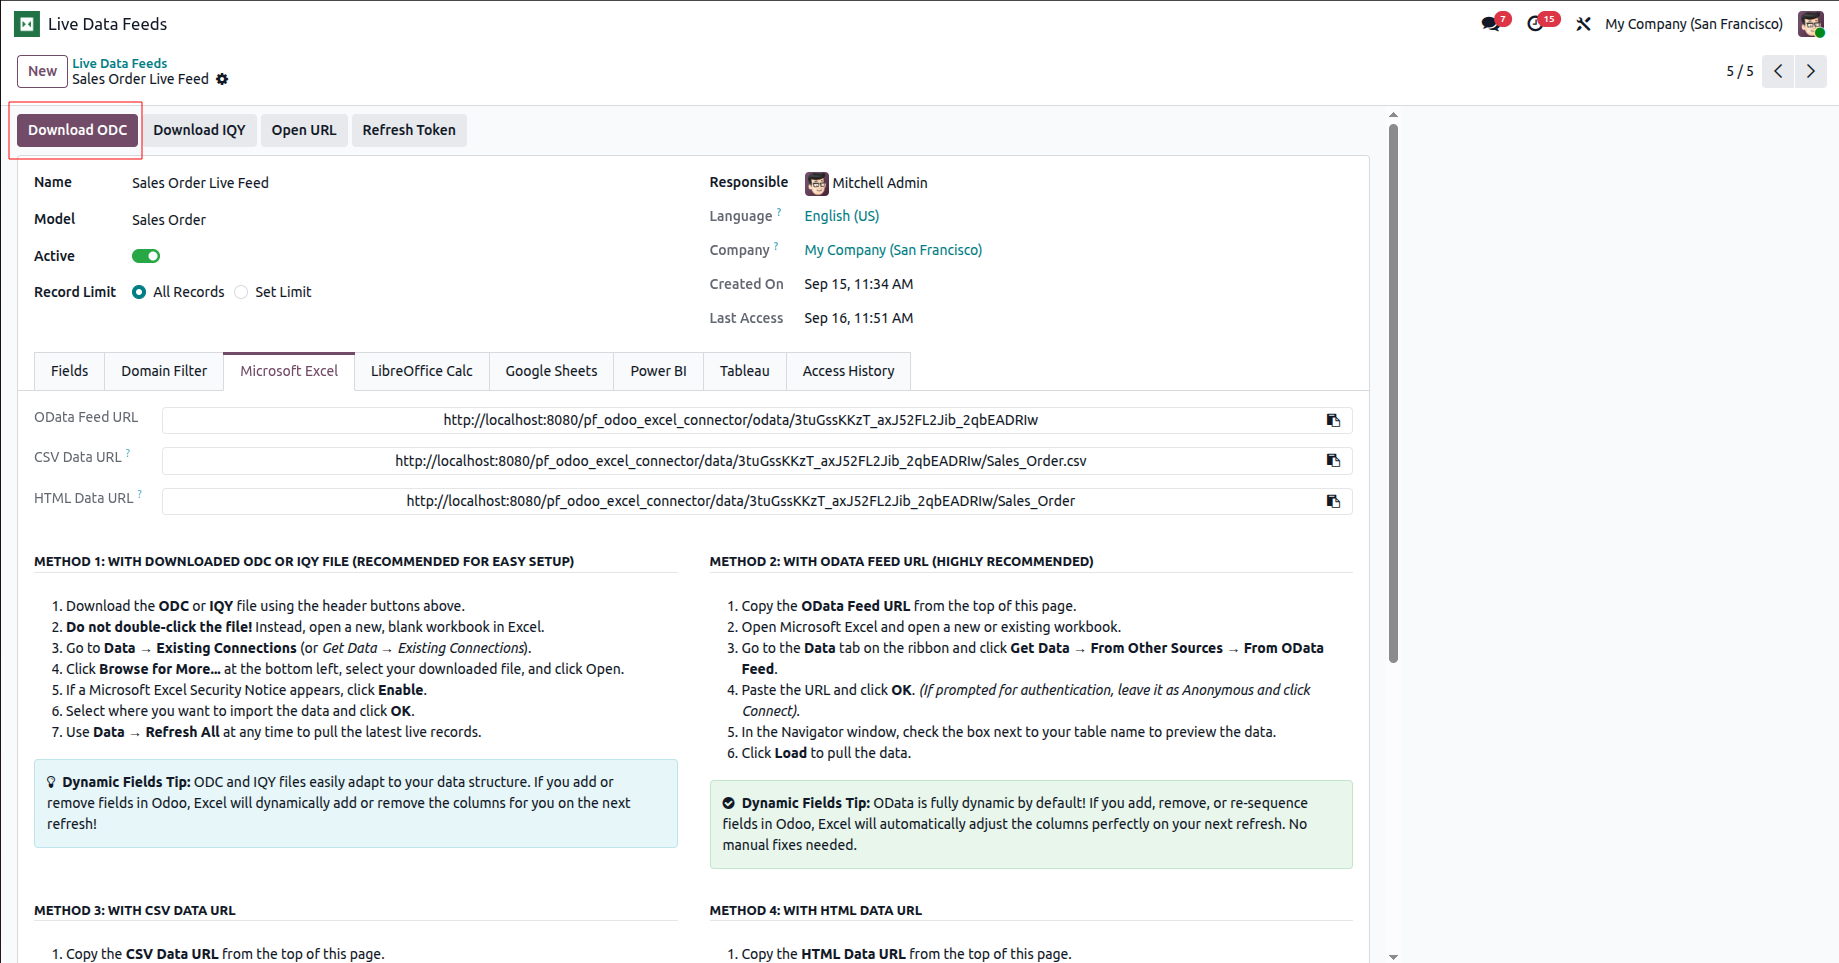
1. Method 1: With Downloaded ODC or IQY File (Recommended for easy setup): Go to the Microsoft Excel tab where you can find the OData feed URL, CSV data URL, HTML data URL, and four methods for setup. To go with the first method, download the ODC file by clicking the Download ODC button.
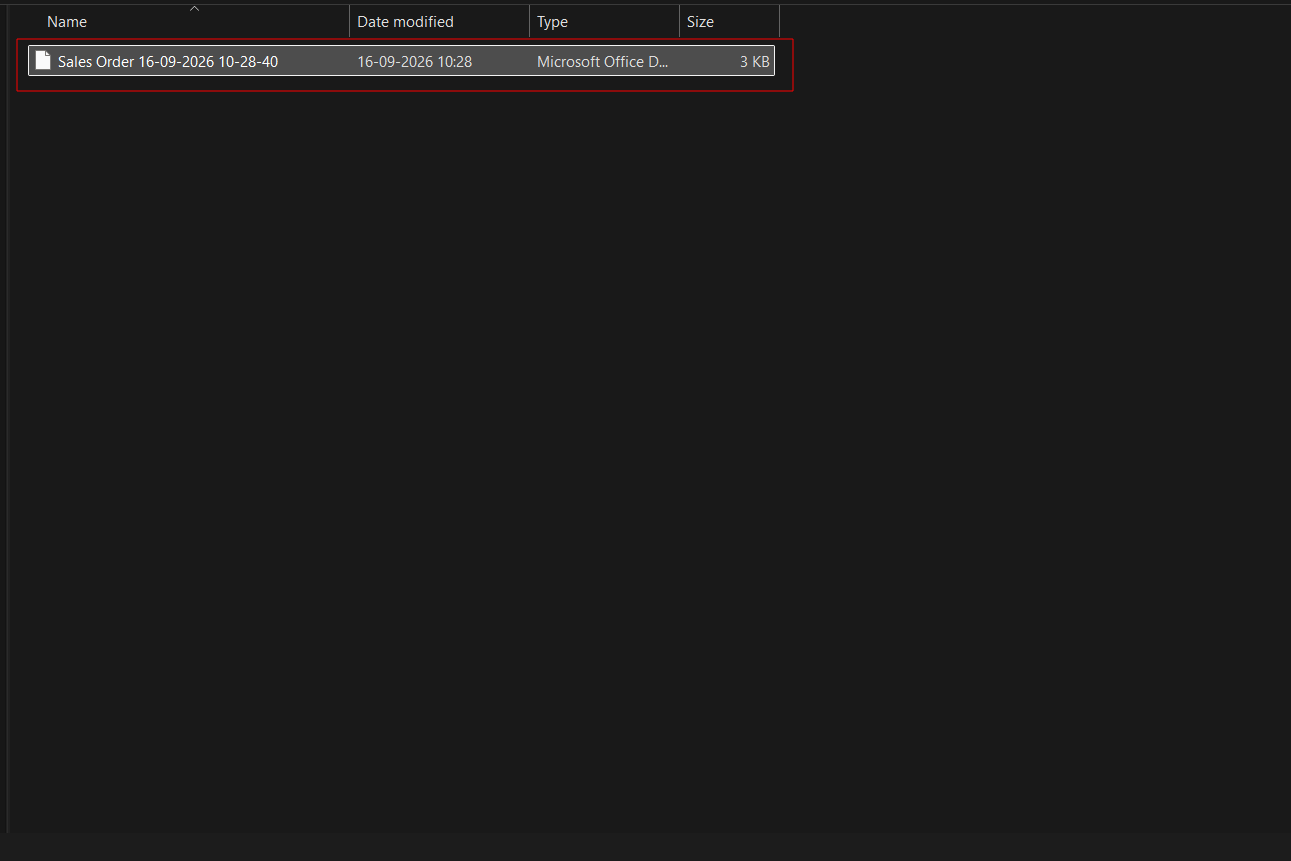
2. Open the downloaded ODC file.
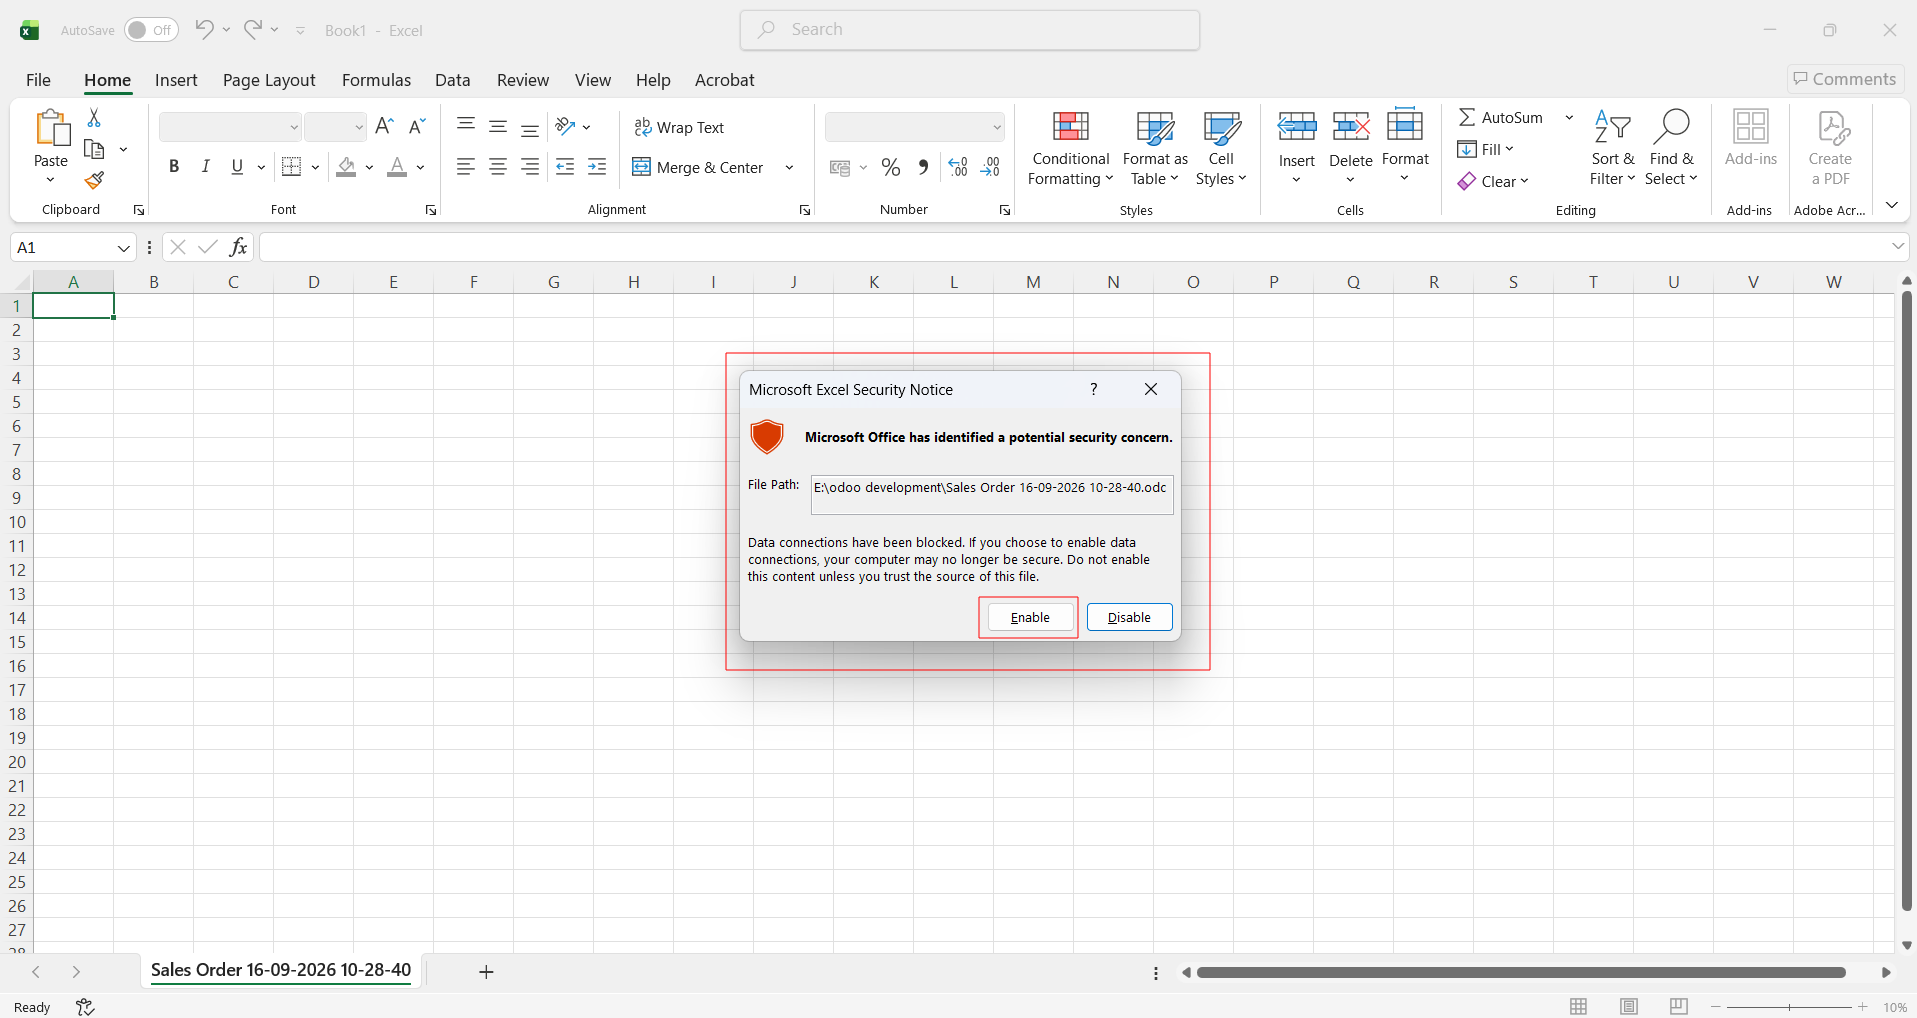
3. A Microsoft Excel Security Notice wizard will open asking permission to open the file. Simply click Enable.
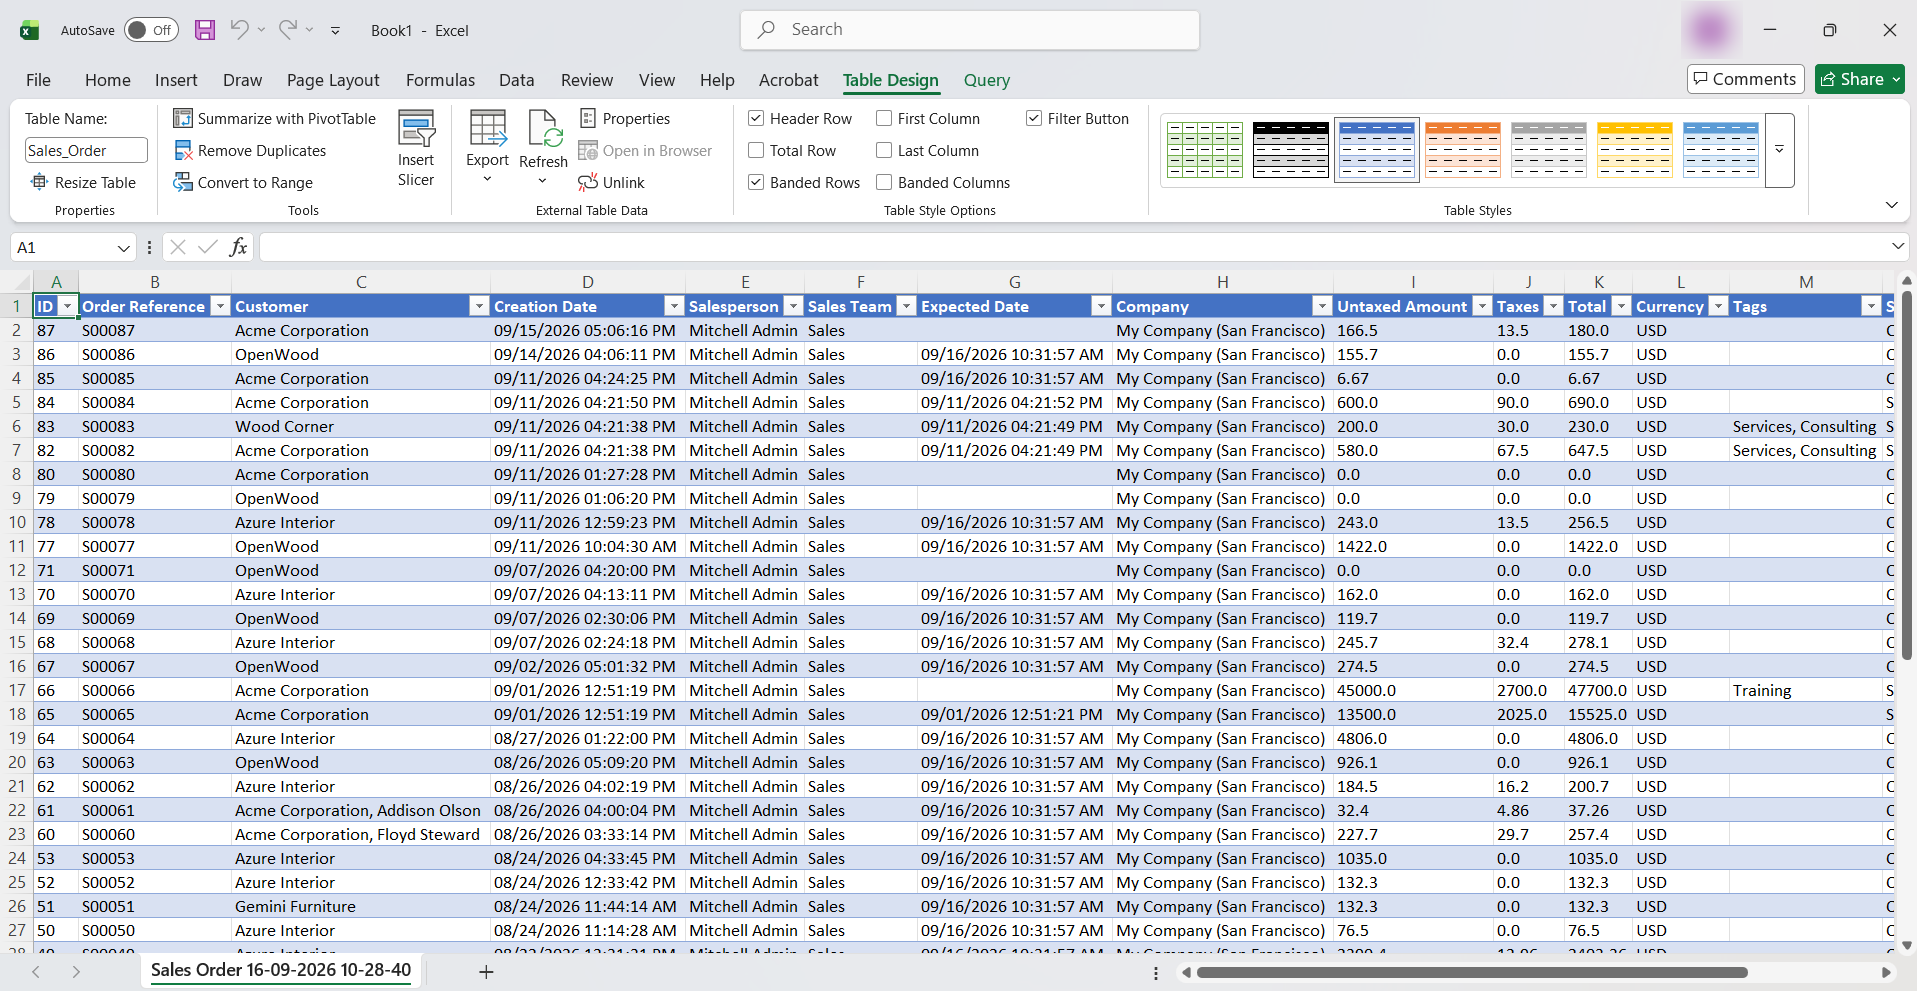
4. Once enabled, Excel loads the exported Odoo columns and records into the sheet, giving users a refreshable workbook connected to the live data feed they created in Odoo.Excel sheet.
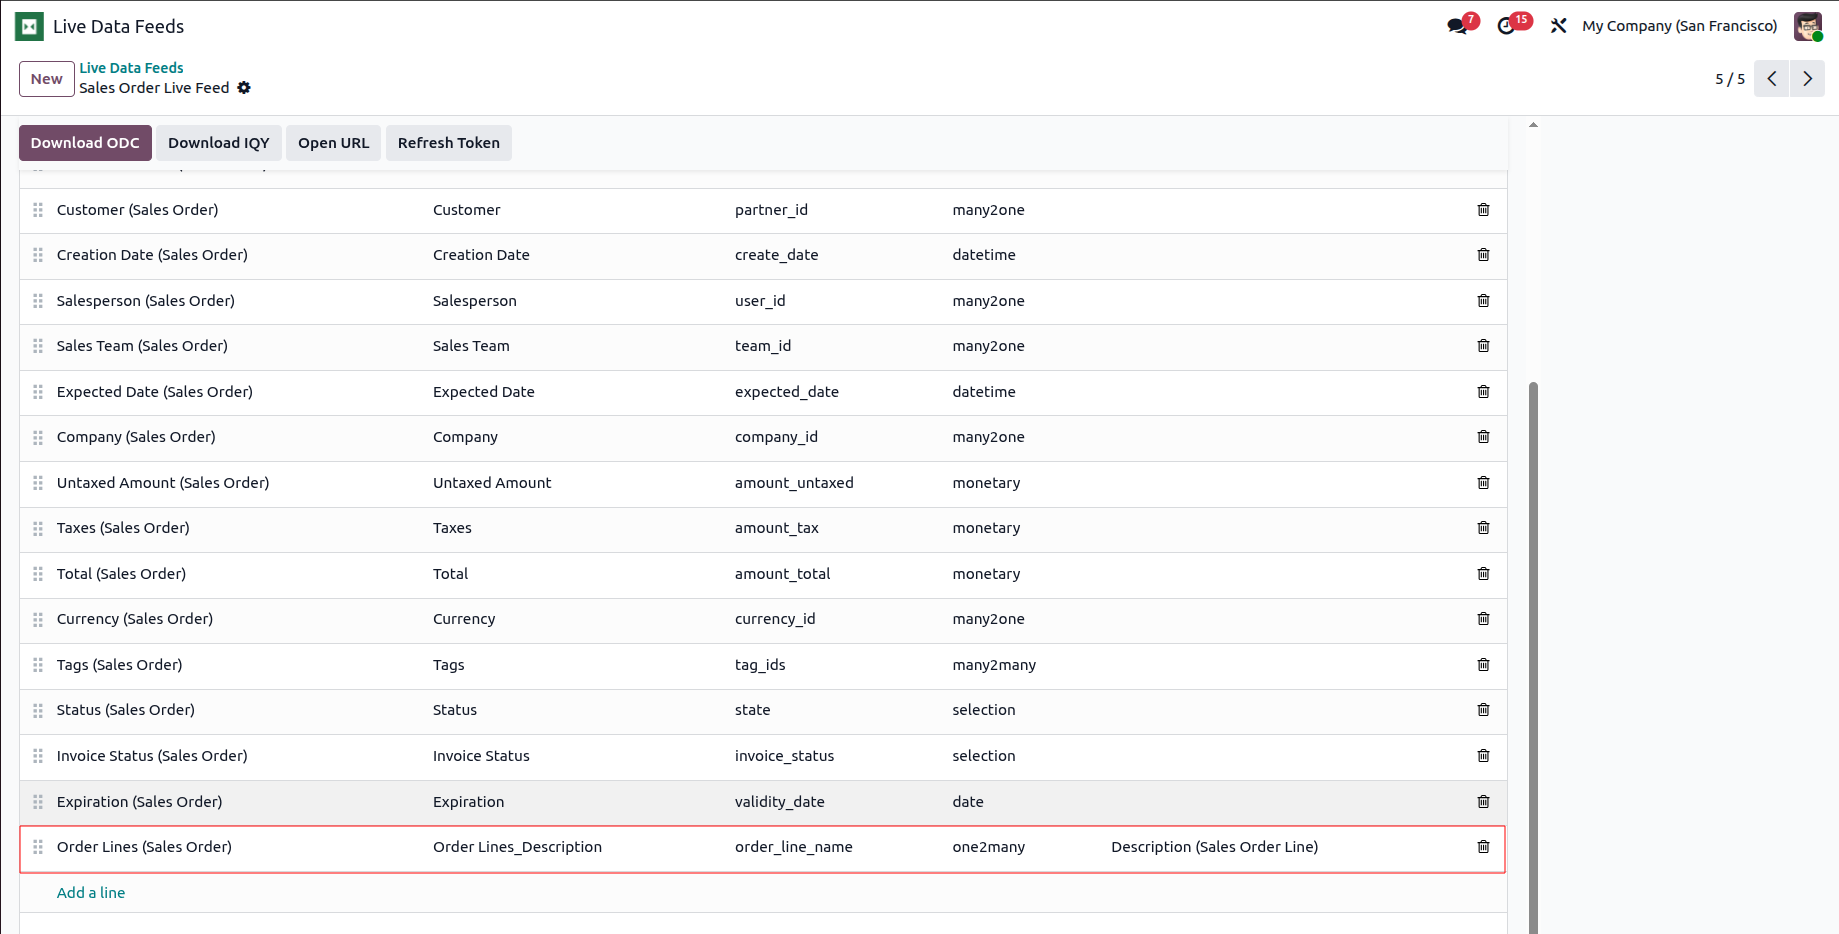
5. If you add a new field in the live data feed...
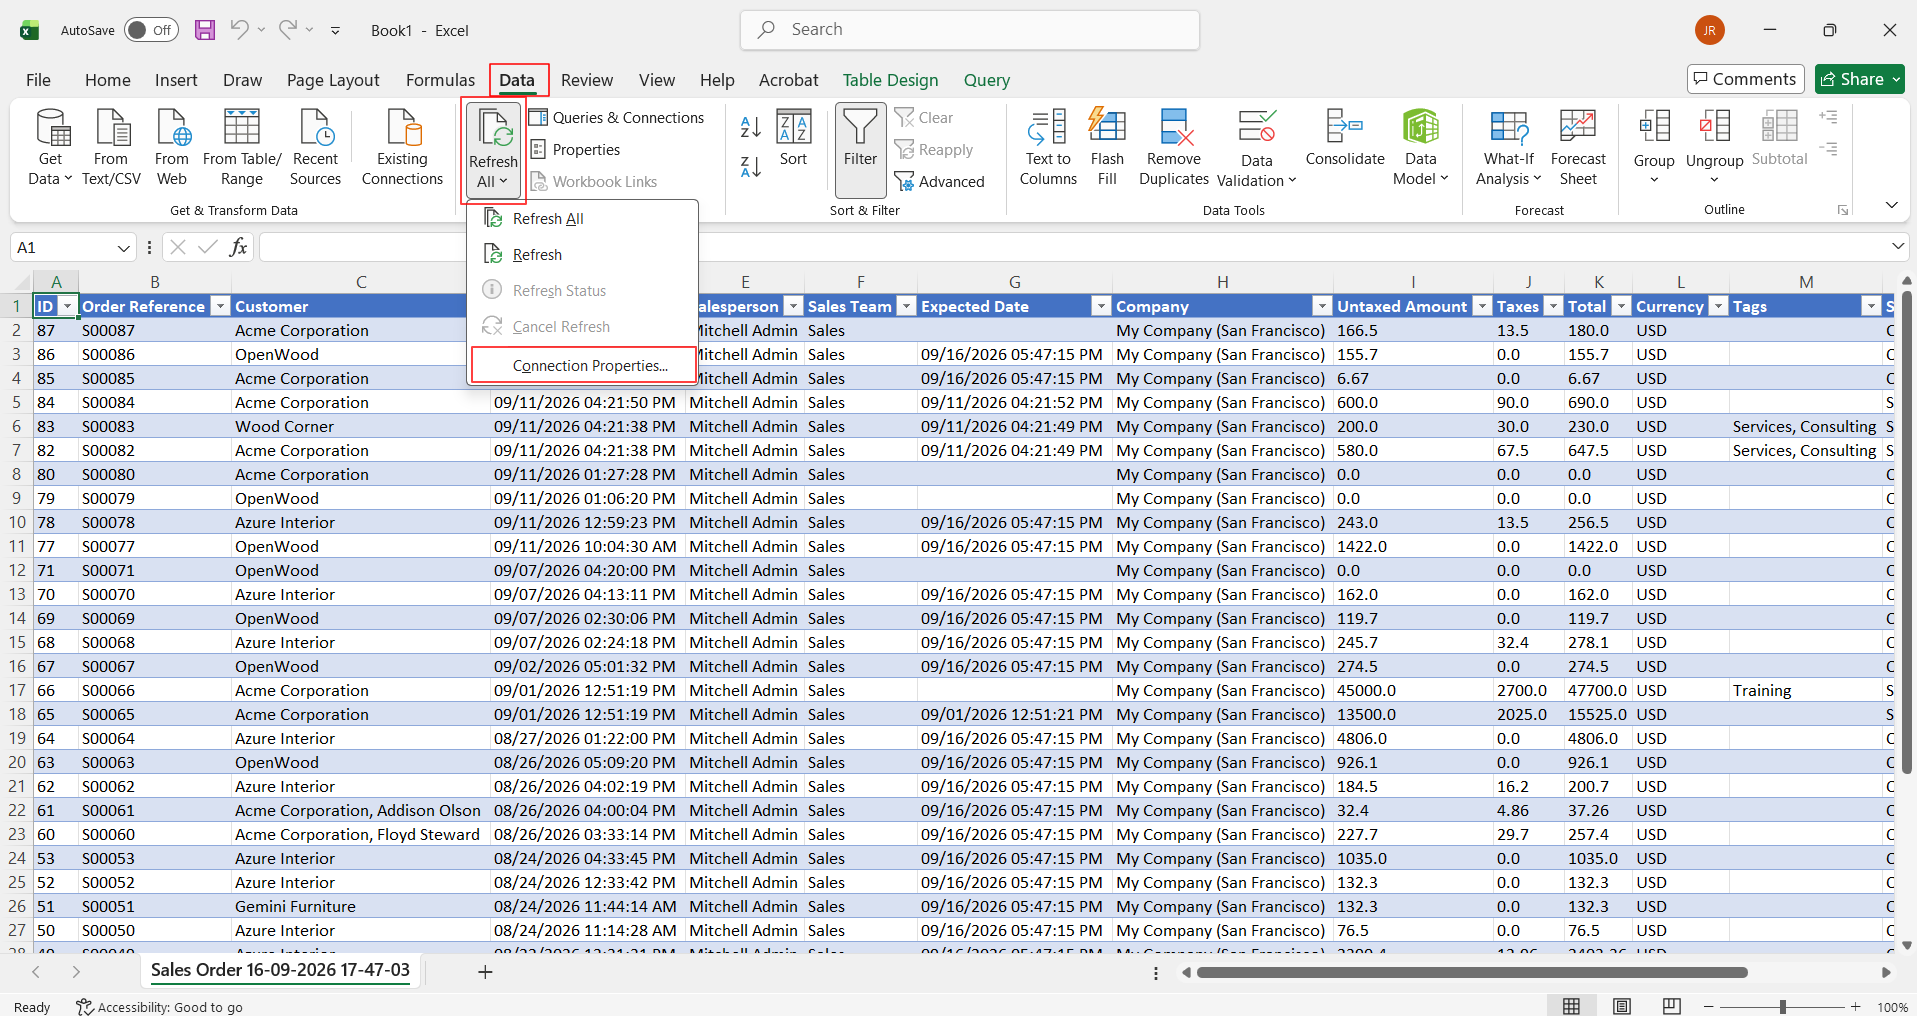
6. ...you can manually refresh by clicking the refresh button which you can find in Data -> Refresh All. You can also set an interval refresh by going to Data -> Refresh All -> Connection Properties.
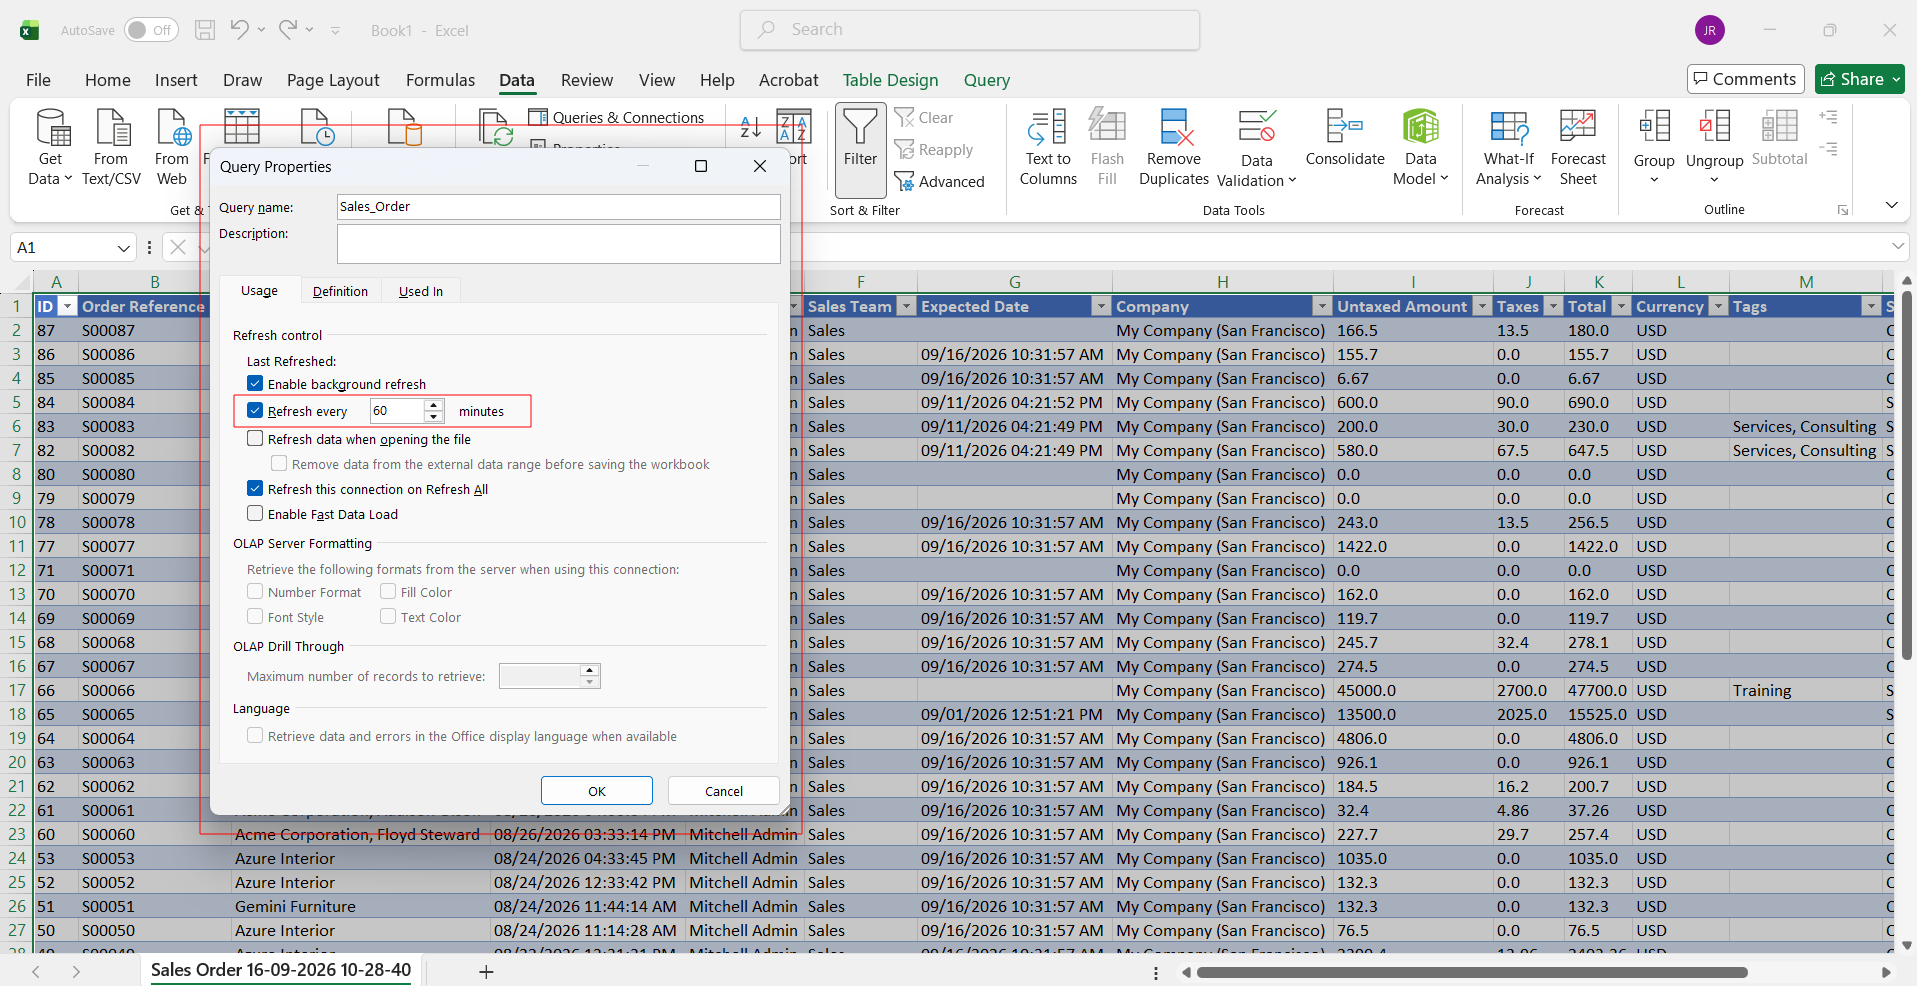
7. The Query Properties wizard will open. Go to Usage -> Refresh every -> set your interval.
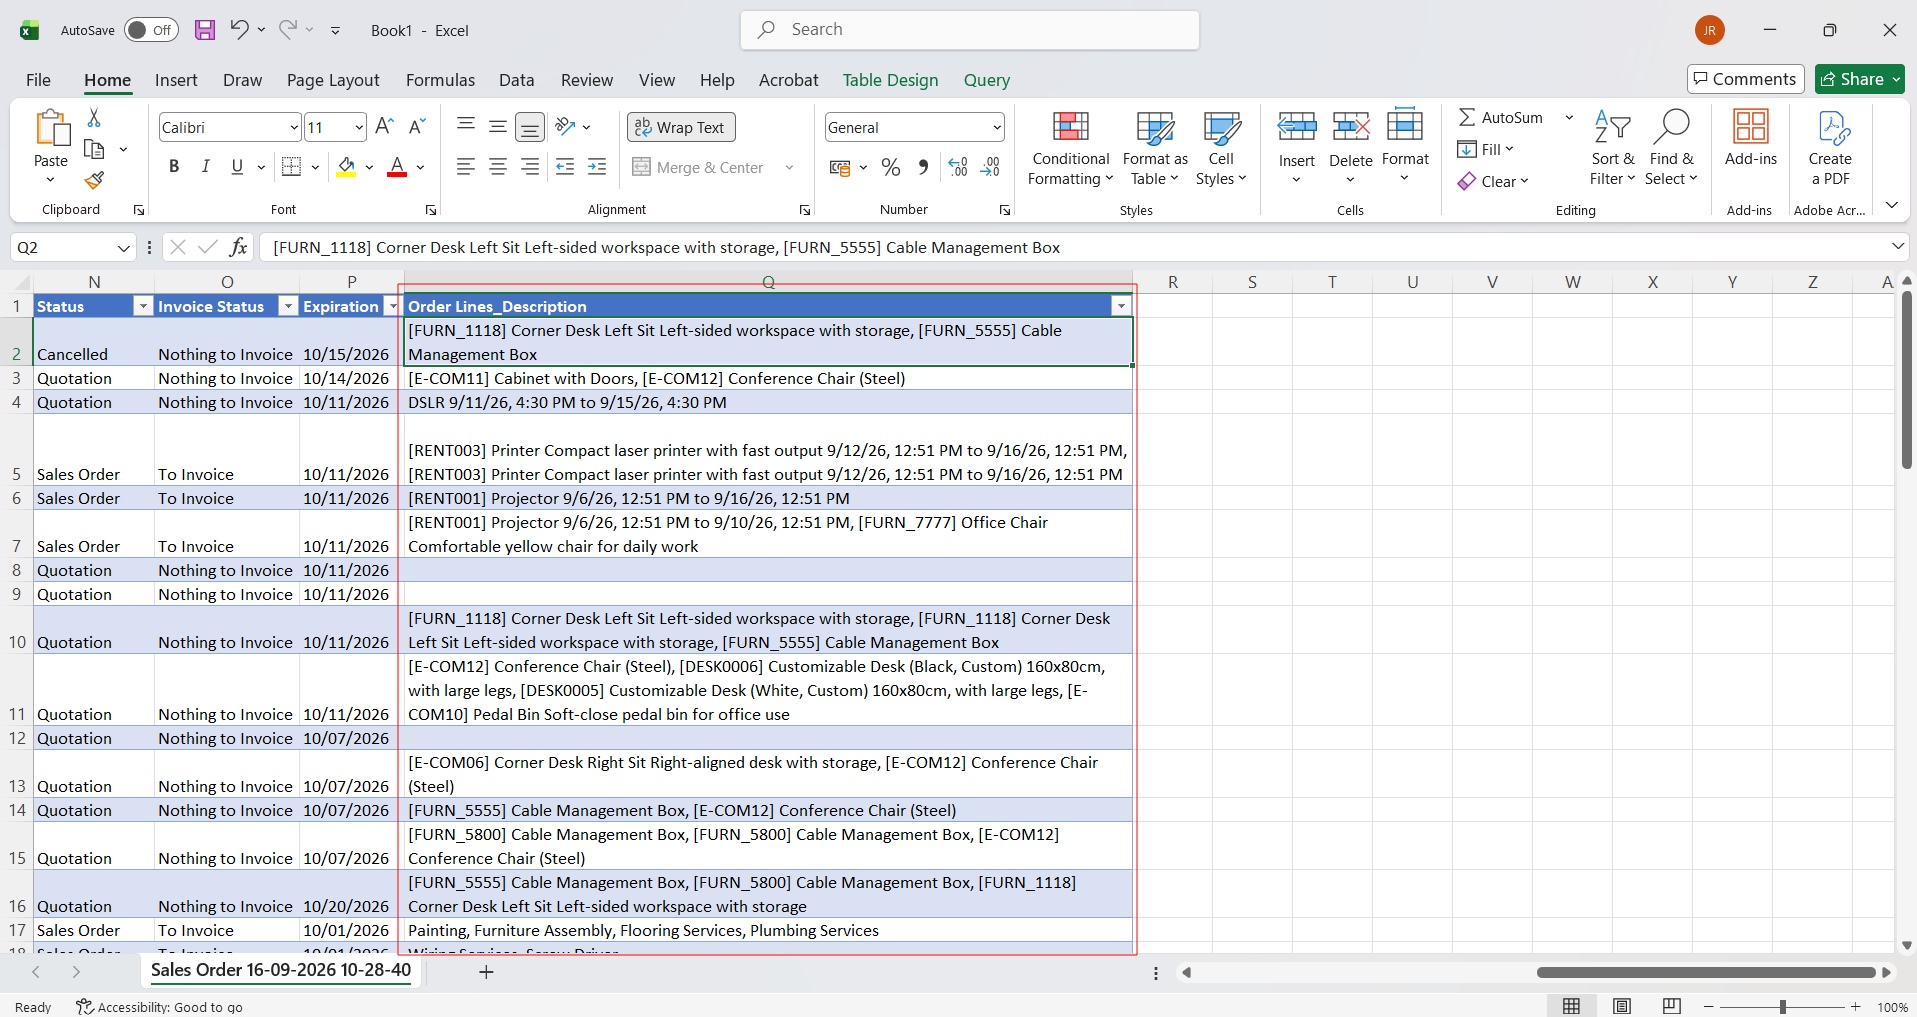
8. After clicking Refresh All or when the refresh interval runs, changes such as new columns (e.g., sale_order_description) are automatically loaded into the current Excel sheet.
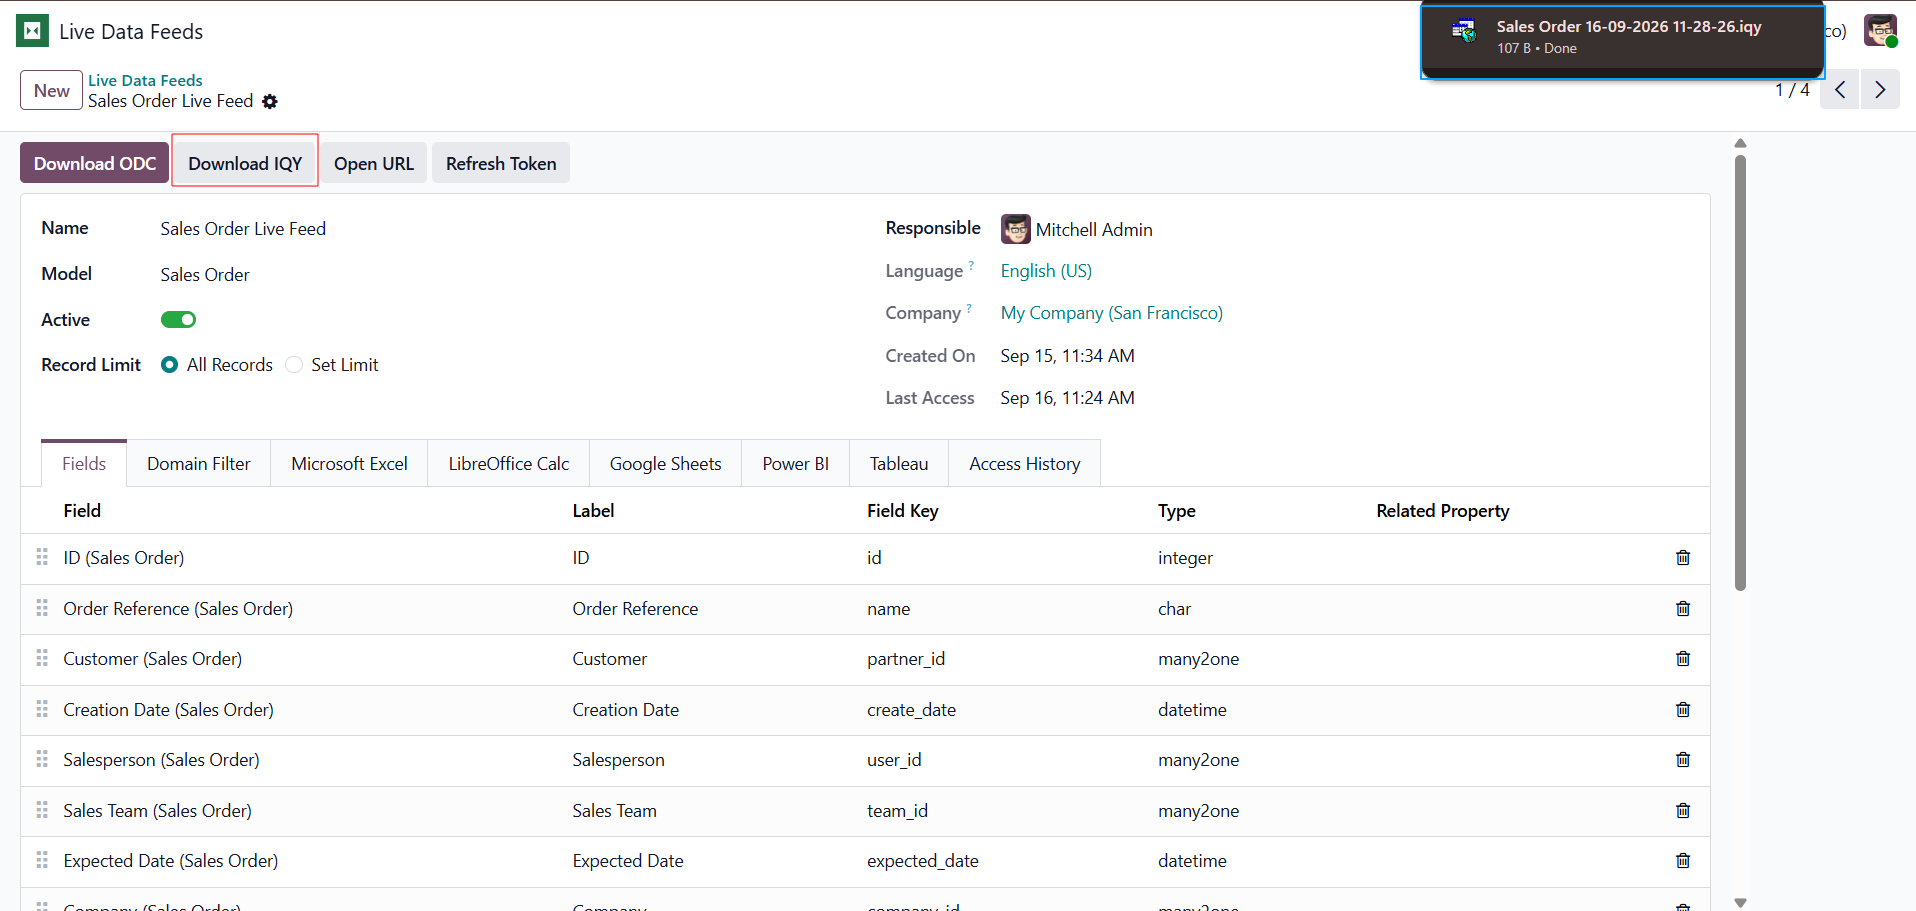
9. You can also connect the live data feed to Microsoft Excel with an .iqy file. Simply download the .iqy file by clicking the Download IQY button.
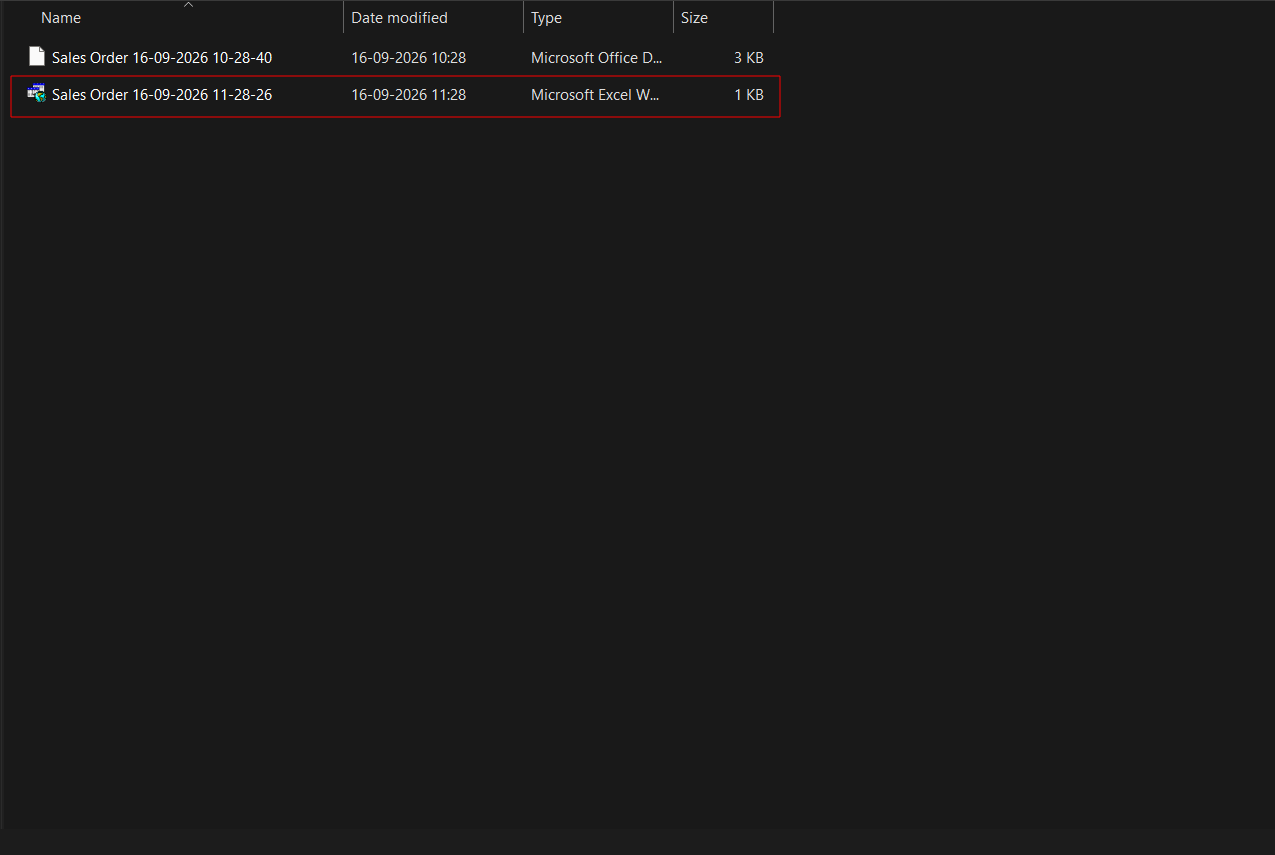
10. Open that downloaded .iqy file.
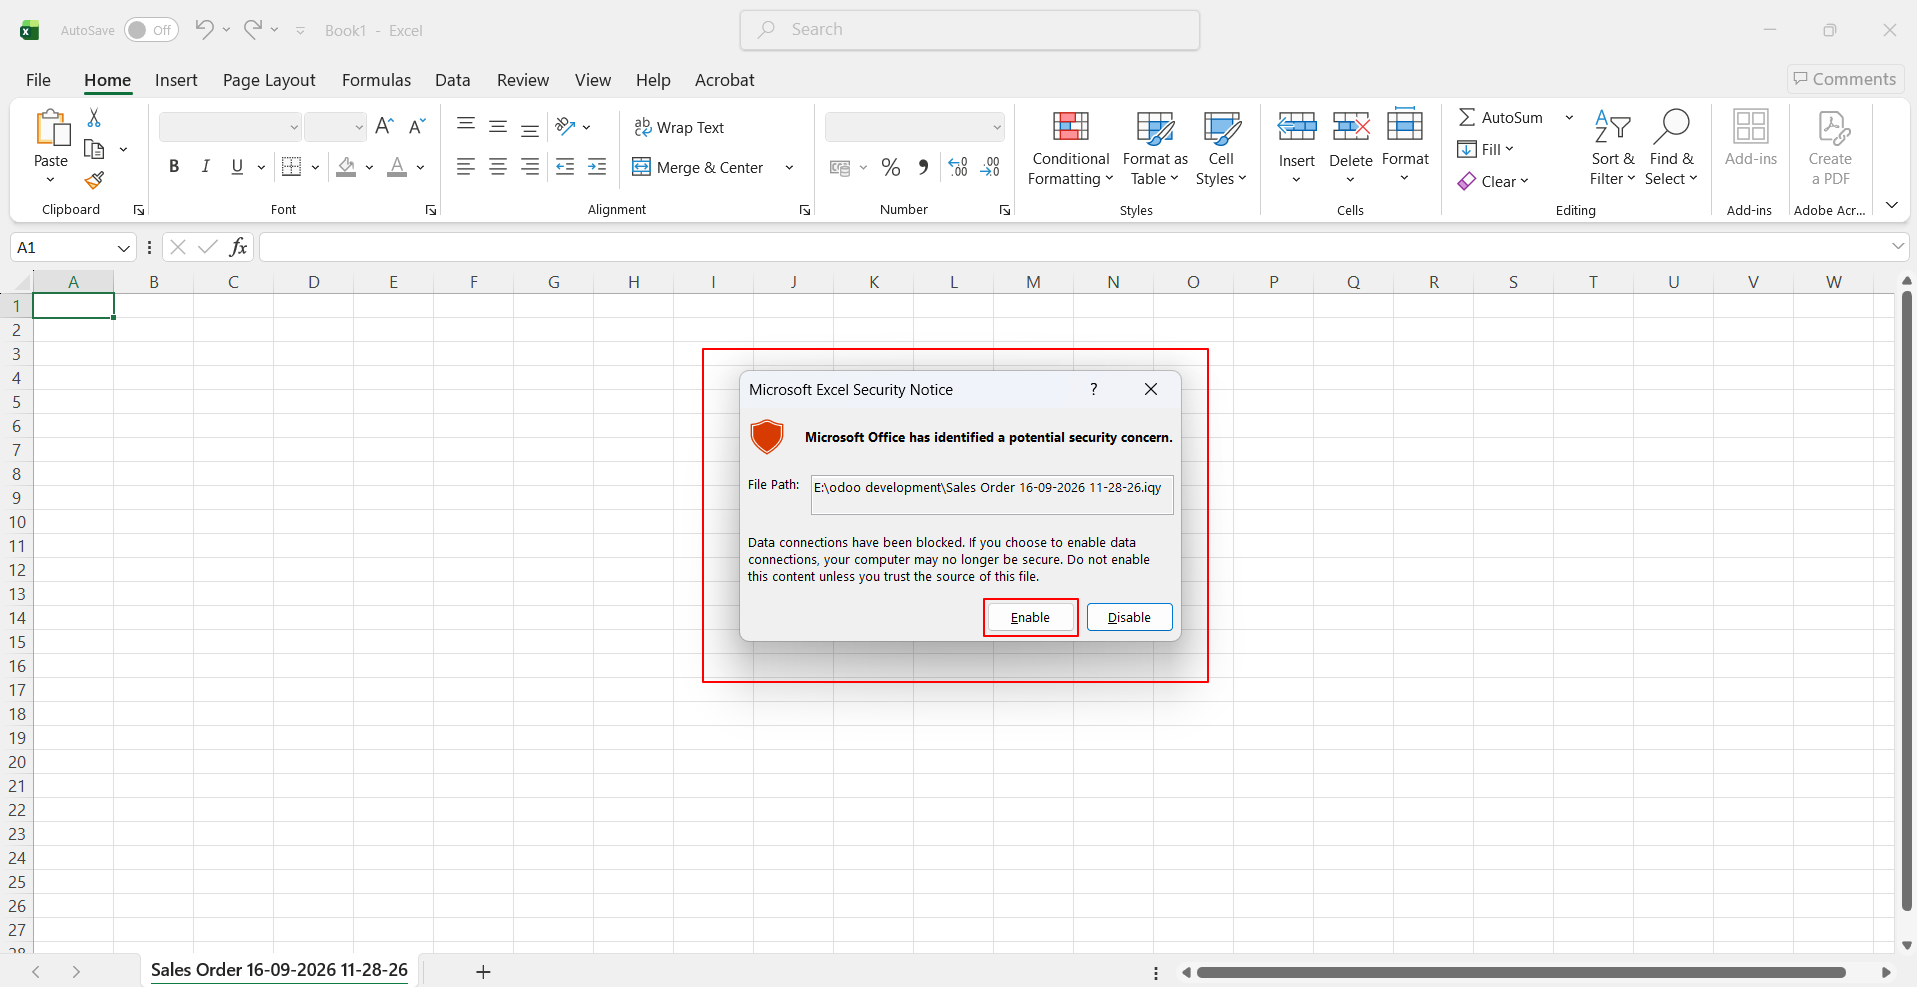
11. Excel displays a security notice before opening external data connections. Click Enable to allow the workbook to fetch data from the Odoo connector.
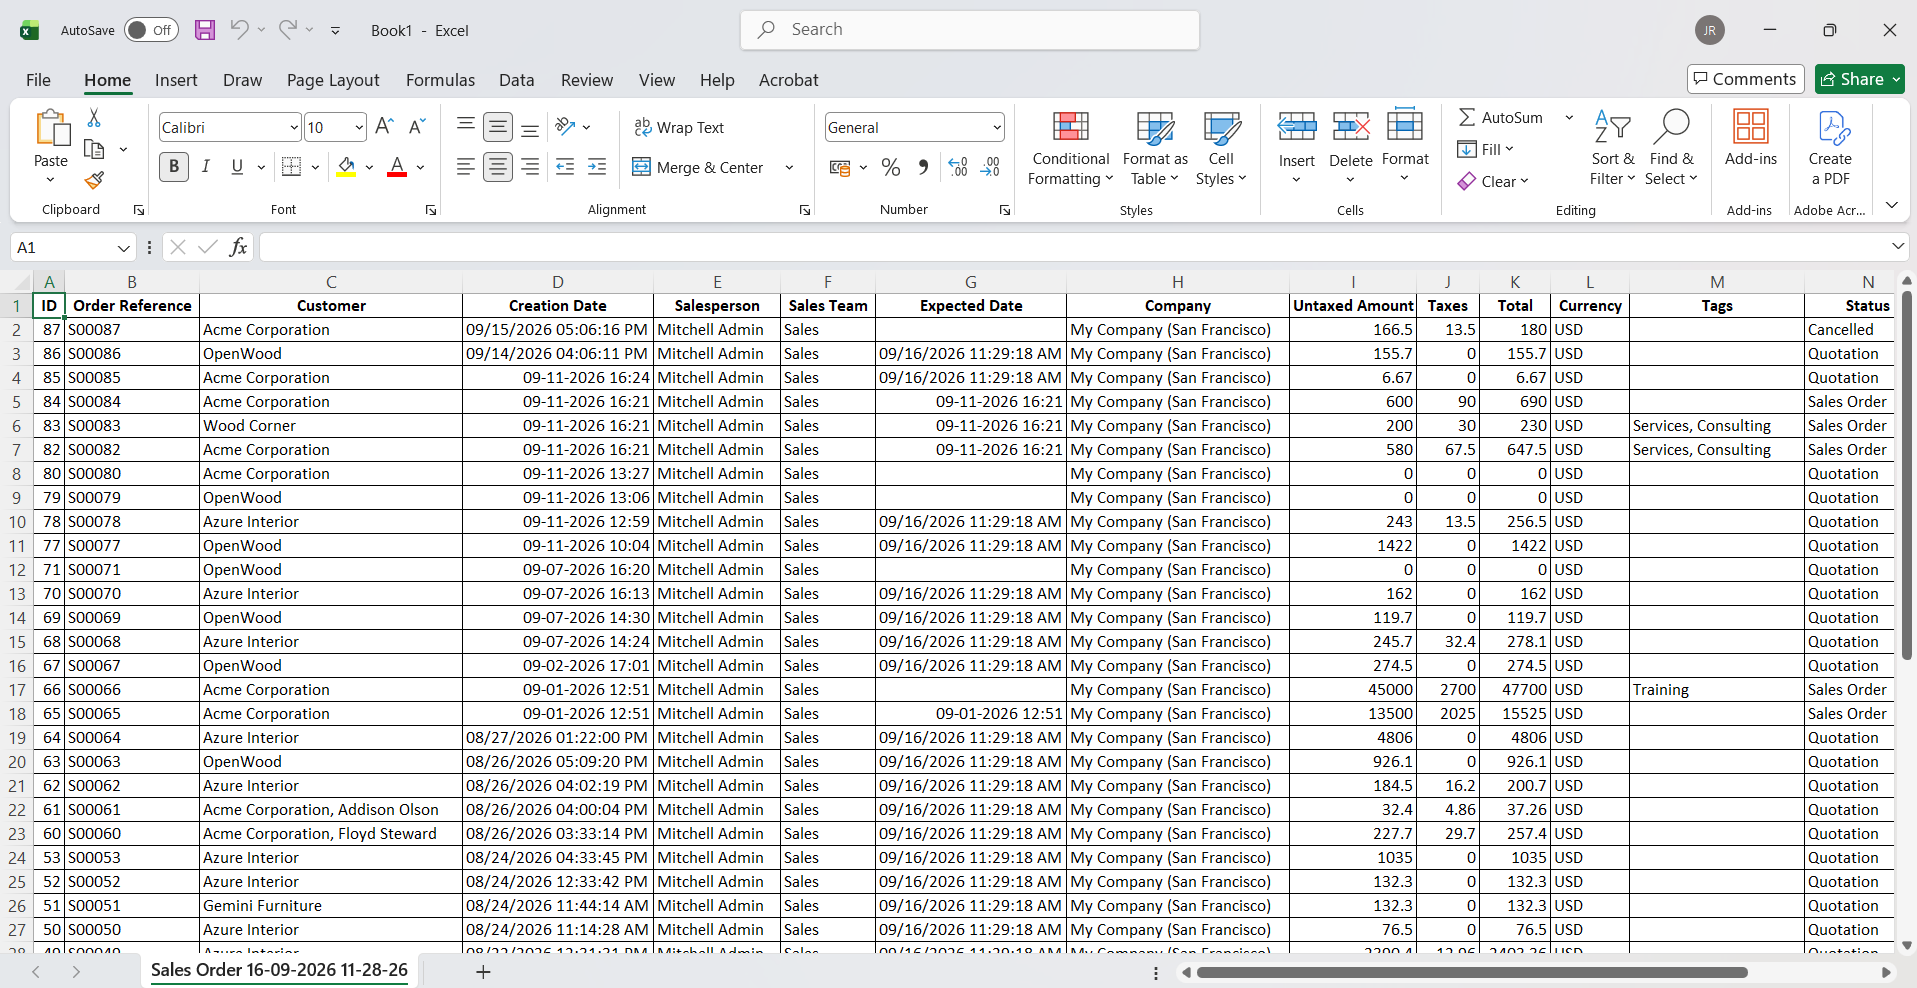
12. Once enabled, Excel loads the exported Odoo columns and records into the sheet, giving users a refreshable workbook connected to the live data feed they created in Odoo.
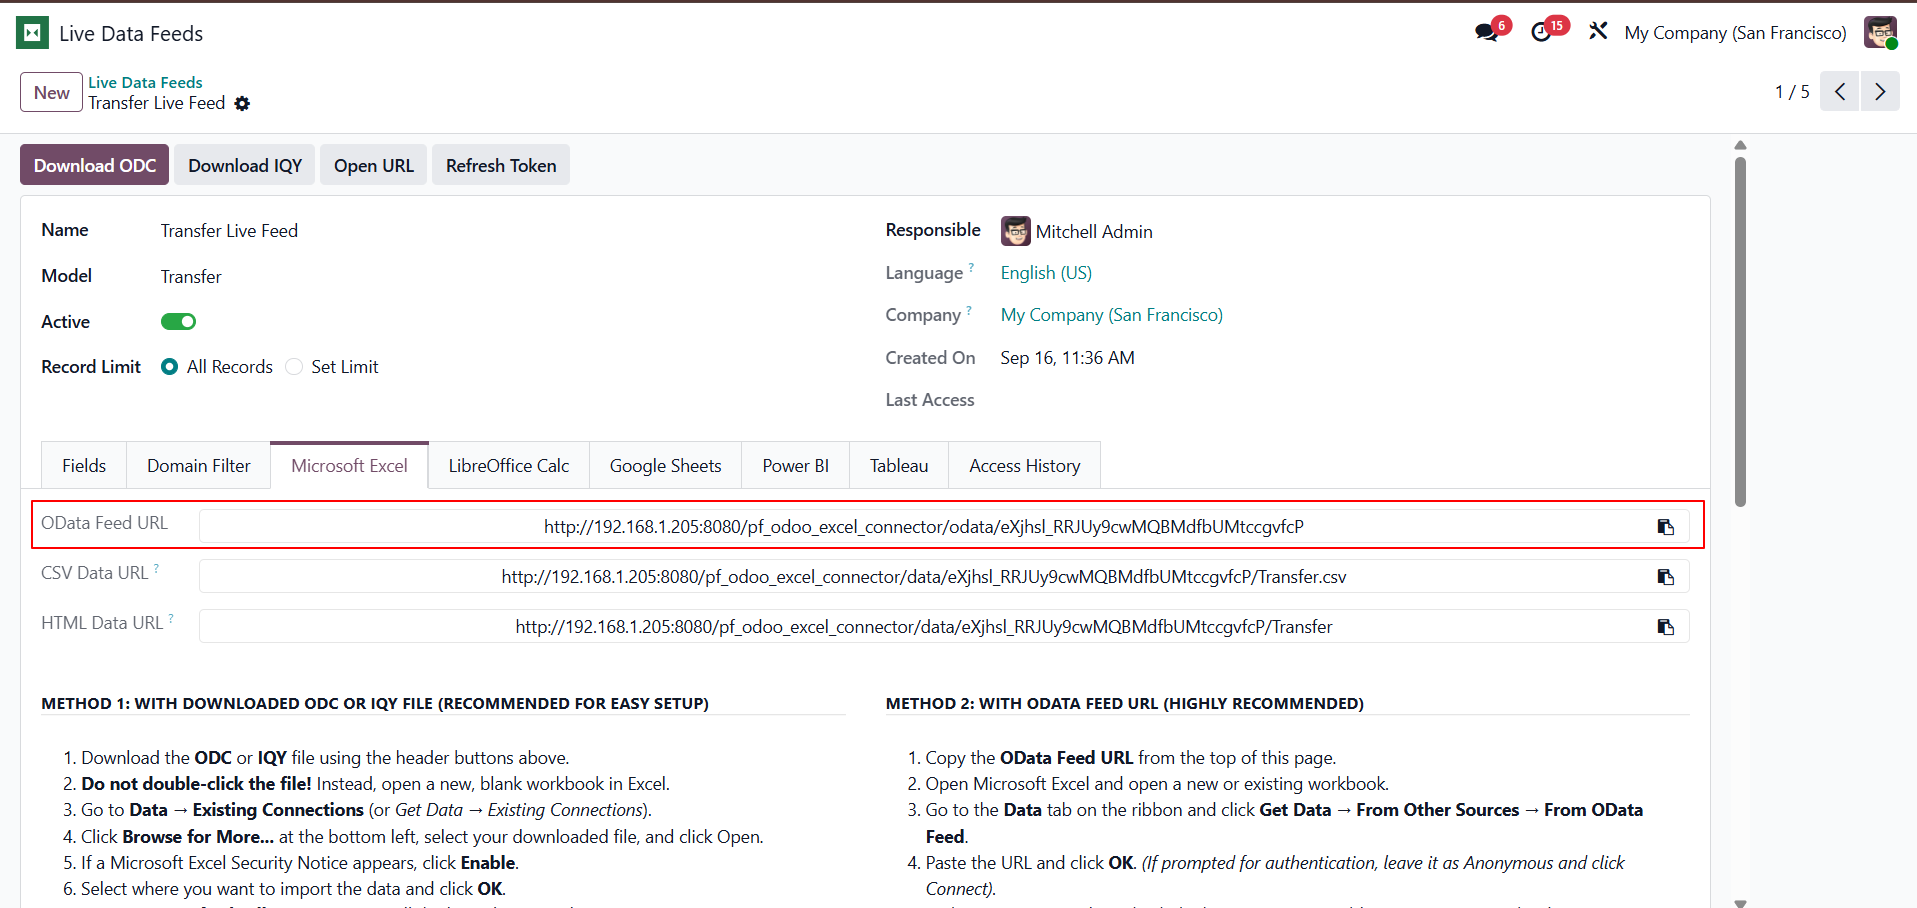
13. Method 2: With OData Feed URL (Highly Recommended): If you want to connect the live data feed using OData, copy the OData feed URL.
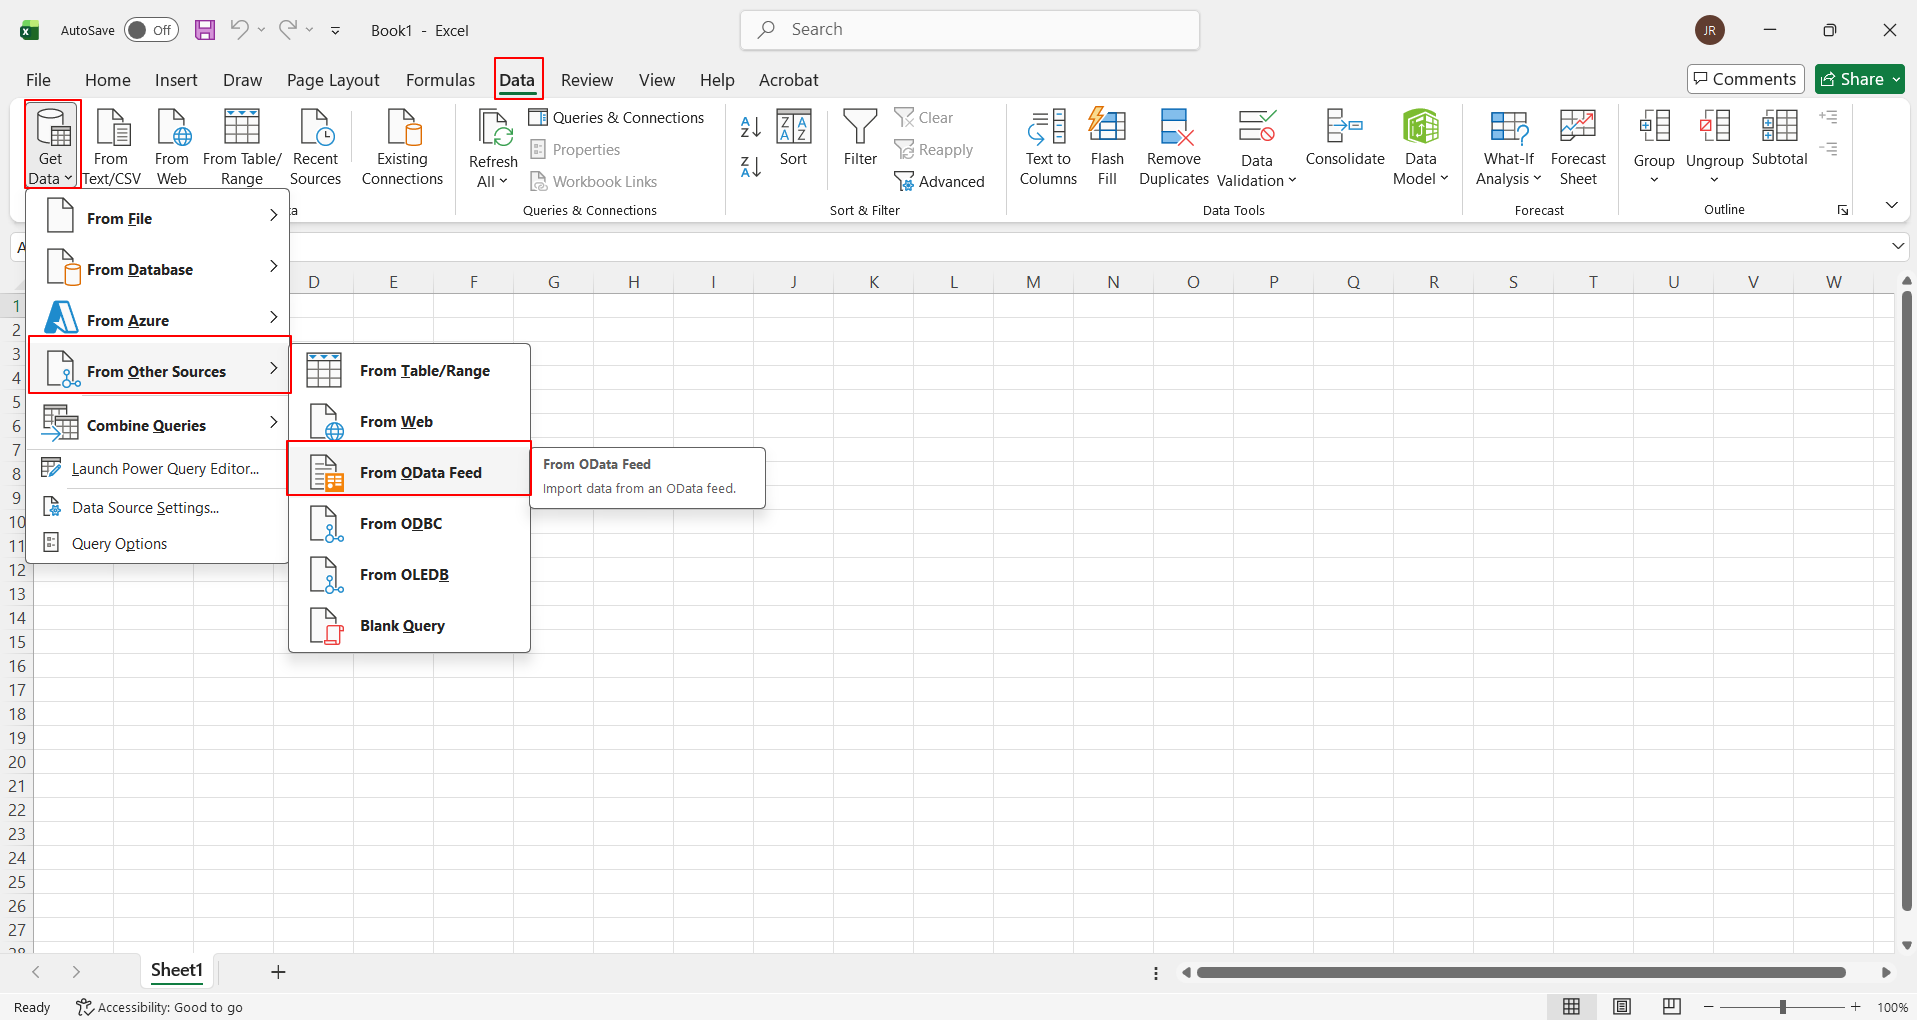
14. Open a new Excel sheet -> Data -> Get Data -> From Other Sources -> From OData Feed.
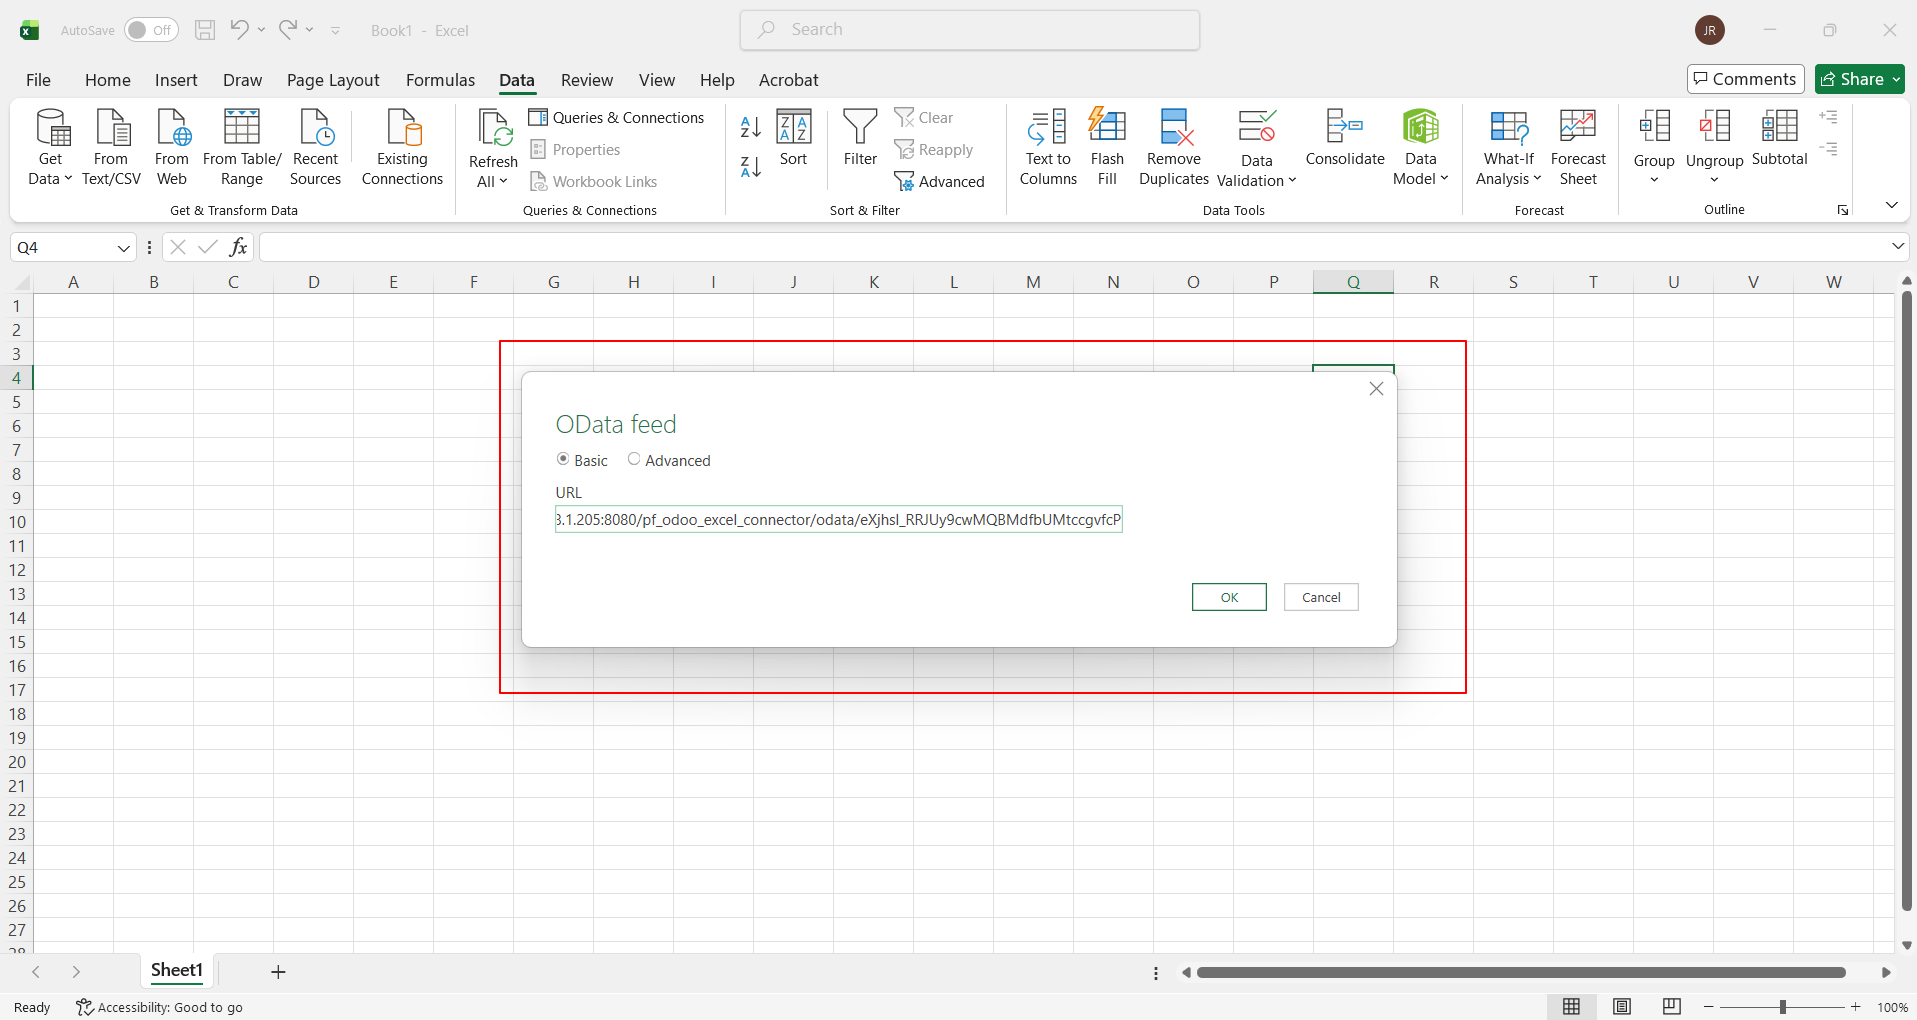
15. The OData Feed wizard will open. Paste the OData feed URL in there and click OK.
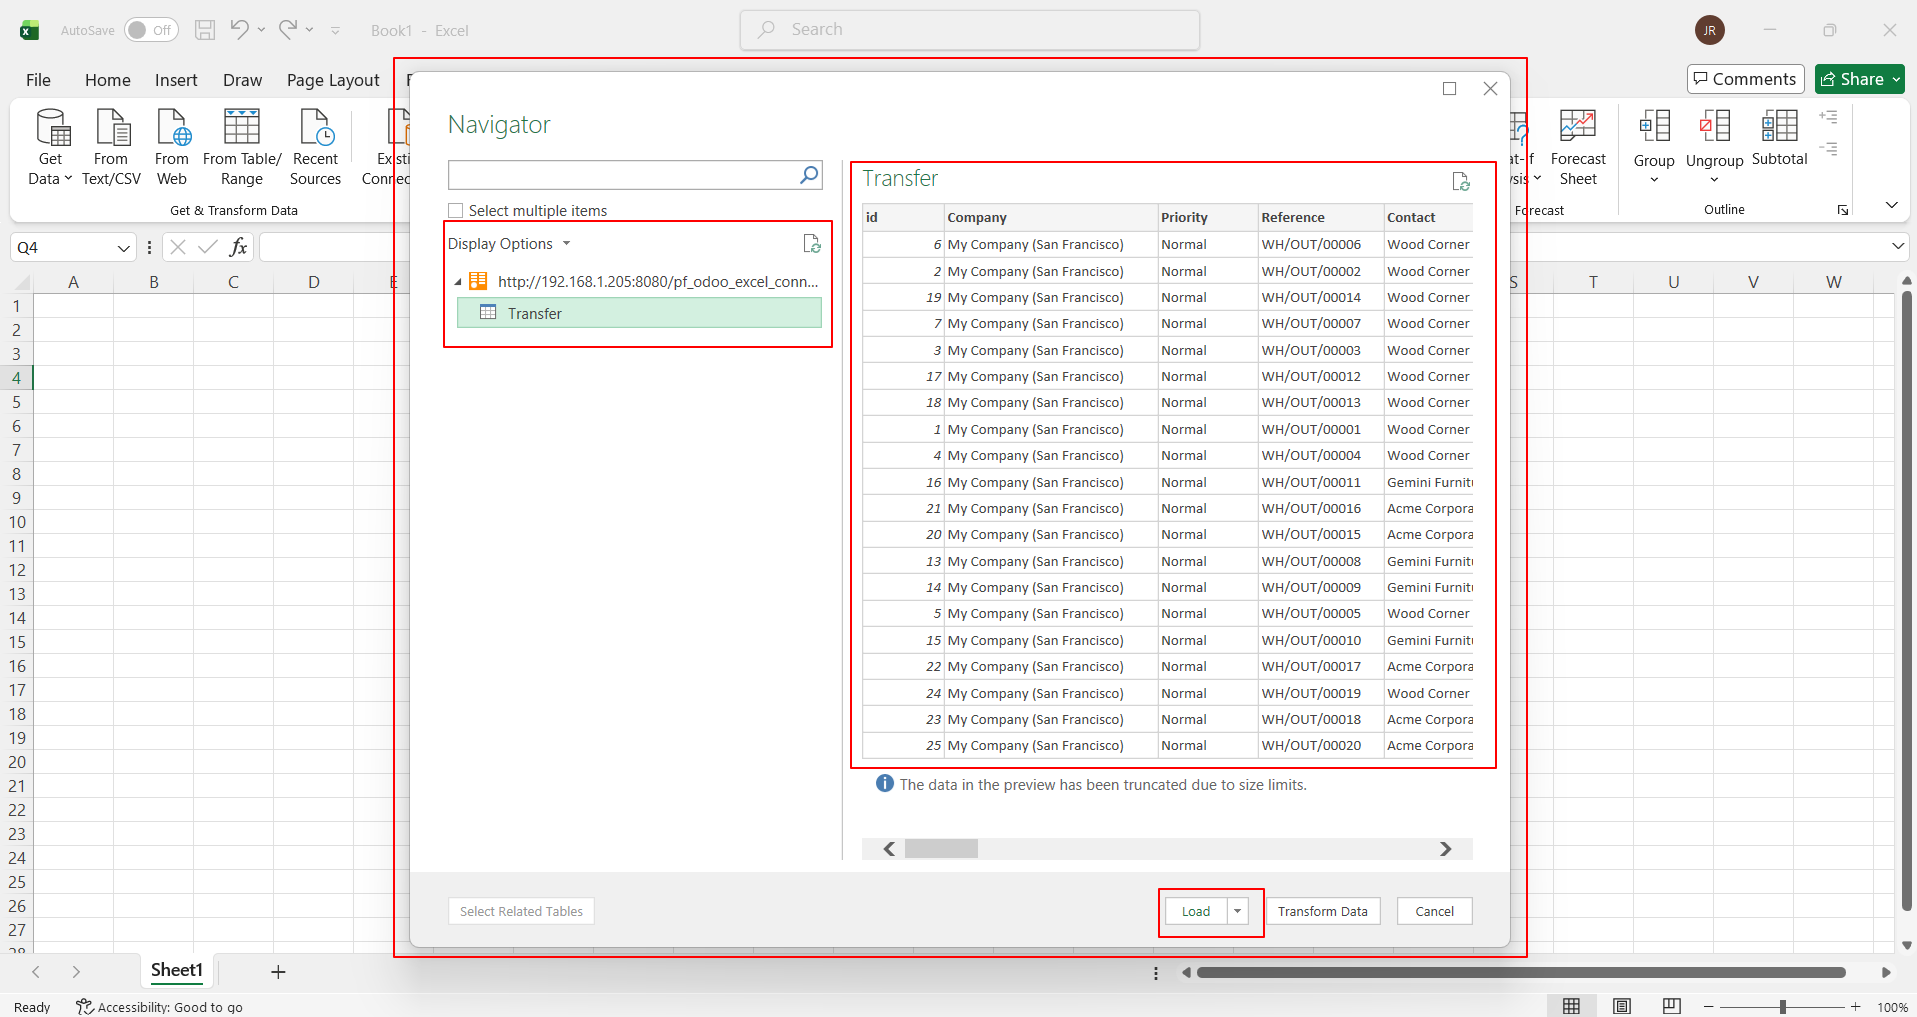
16. A Navigator wizard will open. On the left side, you can find Display Options; select your query (which is the name of your feed model). Preview your data on the right side, then click Load.
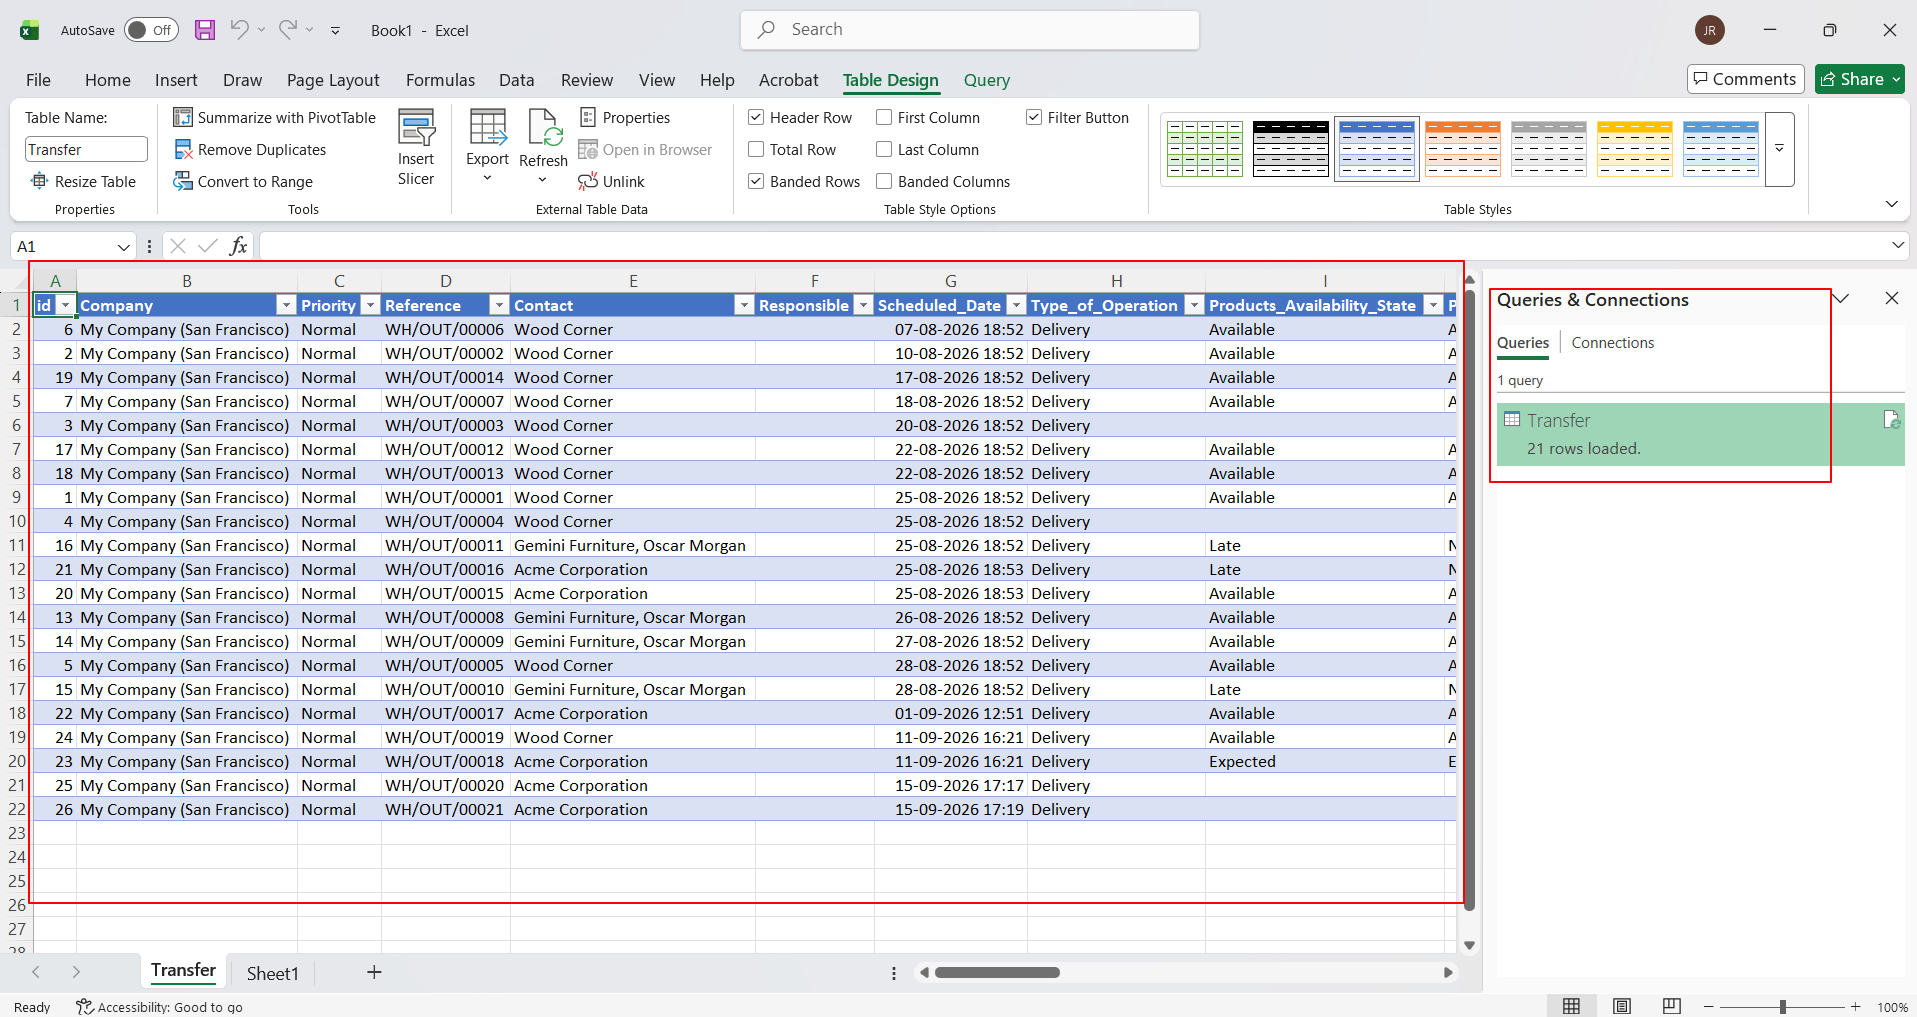
17. Once you click Load, Excel loads the exported Odoo columns and records into the sheet, giving users a refreshable workbook connected to the live data feed.
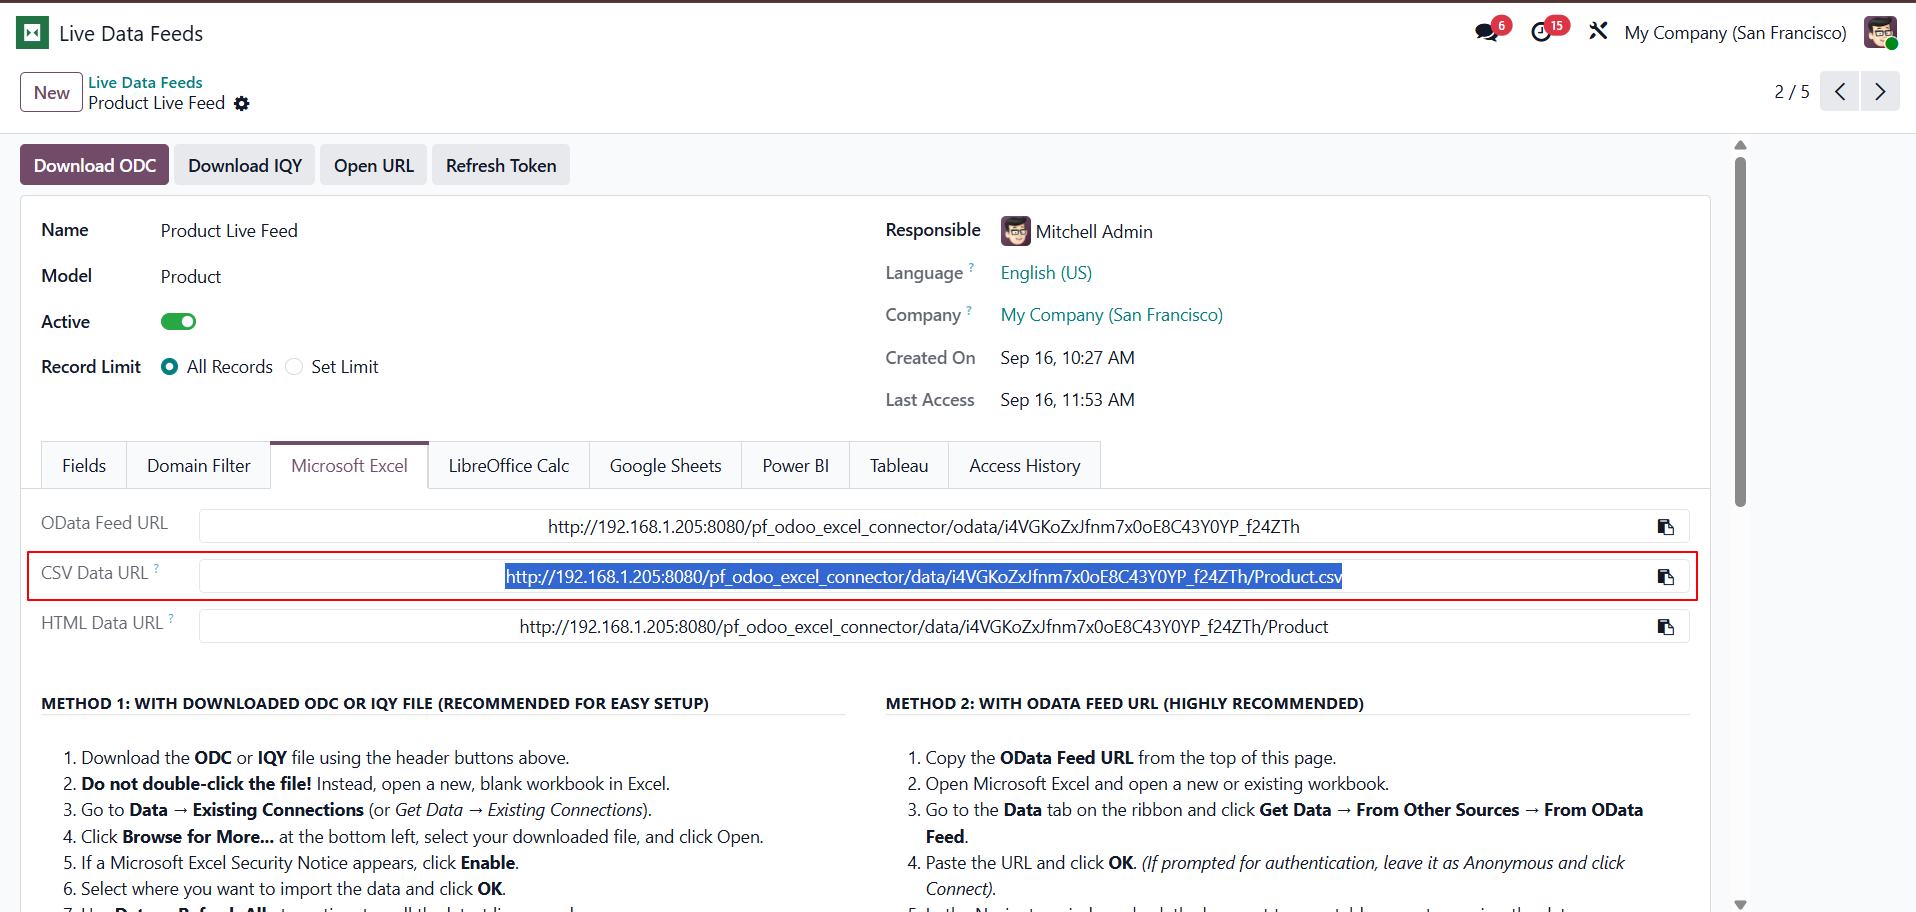
18. Method 3: With CSV Data URL: If you want to connect the live data feed using the CSV data format, copy the CSV data URL.
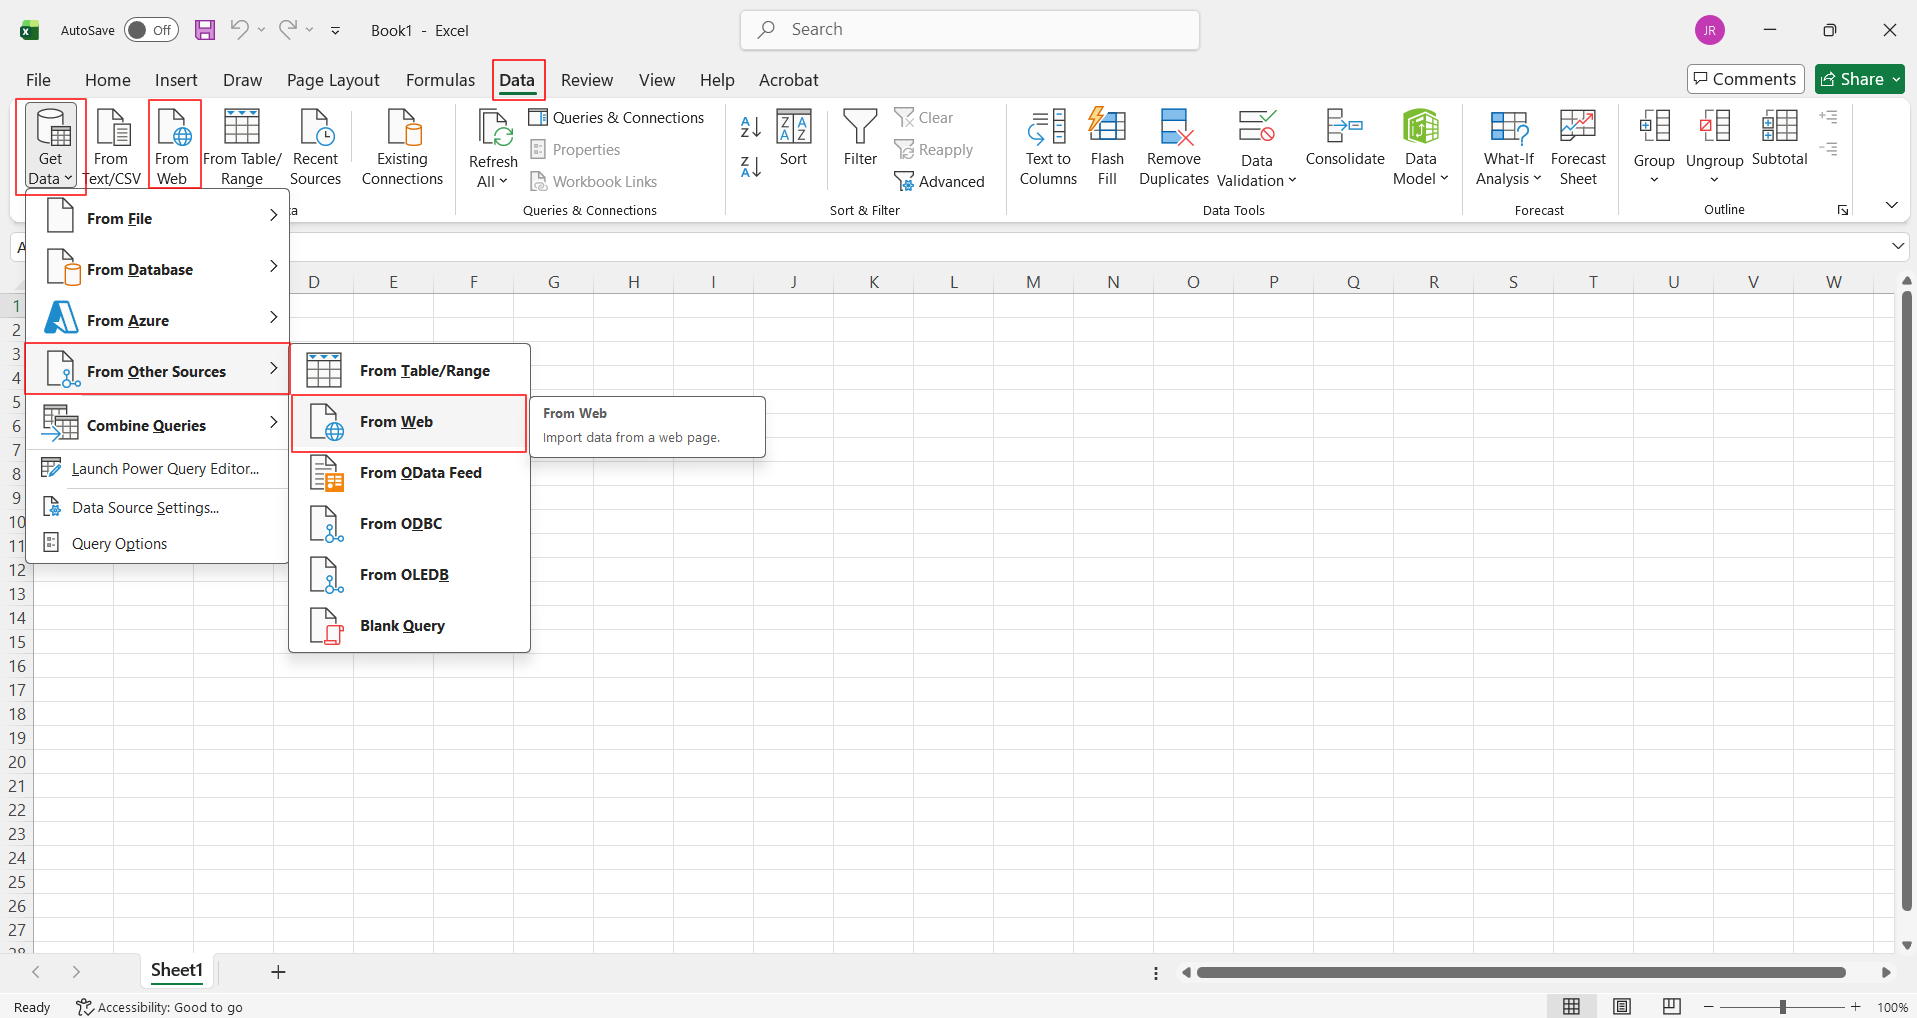
19. Open a new Excel sheet -> Data -> Get Data -> From Other Sources -> From Web (or click the From Web button in the header as shown in the image).
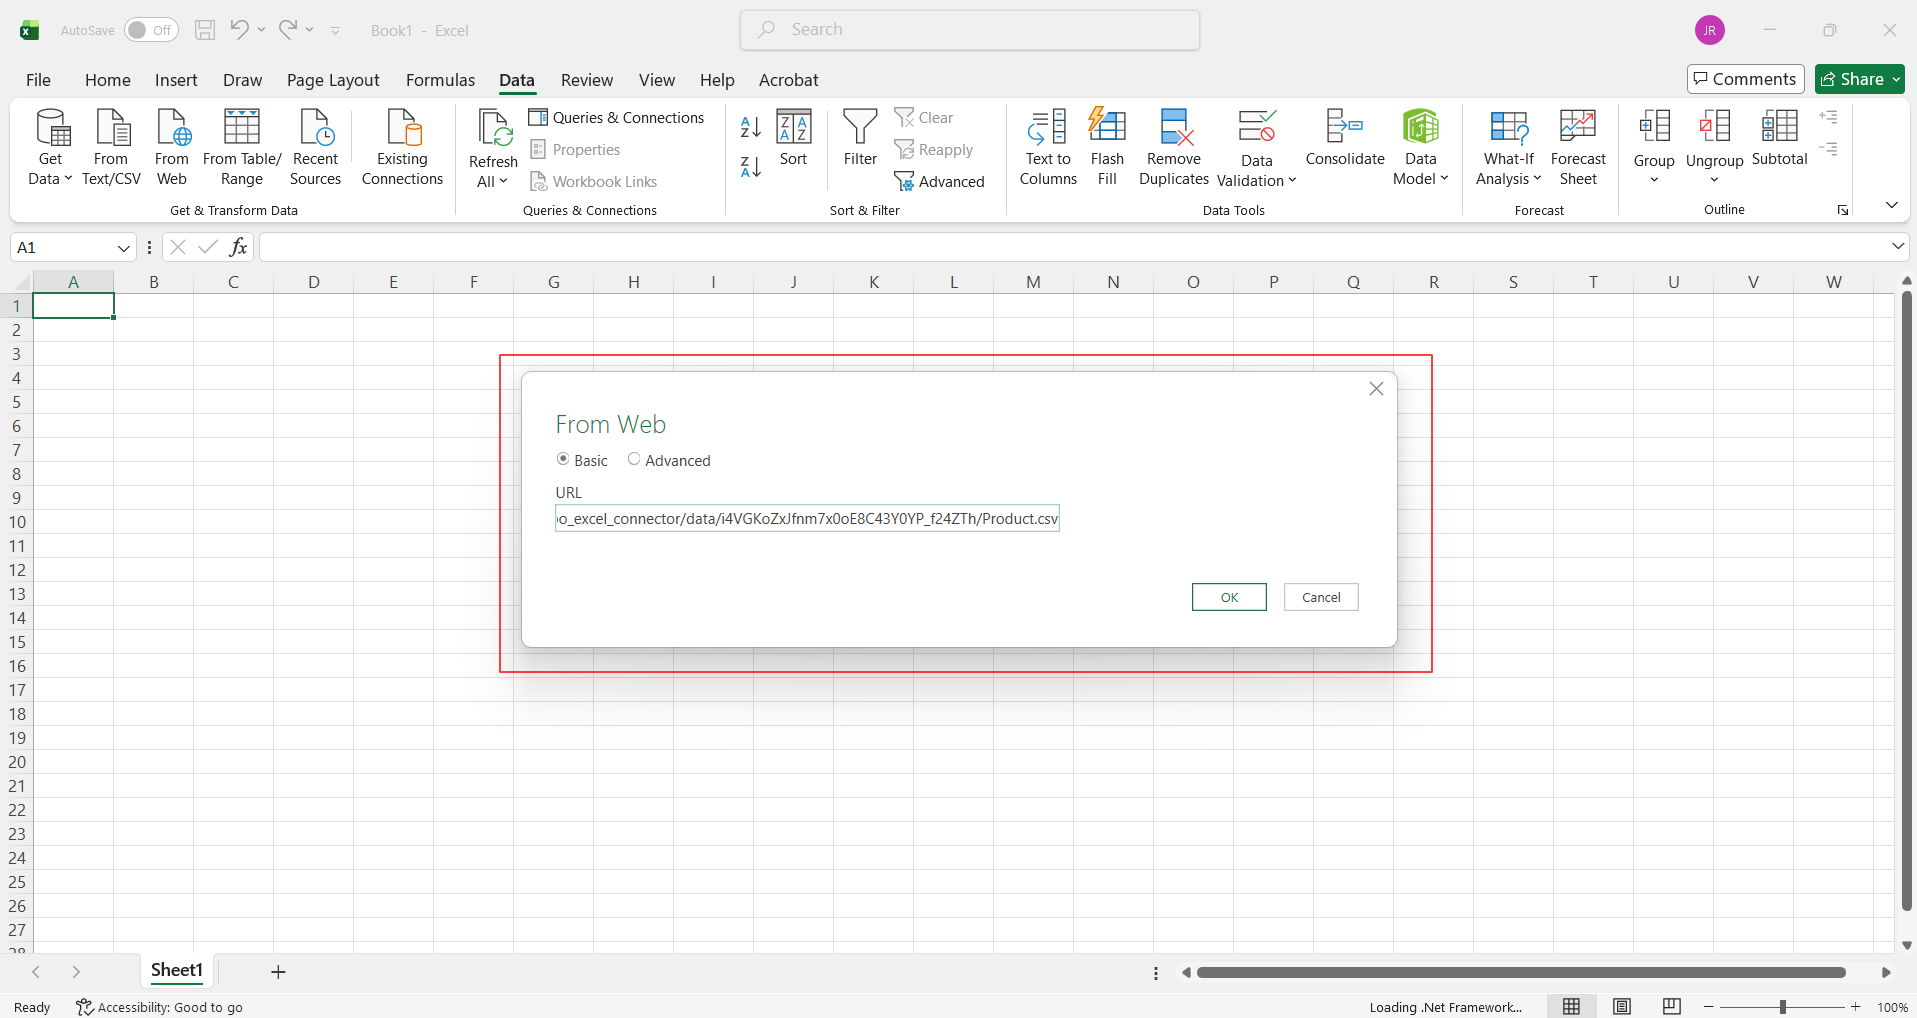
20. The From Web wizard will open. Paste the URL there and click OK.
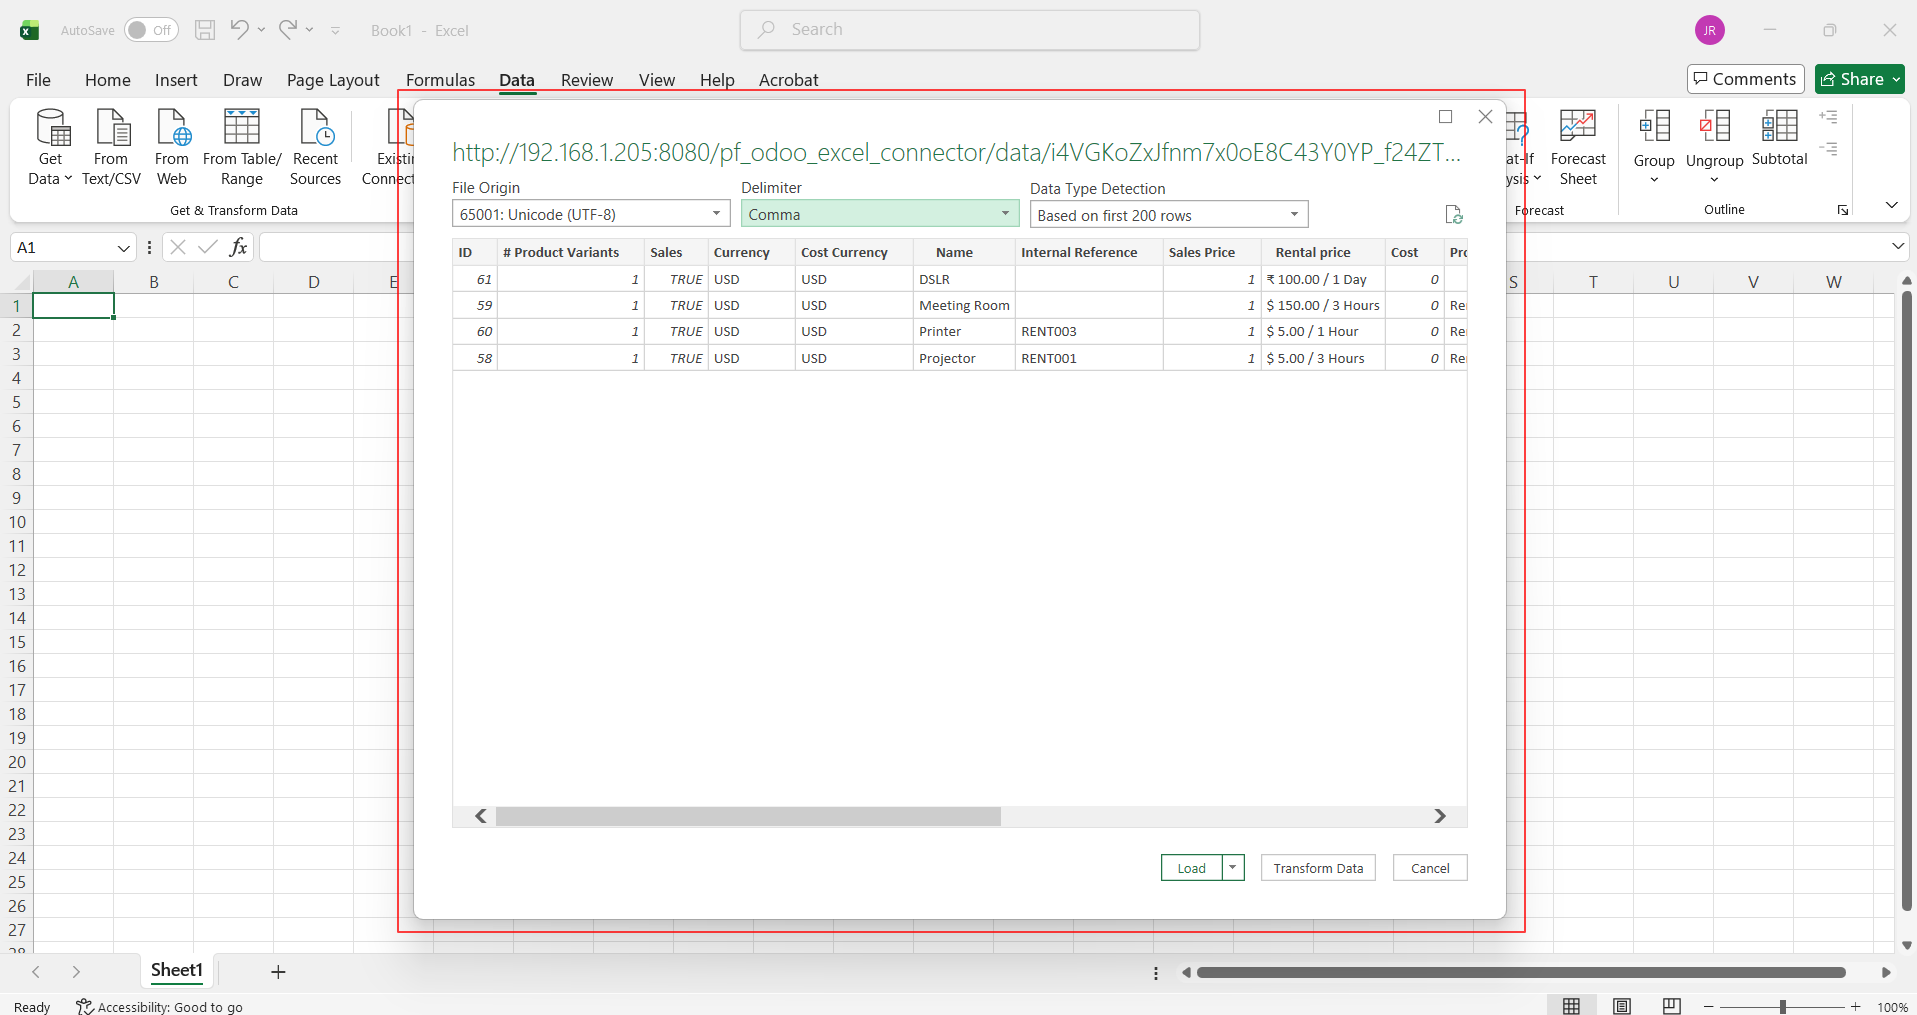
21. Another wizard will open where you can preview your data records. Now click Transform Data.
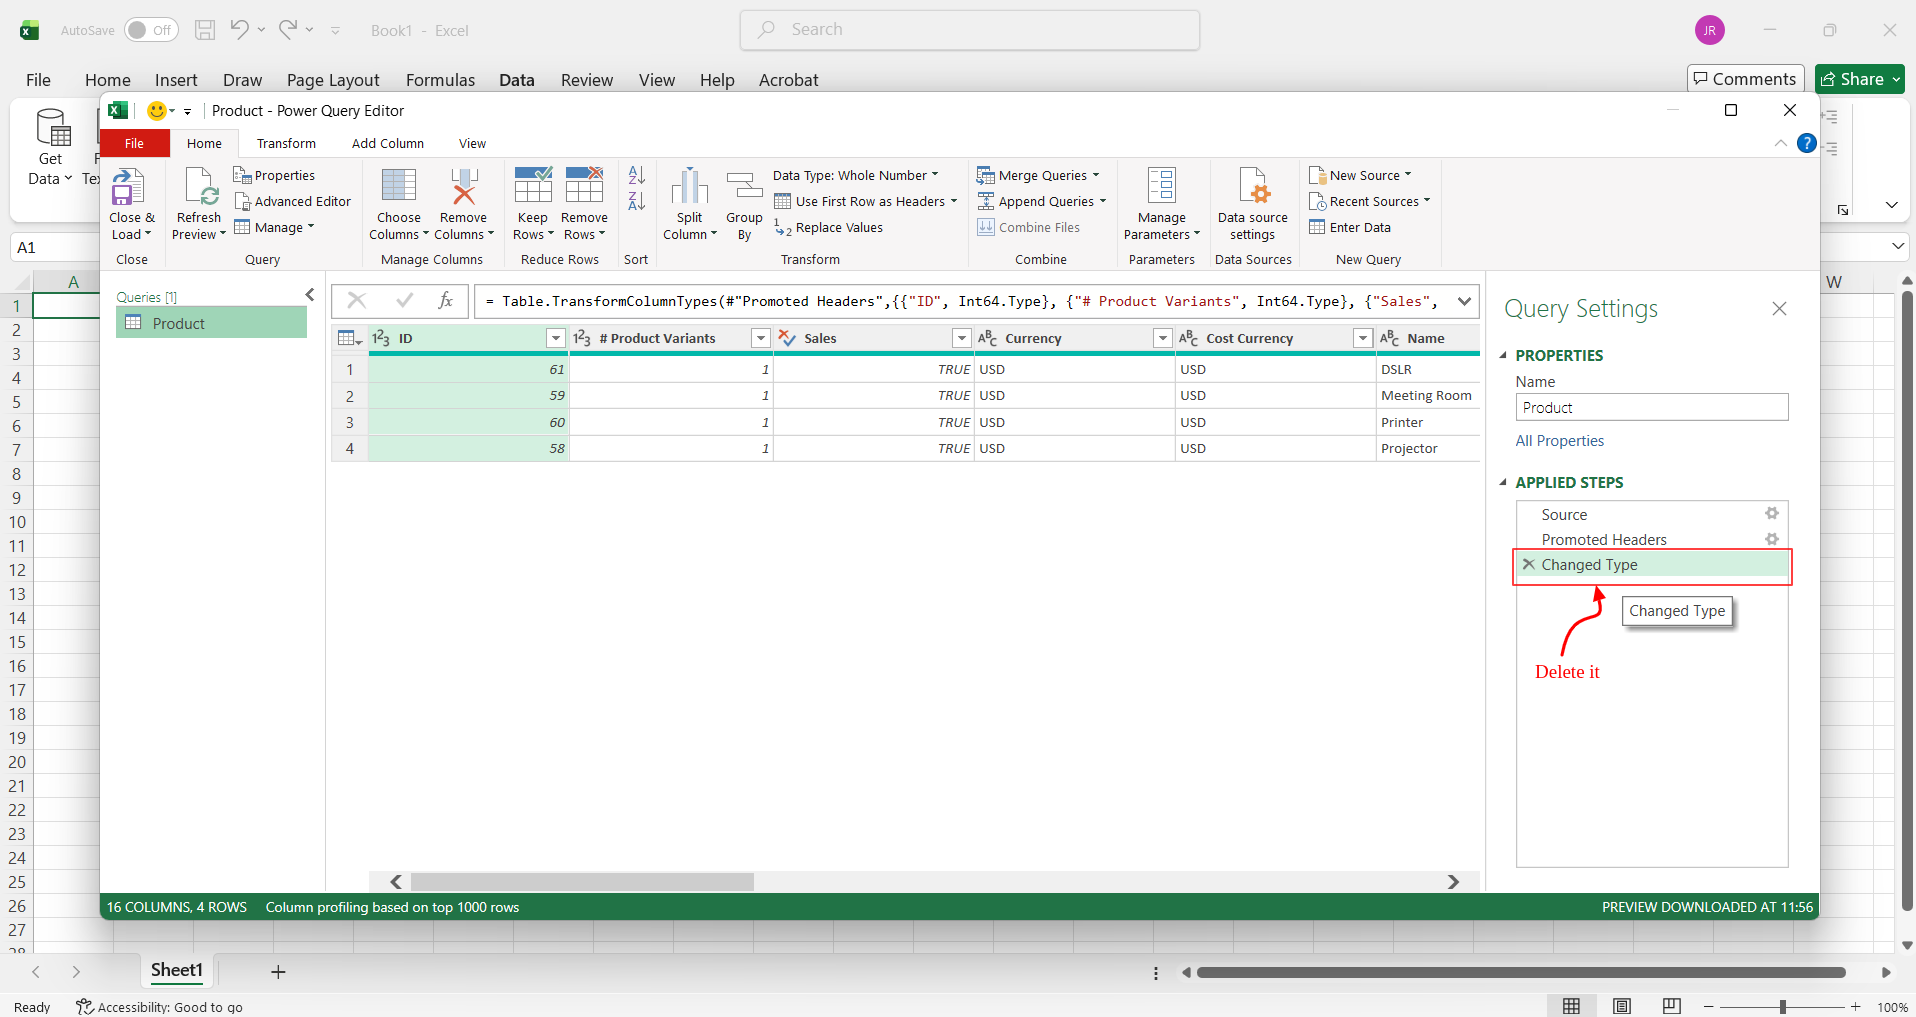
22. The Power Query Editor will open. Delete the "Changed Type" step from the Applied Steps.
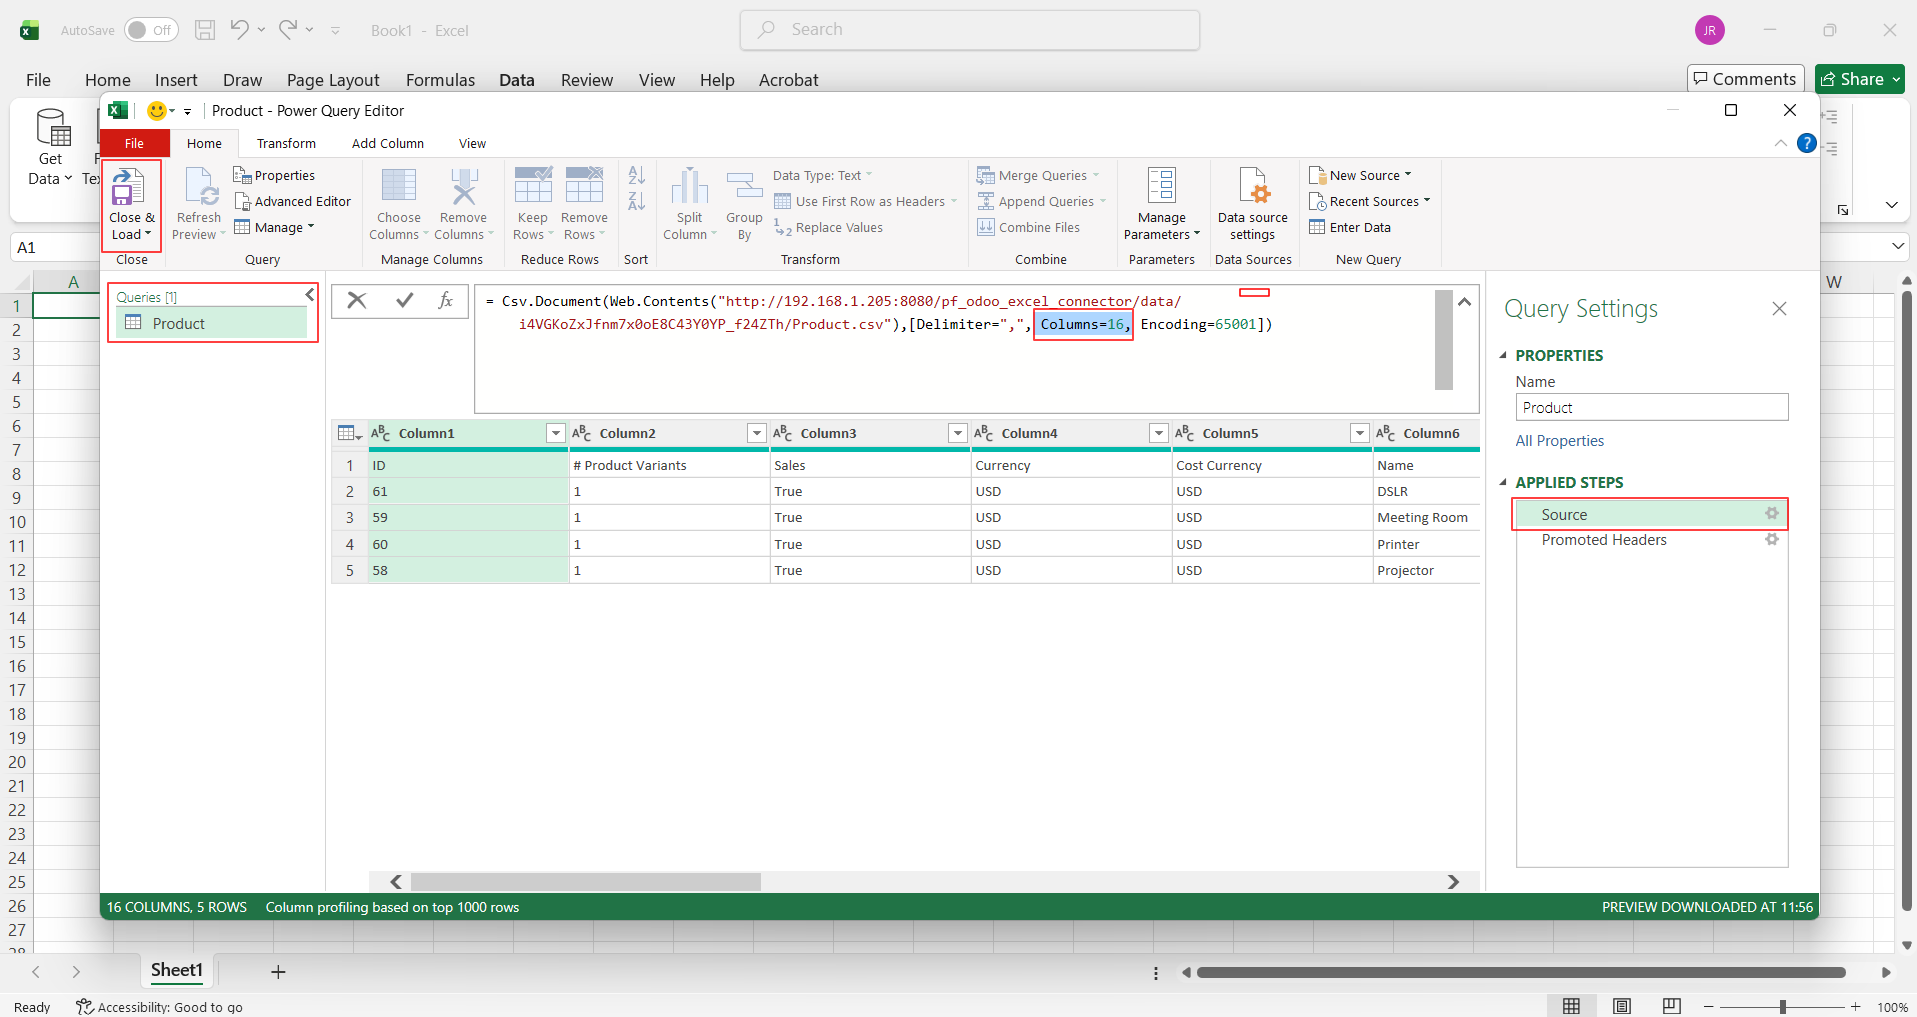
23. Now in Applied Steps, go to Source, go to the formula bar, and remove the columns parameter (For example, columns='16'), then click Close & Apply.
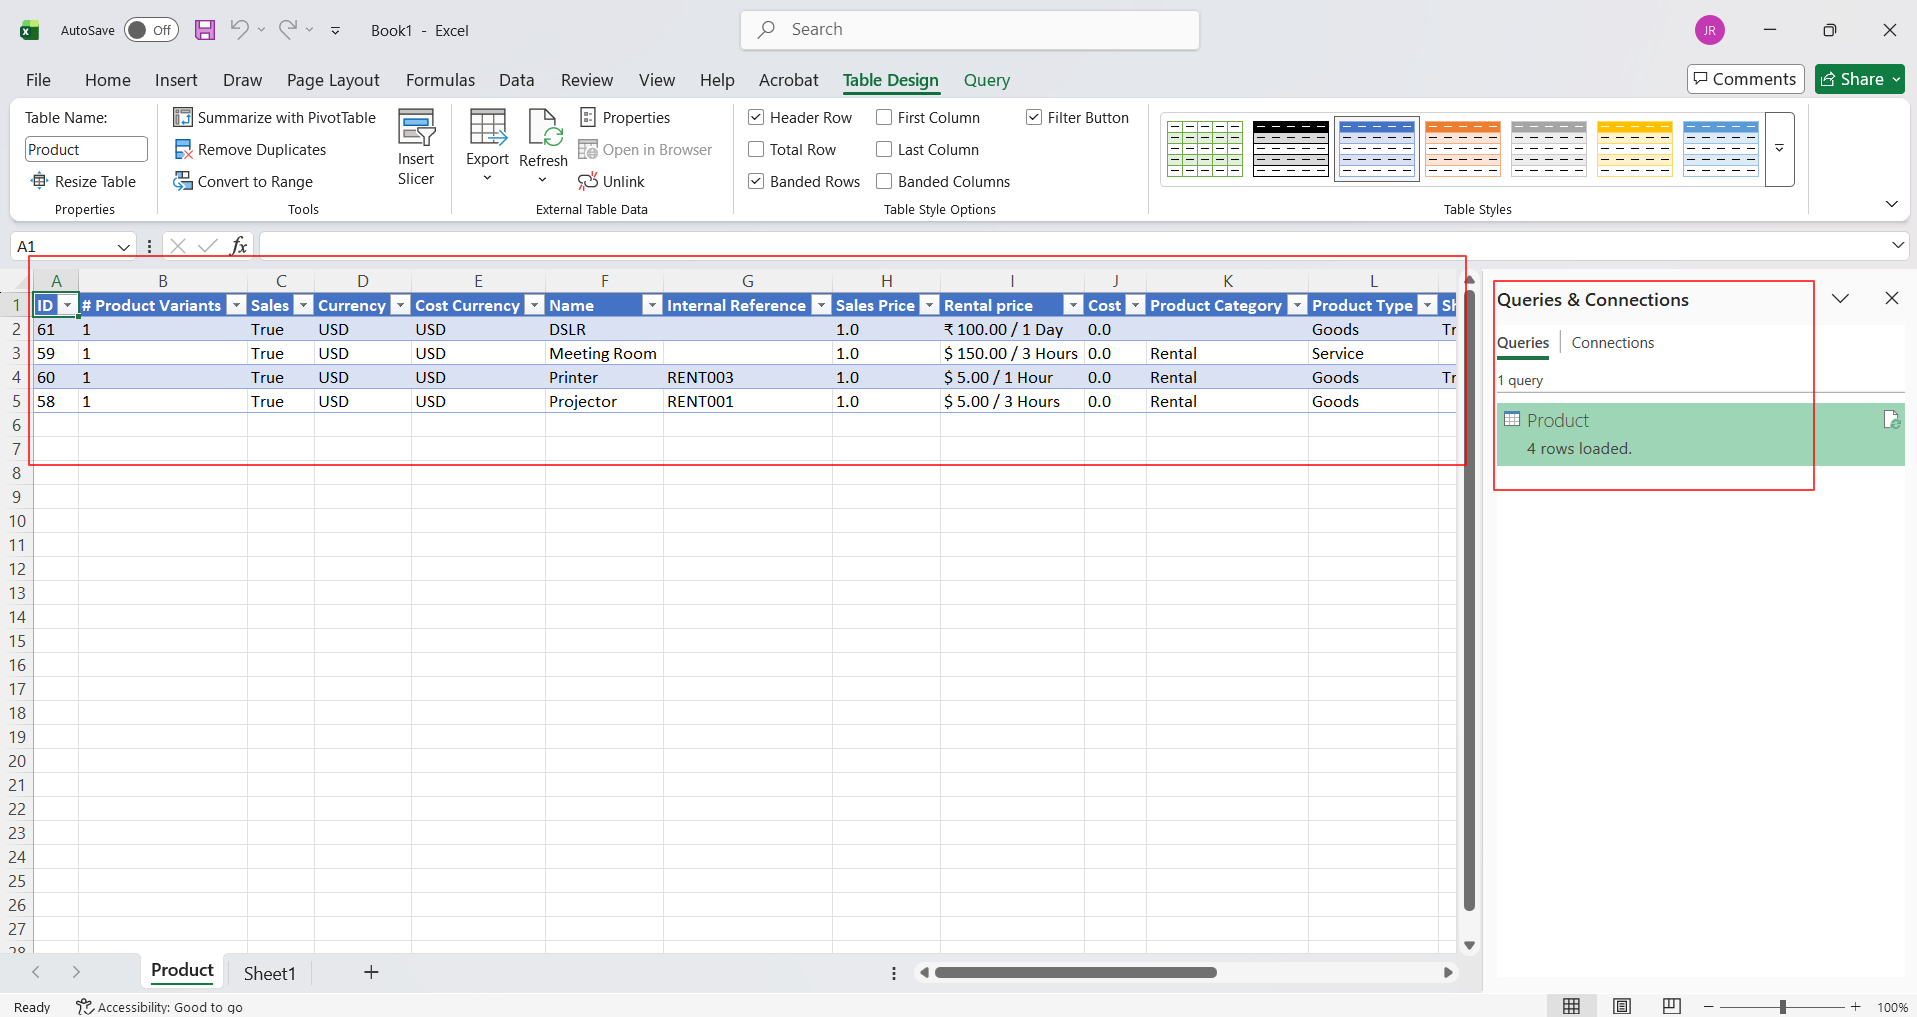
24. Once you click Close & Apply, Excel loads the exported Odoo columns and records into the sheet.
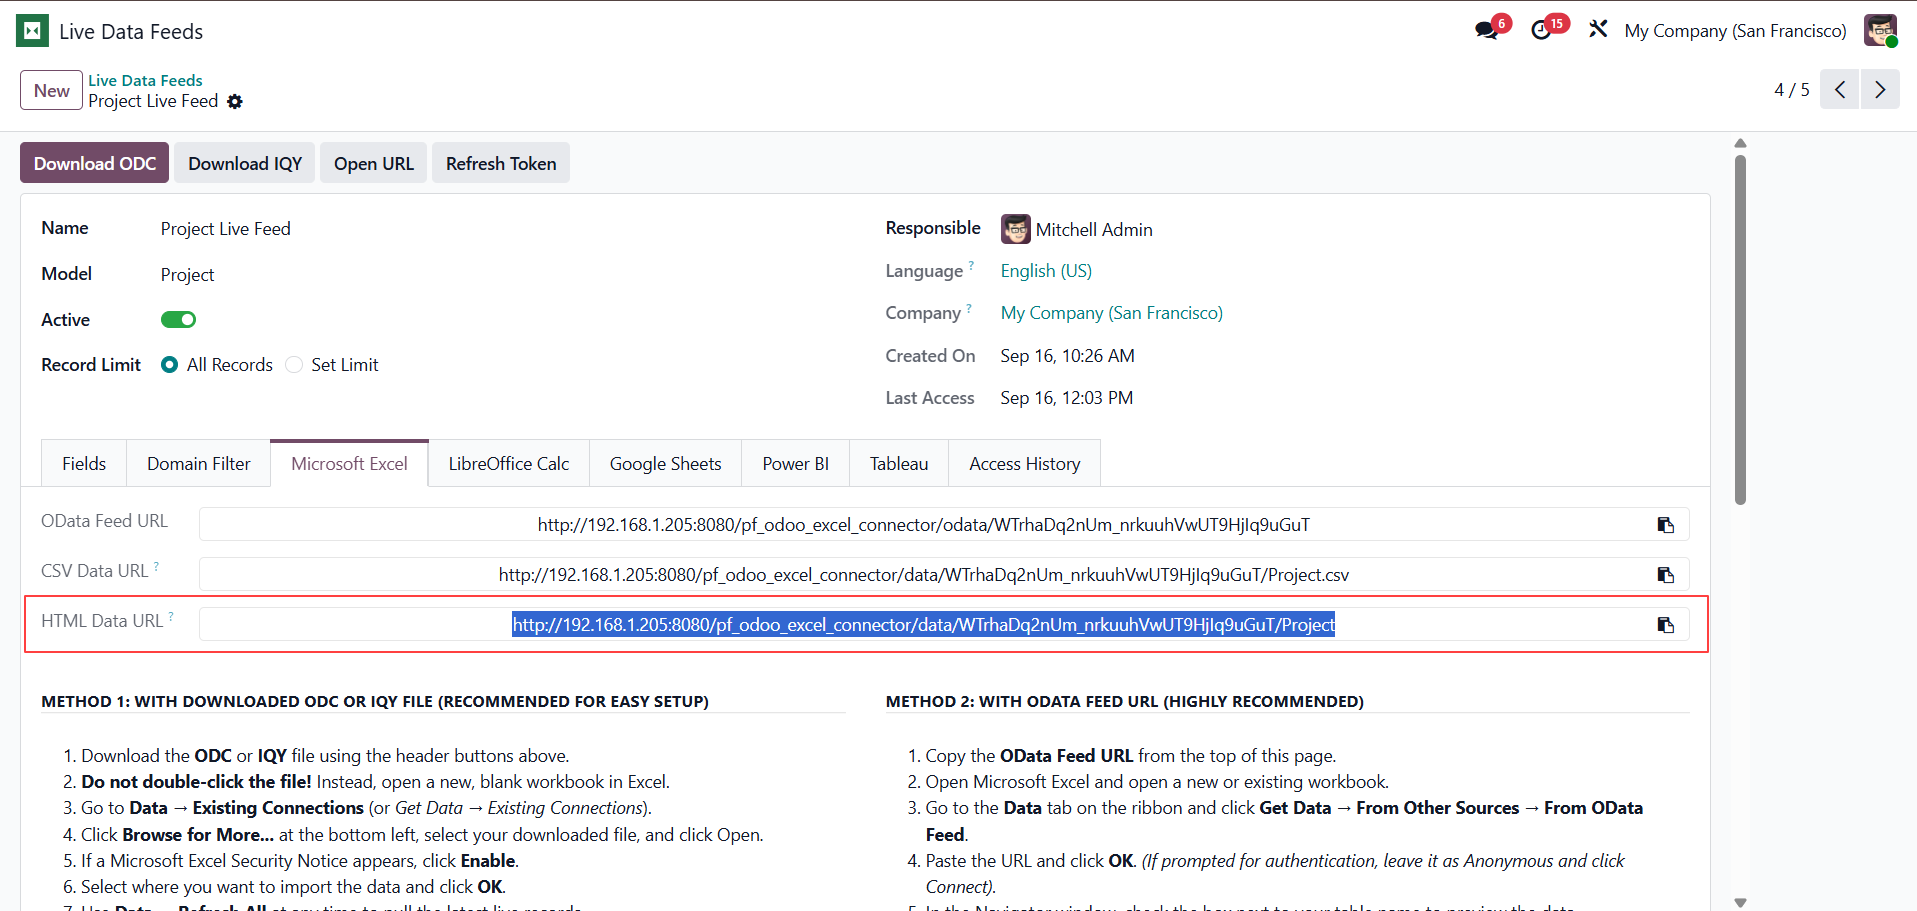
25. Method 4: With HTML Data URL: If you want to connect the live data feed using the HTML data format, copy the HTML data URL.
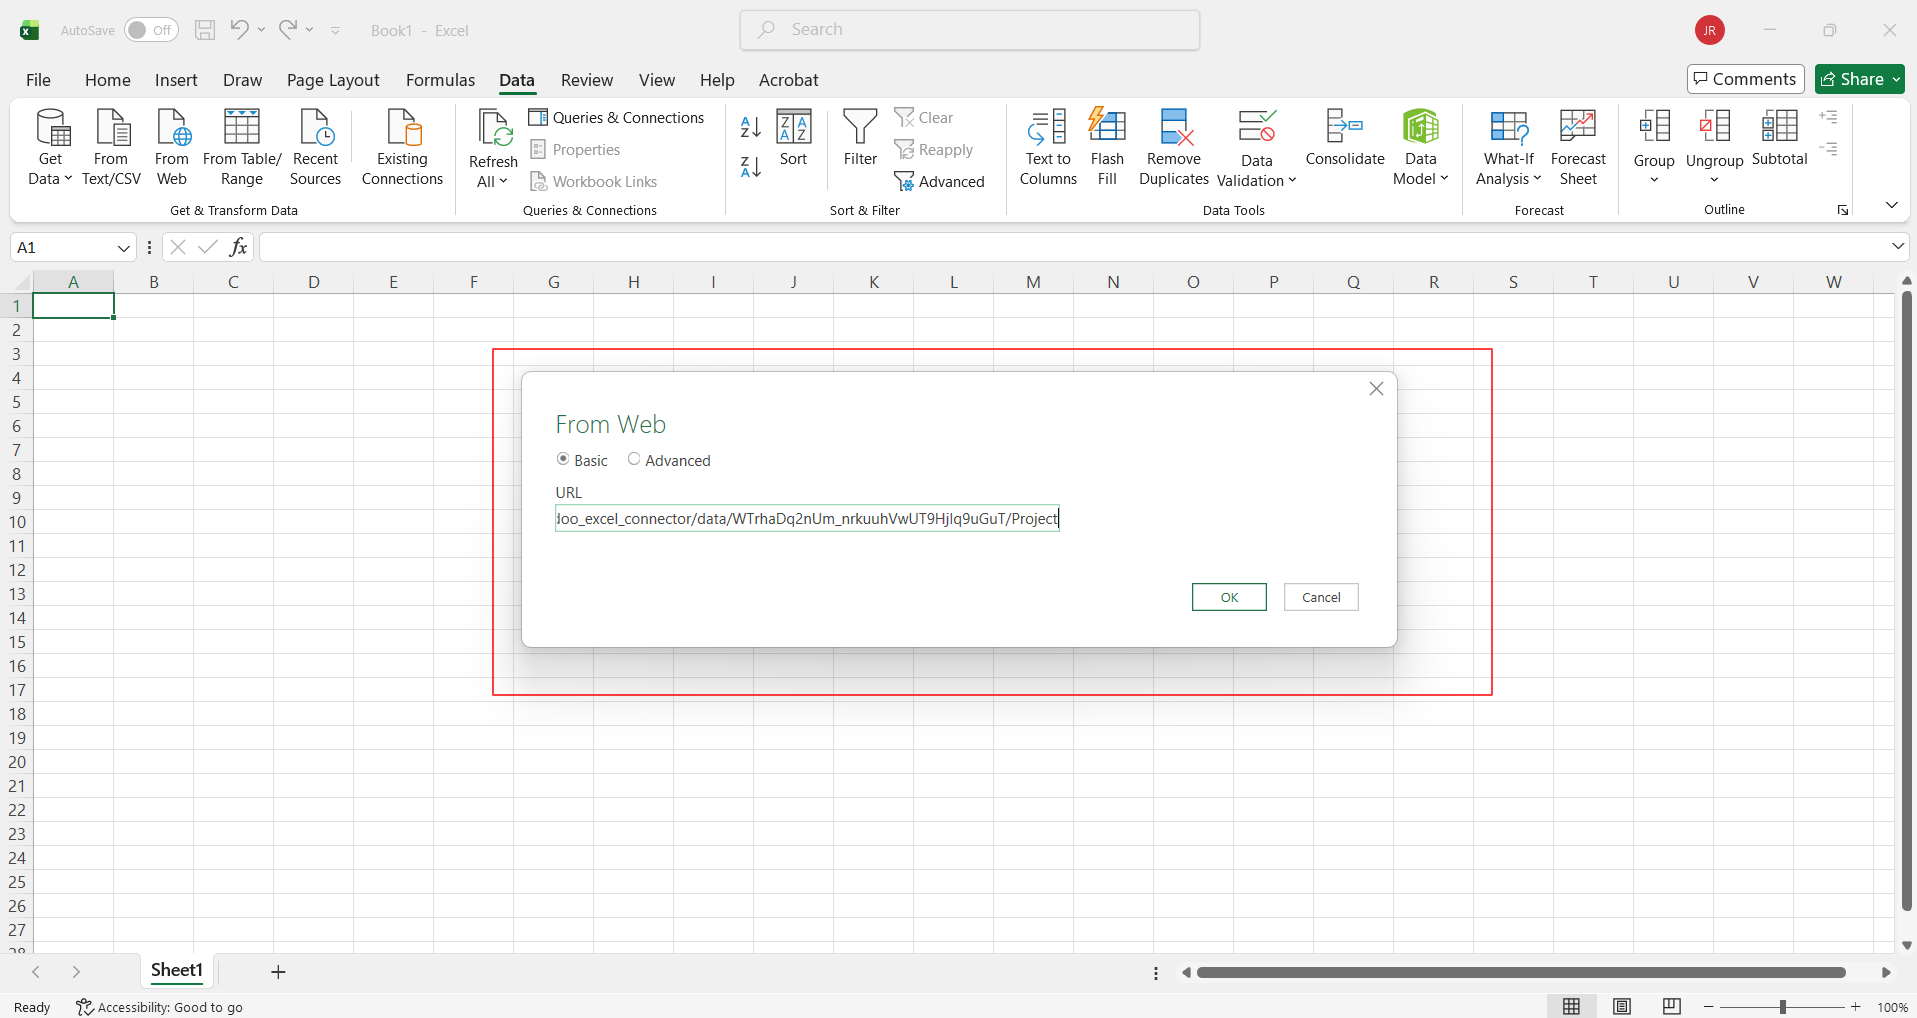
26. Click Get Data -> From Web, paste the URL in the From Web wizard, and click OK.
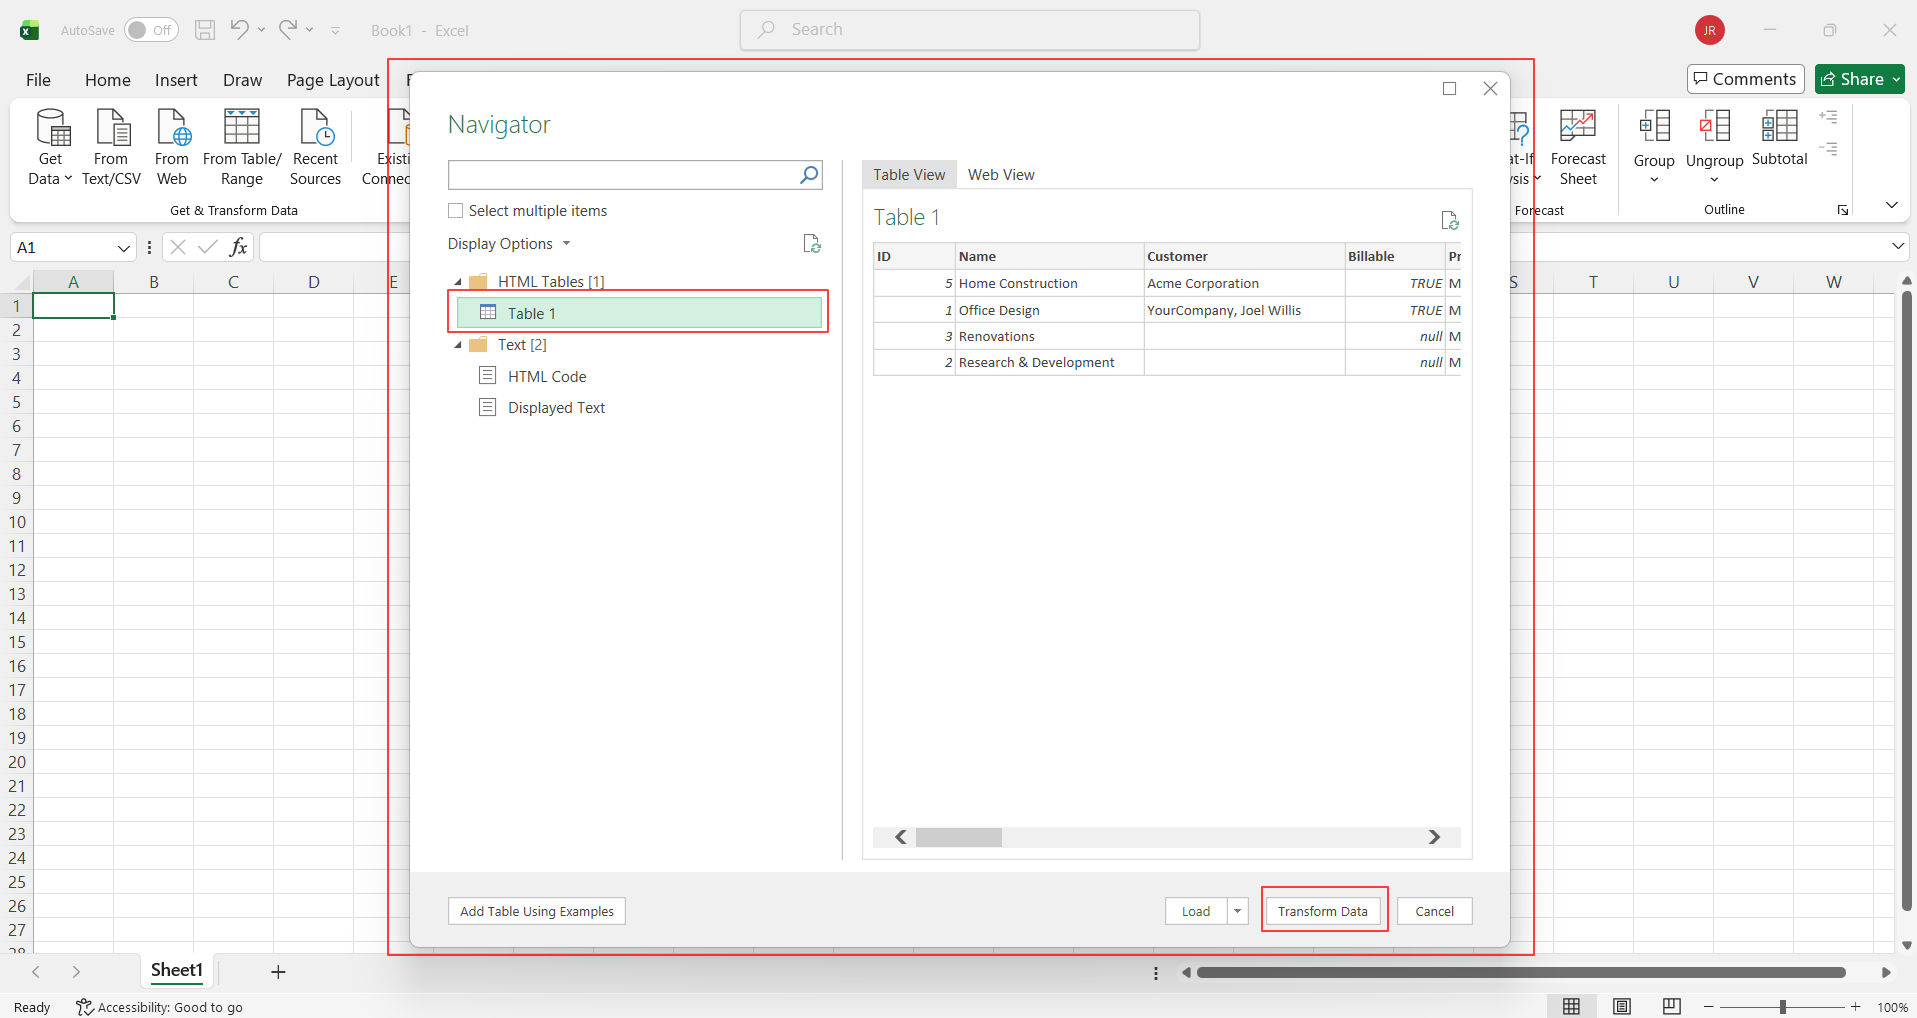
27. A Navigator wizard will open. On the left side, select table 1, preview your data on the right, and then click Transform Data.
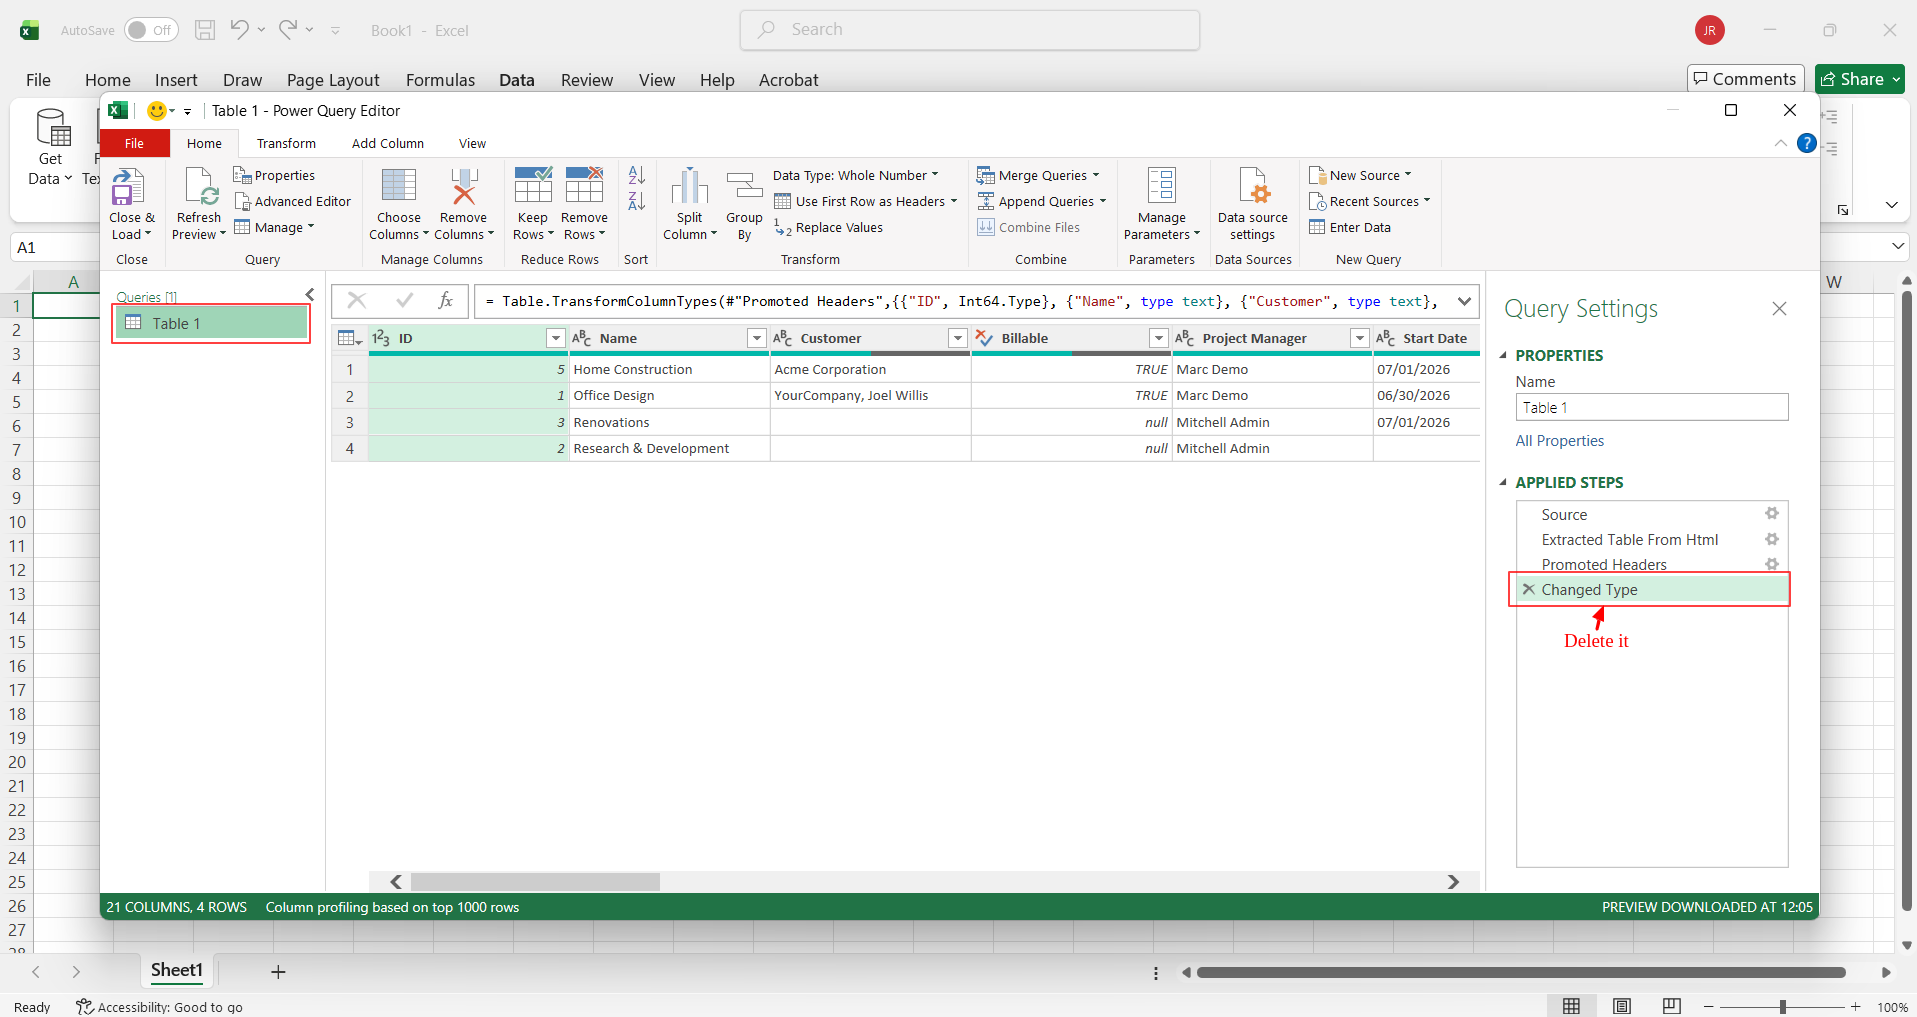
28. The Power Query Editor will open. Delete the "Changed Type" step from the Applied Steps.
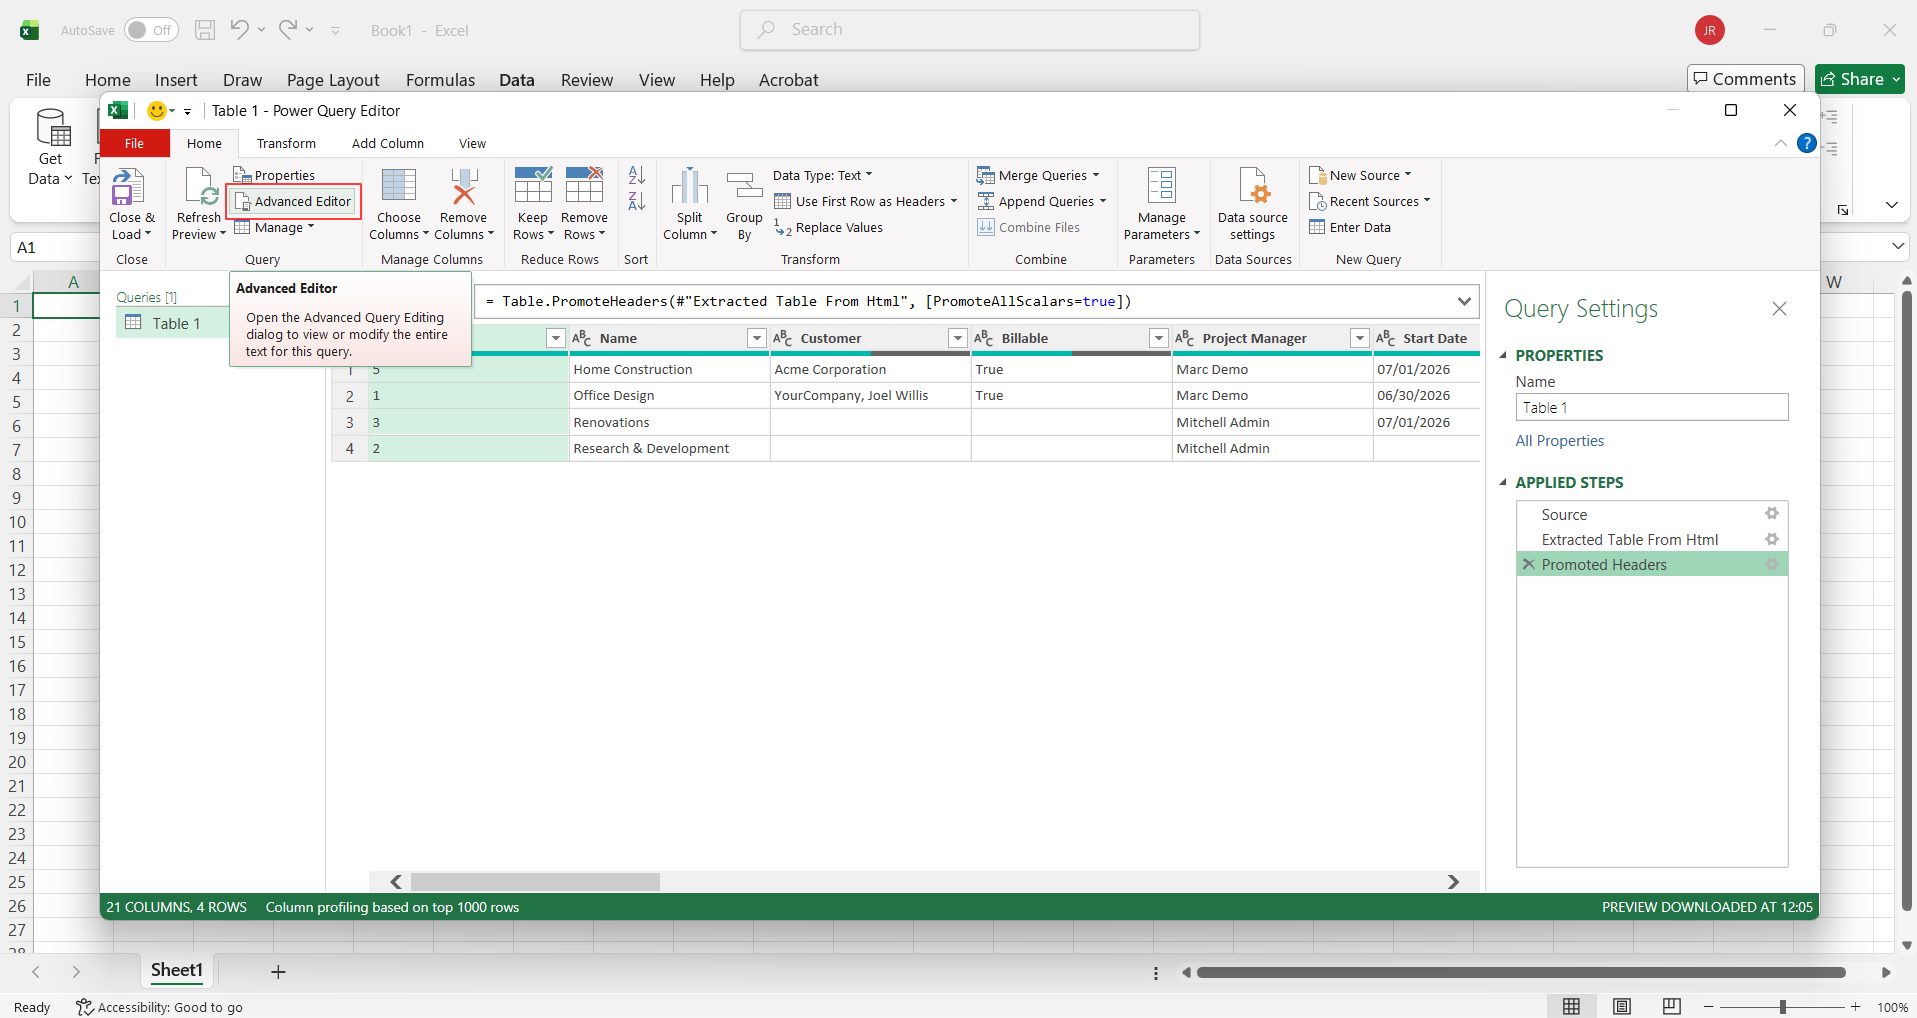
29. Go to Home -> Advanced Editor.
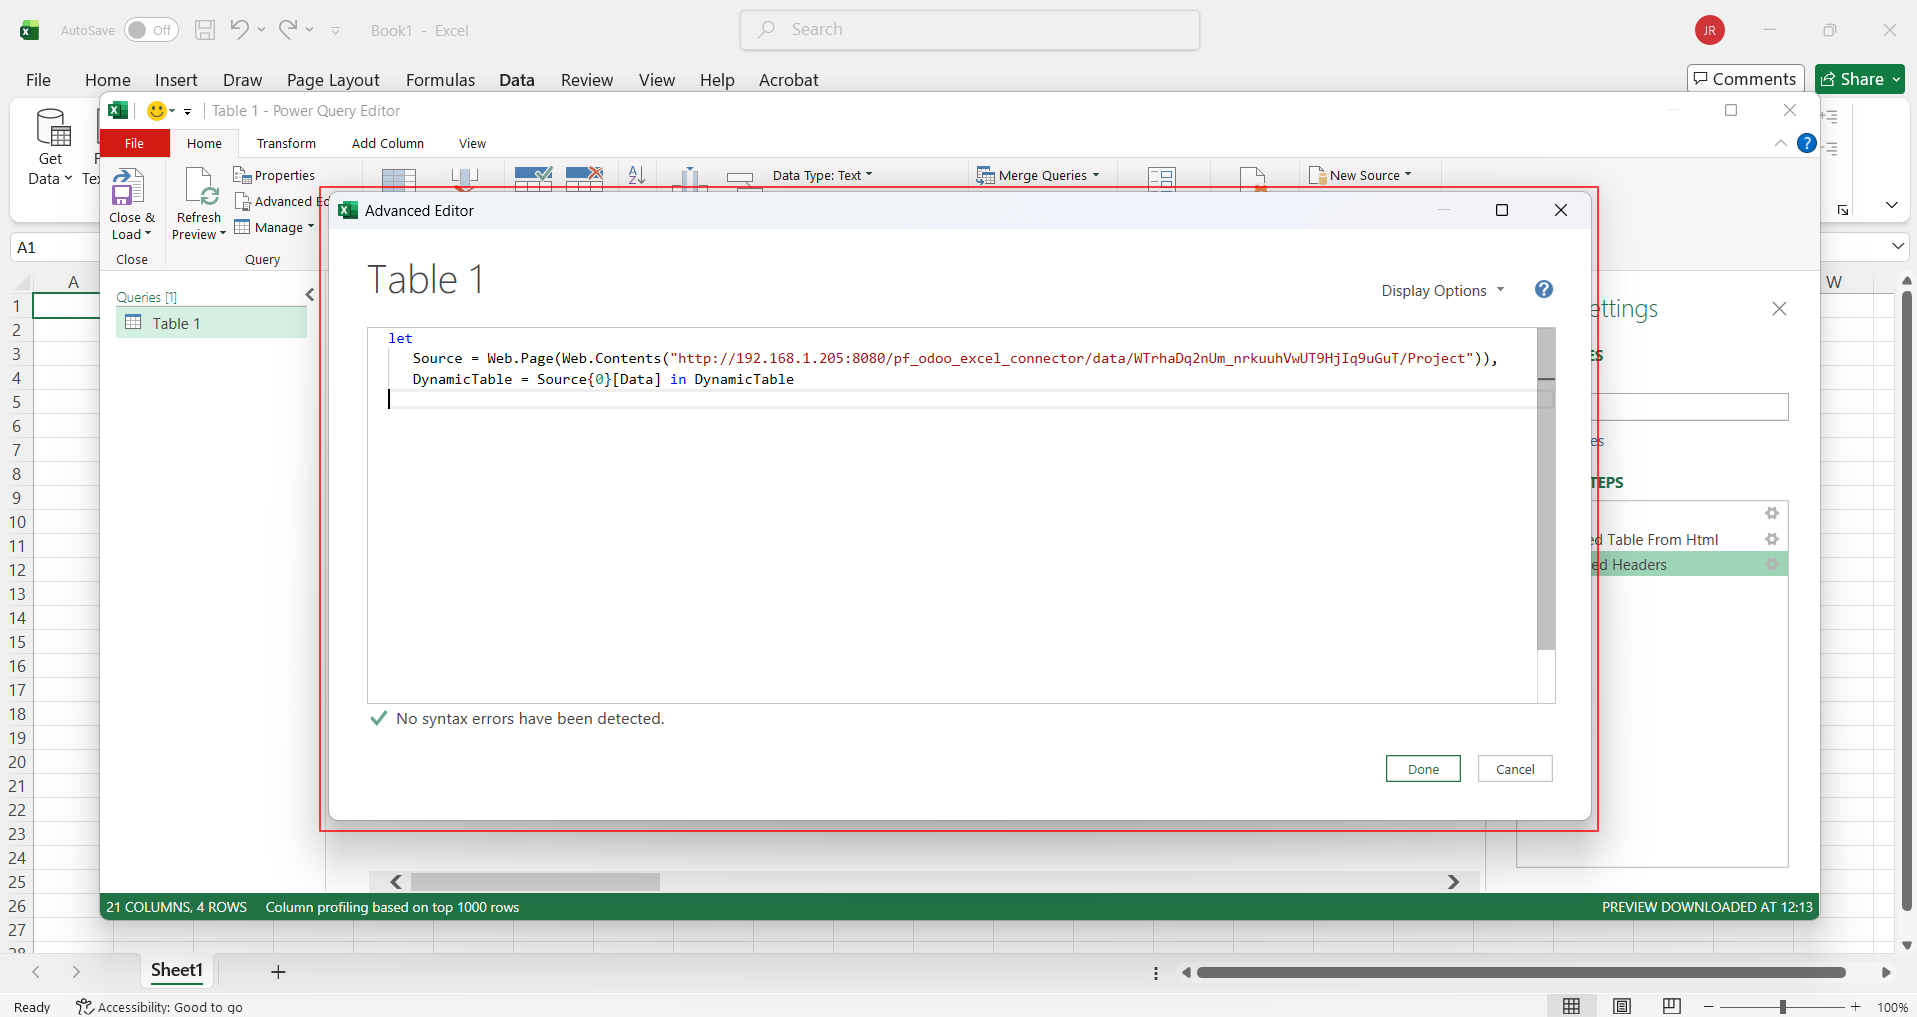
31. Paste it into the Advanced Editor and click Done.
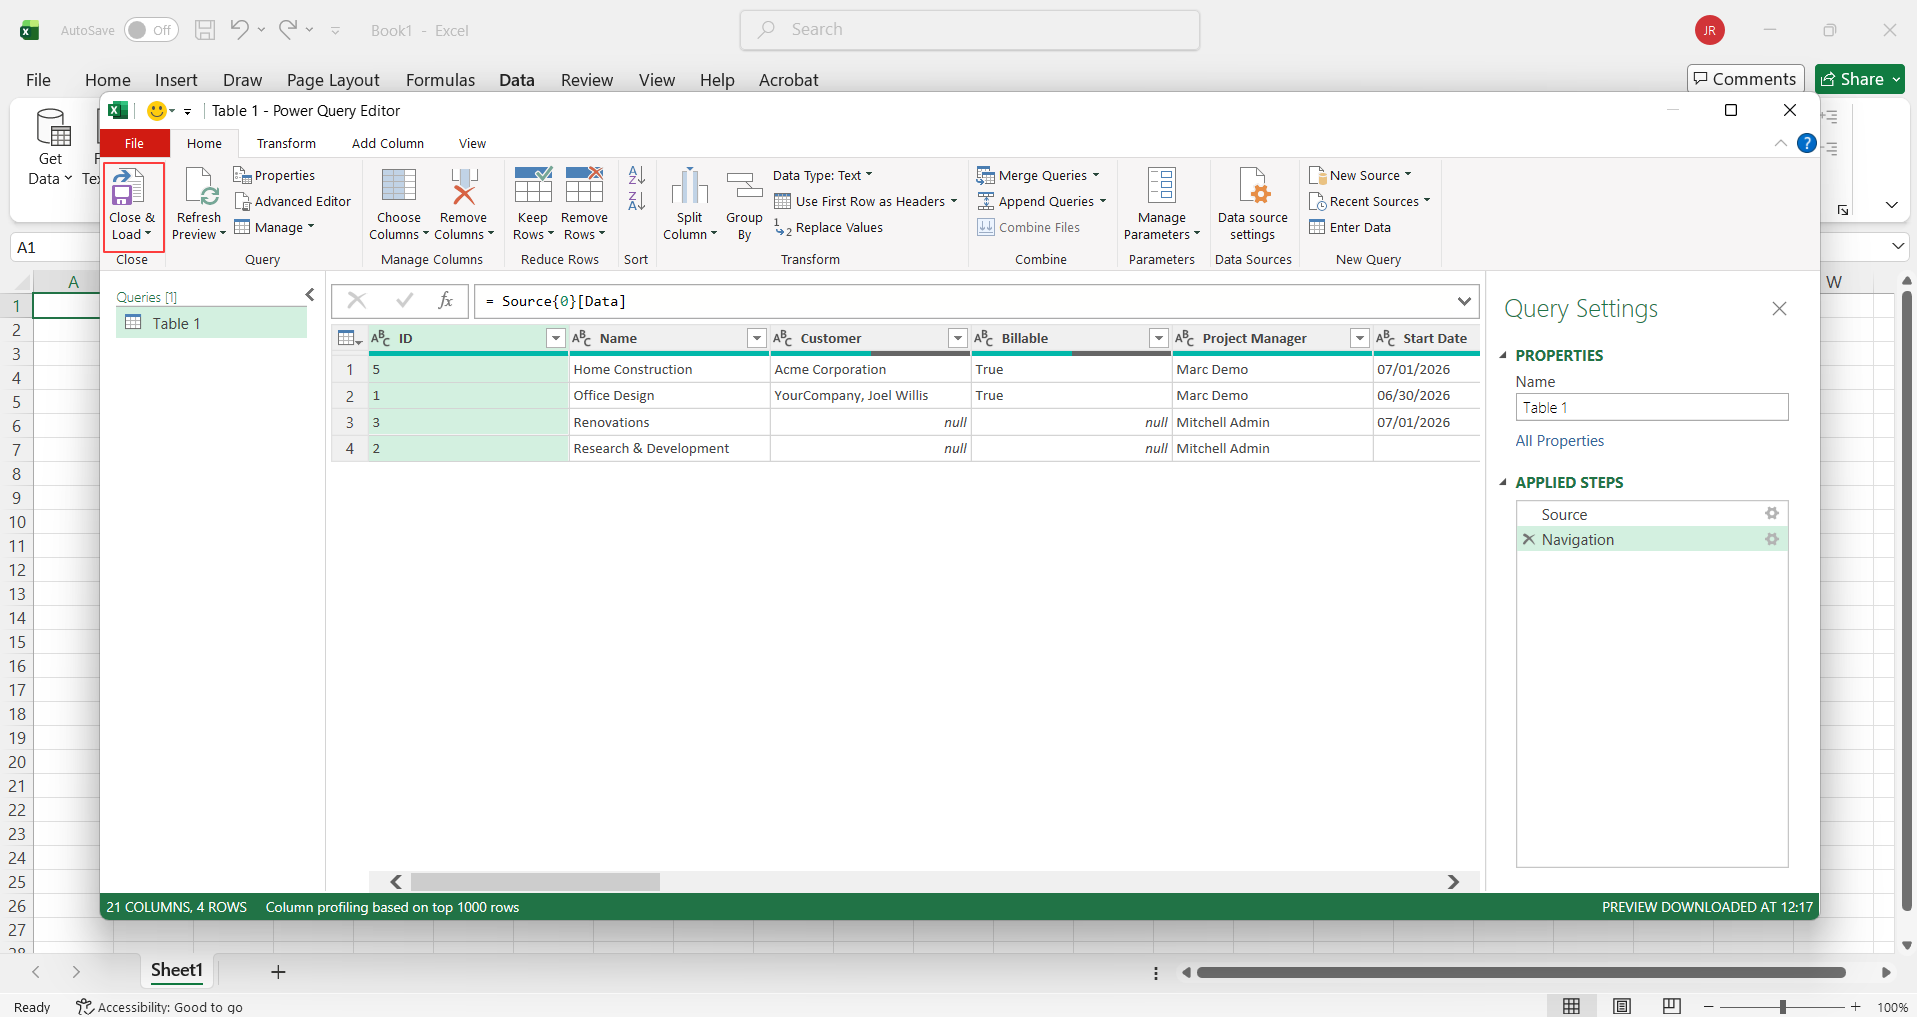
32. Now click on Close & Apply.
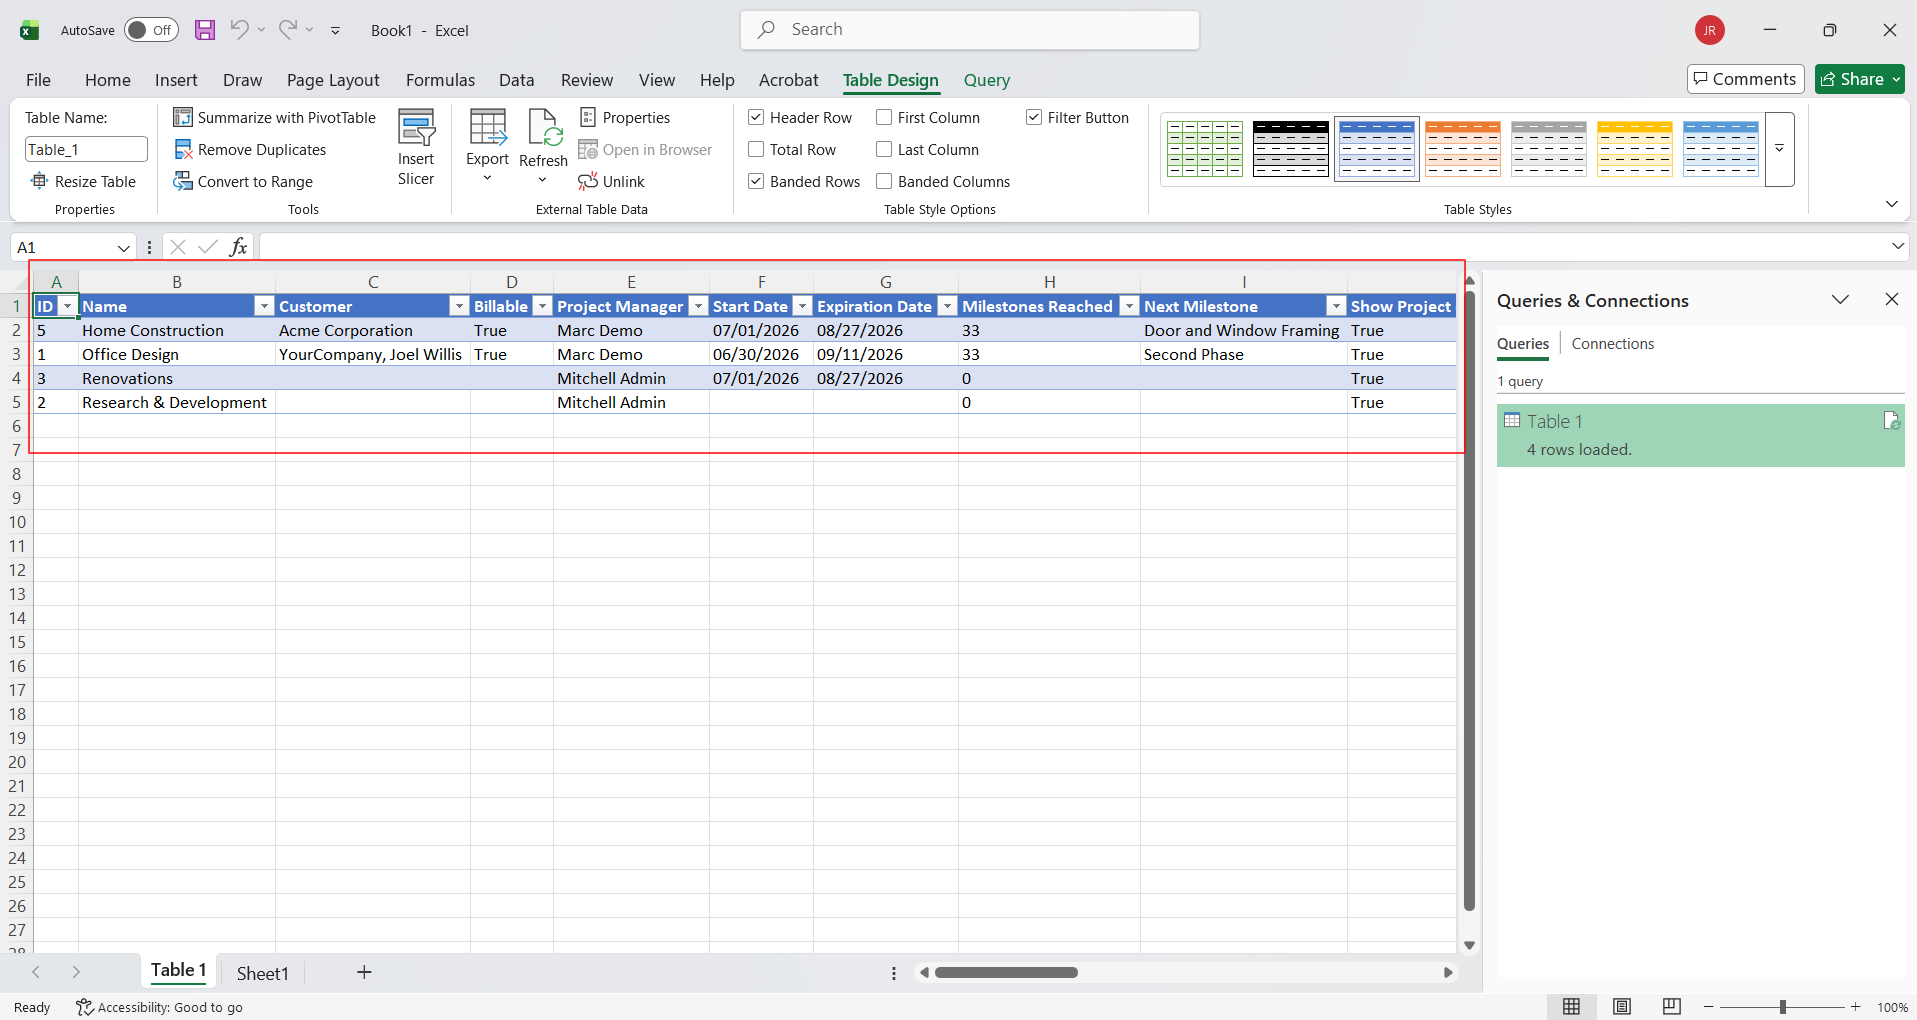
33. Once you click Close & Apply, Excel loads the exported Odoo columns and records into the sheet, giving users a refreshable workbook connected to the live data feed.
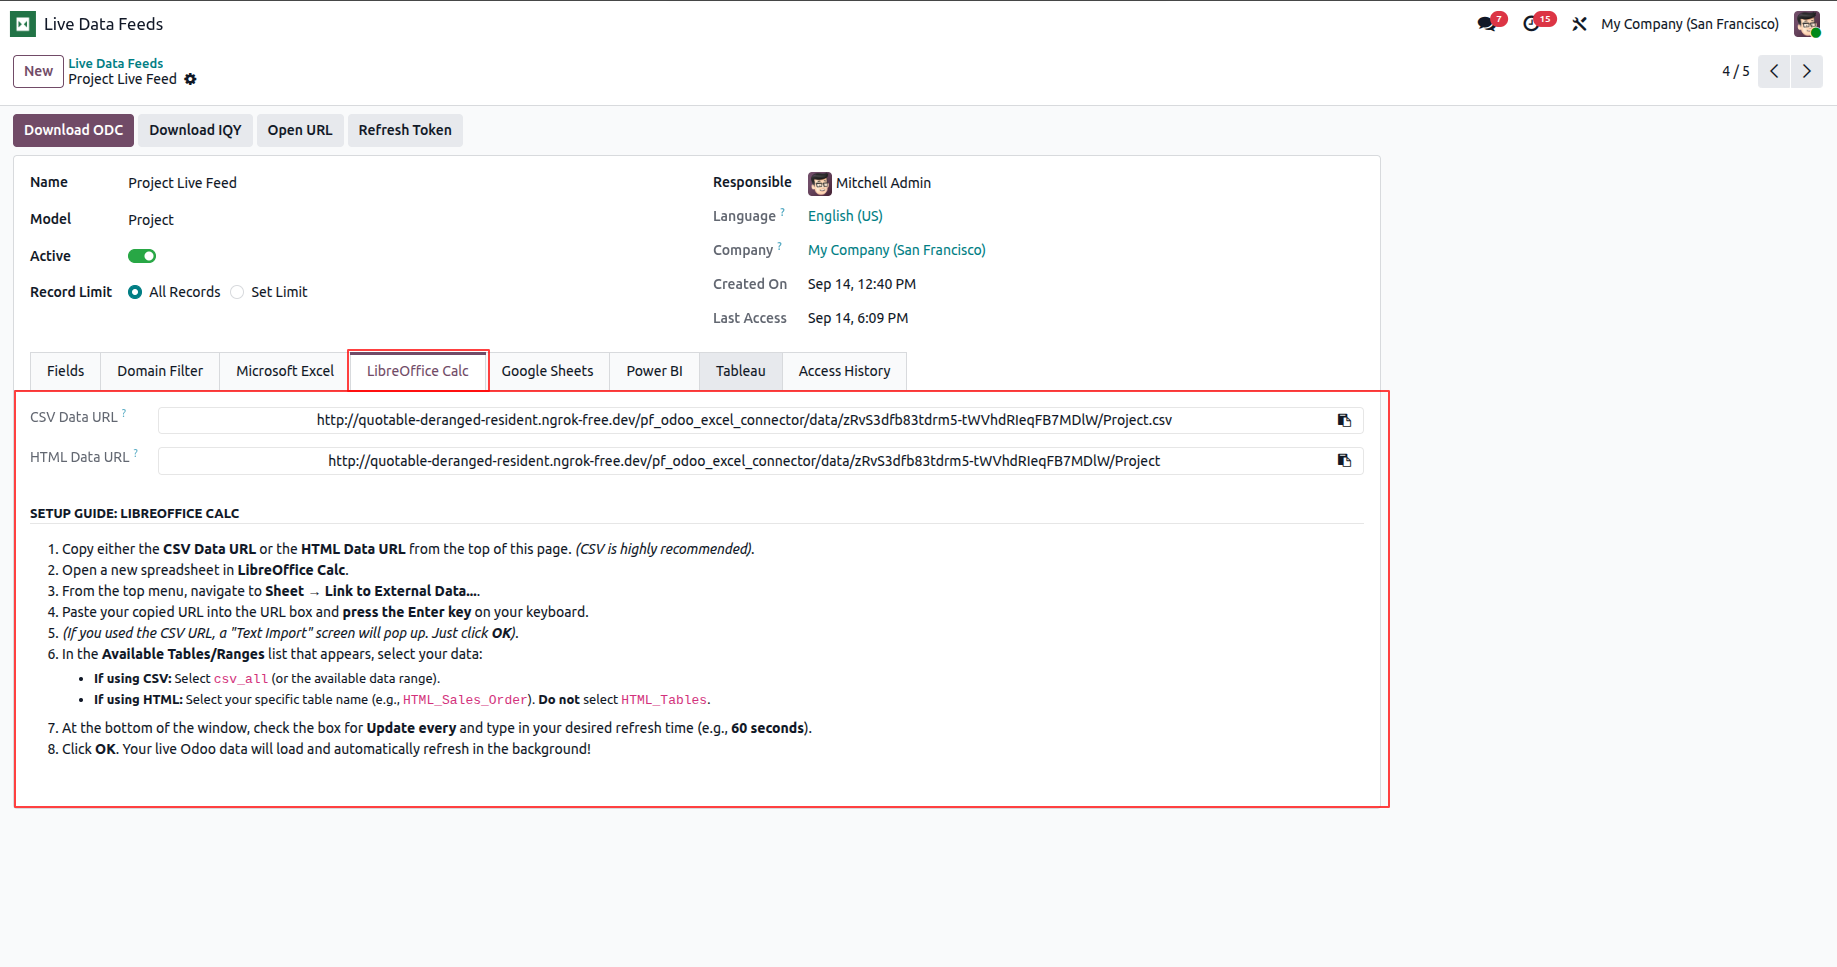
1. Go to the LibreOffice Calc tab where you can find the CSV data URL, HTML data URL, and setup steps.
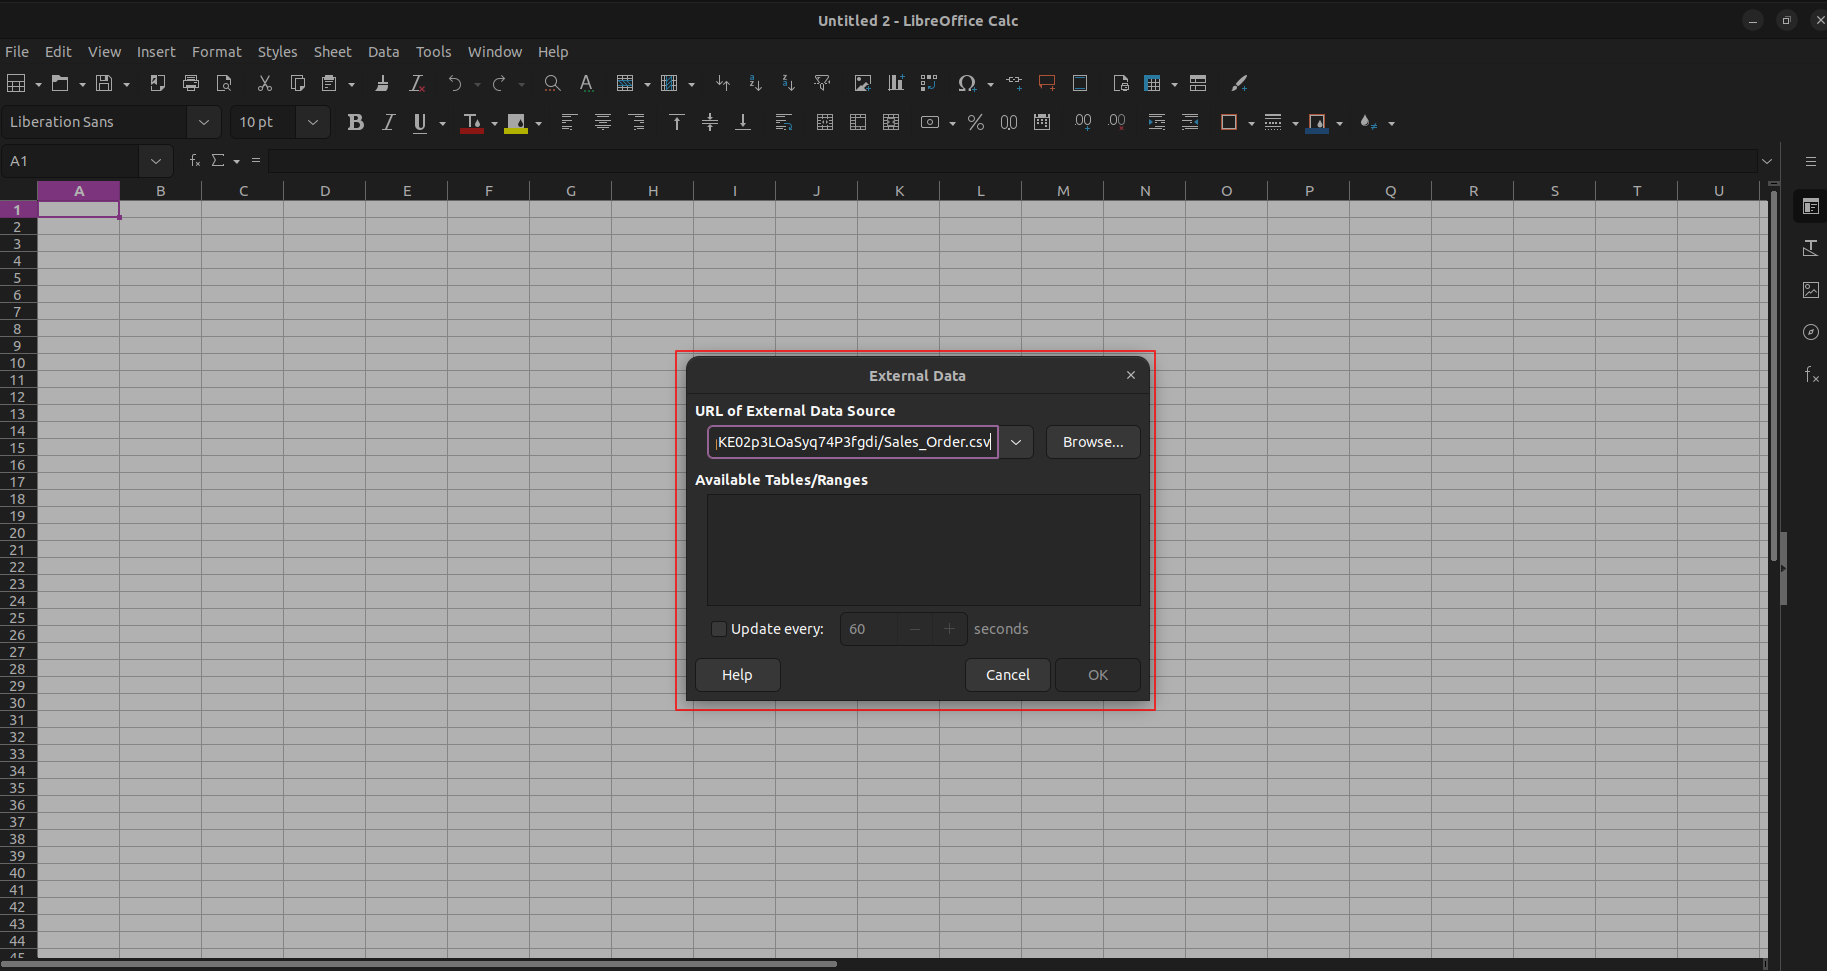
2. Copy the CSV data URL first. Go to a new LibreOffice spreadsheet and navigate to Sheet -> Link to External Data. This opens the External Data wizard; paste in the CSV URL and press Enter.
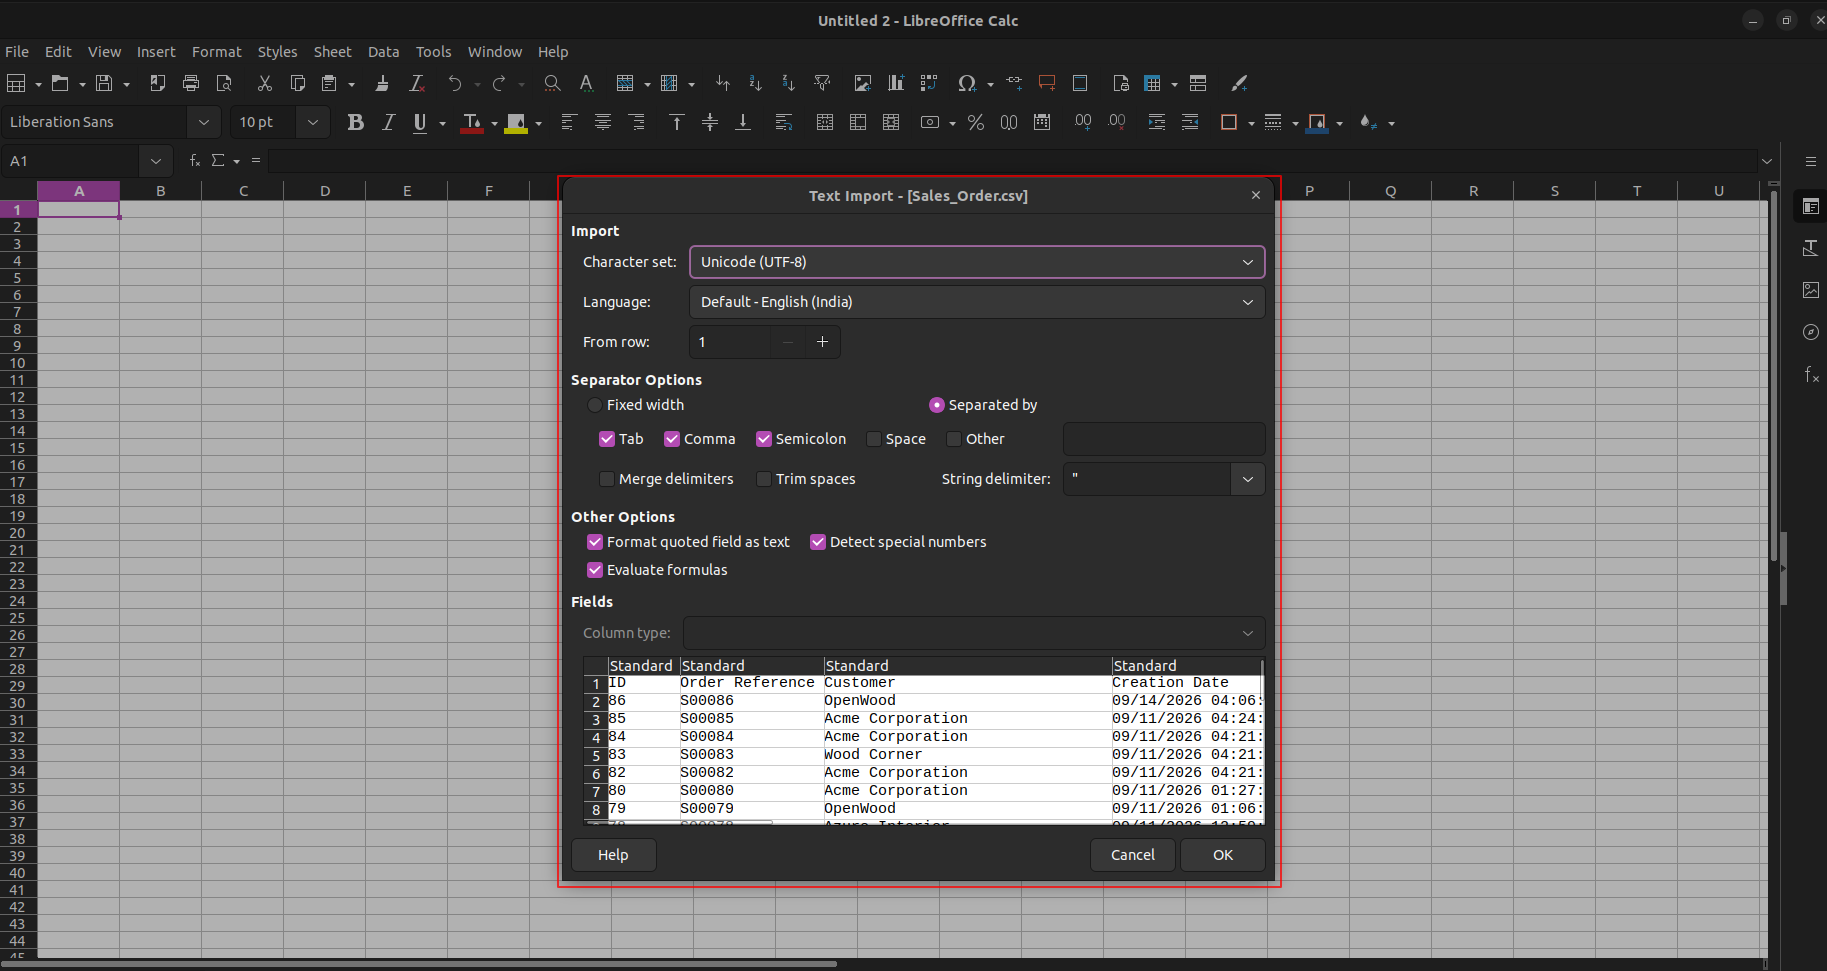
3. That opens another wizard called Text Import. Set it as shown in the image and click OK.
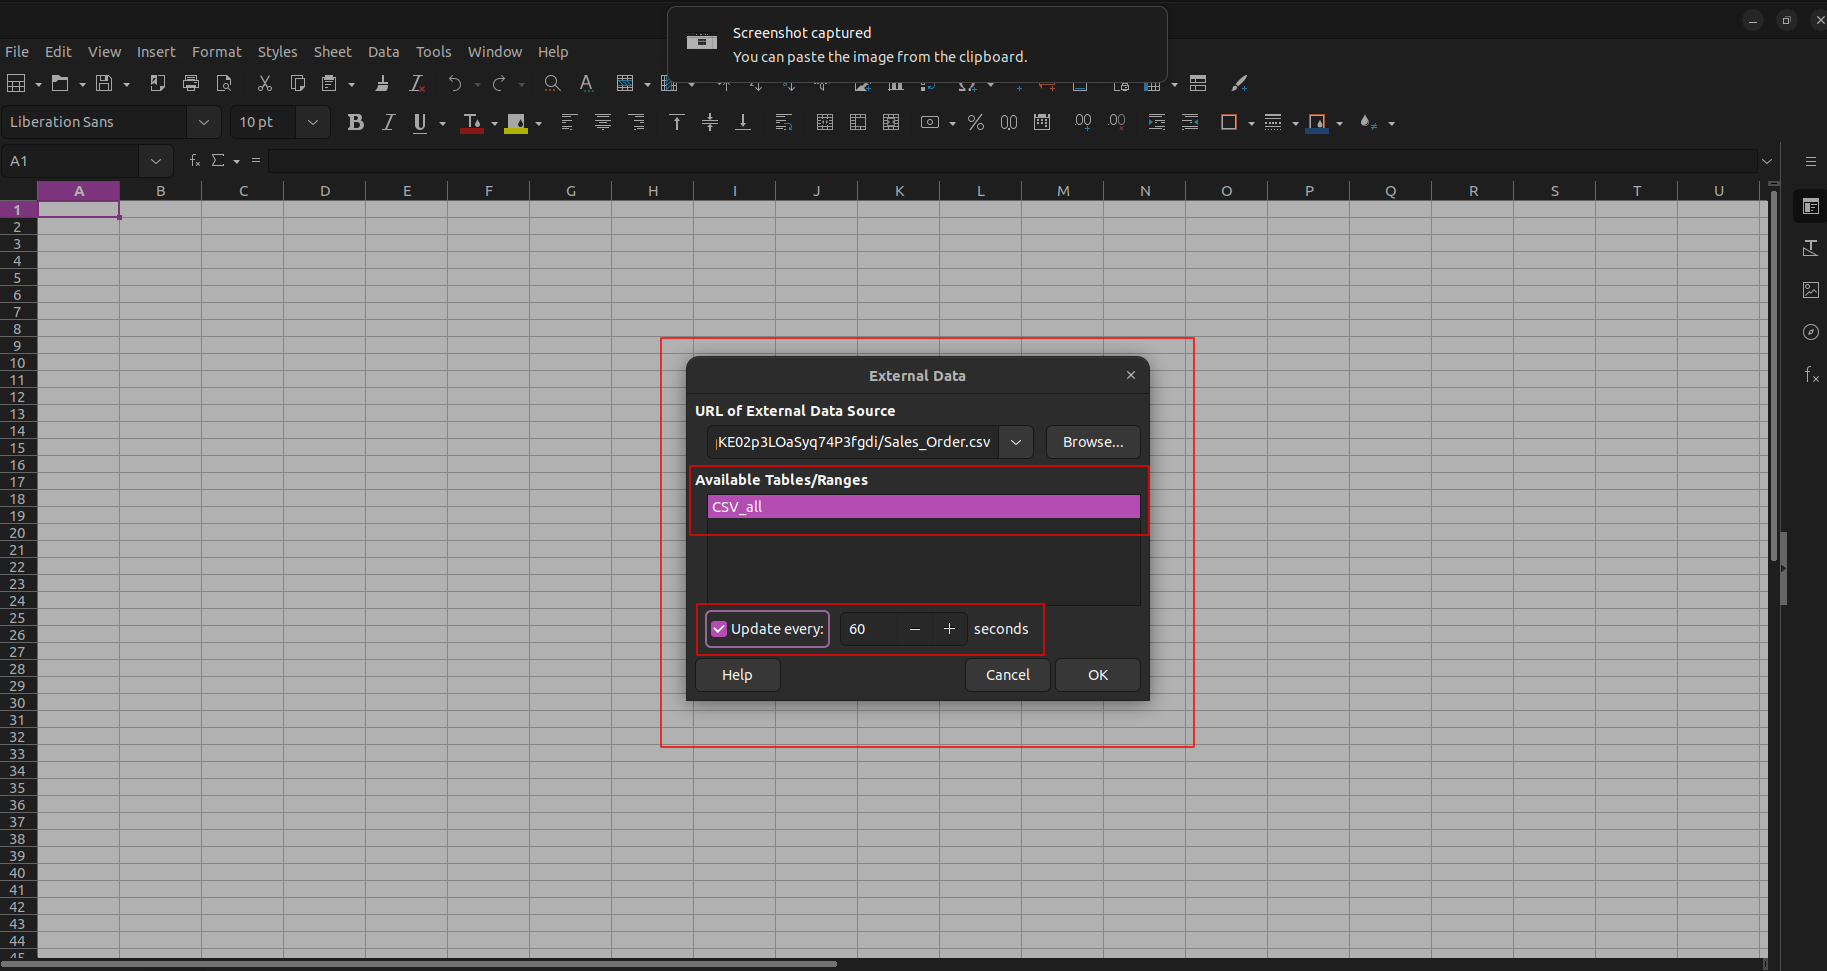
4. Then in the External Data wizard, the Tables/Ranges will show csv_all, and below it you can find "Update every". Set the interval there and click OK.
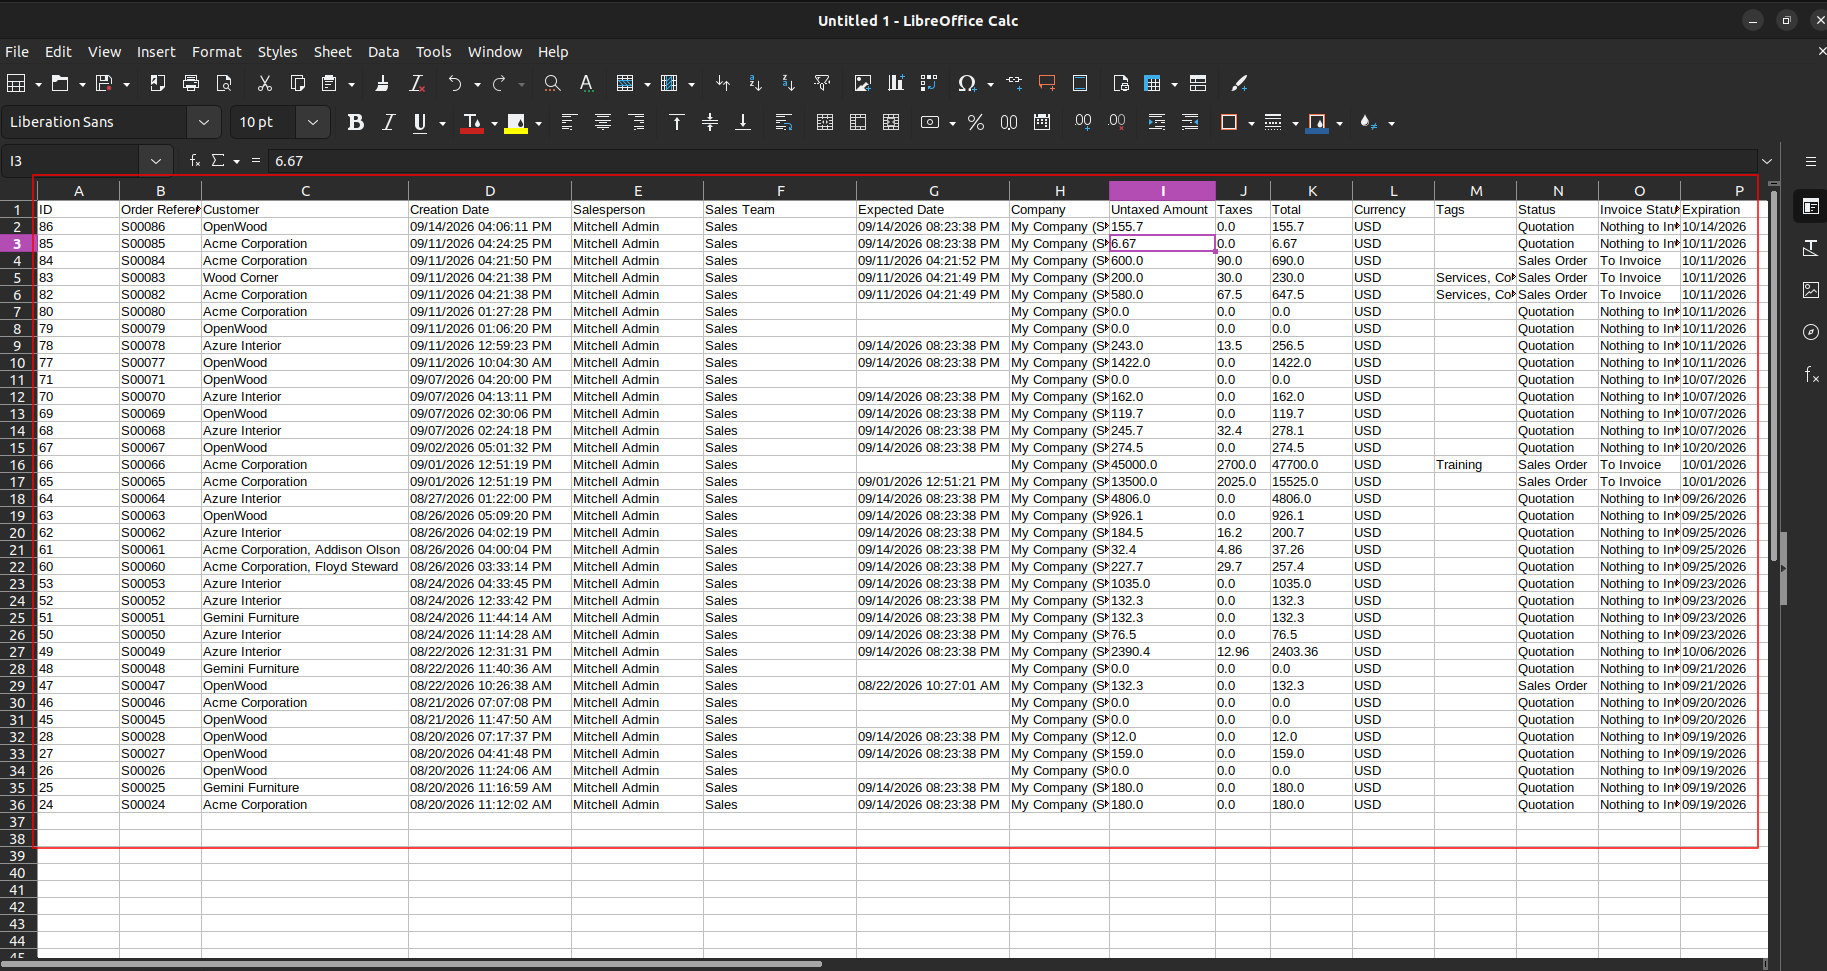
5. After confirming the import, LibreOffice inserts the connector data into the worksheet with the exported columns and records ready for reporting or further analysis.
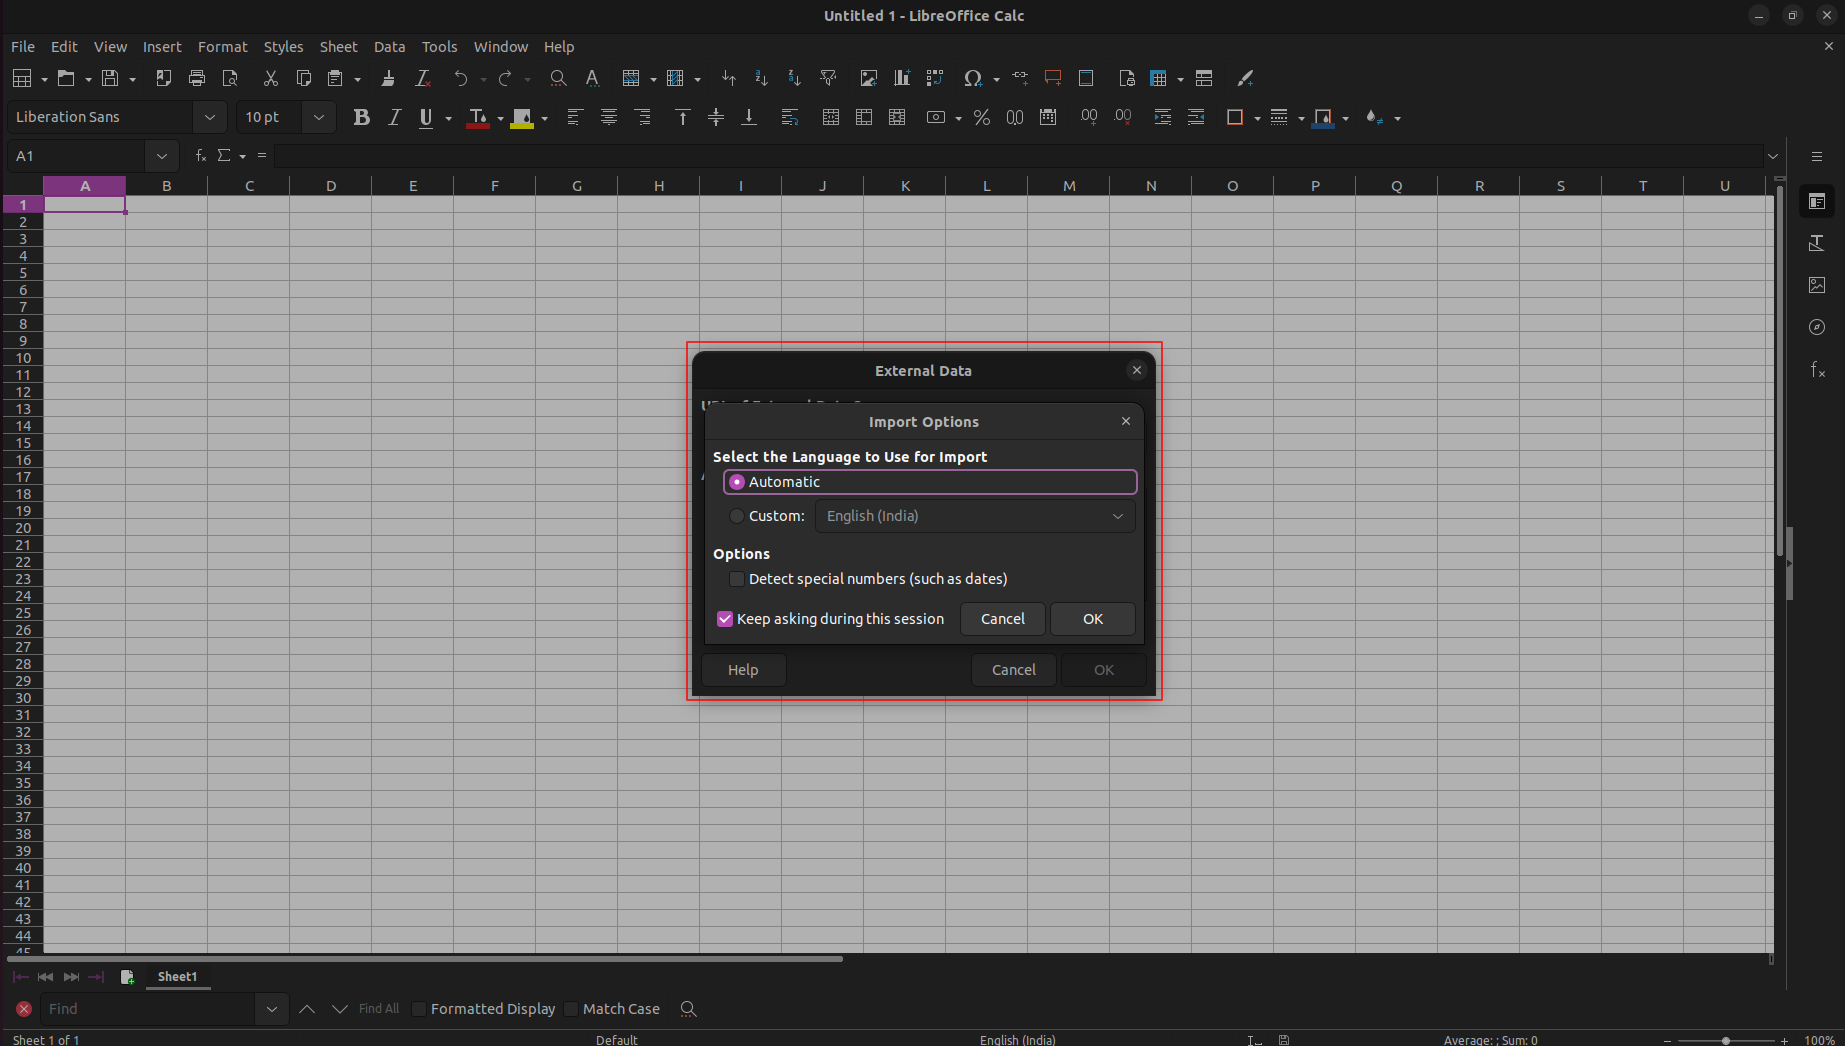
6. If you use the HTML data URL in the External Data wizard and click OK, an Import Options wizard will open. Select options based on your requirement and click OK.
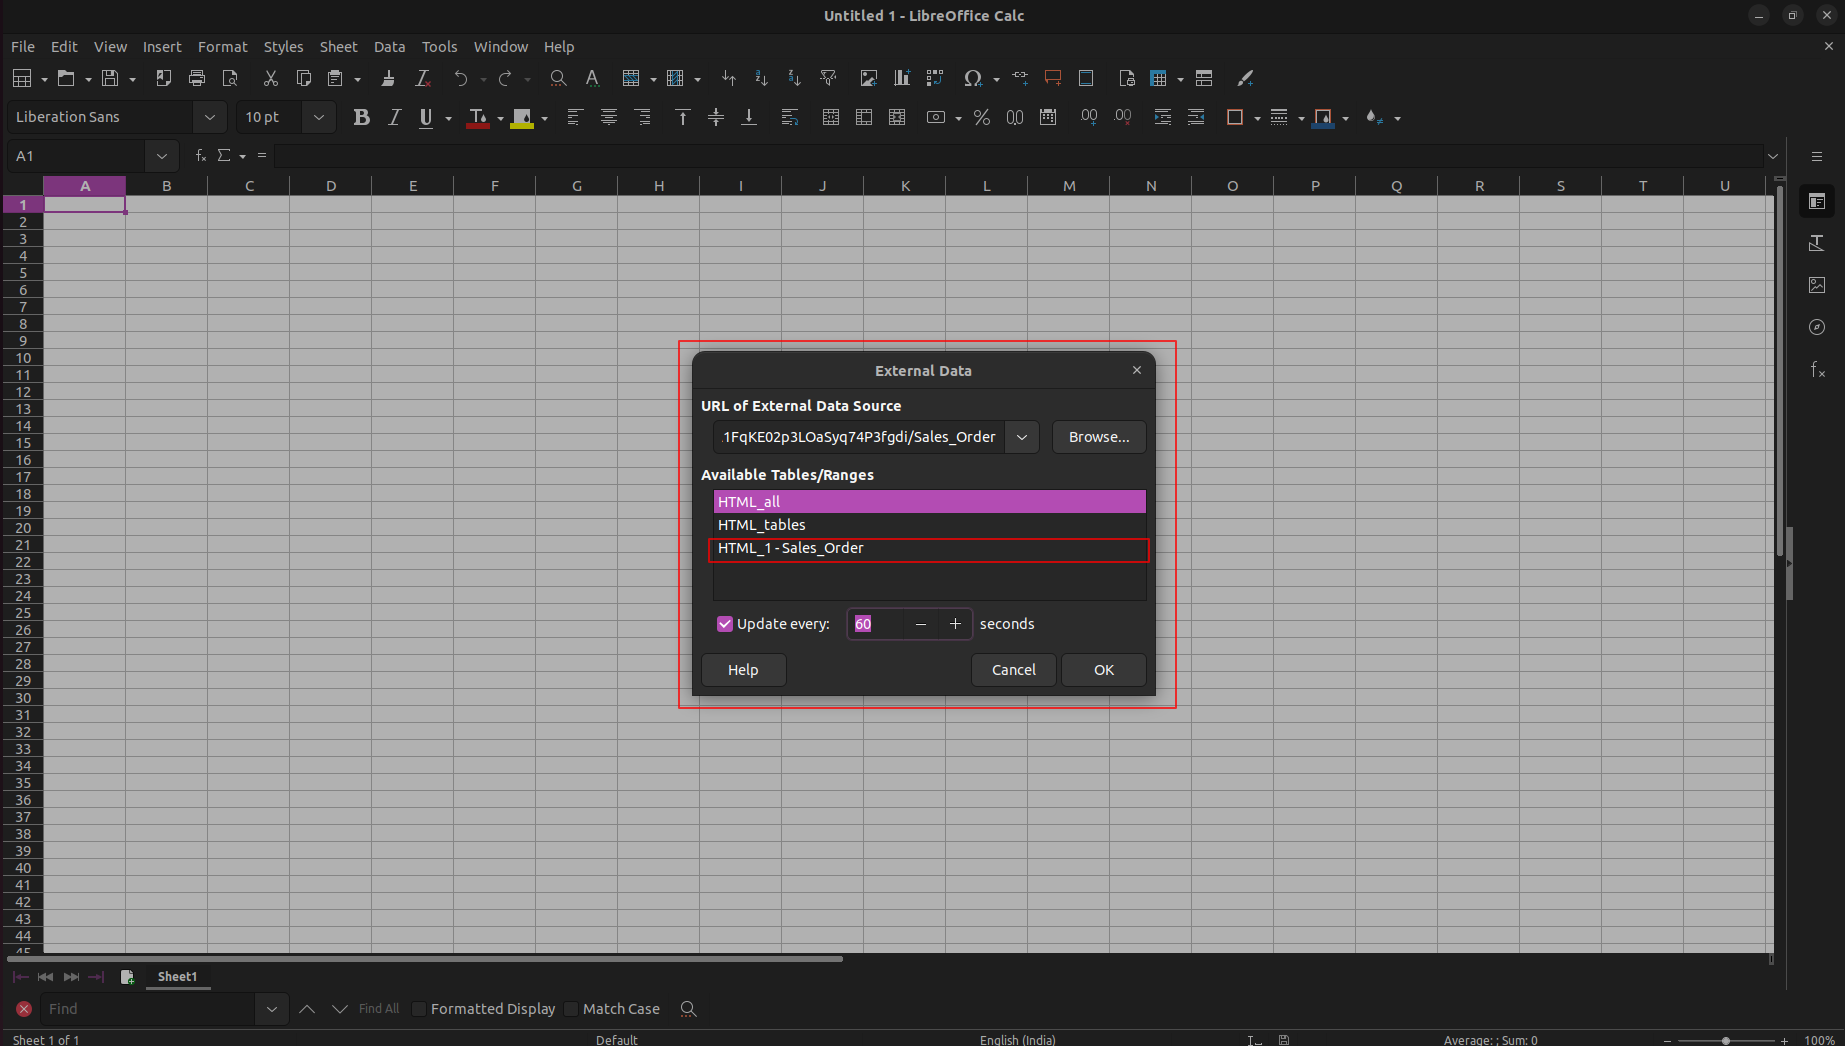
7. Then in the External Data wizard, the Tables/Ranges will show html_all, html_tables, and html_(model_name). Select either html_all or html_(model_name)—do not select html_tables—and click OK.
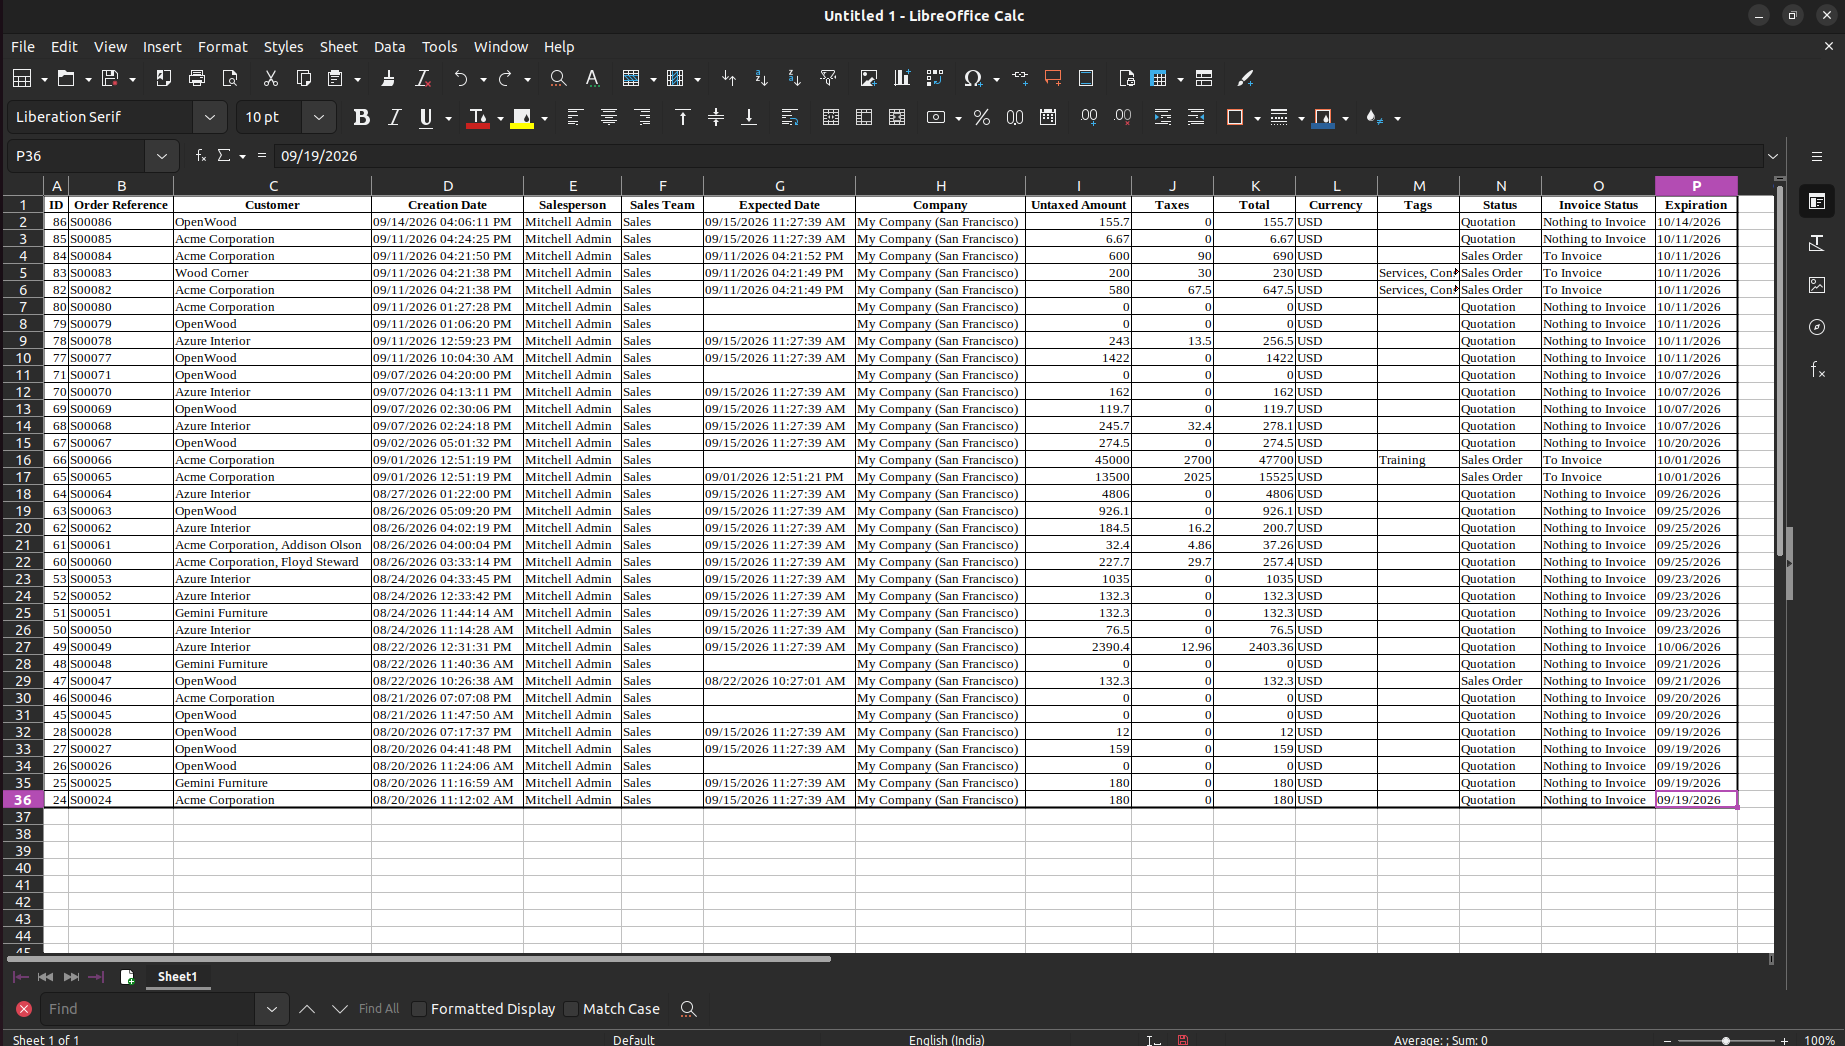
8. After confirming the import, LibreOffice inserts the connector data into the worksheet with the exported columns and records in table format ready for reporting or further analysis.
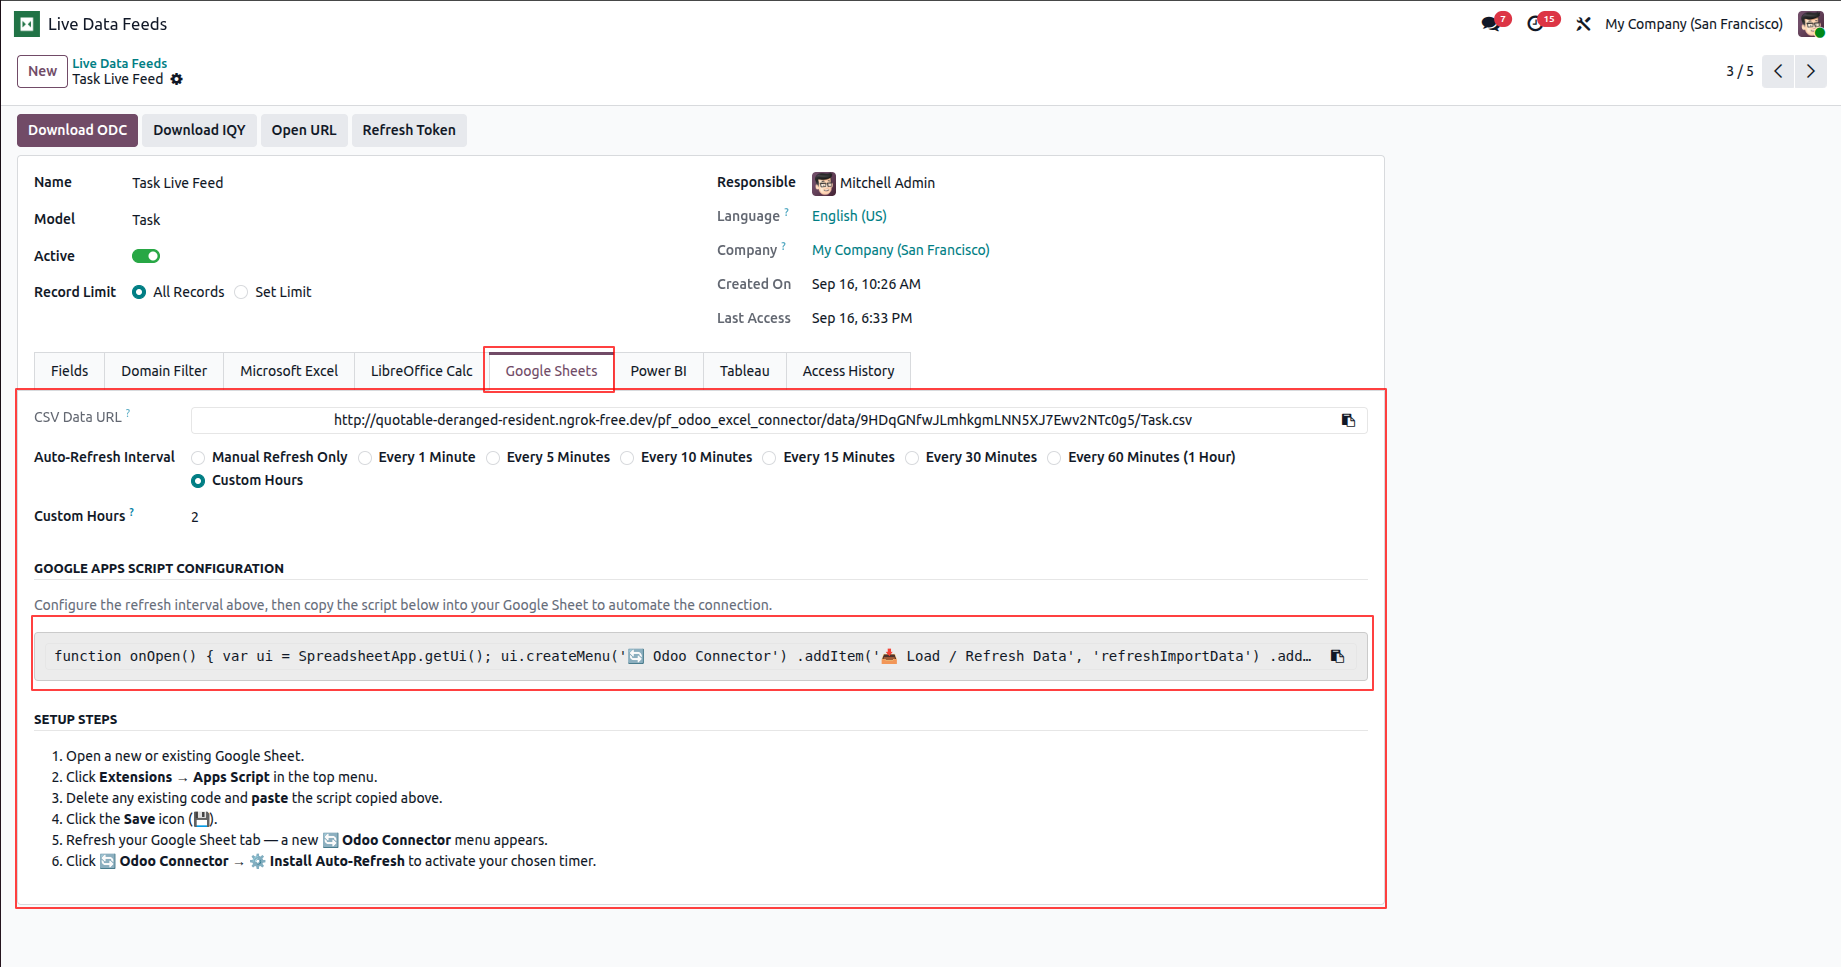
1. Go to the Google Sheets tab, where you will find the CSV Data URL, Google Apps Script Configuration, and Setup Steps. Follow the provided instructions to connect your data to Google Sheets, then copy the Google Apps Script Configuration.
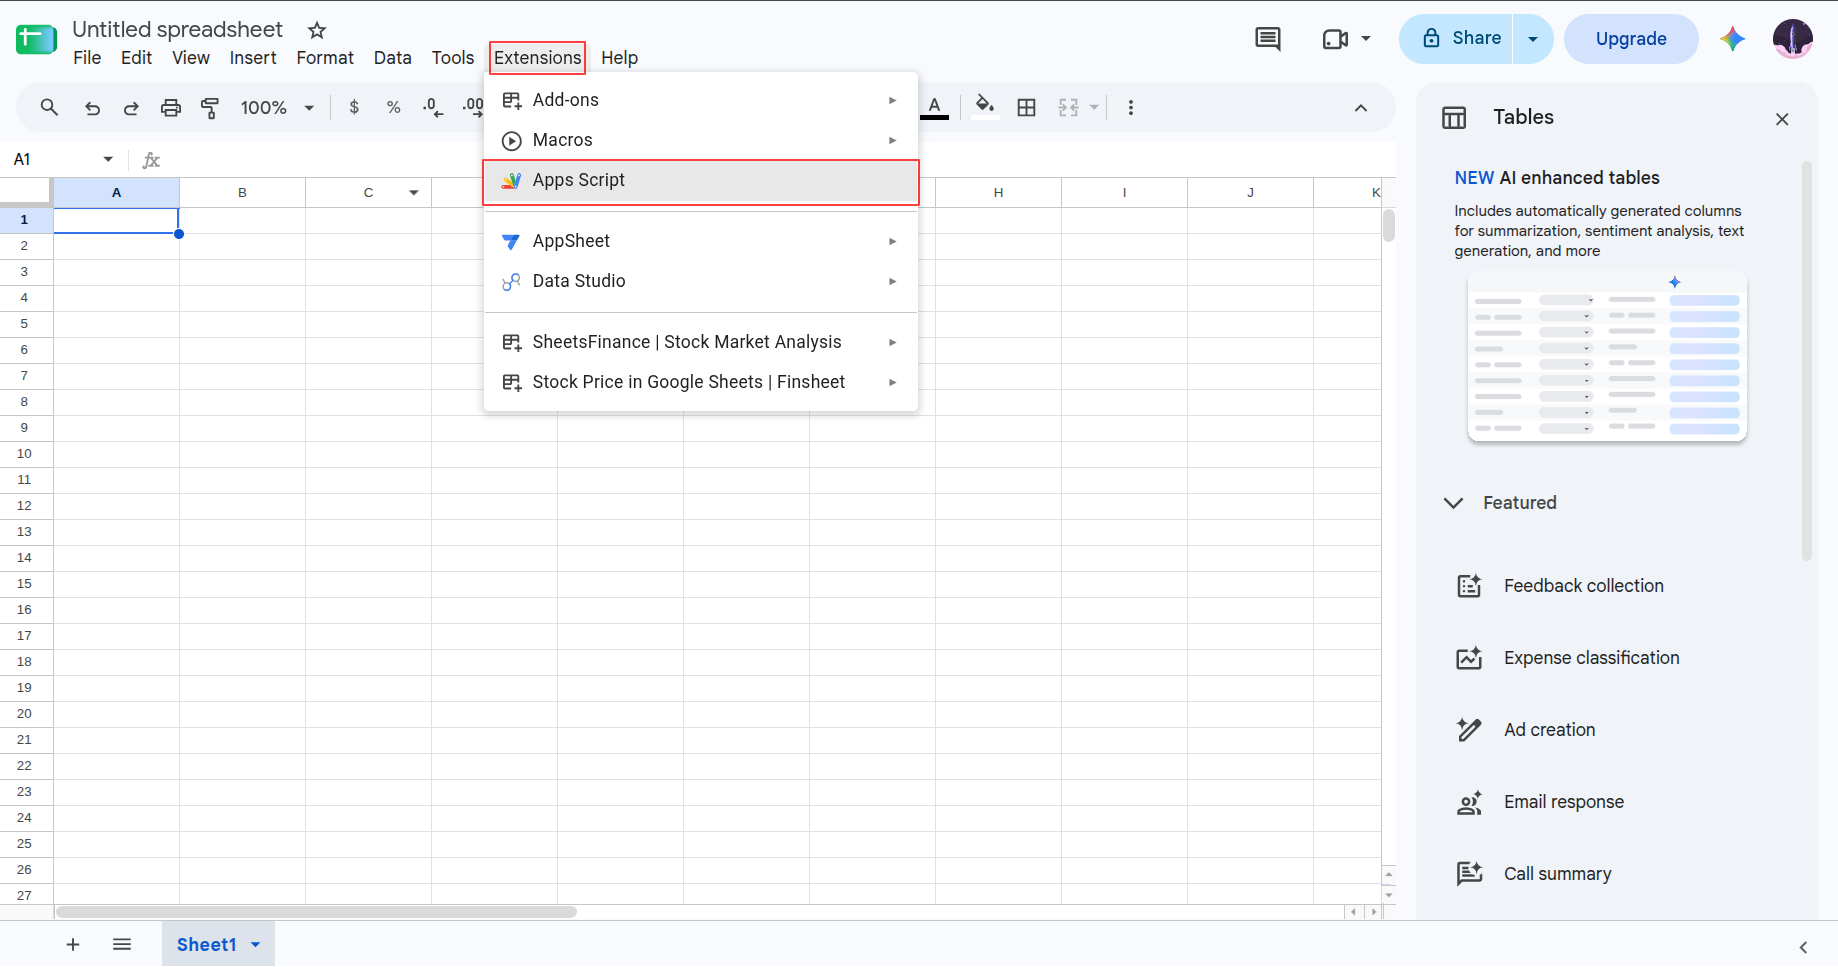
2. Go to a new Google Sheet -> Extensions -> Apps Script.
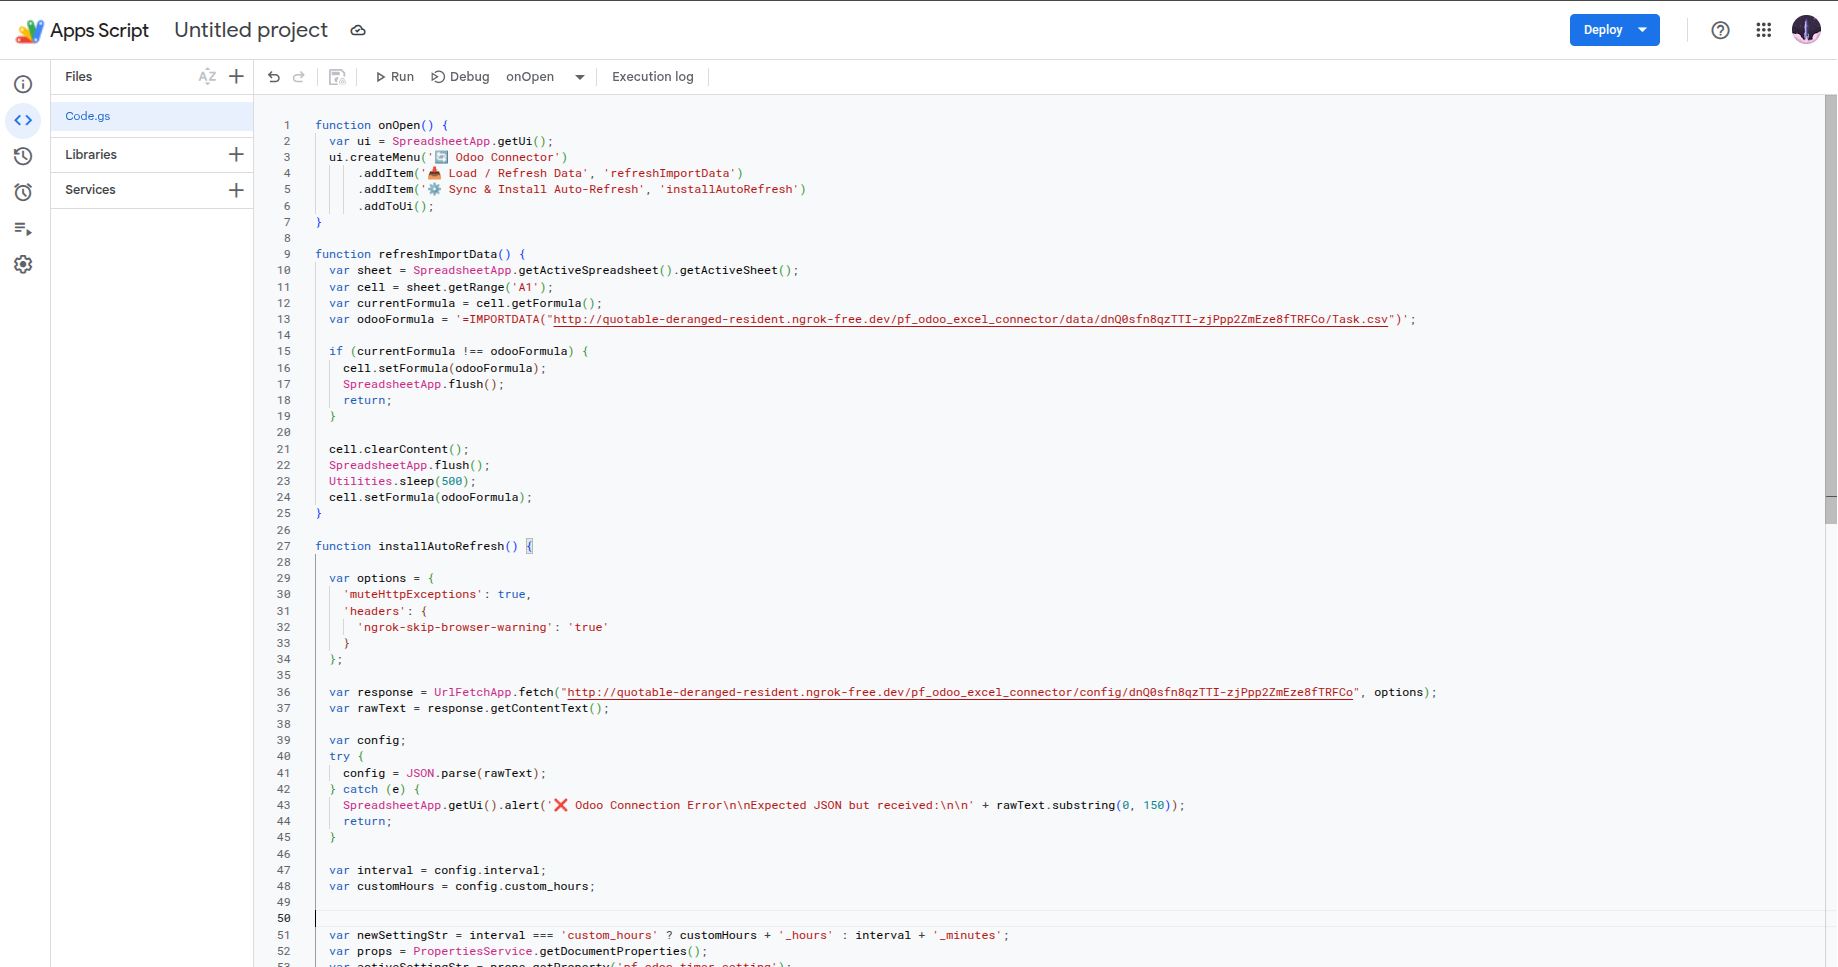
3. Remove the existing script, paste our script, and save.
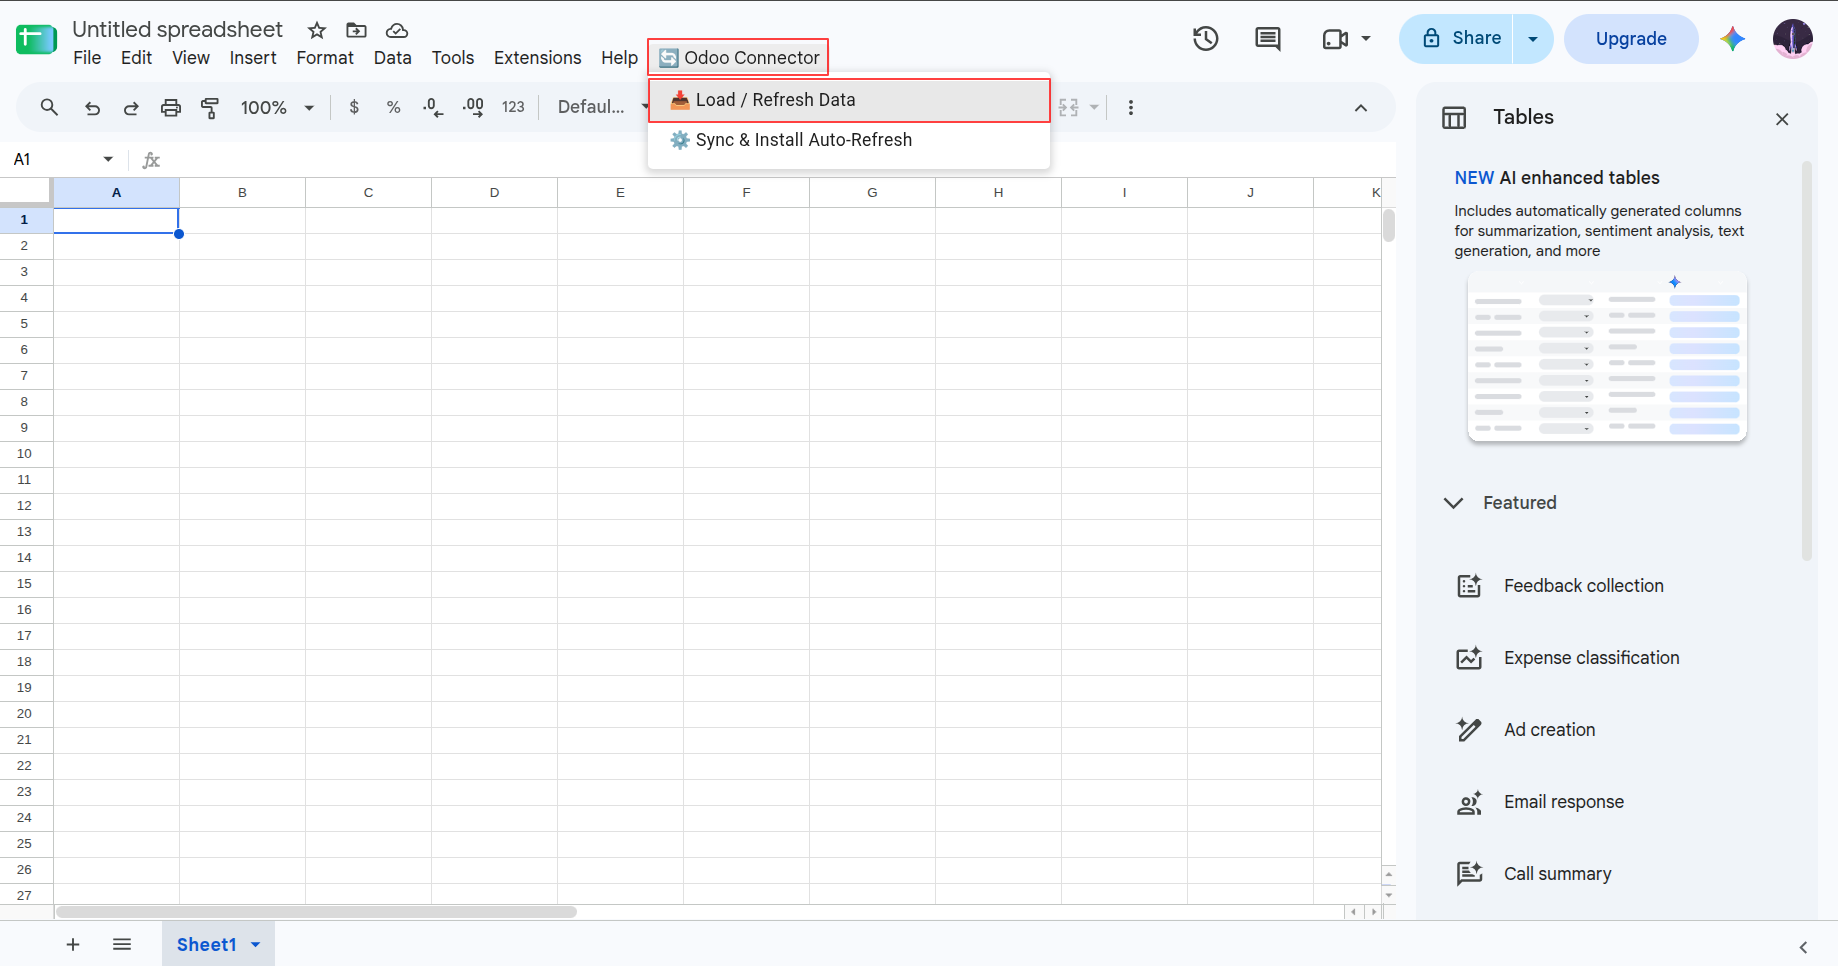
4. Refresh the Google Sheet. You will see an Odoo Connector menu where you can find two sub-menus: '📥 Load / Refresh Data' and '⚙️ Sync & Install Auto-Refresh'. Click on '📥 Load / Refresh Data'.
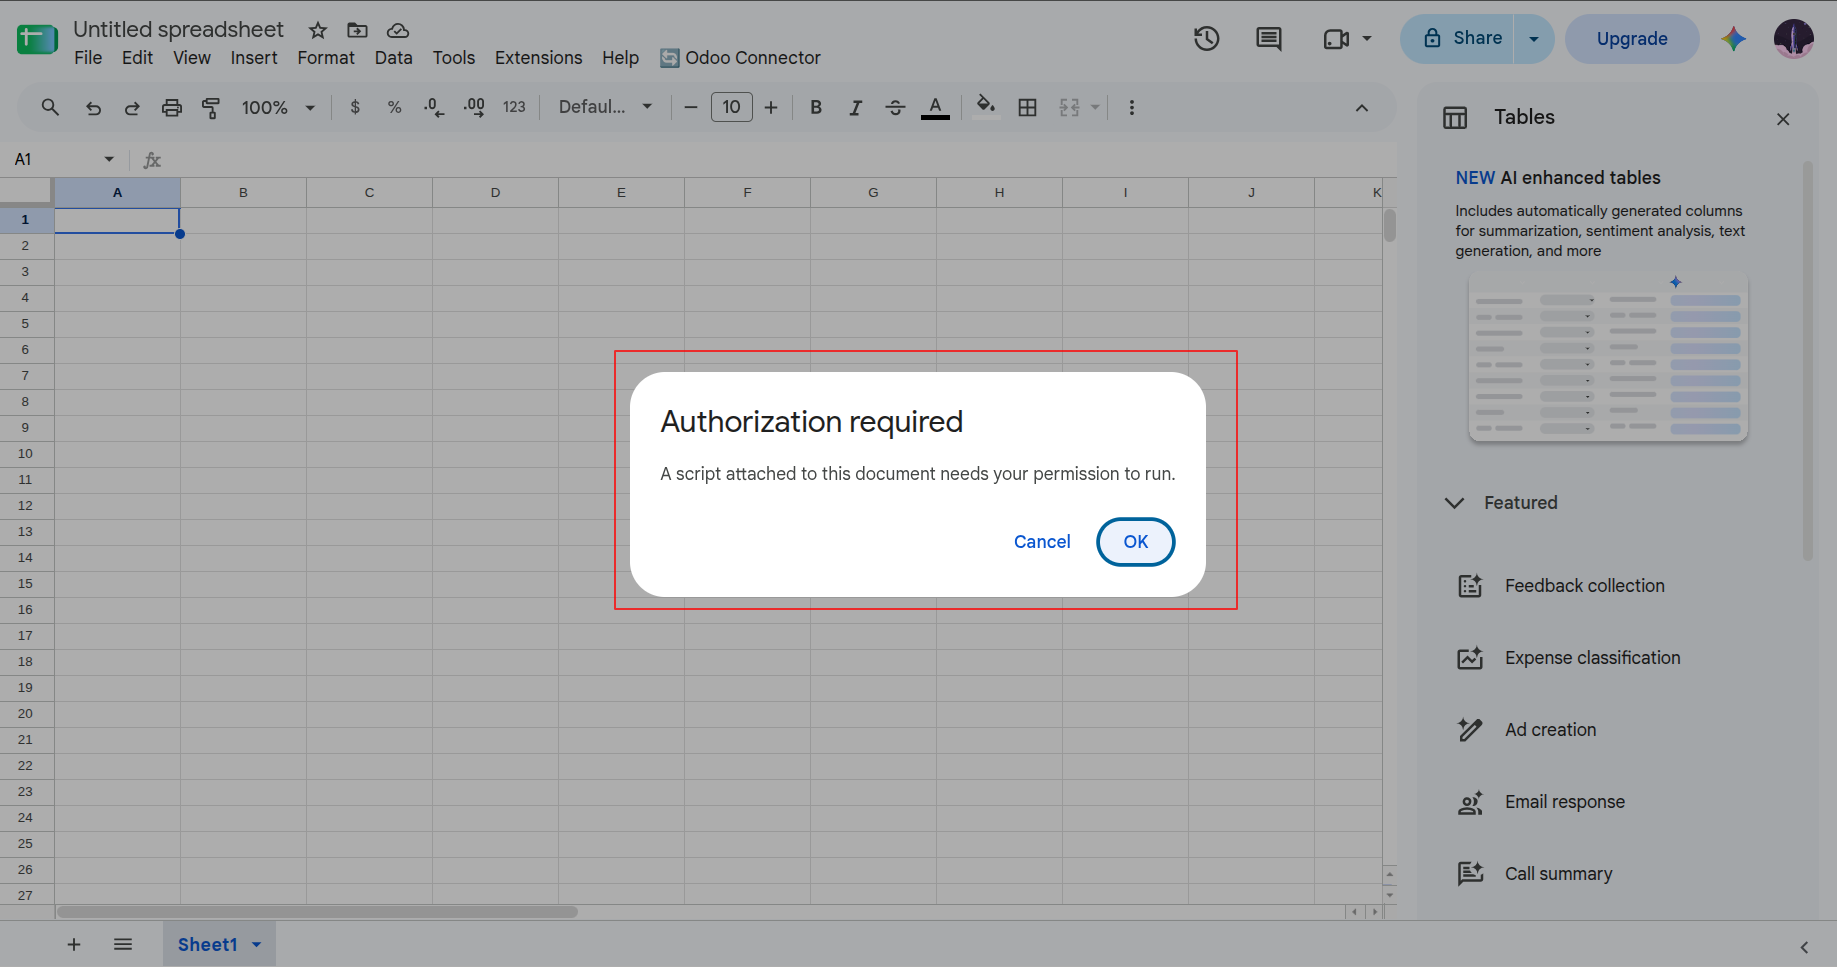
5. It will ask for permission, just click OK (Don't worry, it's fully safe and secure).
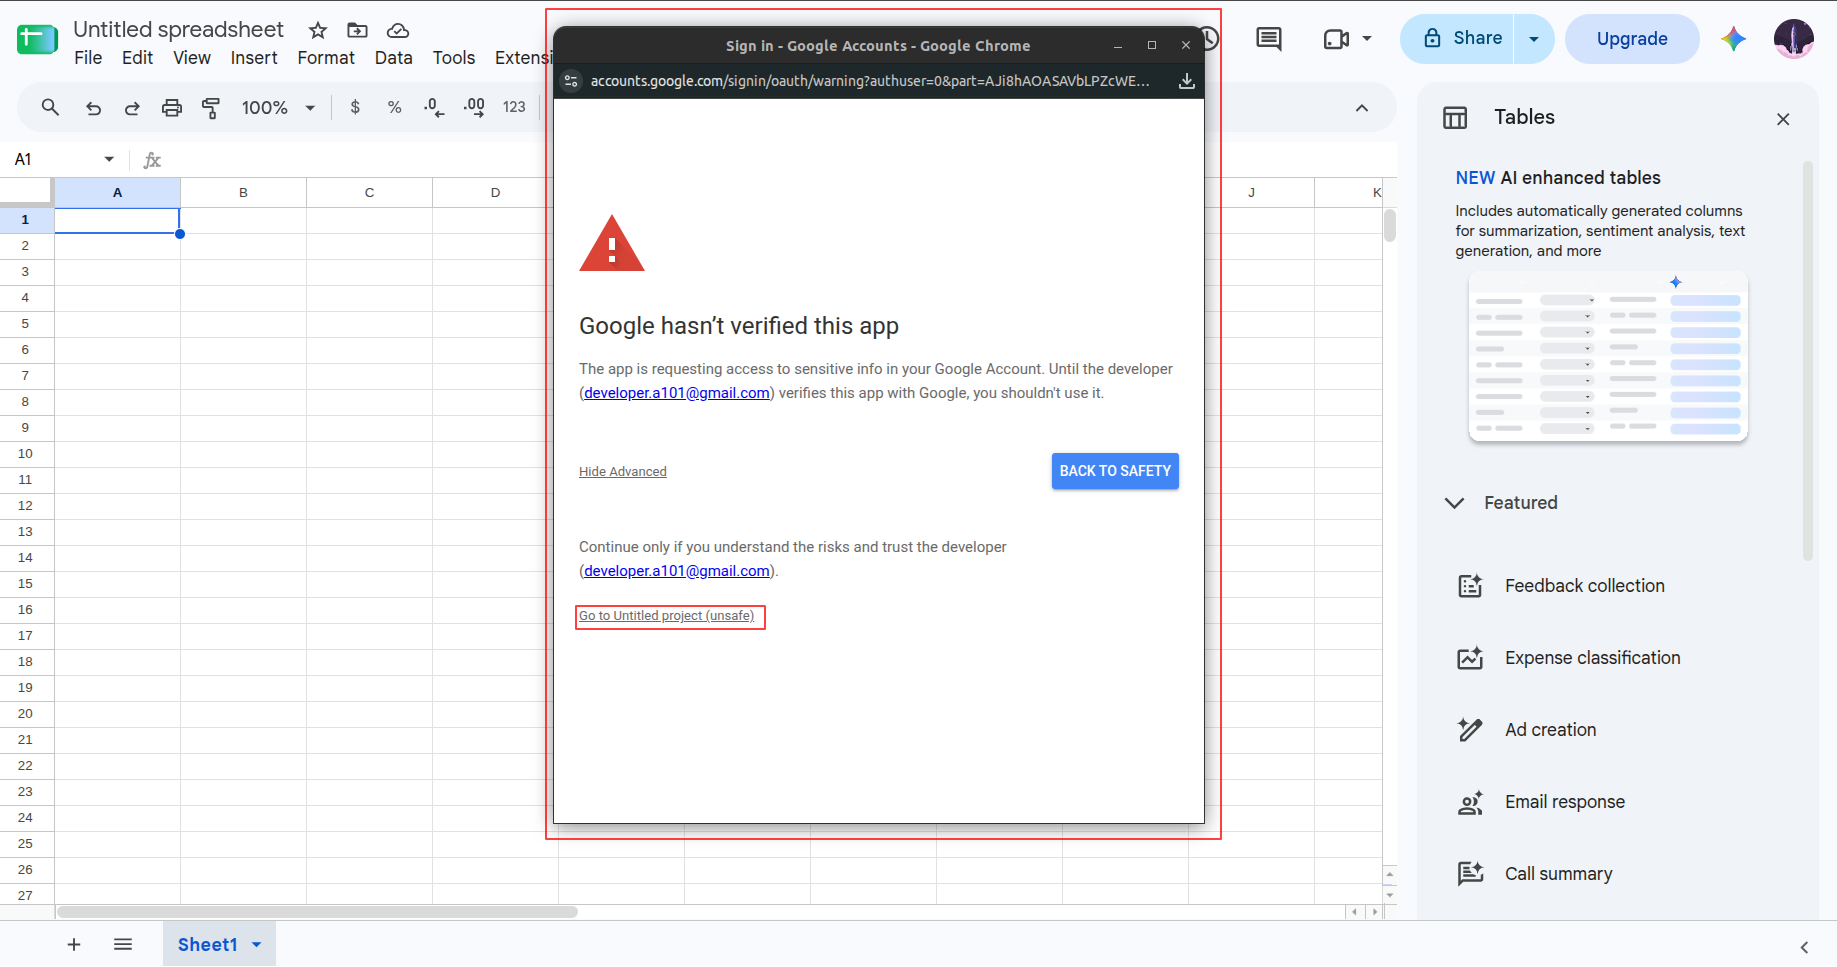
6. It will open another wizard. Go to Advanced → Go to Untitled project (your Google Sheet name).
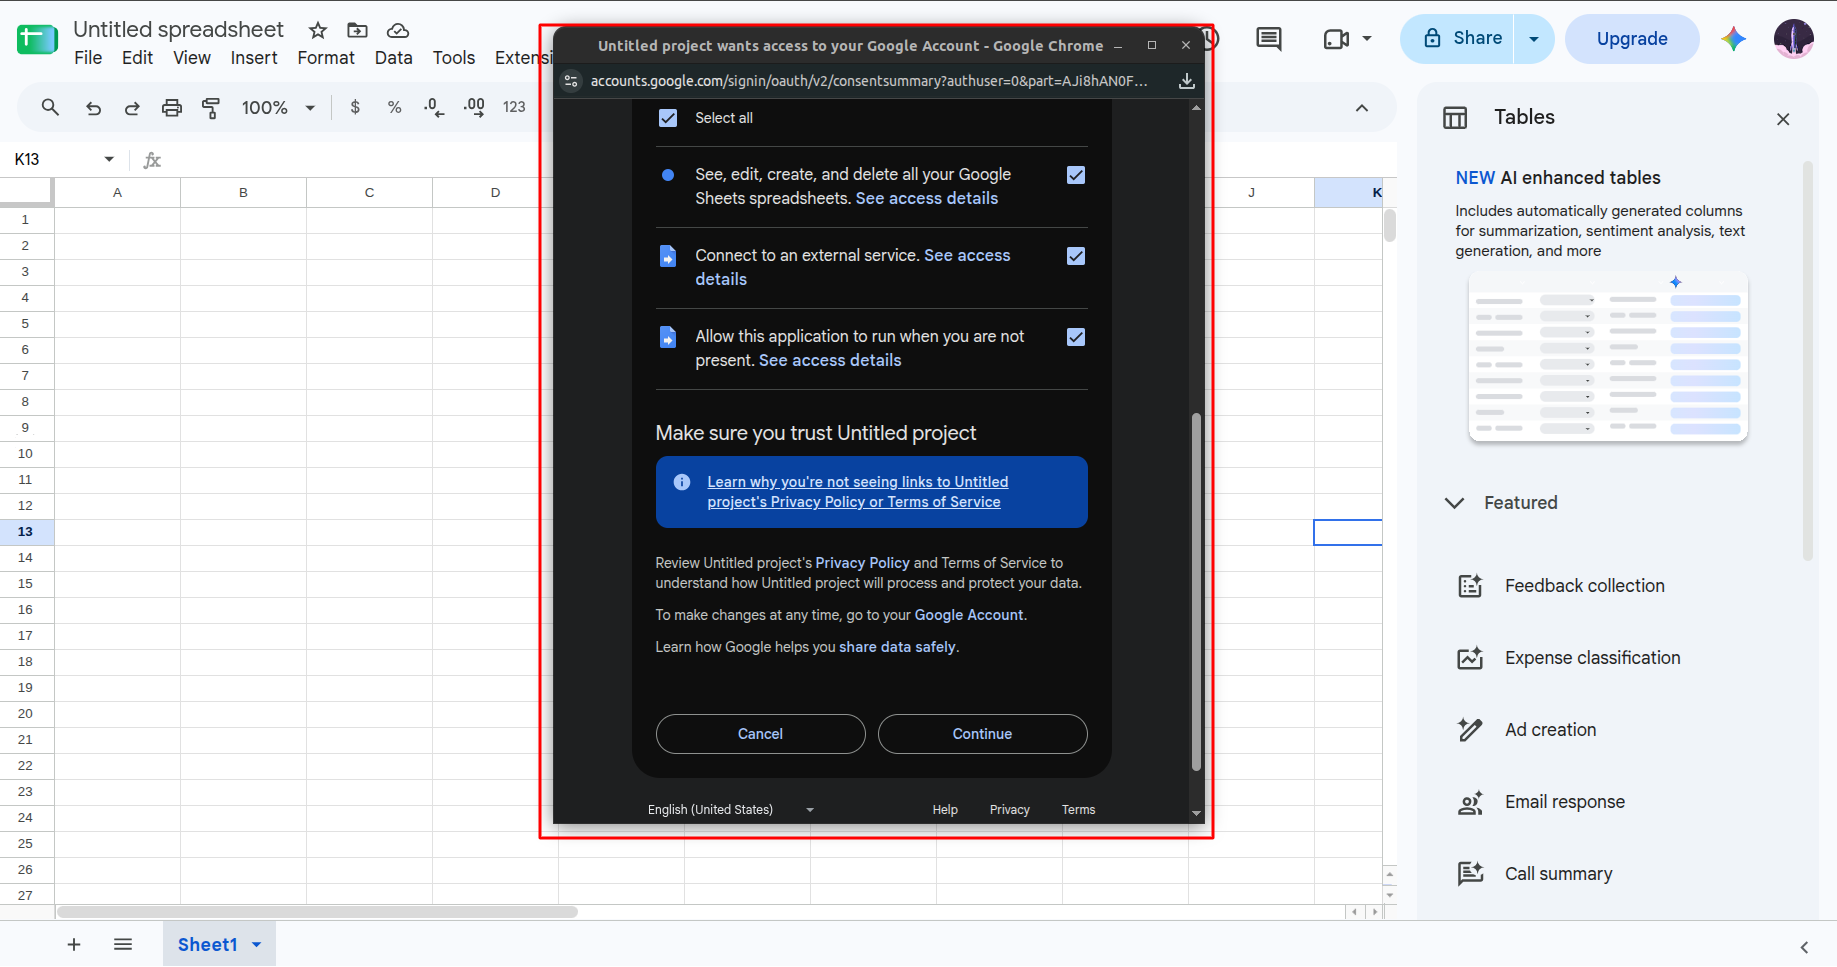
7. Select all permissions and click Continue.
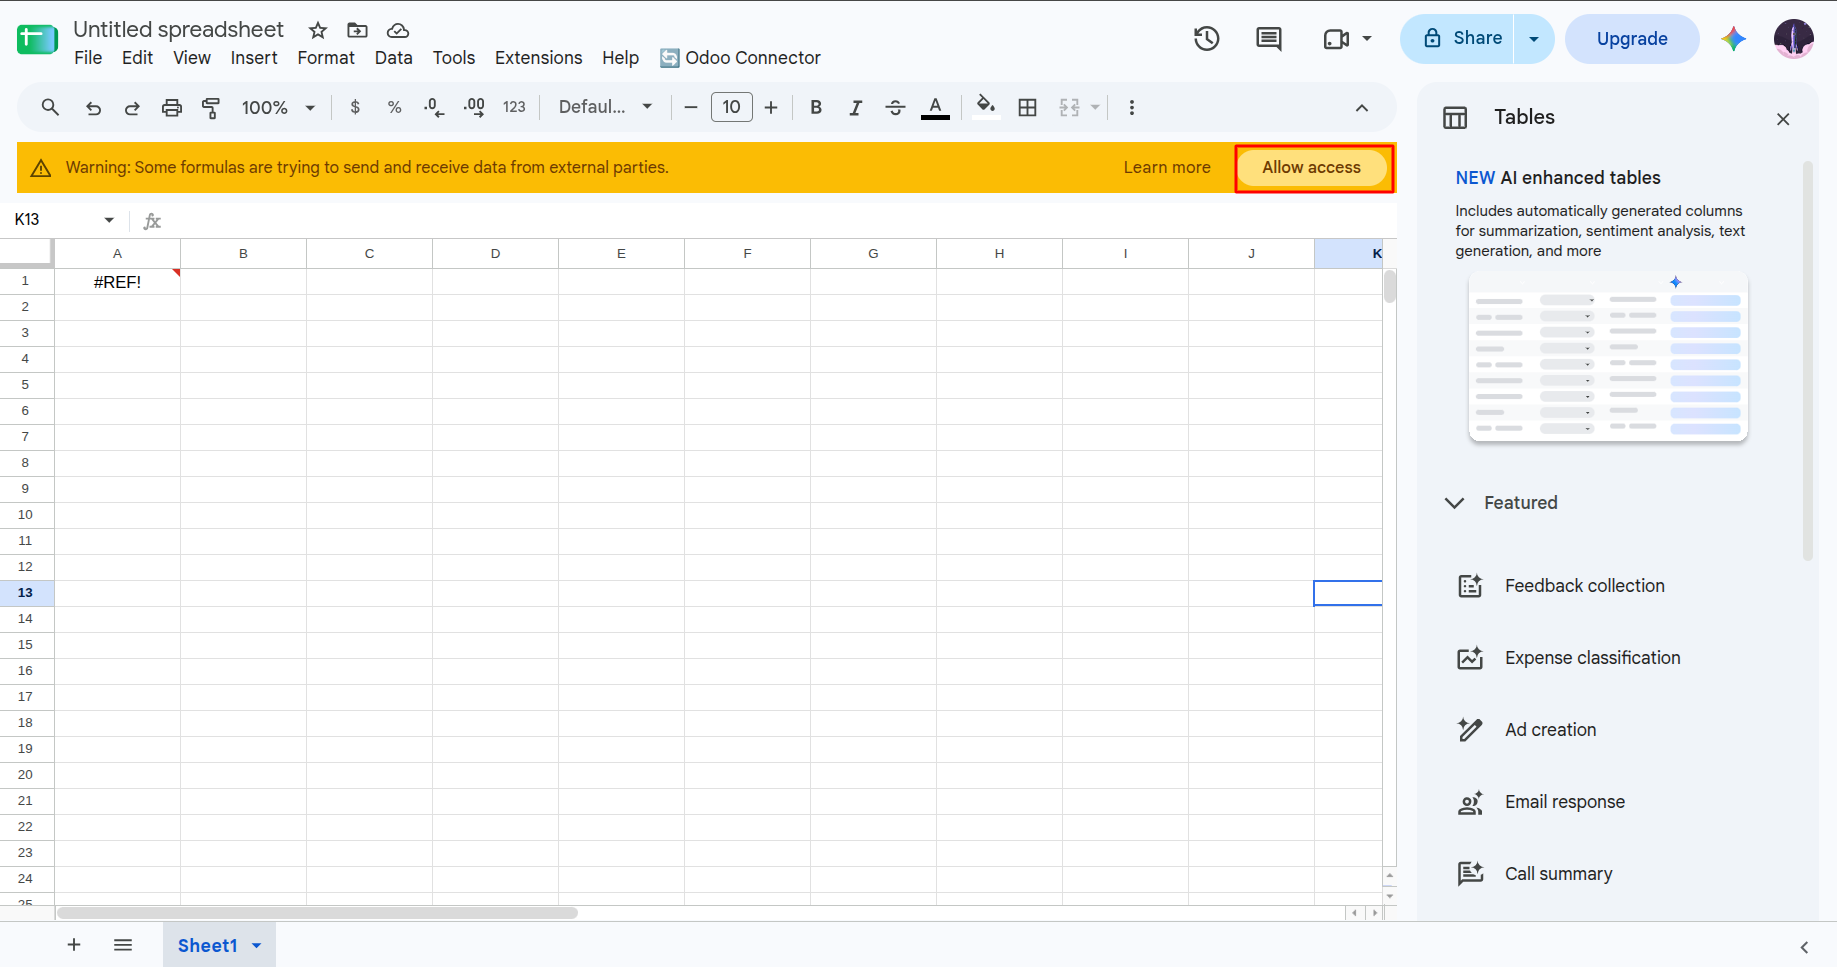
8. Google Sheets detects that the sheet is trying to fetch data from an external source and prompts for permission.
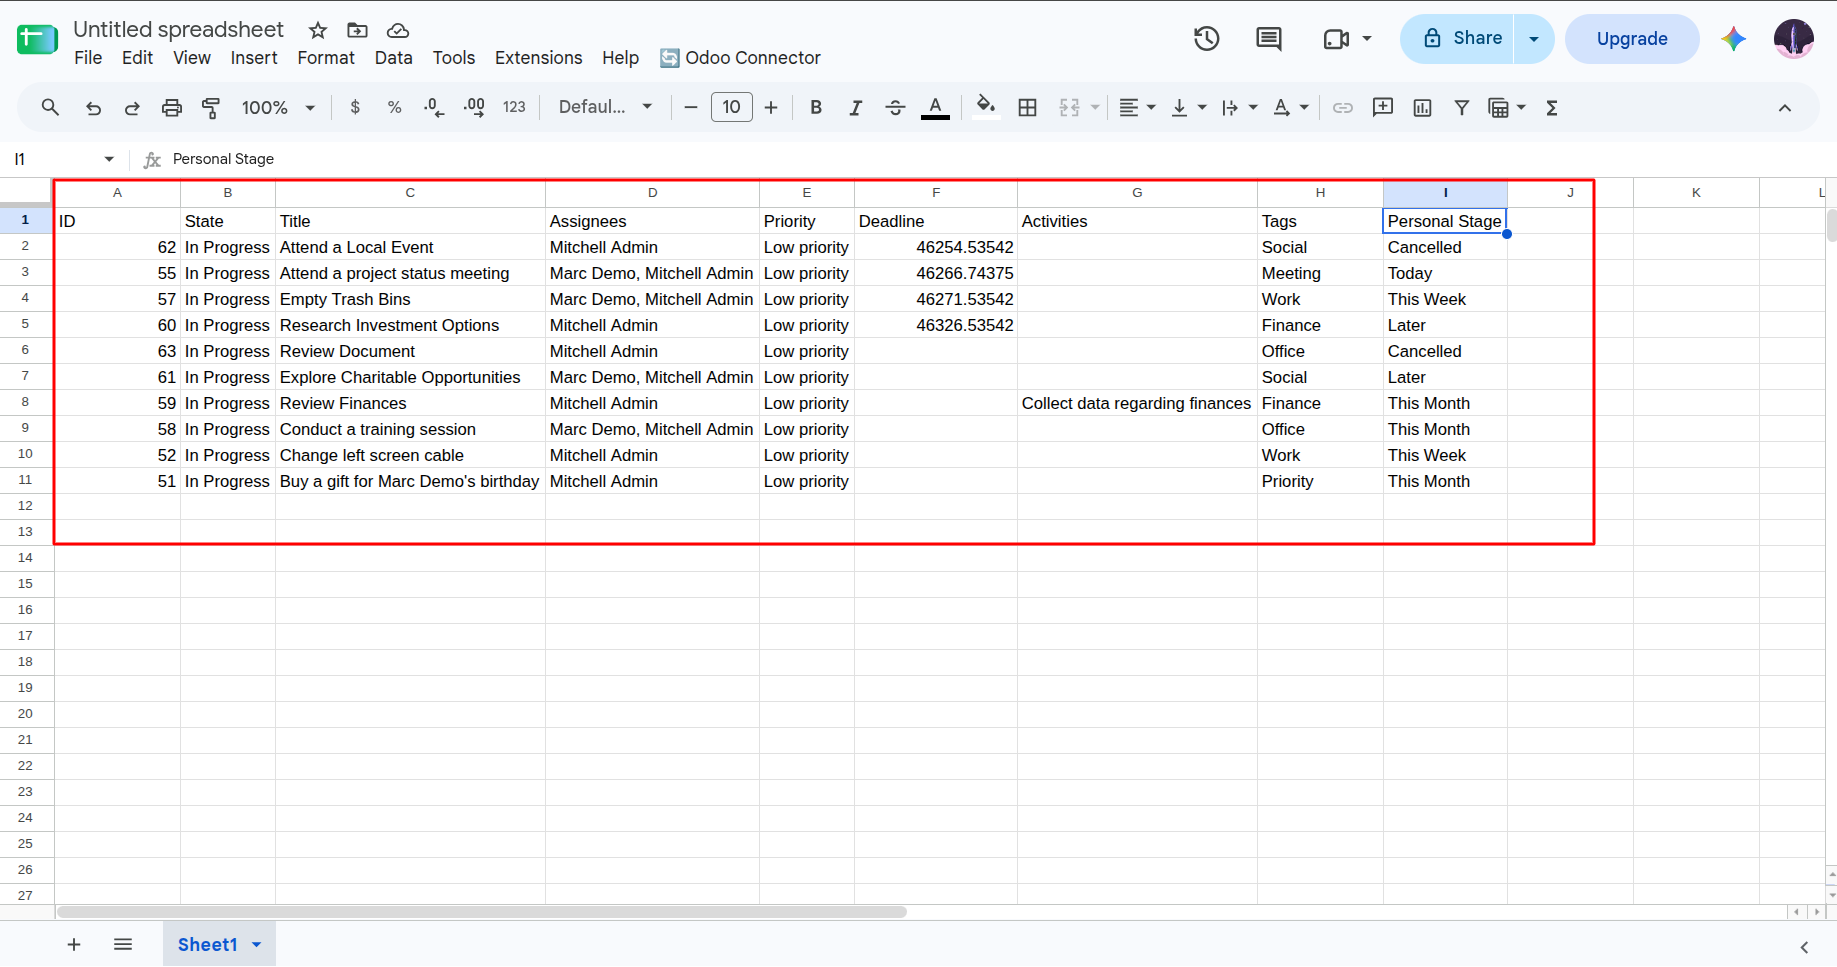
9. After approving access, Google Sheets fetches the exported columns and rows from Odoo.
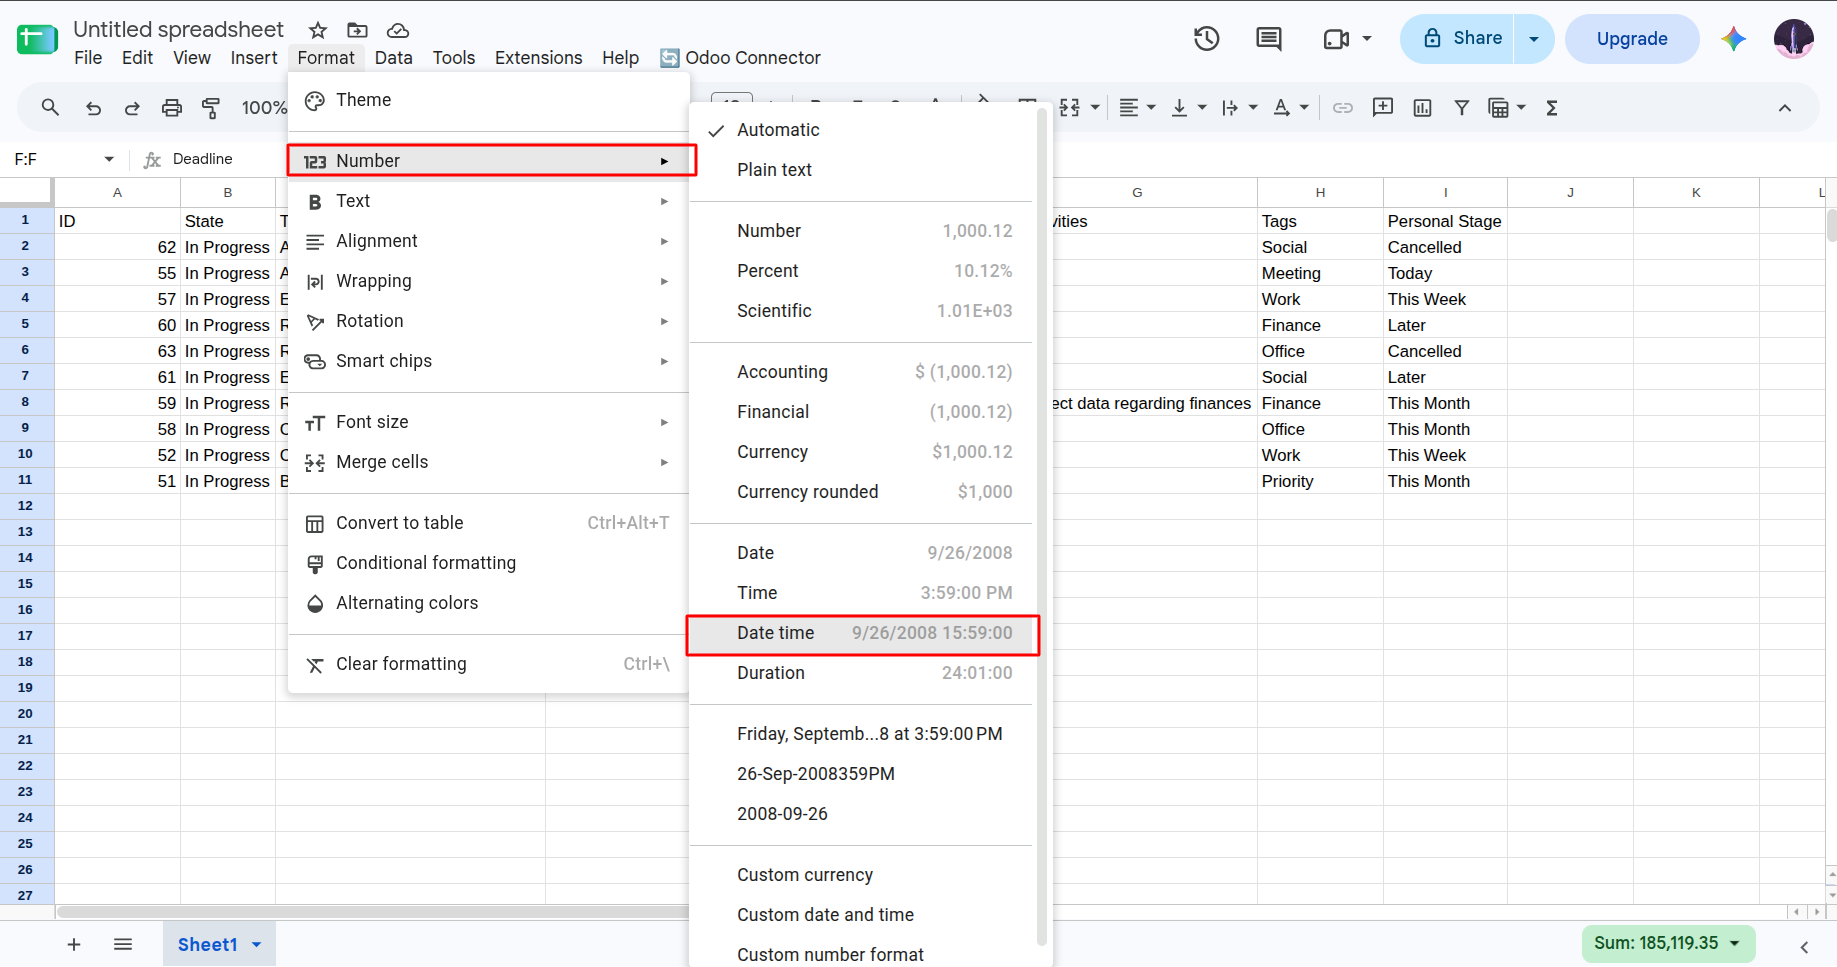
10. Do some formatting as needed. For example, because the CSV data date is in a raw number format, change it to a datetime format.
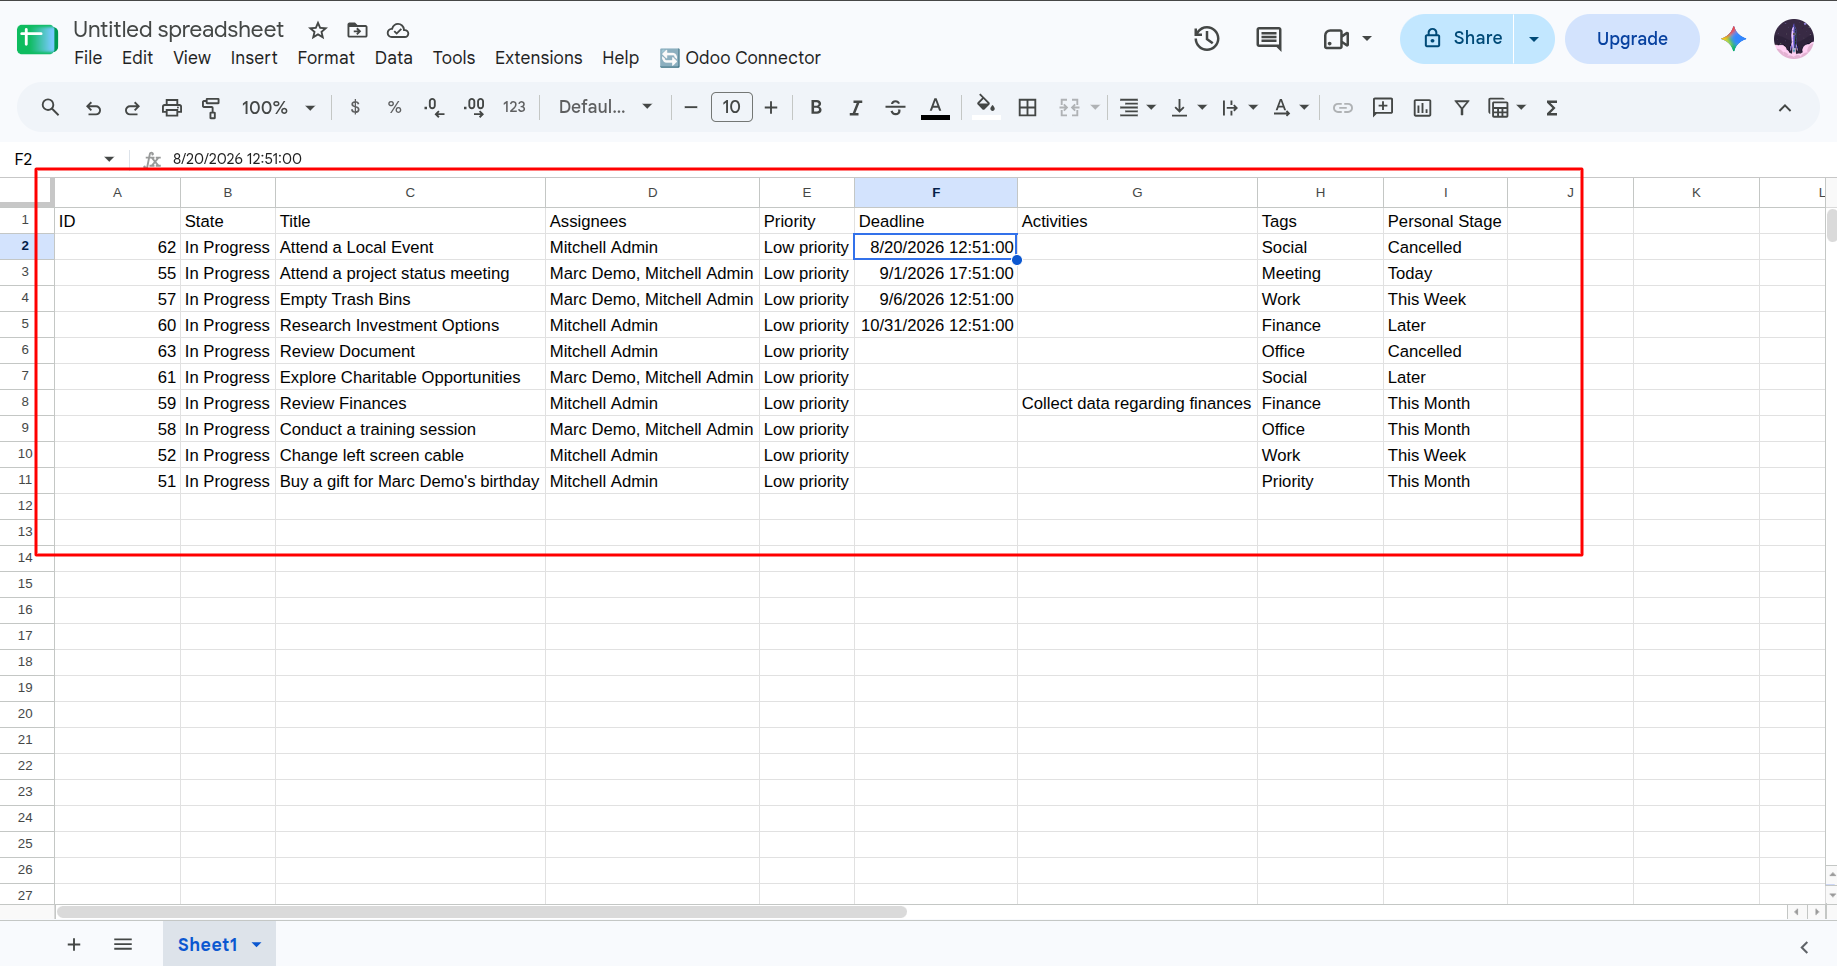
11. Now you can place them directly into the sheet for live spreadsheet reporting.
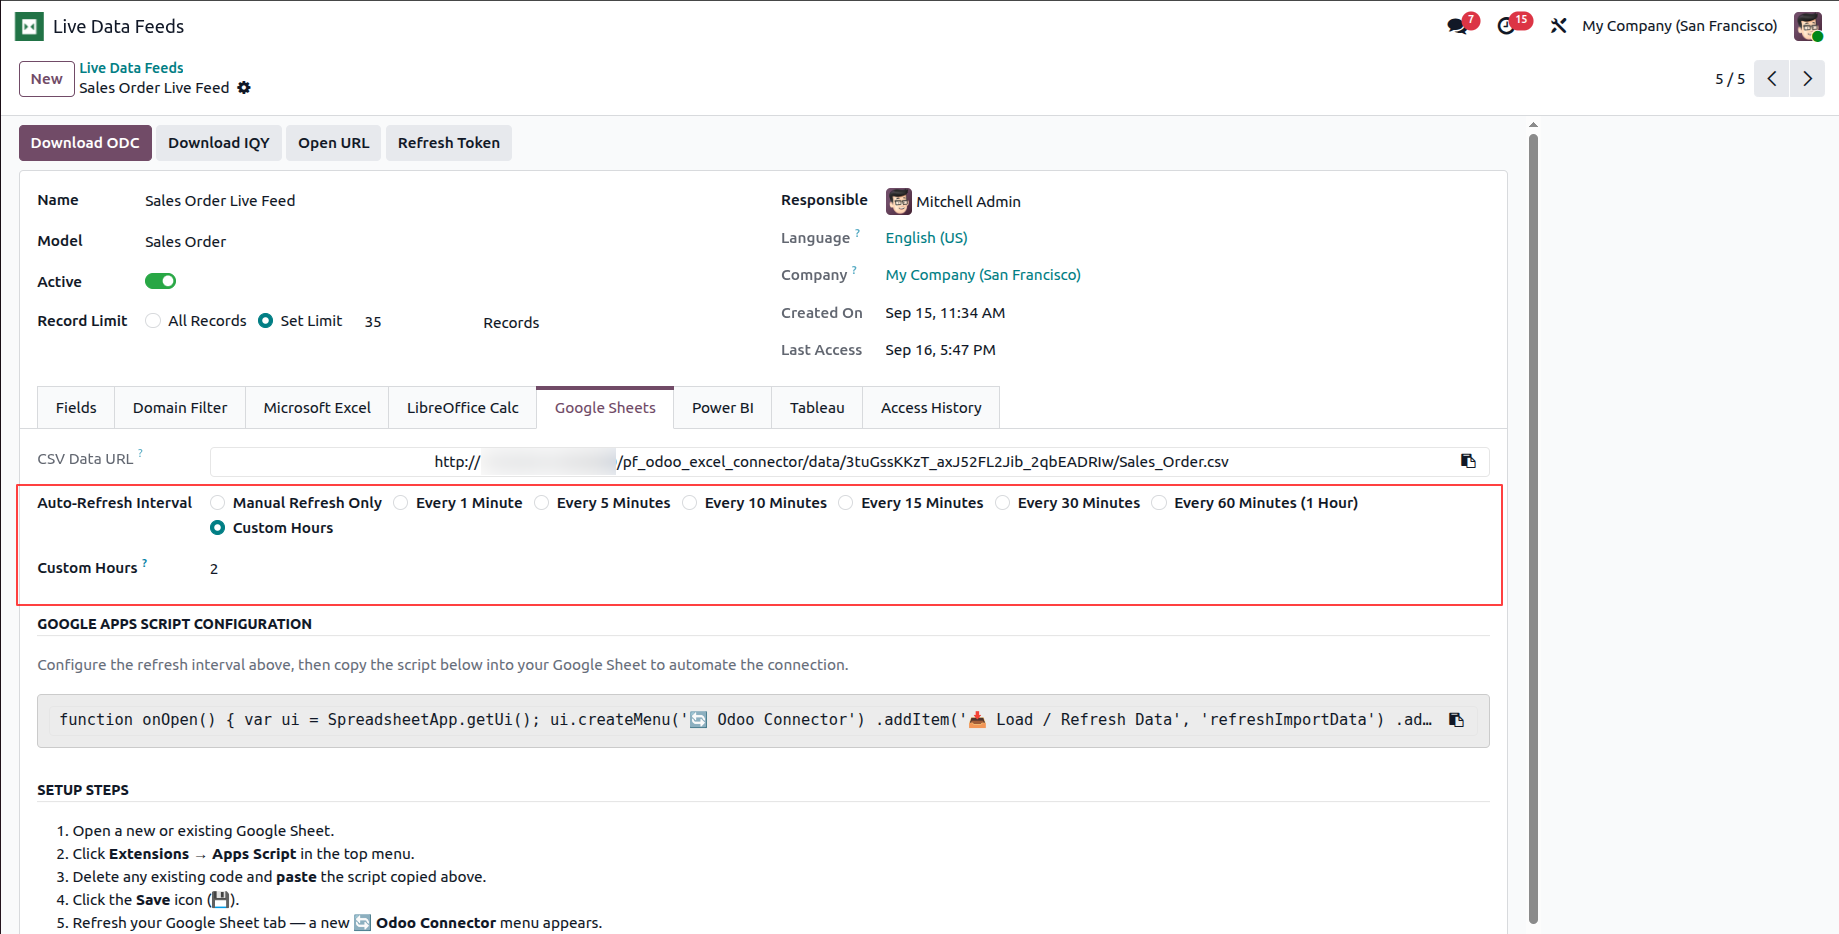
12. To set an automatic refresh interval, select the desired Auto-Refresh Interval in the Live Data Feed and save the configuration.
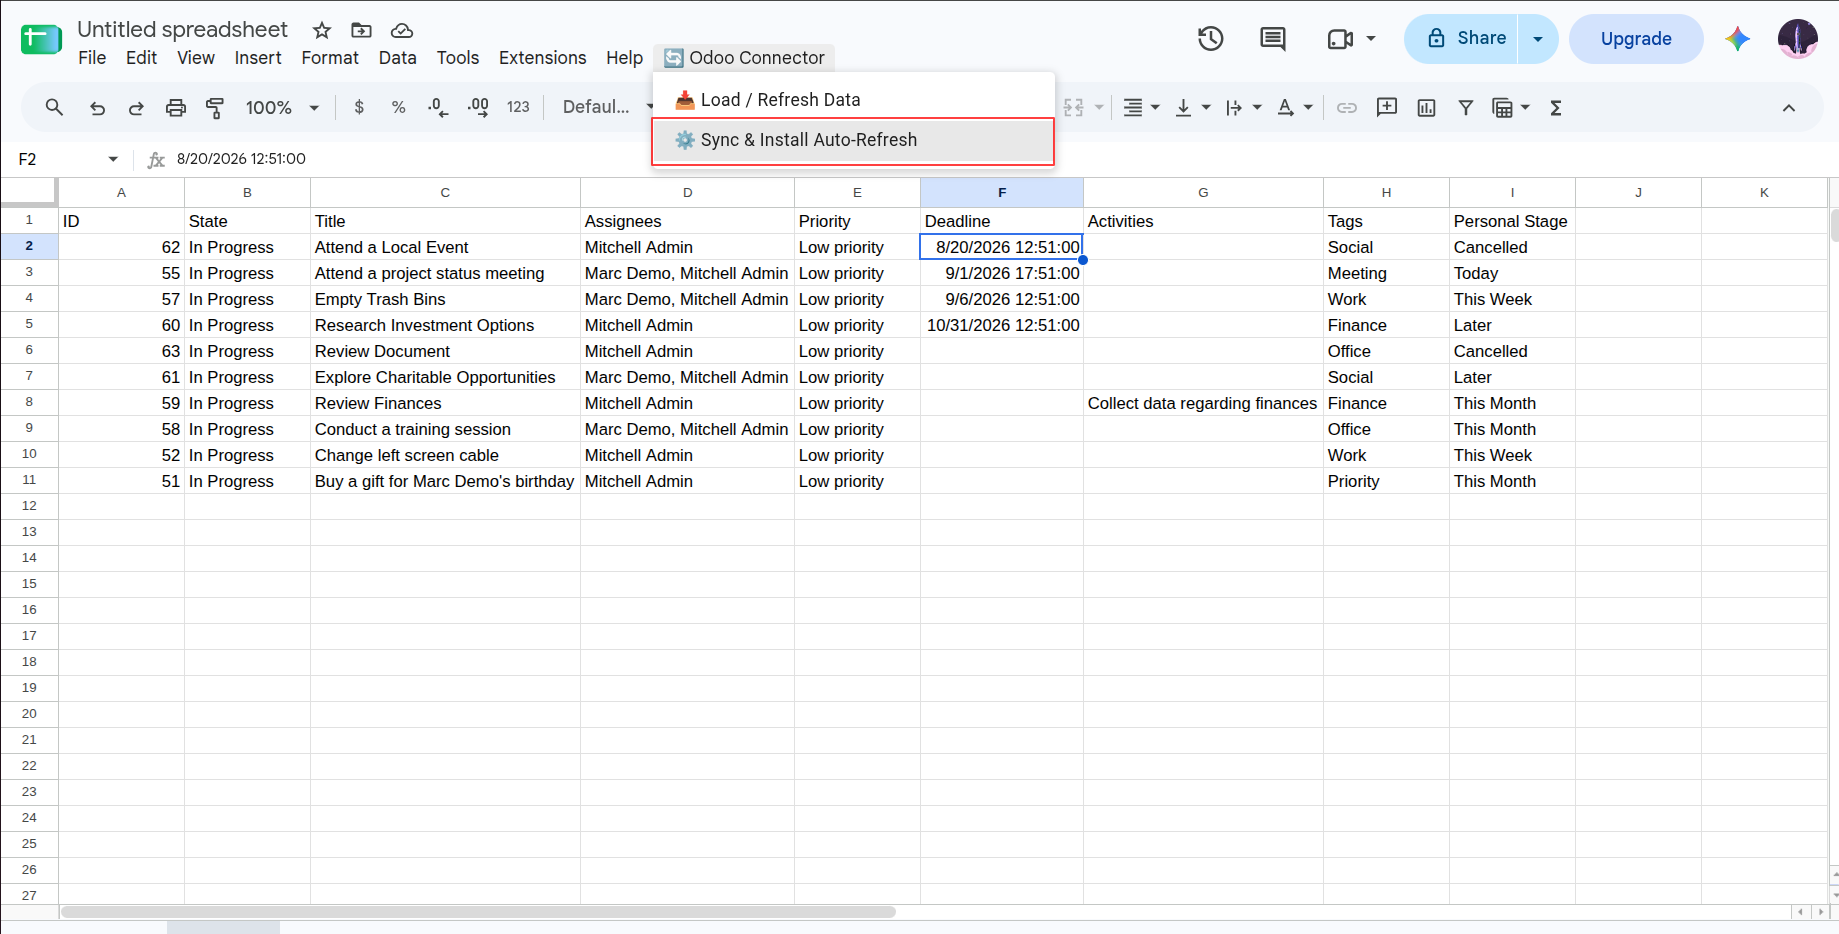
13. Go to Google Sheets -> Odoo Connector -> click '⚙️ Sync & Install Auto-Refresh'.
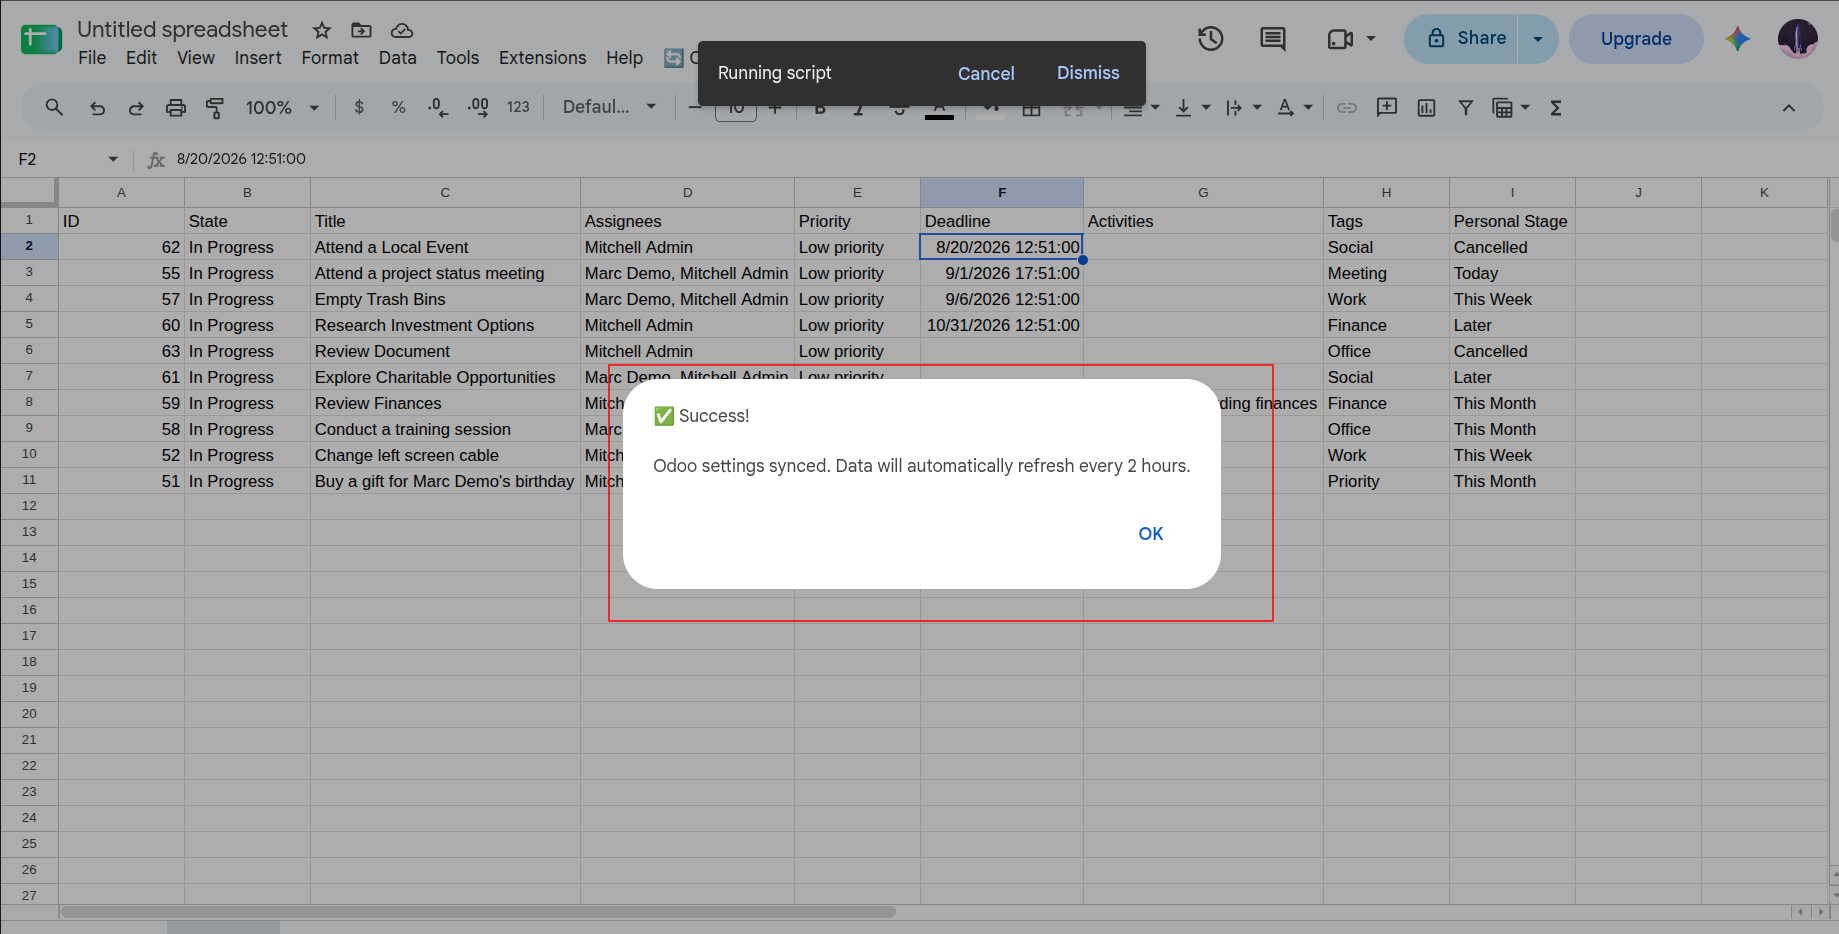
14. By clicking Sync & Install Auto-Refresh, the refresh interval is set exactly as you set it in Odoo. You will see a success popup in Google Sheets.
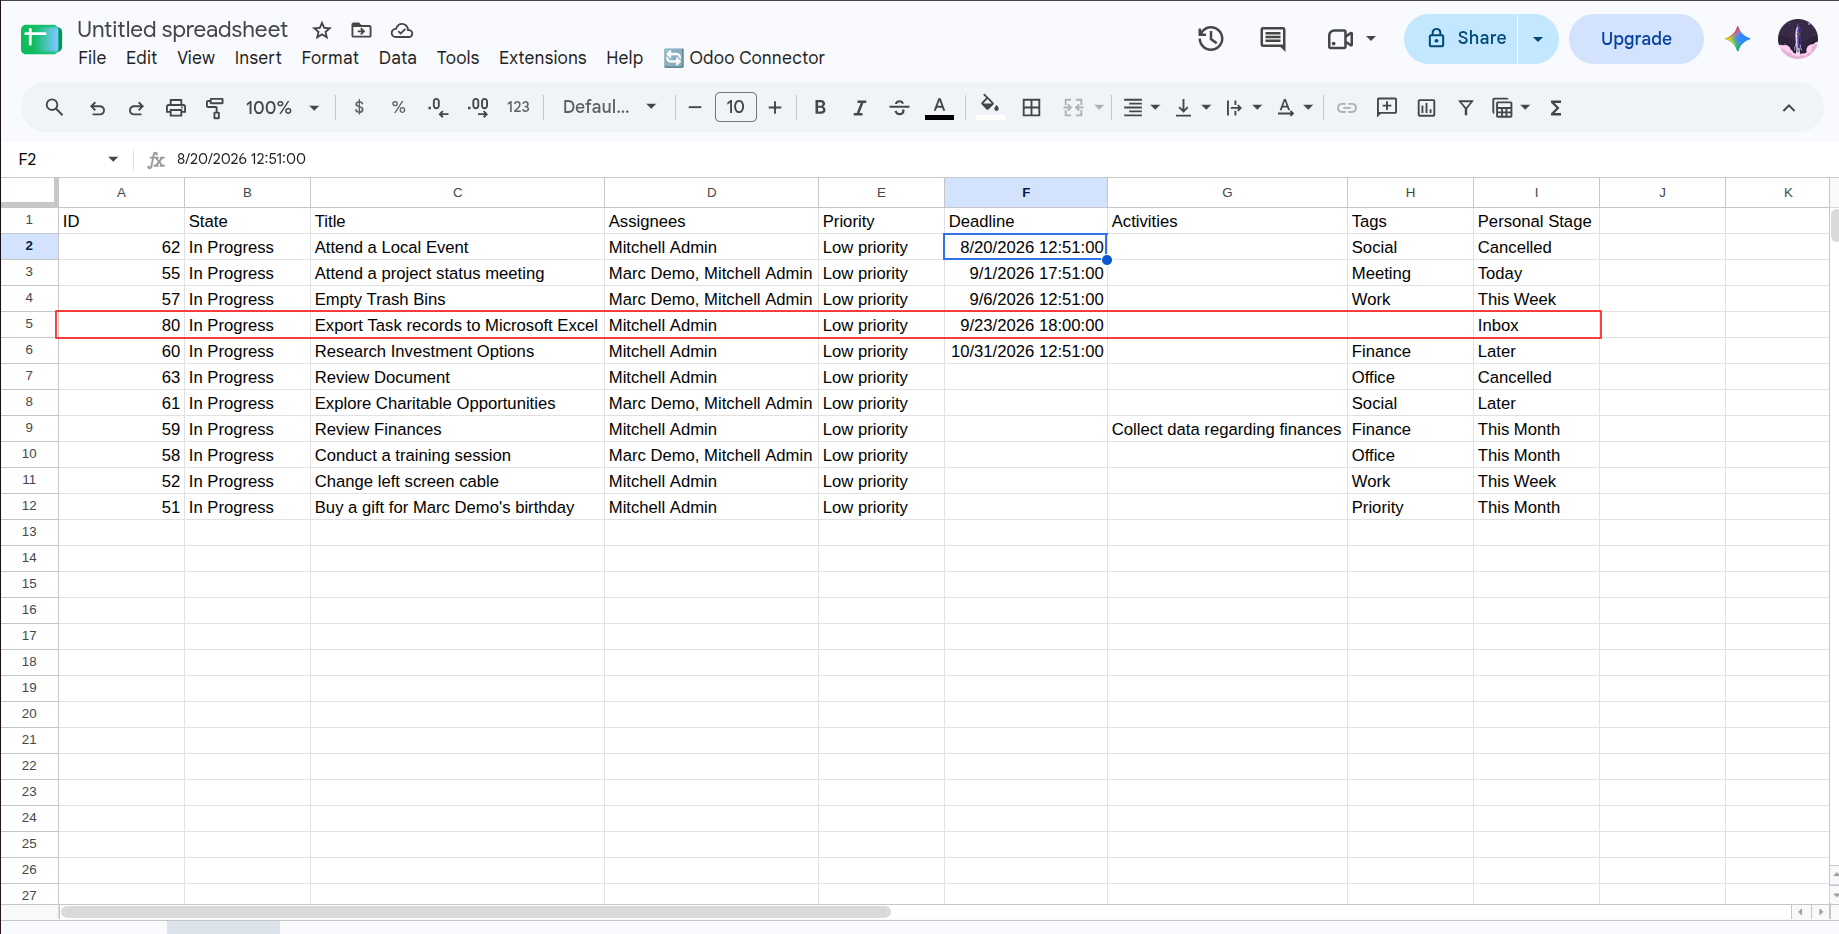
15. After the interval refresh occurs, you can see new records loaded in the Google Sheet.
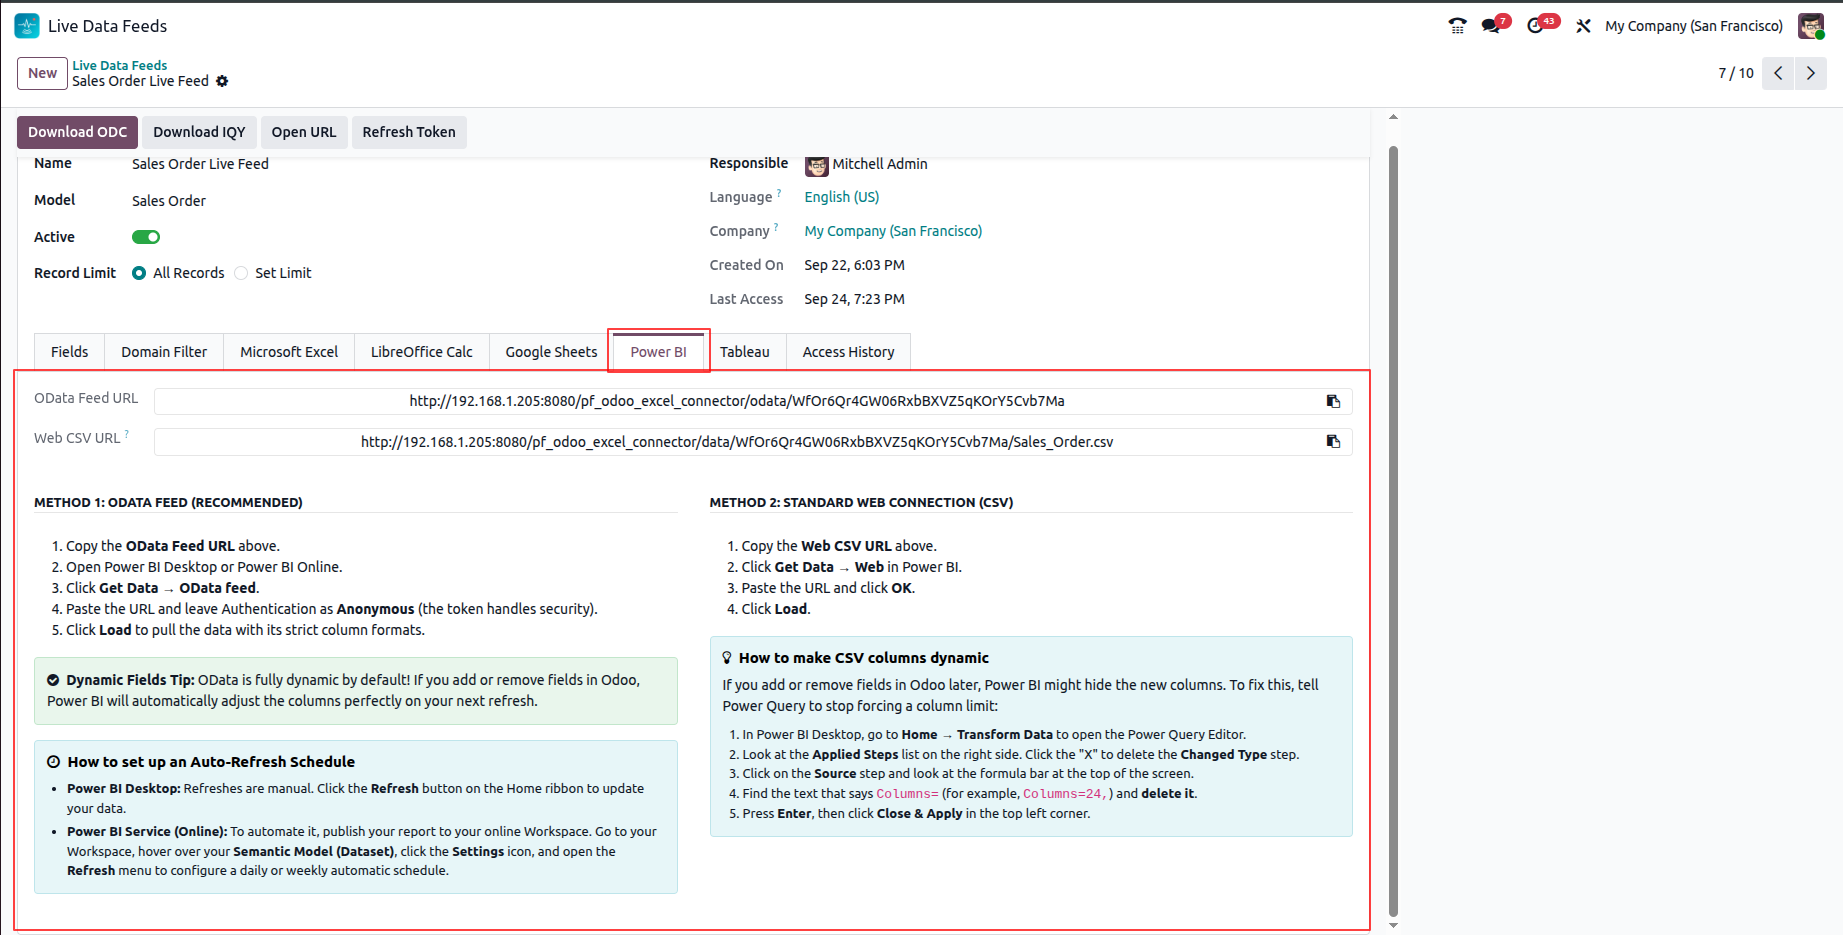
1. Go to the Power BI tab where you can find the OData feed URL, Web CSV URL, and two methods for setup.
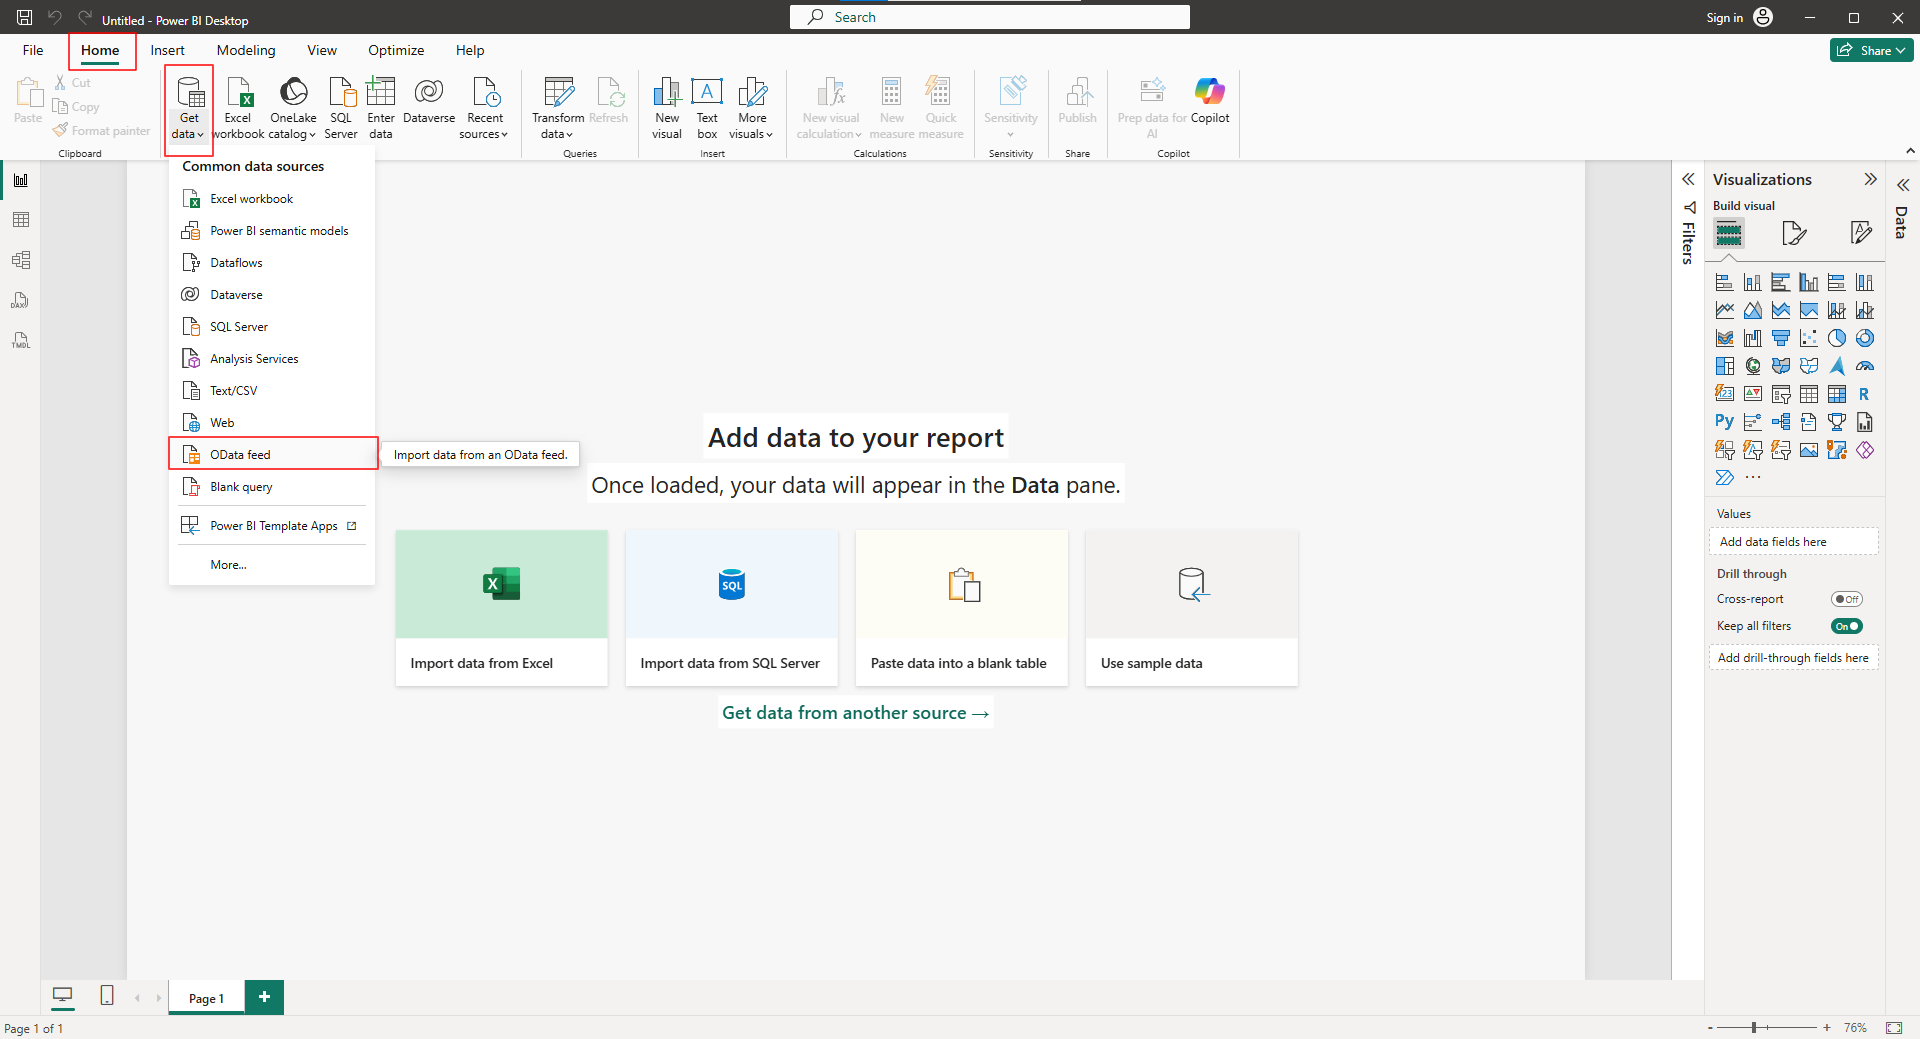
2. Copy the OData URL, then go to Power BI -> open a new blank report -> Home -> Get Data -> OData feed.
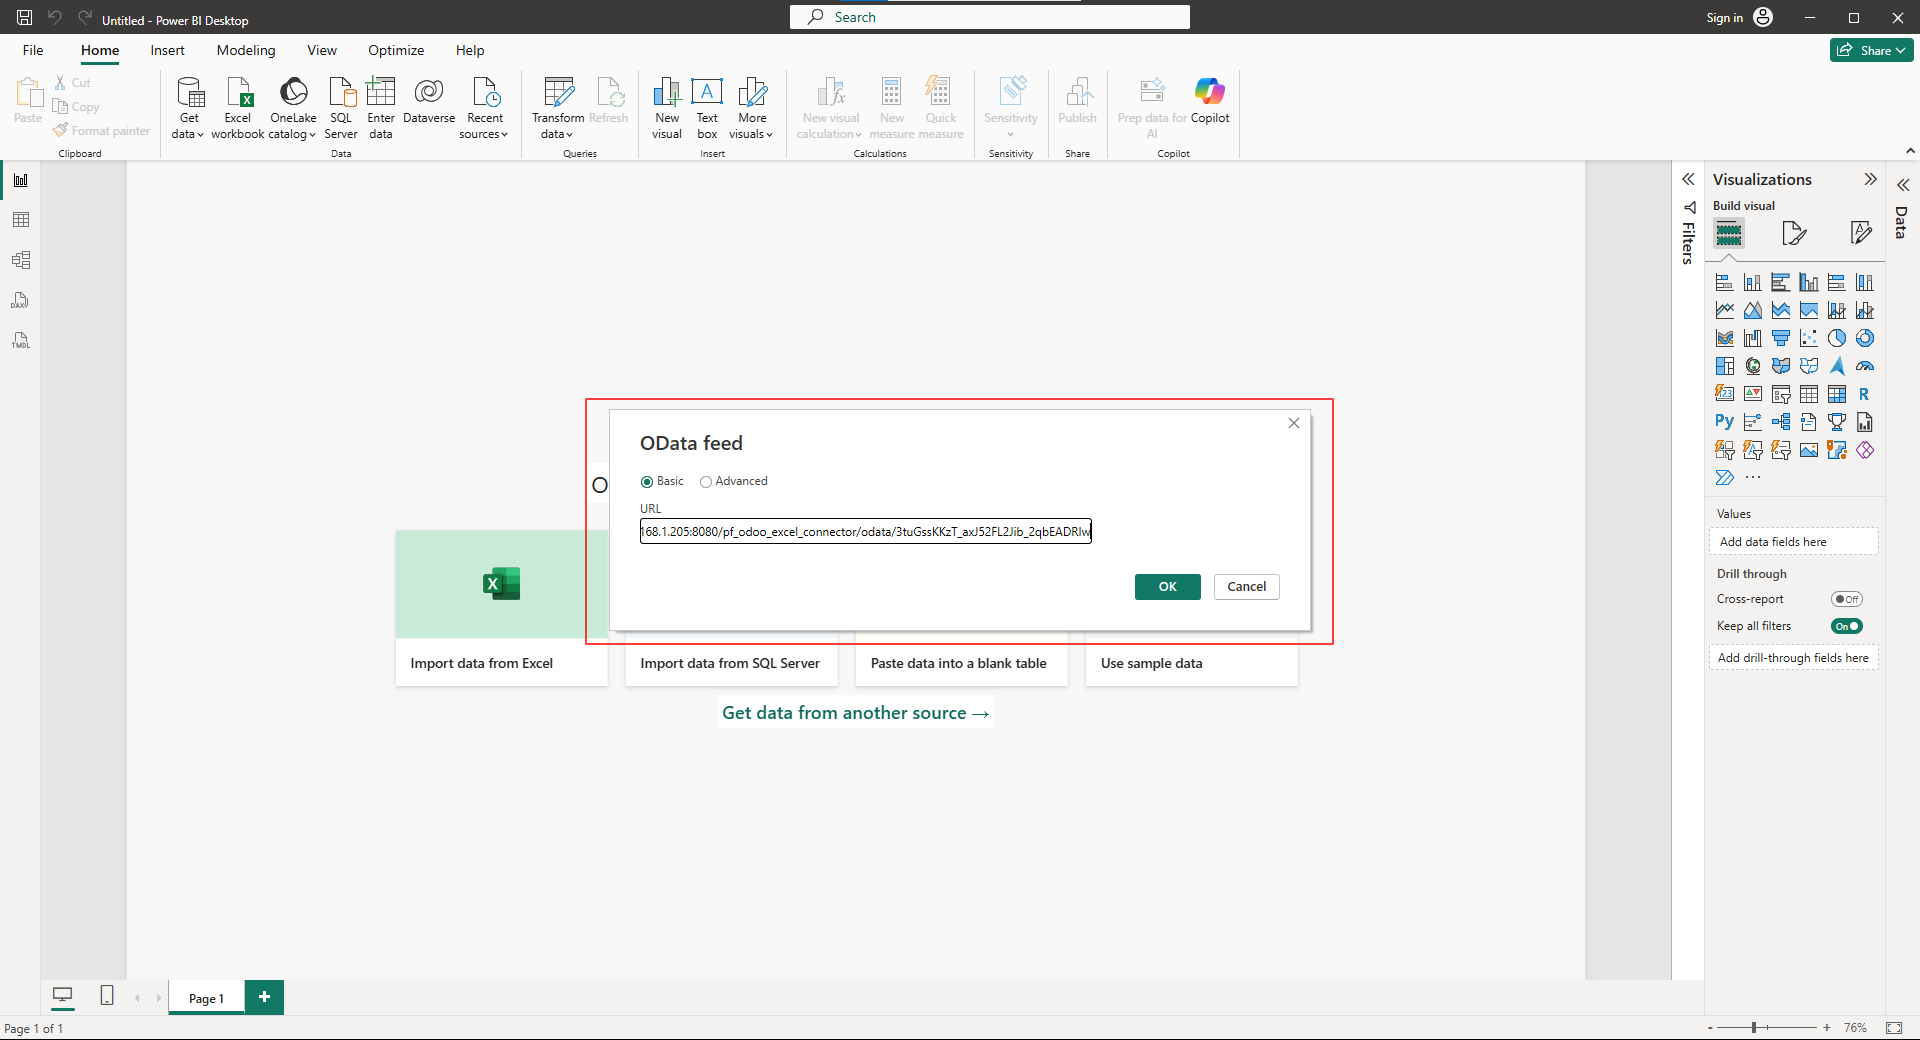
3. The OData feed wizard will open. Paste that OData URL there and click OK.
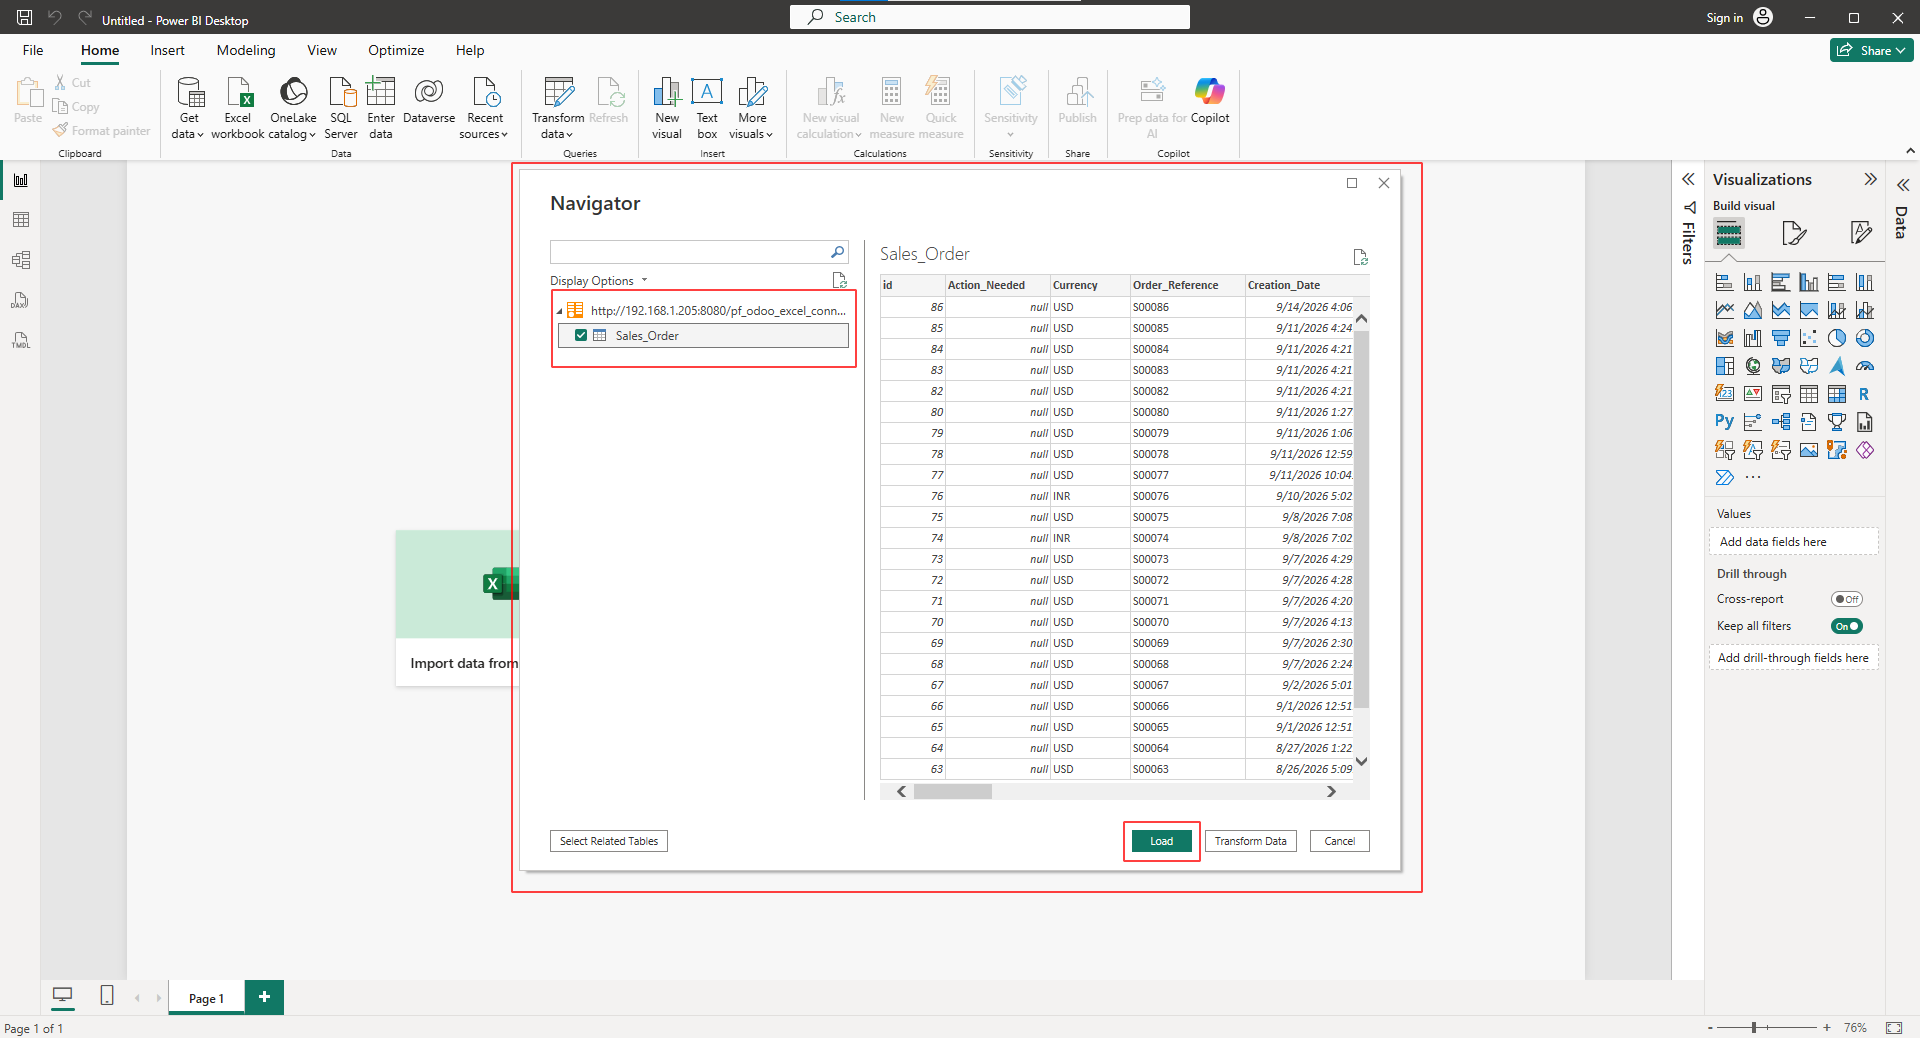
4. A Navigator wizard will open. On the left side, under Display Options, select your query (which is the name of your feed model). After selecting the query, preview your data on the right side, then click Load.
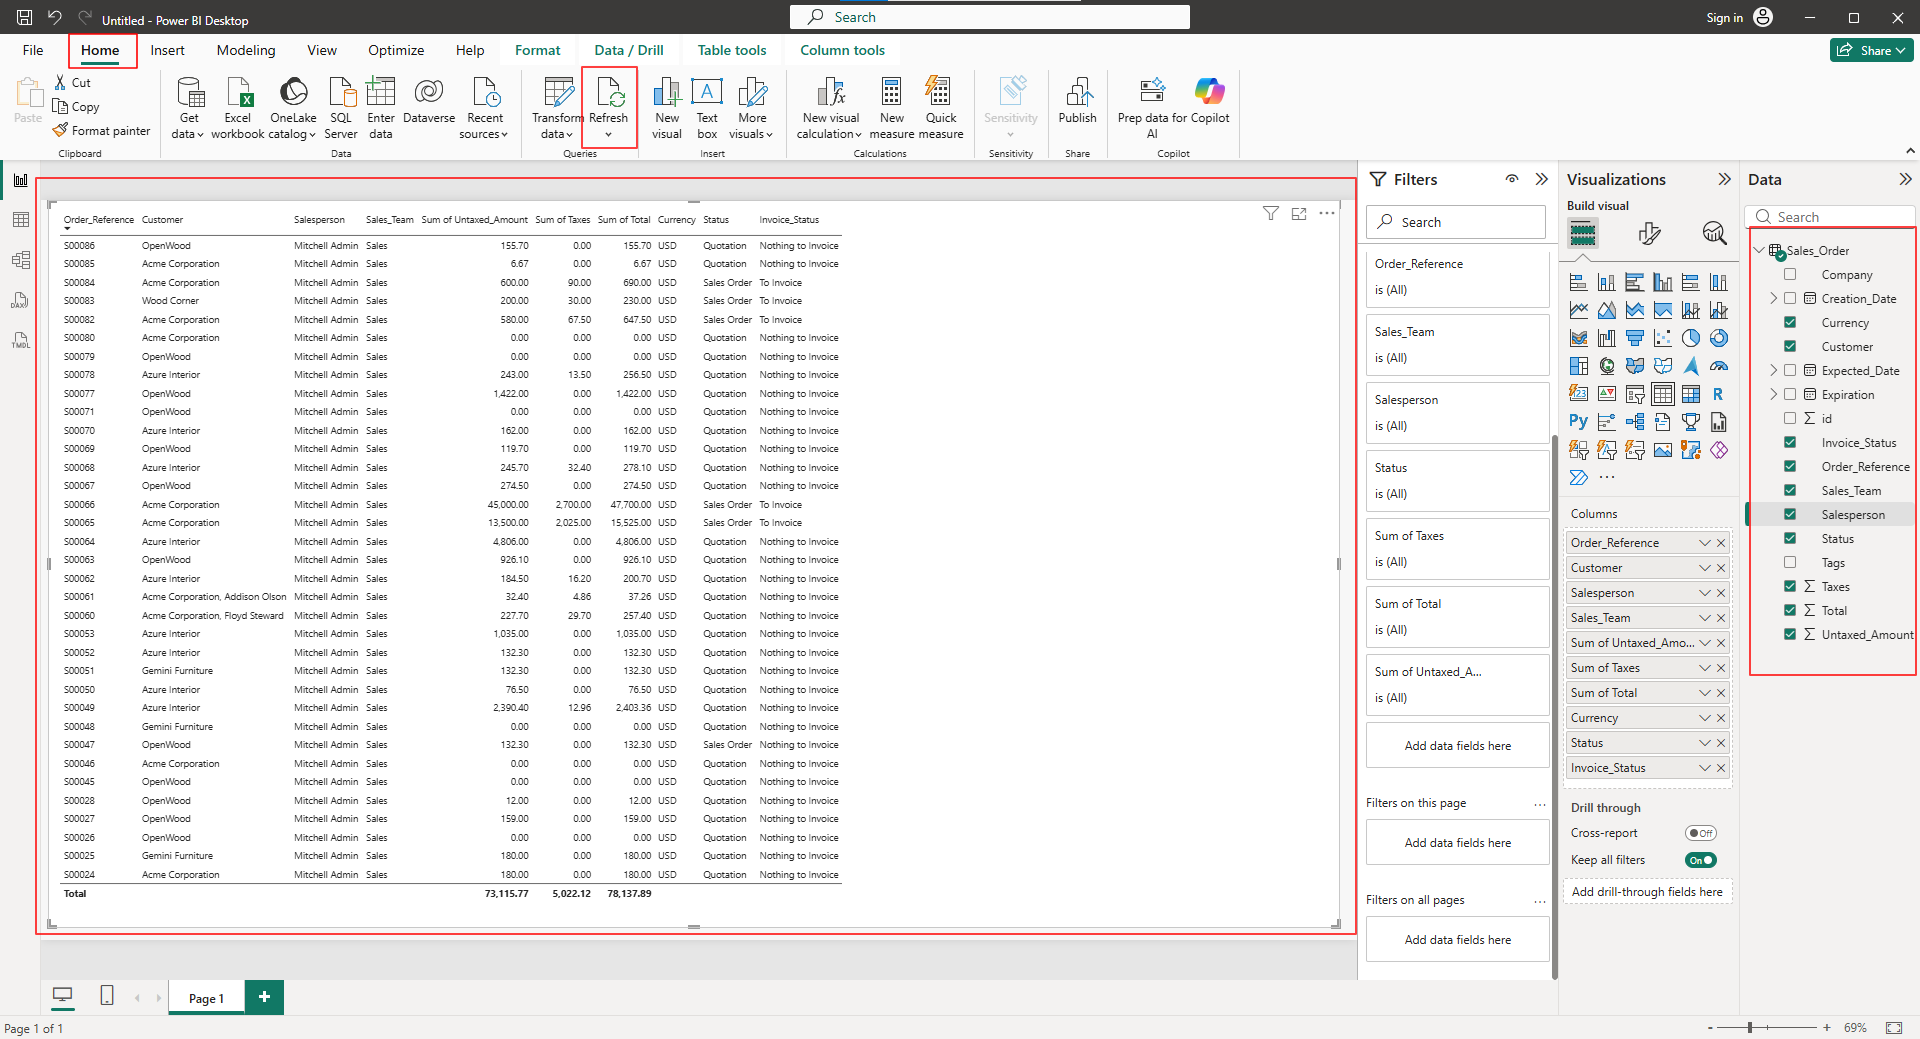
5. Once loaded, Power BI loads the exported Odoo columns and records into the report, giving users a refreshable report connected to the live data feed they created in Odoo. You can refresh data via Home -> Refresh.
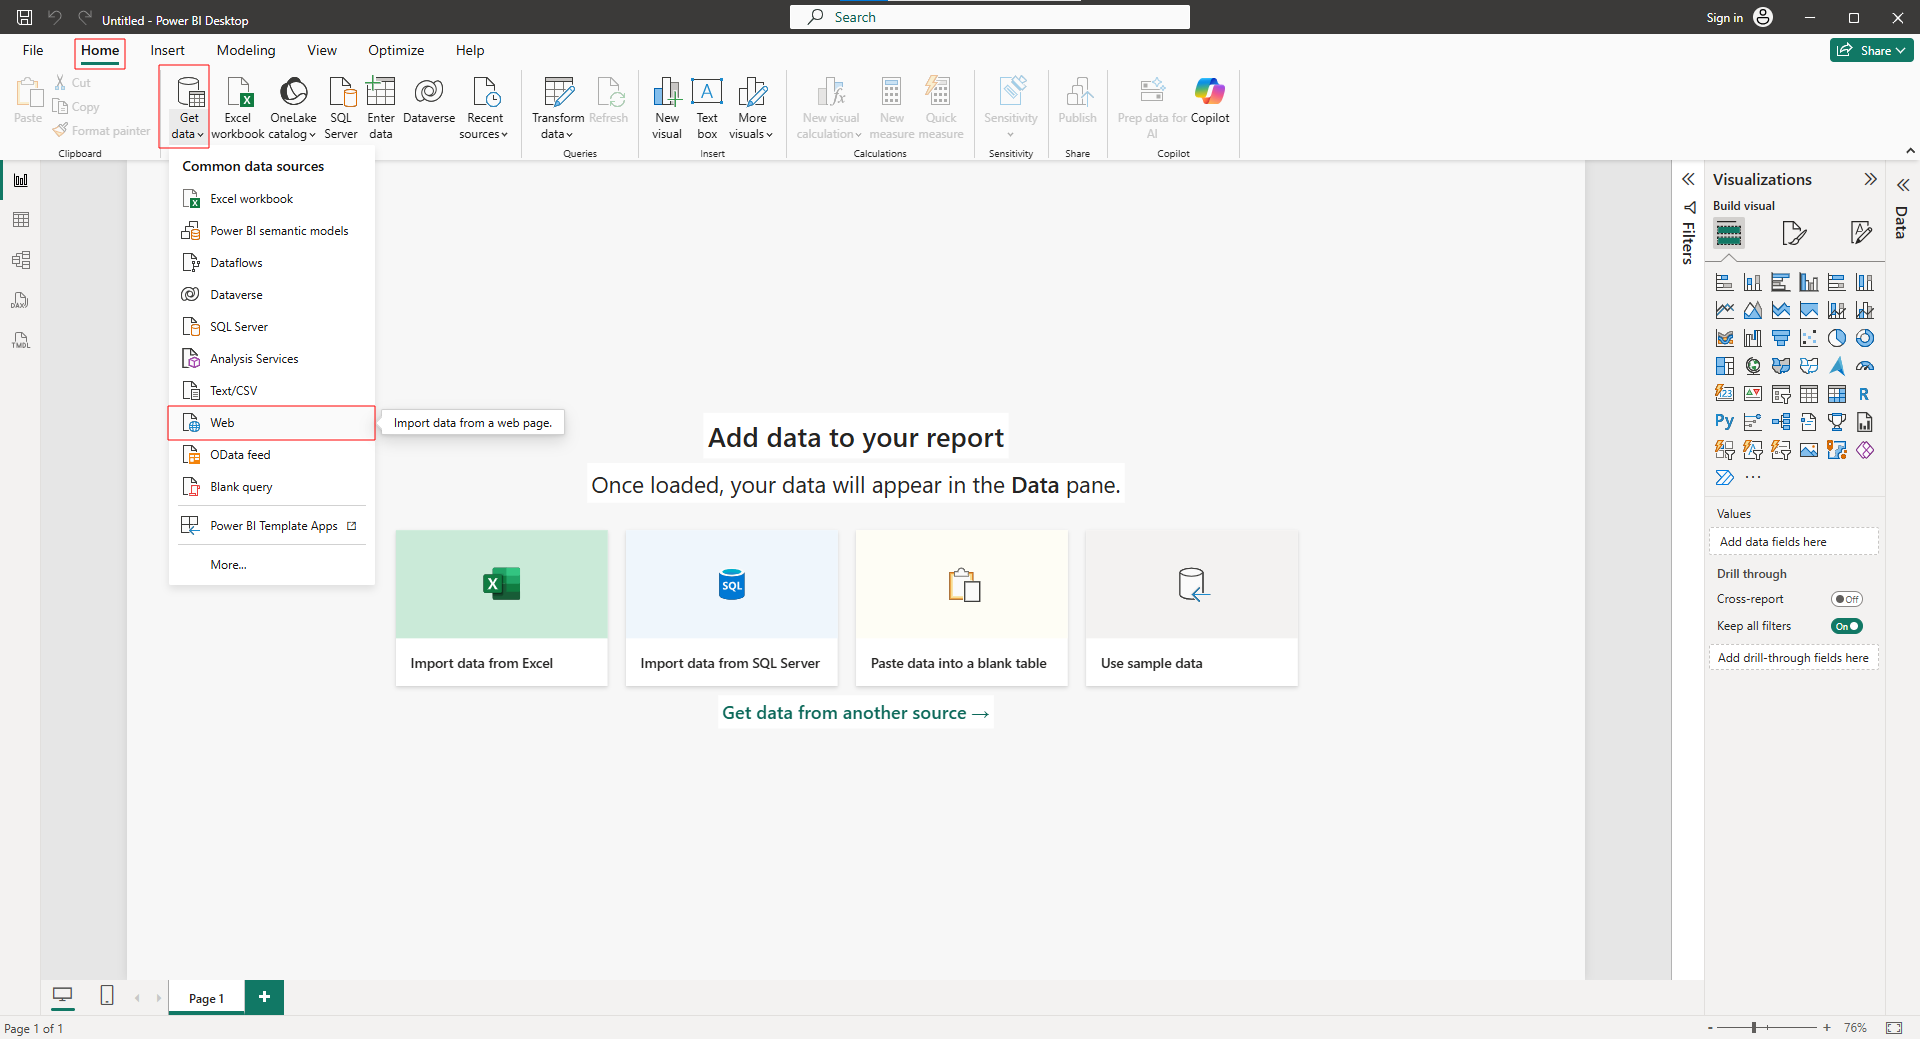
6. If you want to use the Web CSV URL, open a new Power BI report -> Get Data -> From Web.
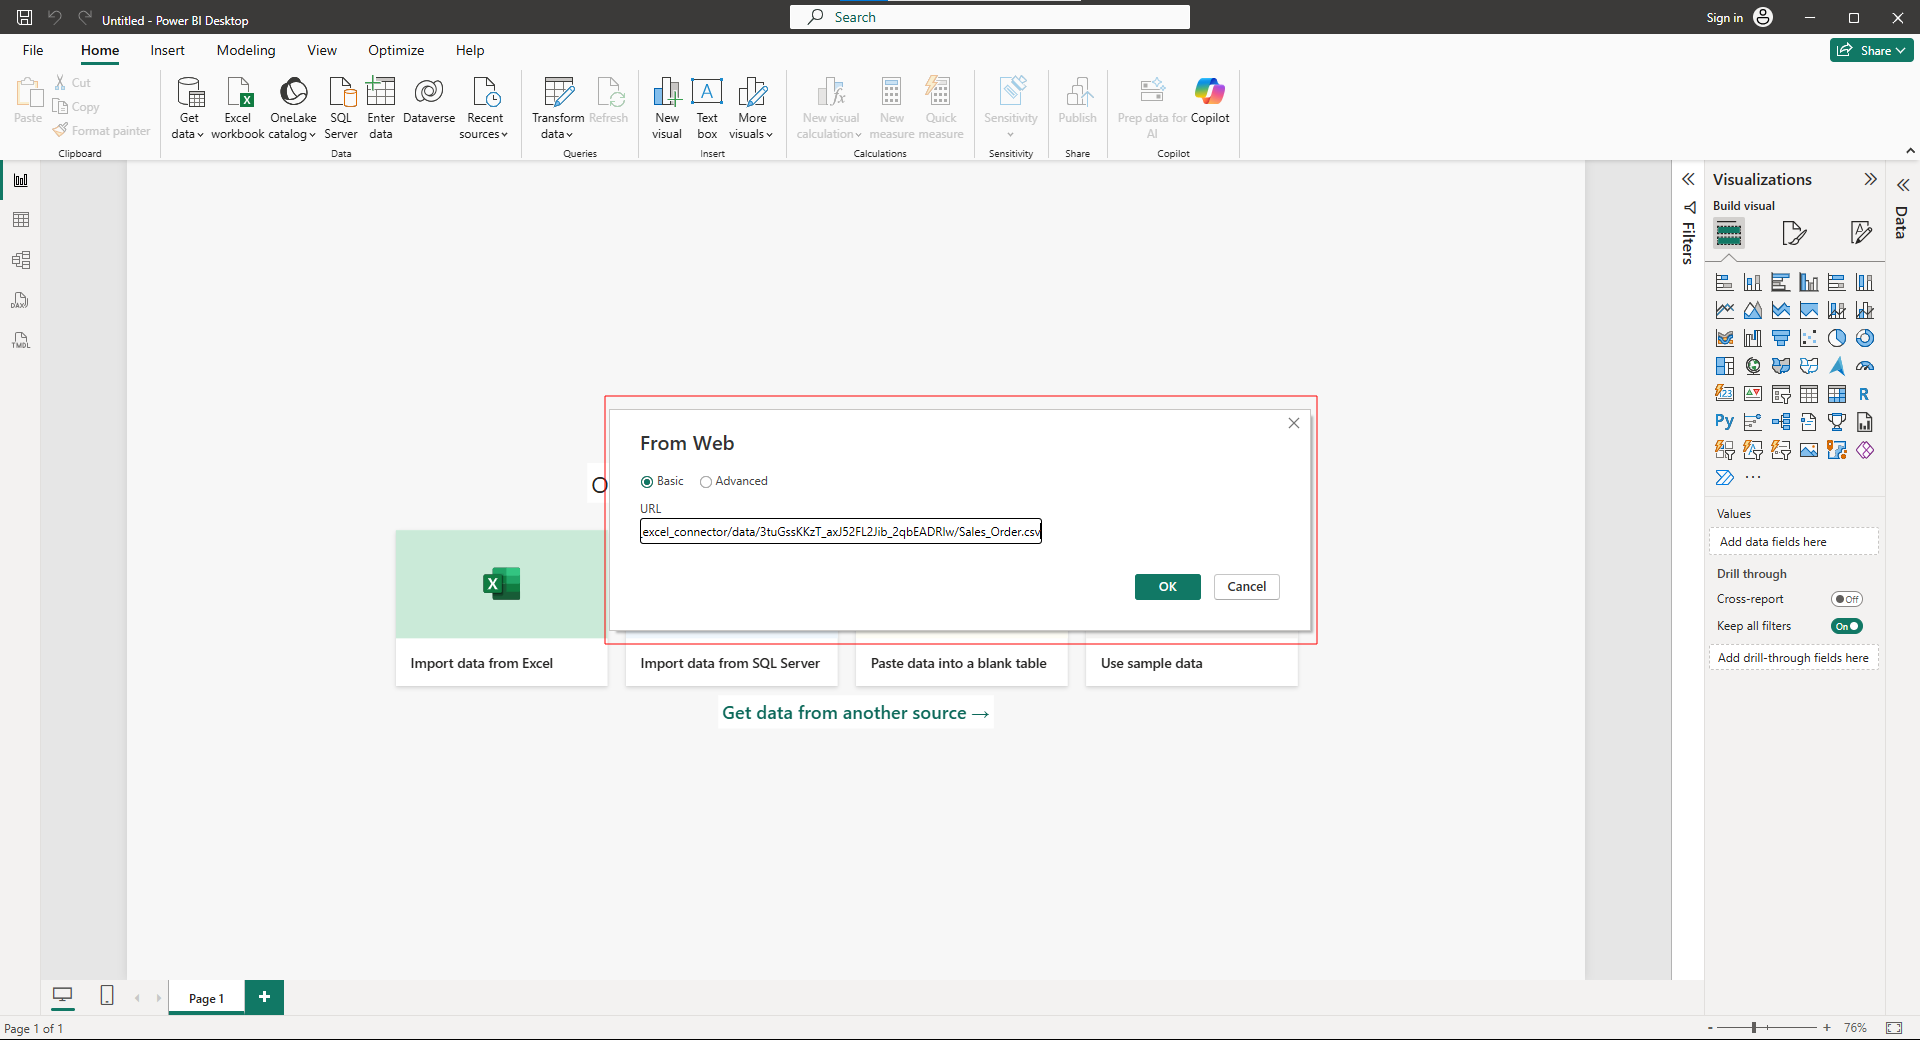
7. A From Web wizard will open. Paste the URL there and click OK.
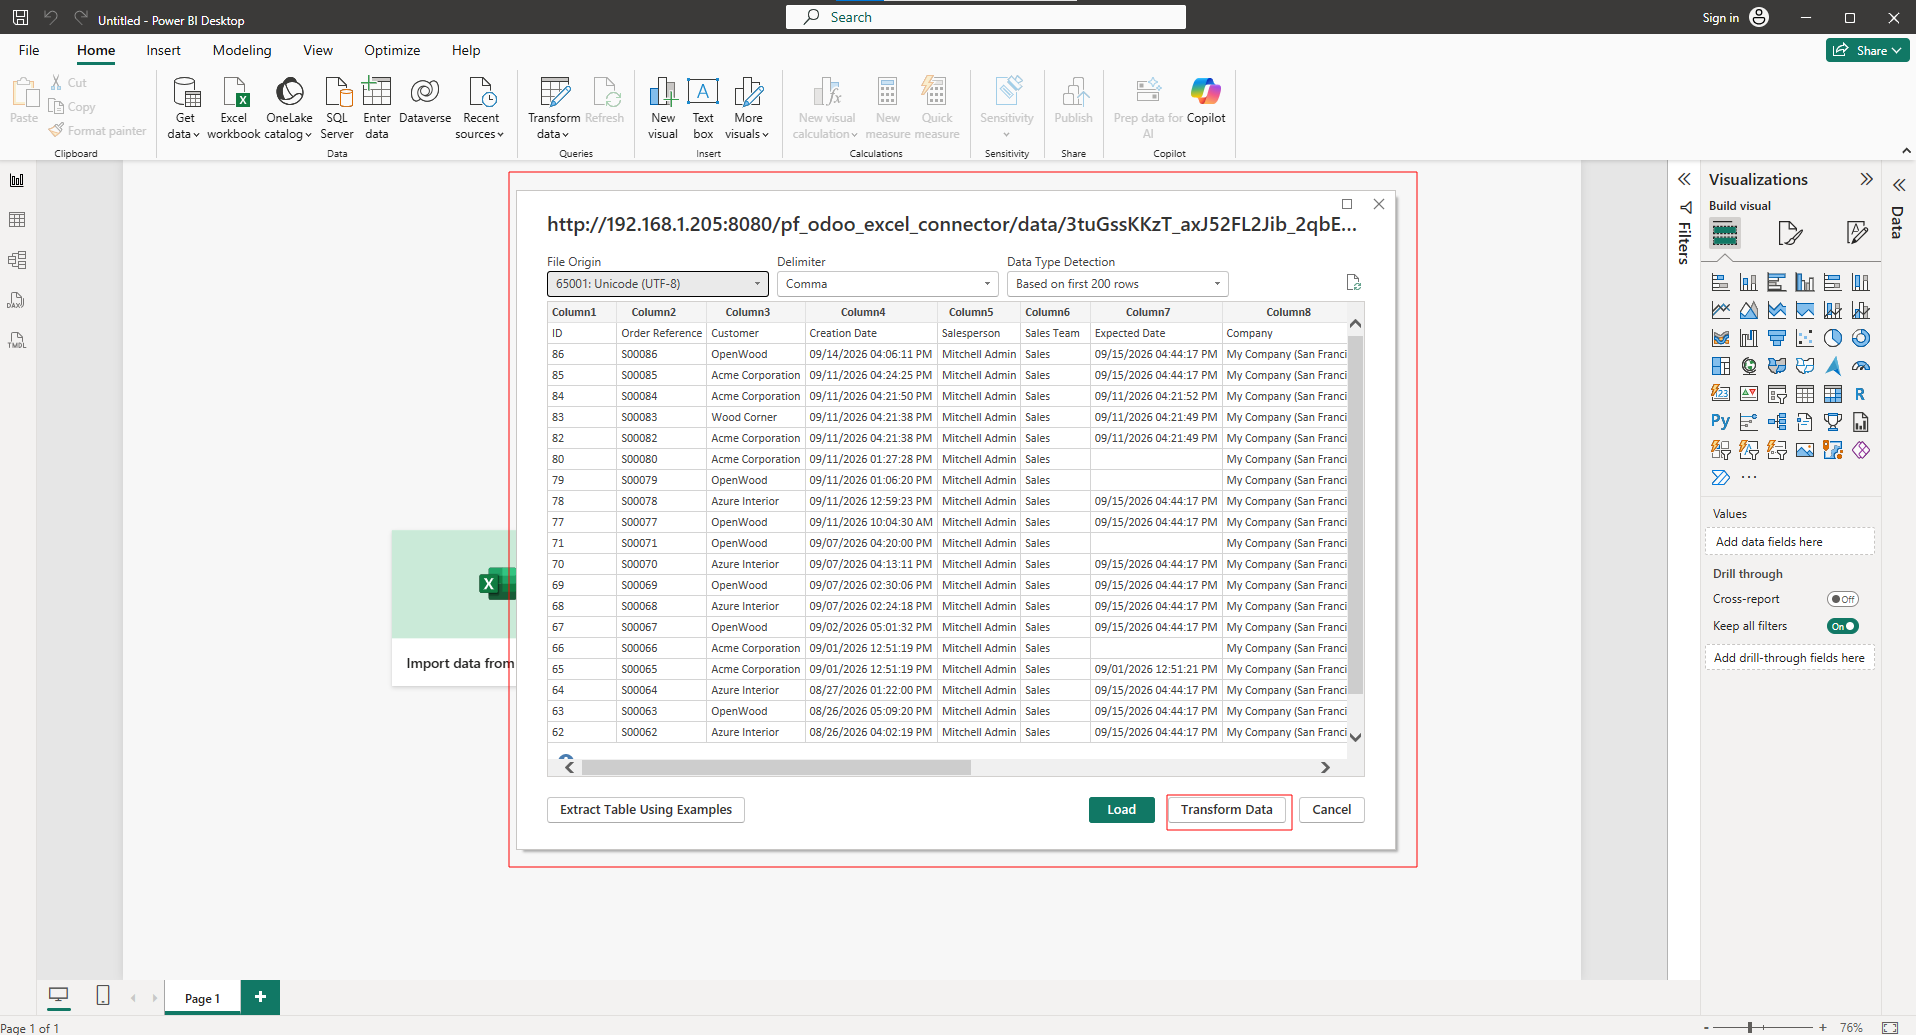
8. Then another wizard will open where you can preview your data records. Now click Transform Data.
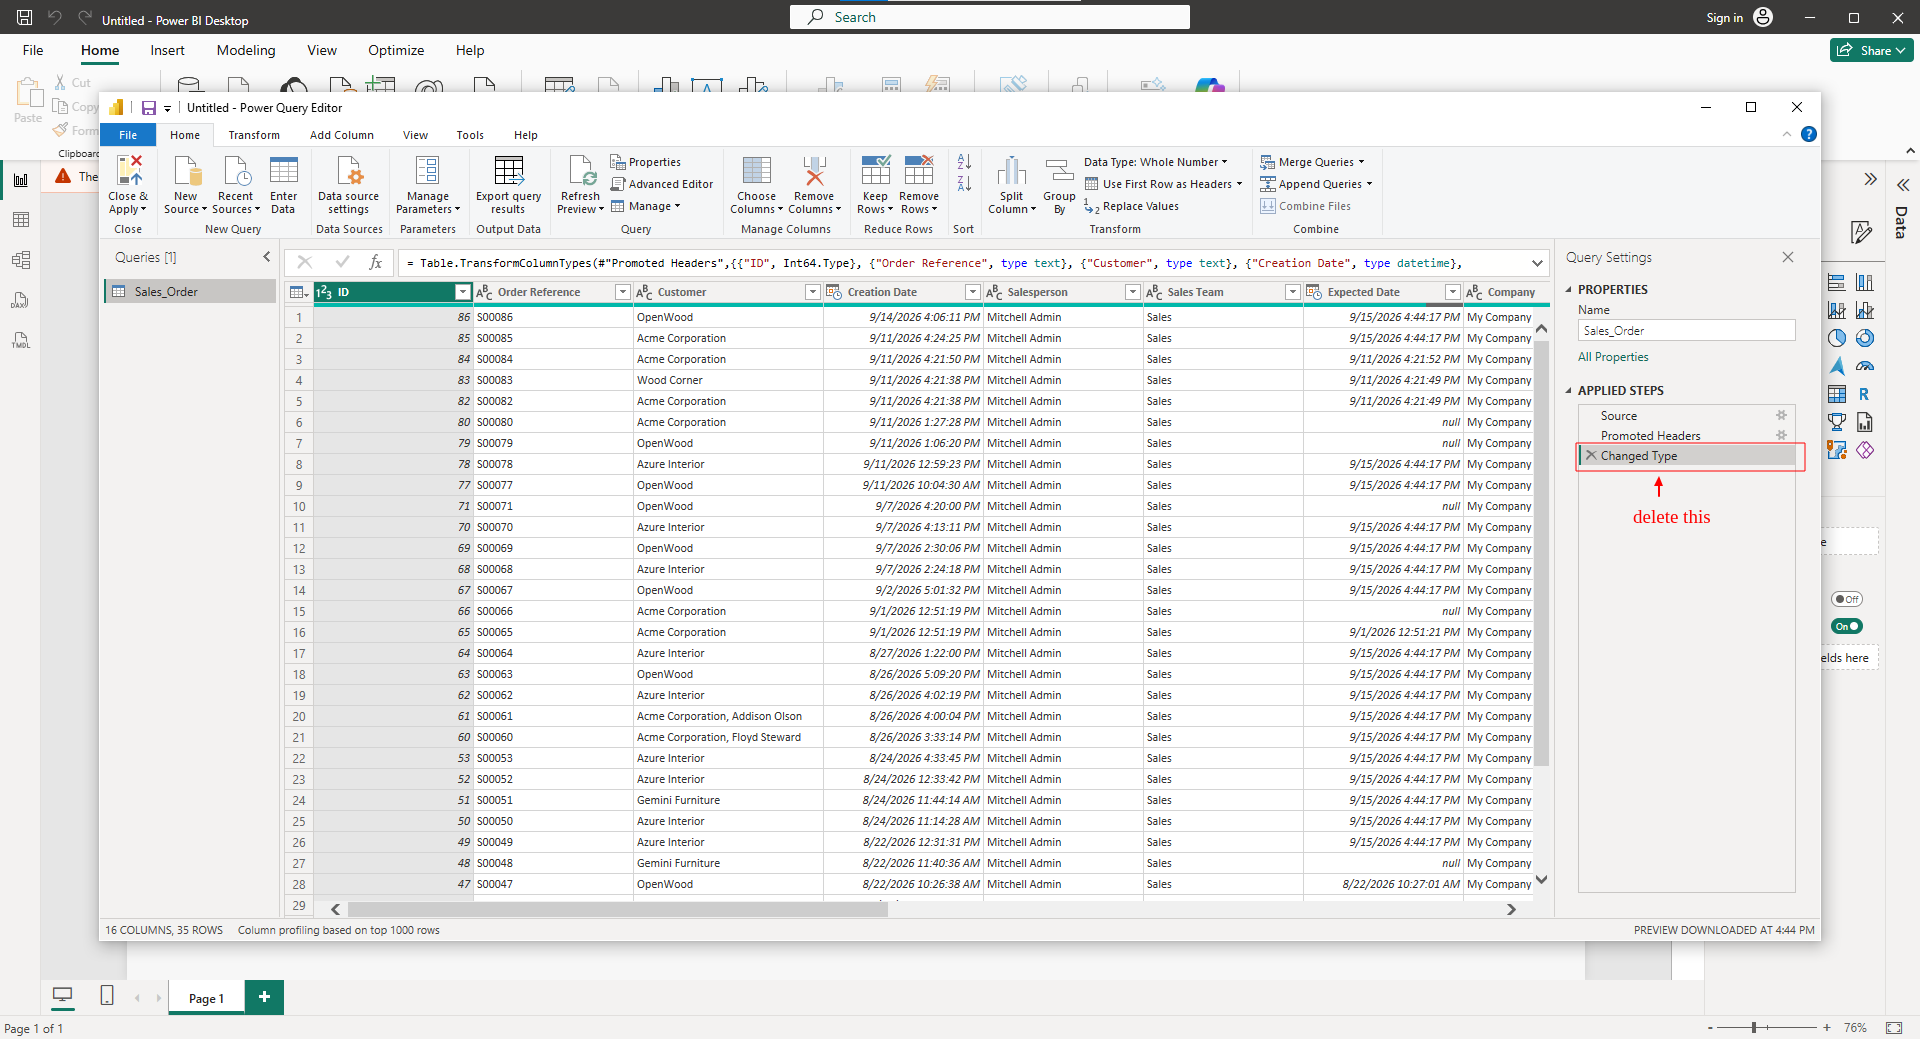
9. The Power Query Editor will open. Delete the "Changed Type" step from the Applied Steps.
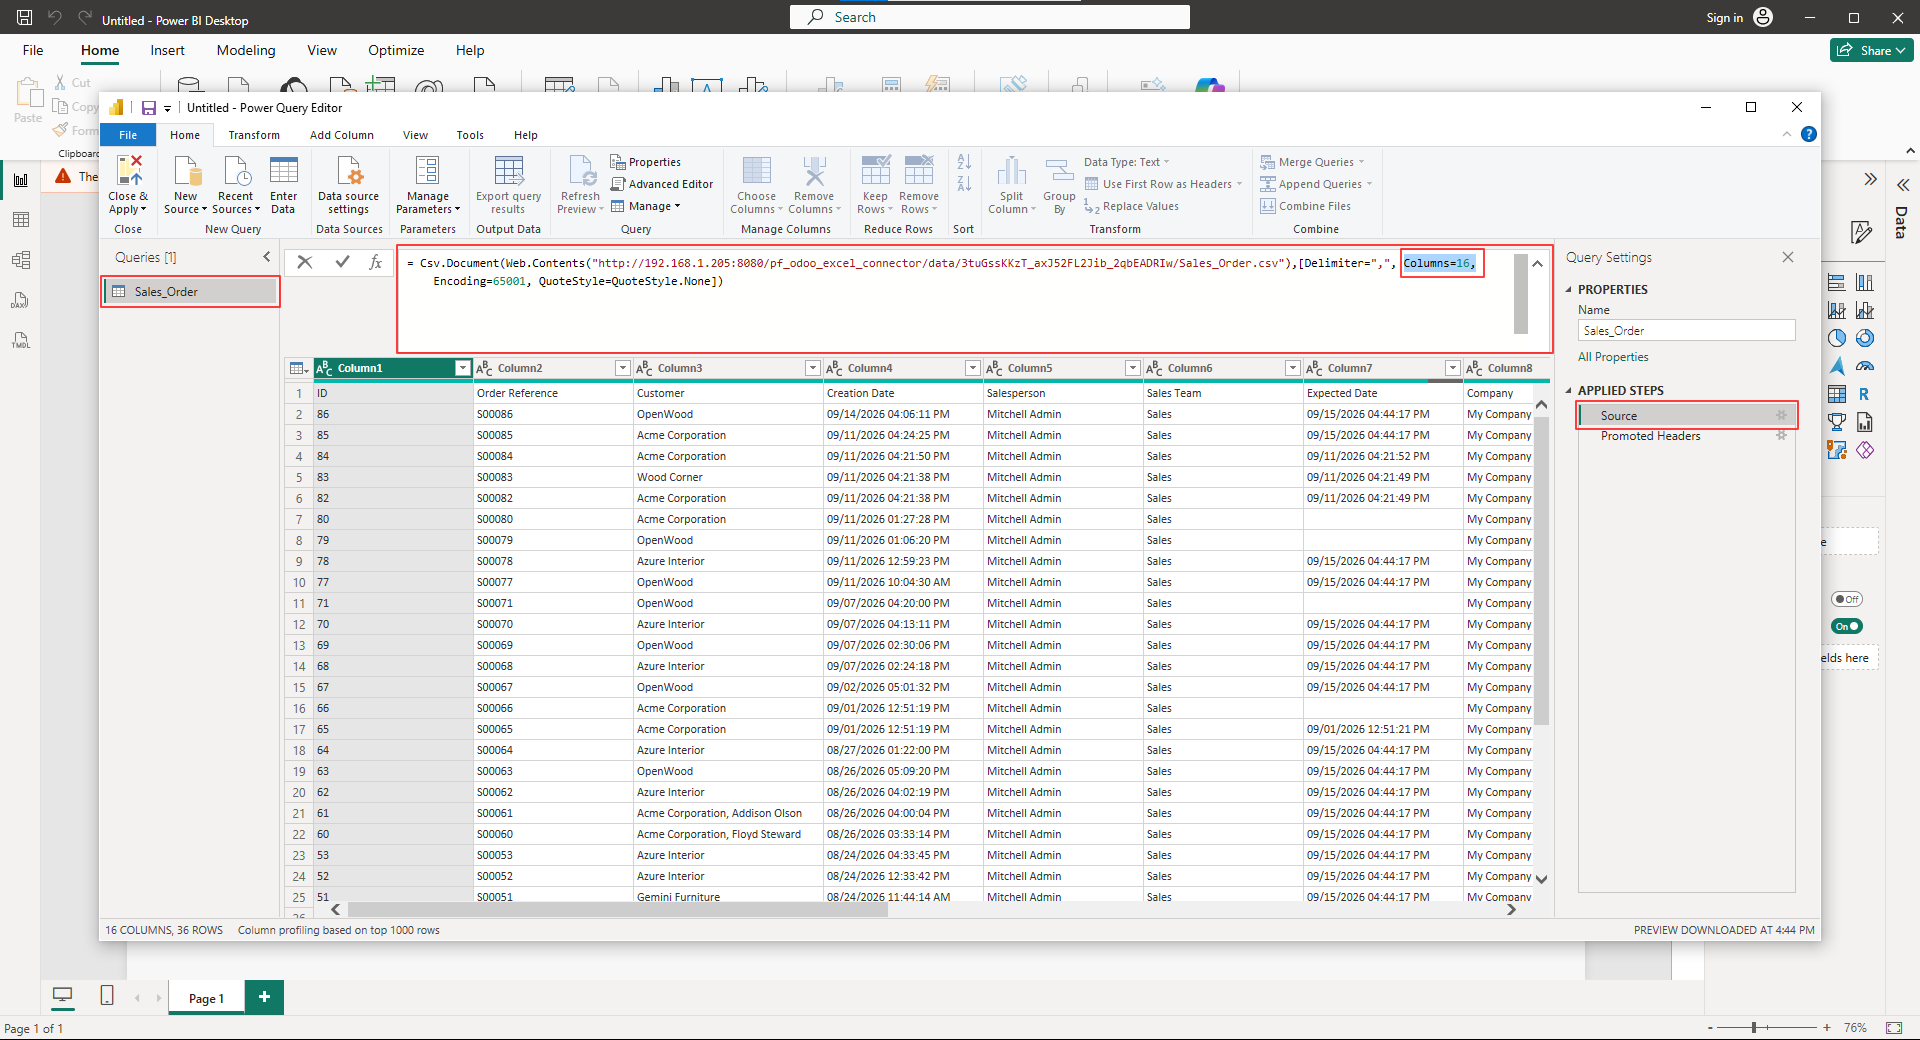
10. Now in Applied Steps, go to Source, go to the formula bar, and remove the columns parameter (For example, columns='16'), then click Close & Apply.
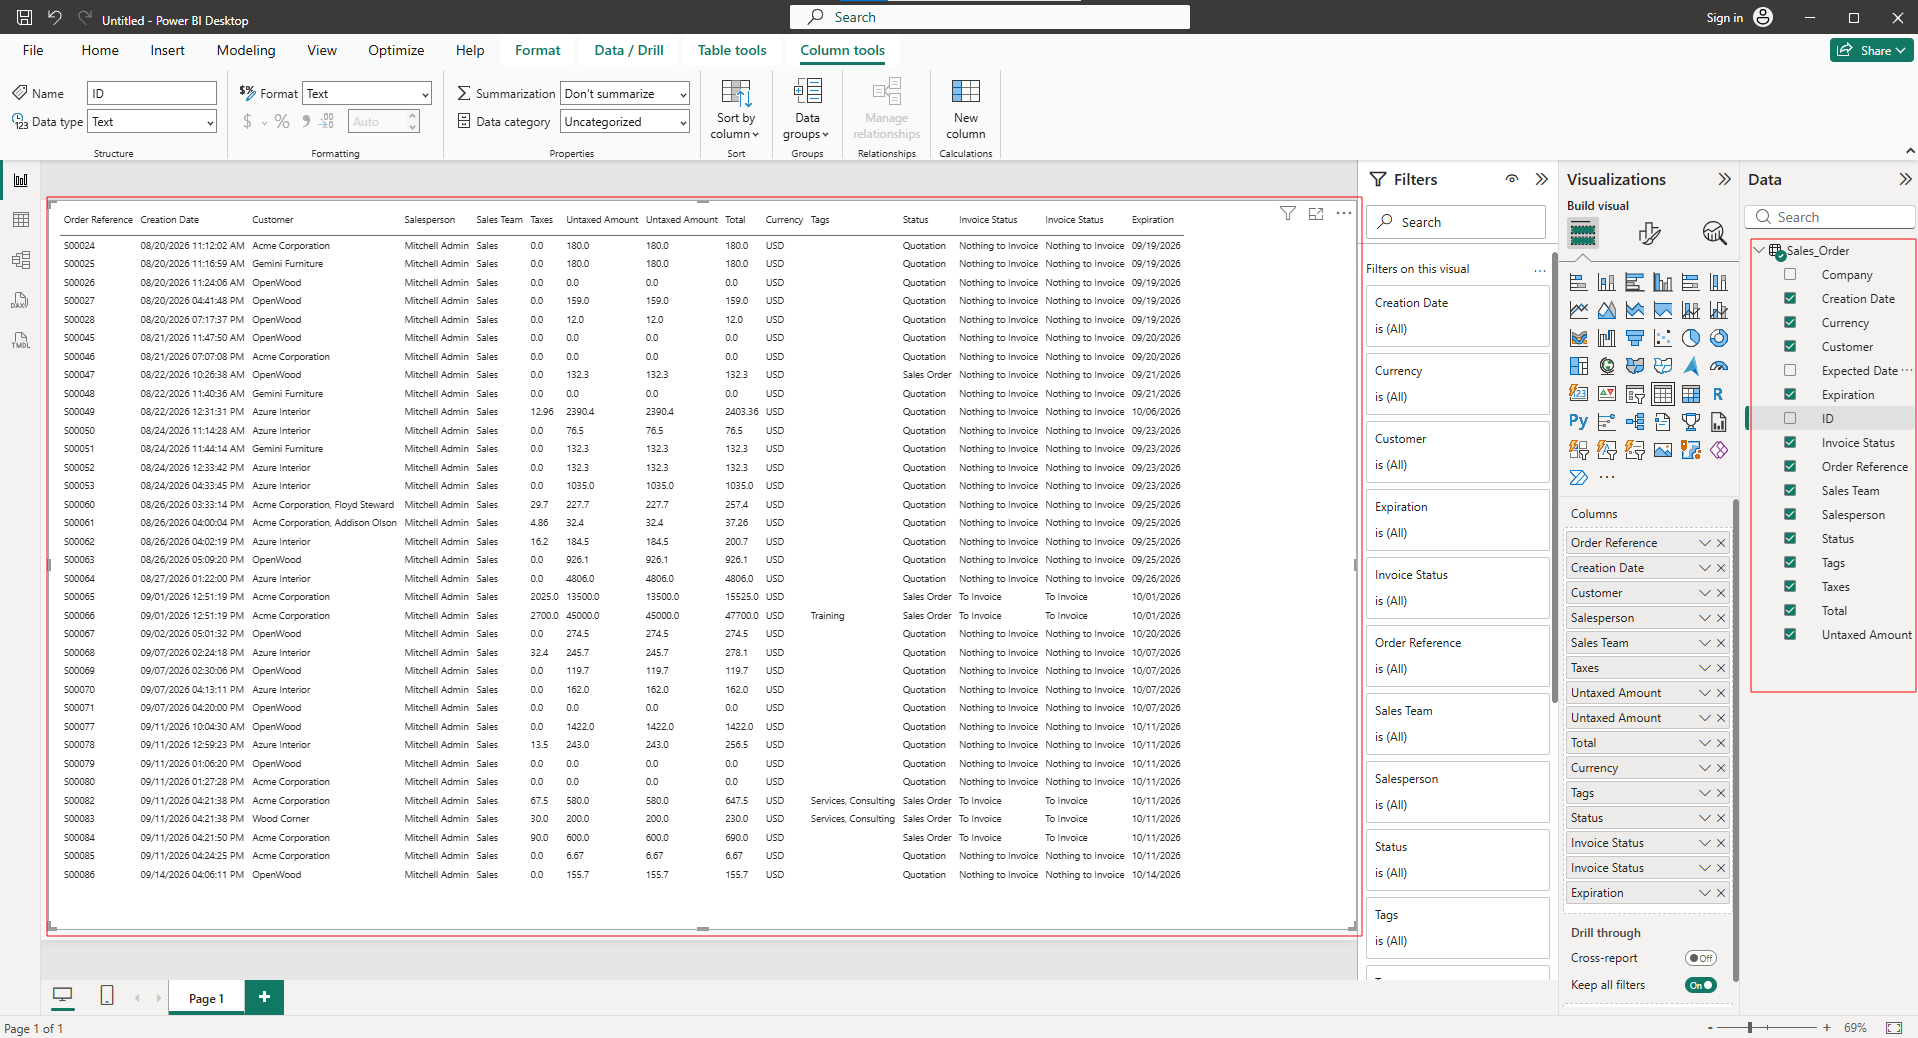
11. Once loaded, Power BI loads the exported Odoo columns and records into the report, giving users a refreshable report connected to the live data feed they created in Odoo.
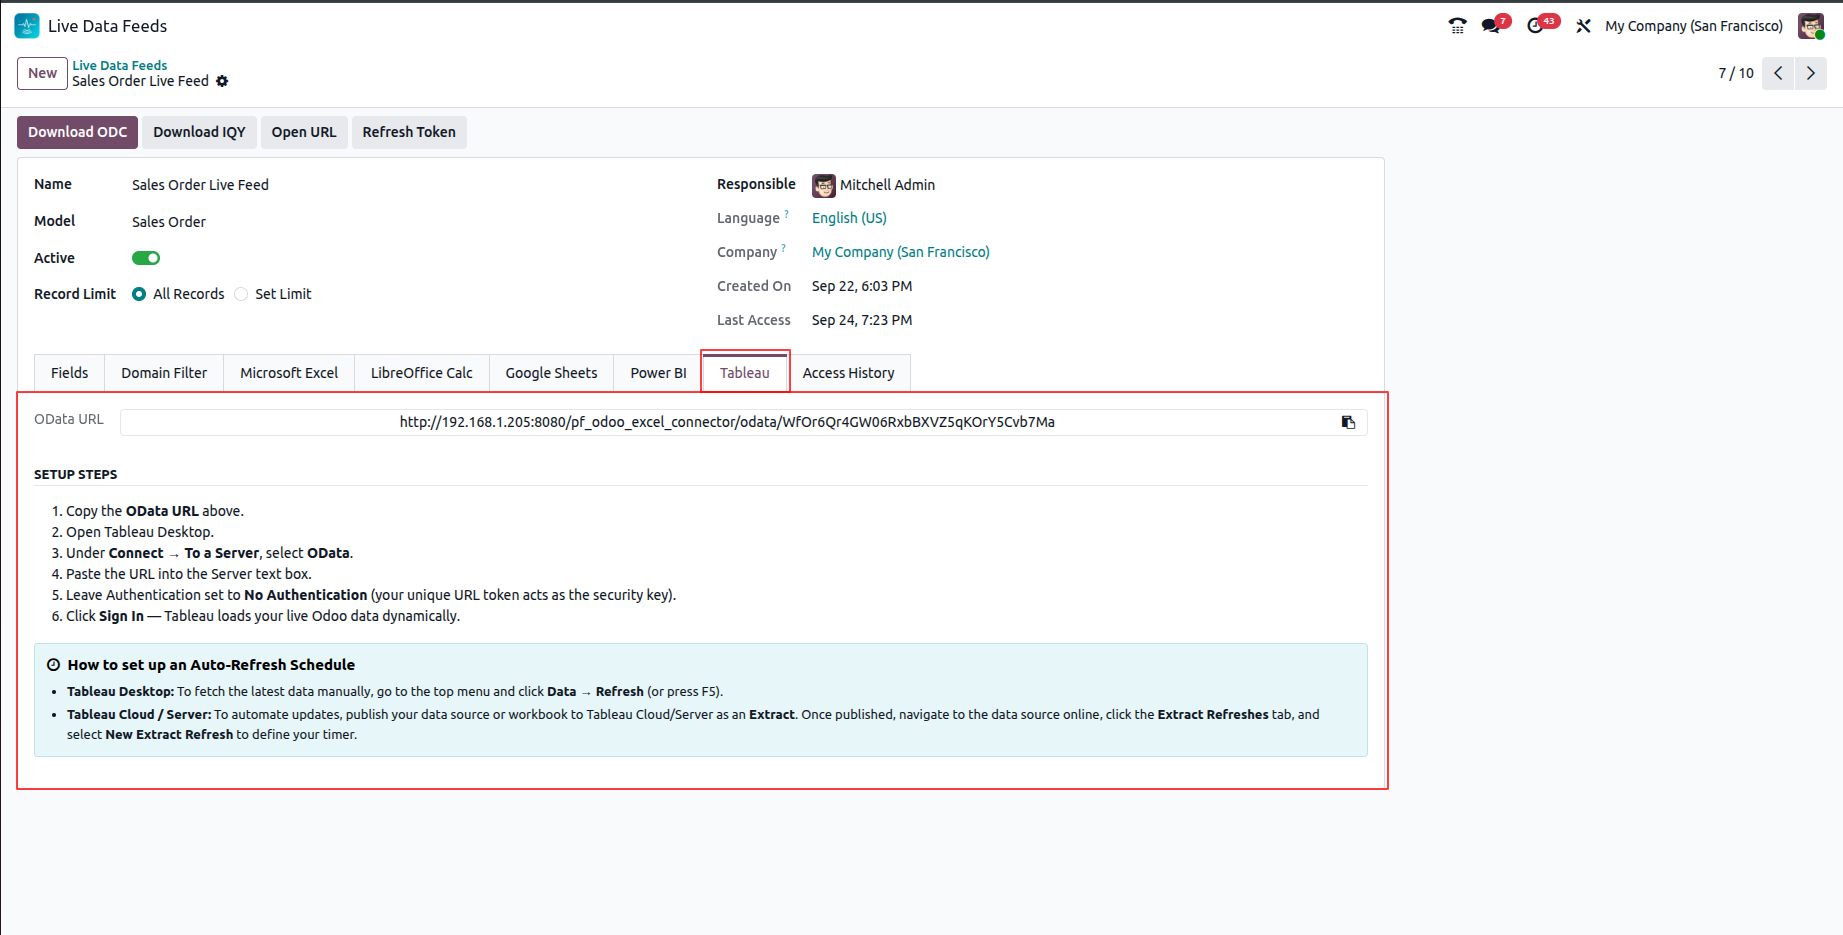
1. Go to the Tableau tab where you can find the OData URL and setup steps.
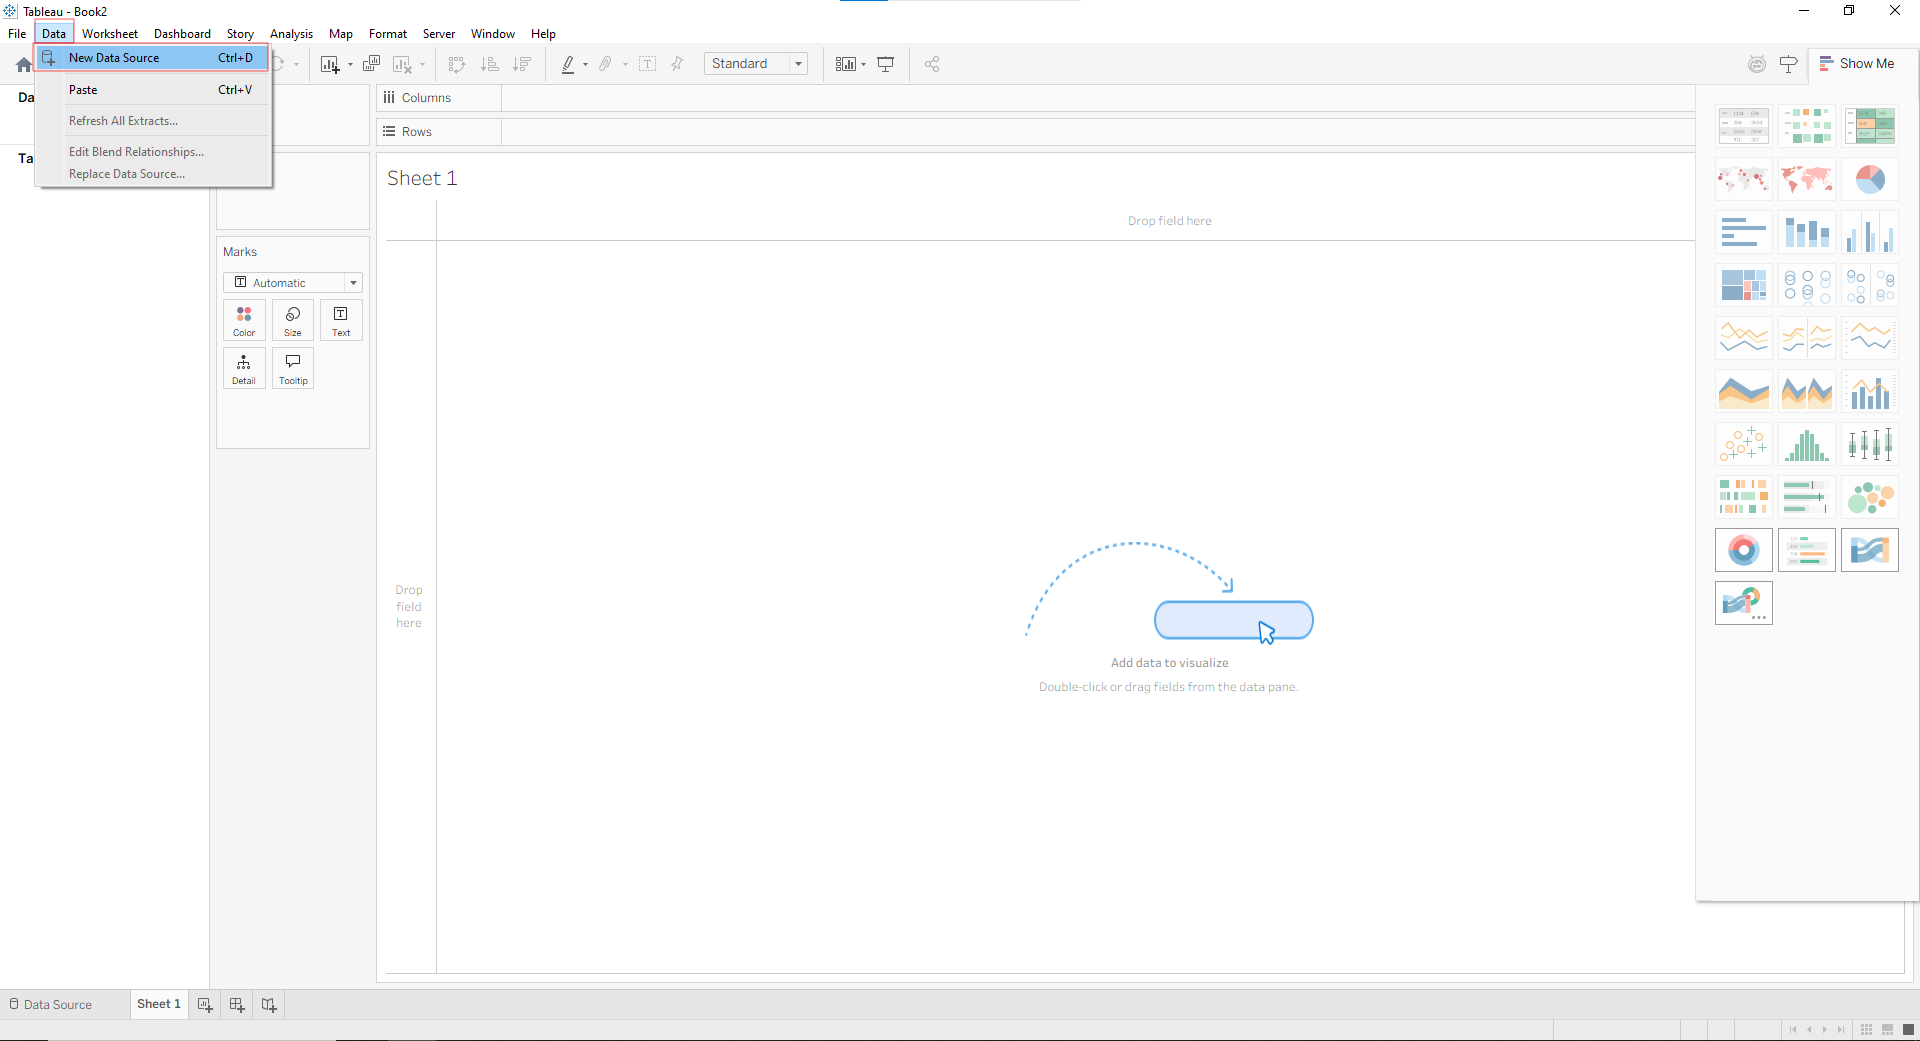
2. Open a new workbook -> Data -> New Data Source.
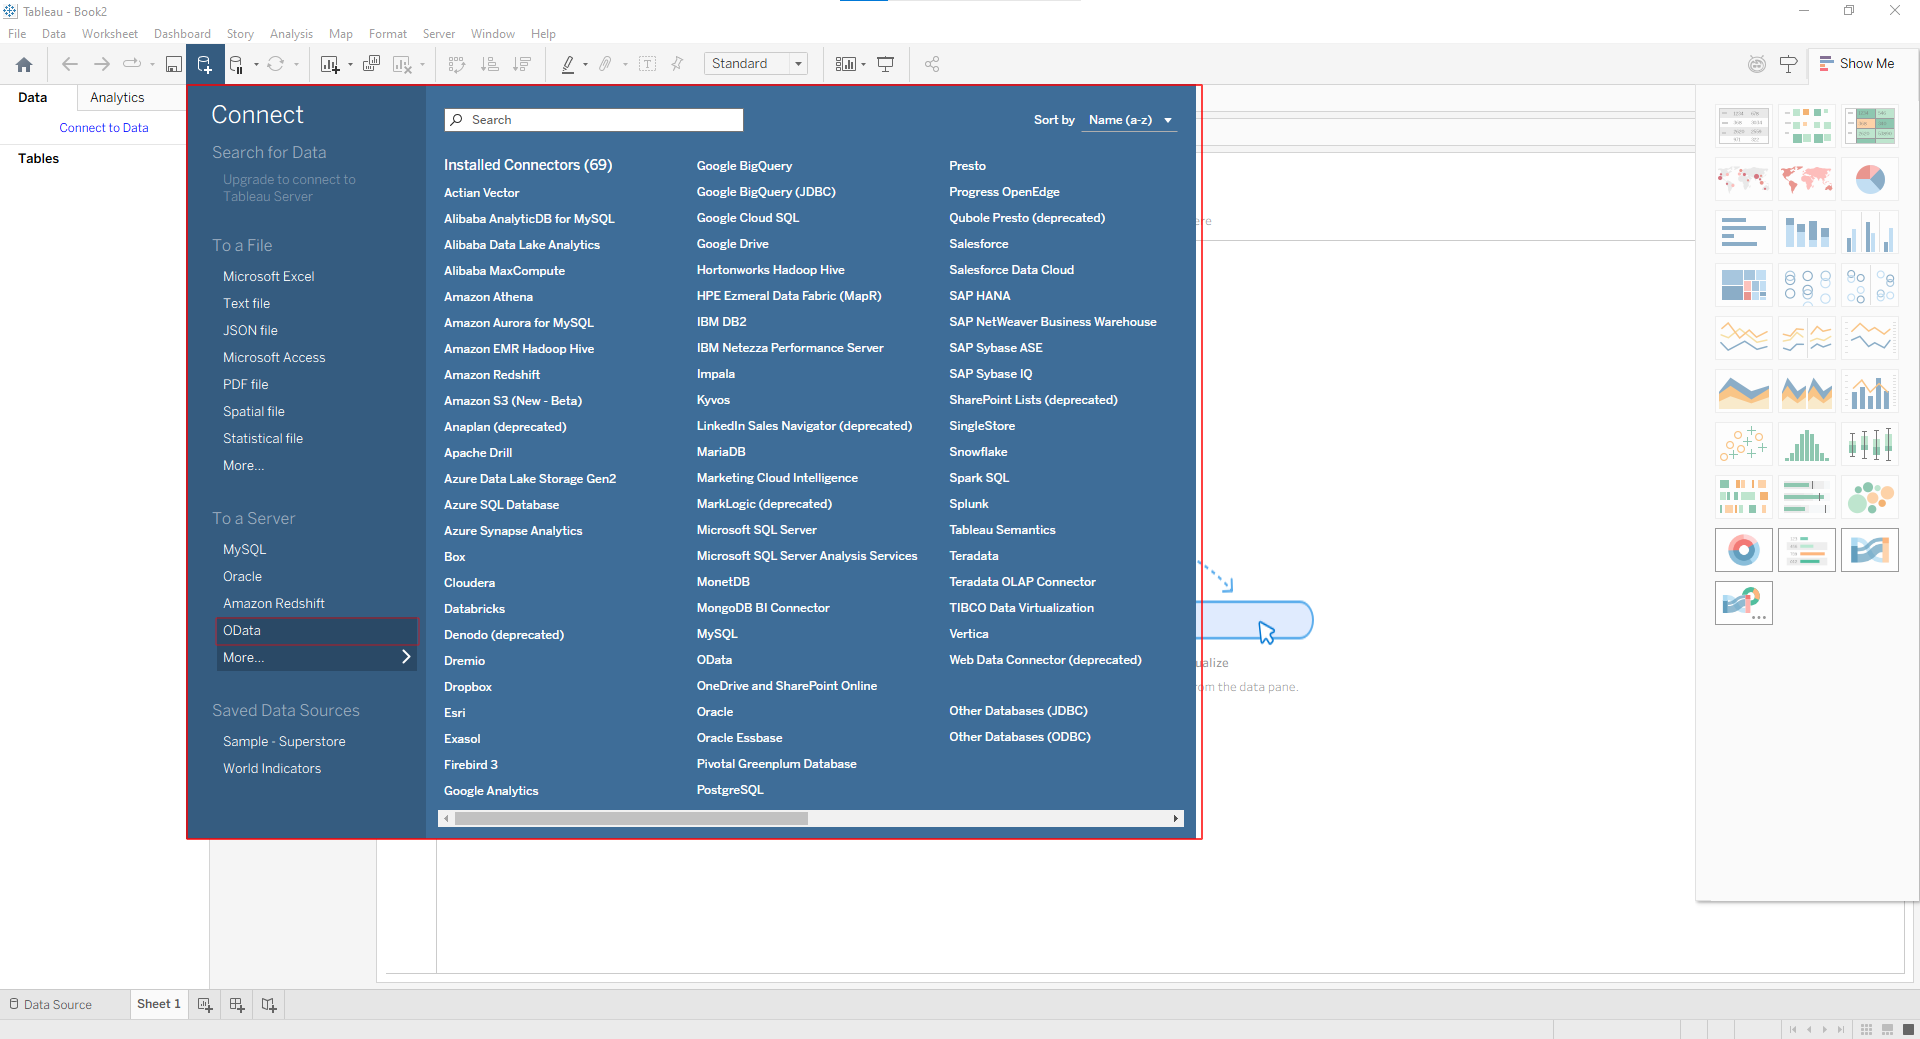
3. You can see different data sources in the opened wizard. Select OData.
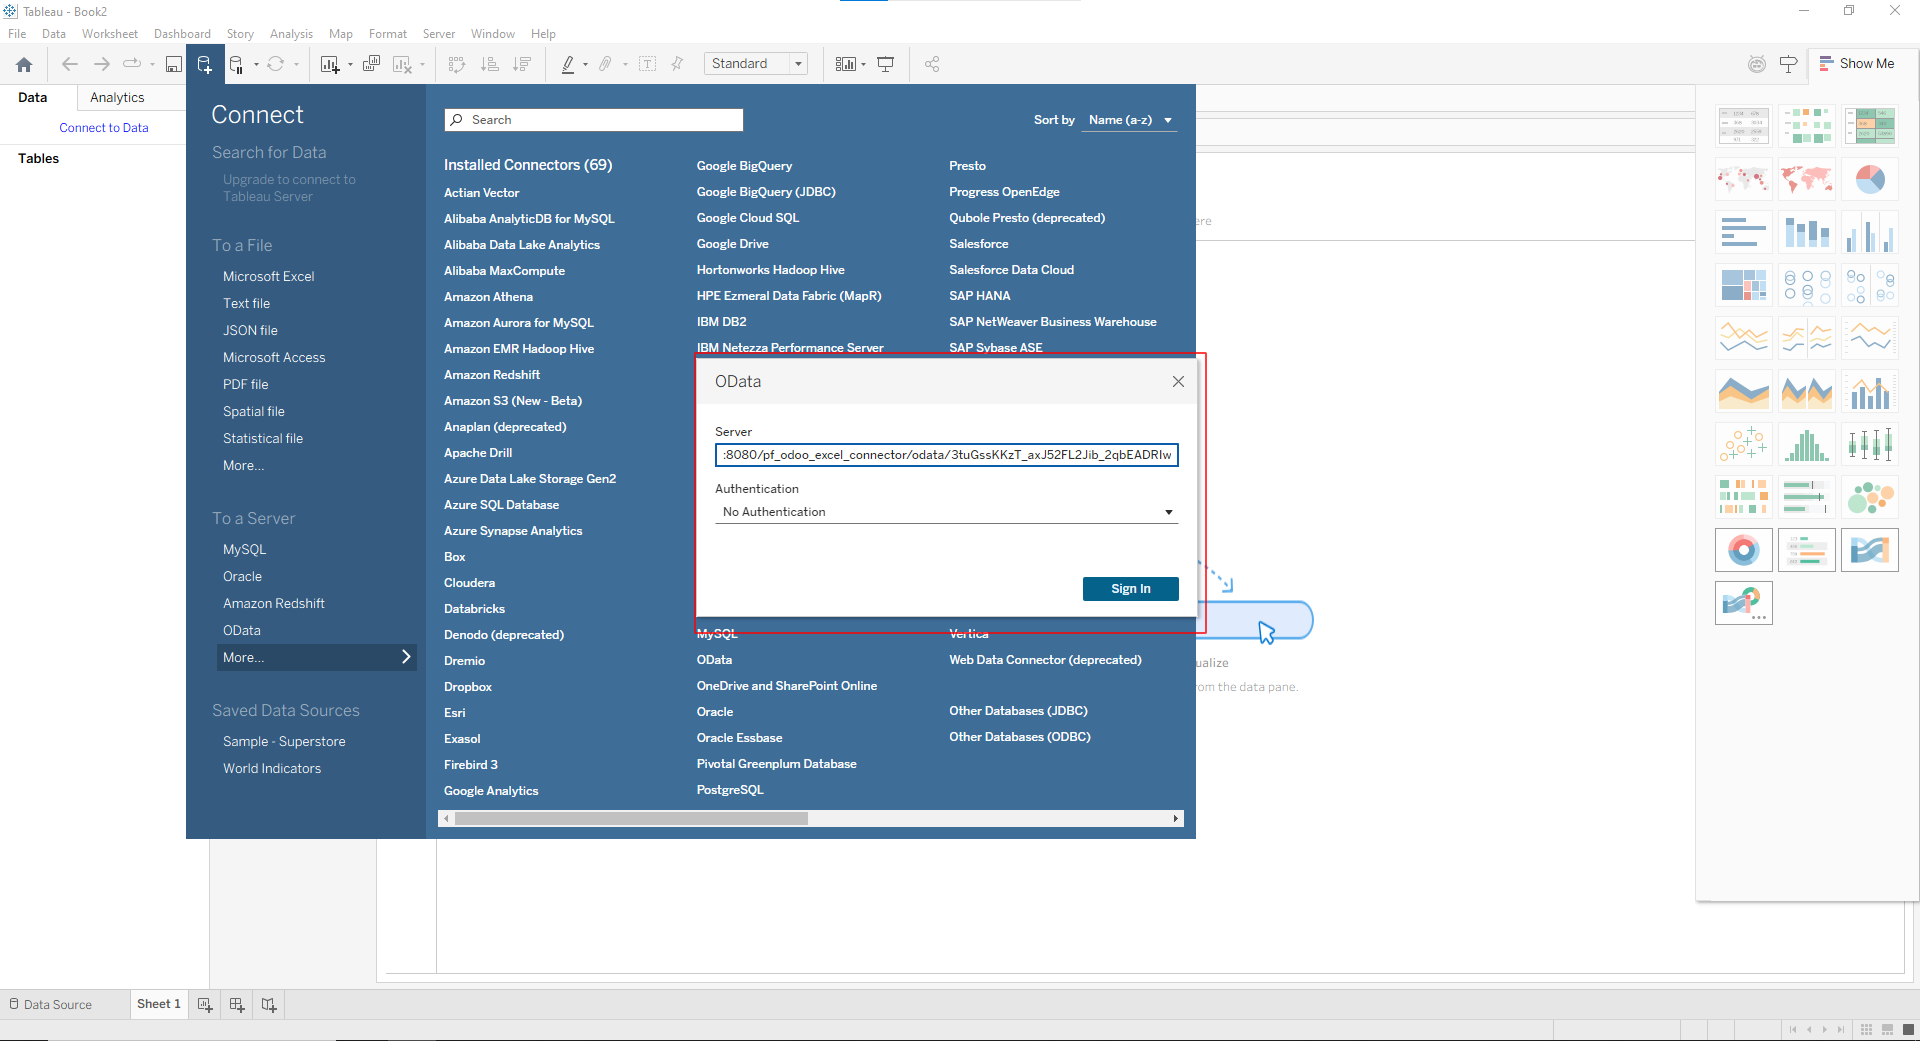
4. The OData wizard will open. Paste the OData URL there and click on the OK button.
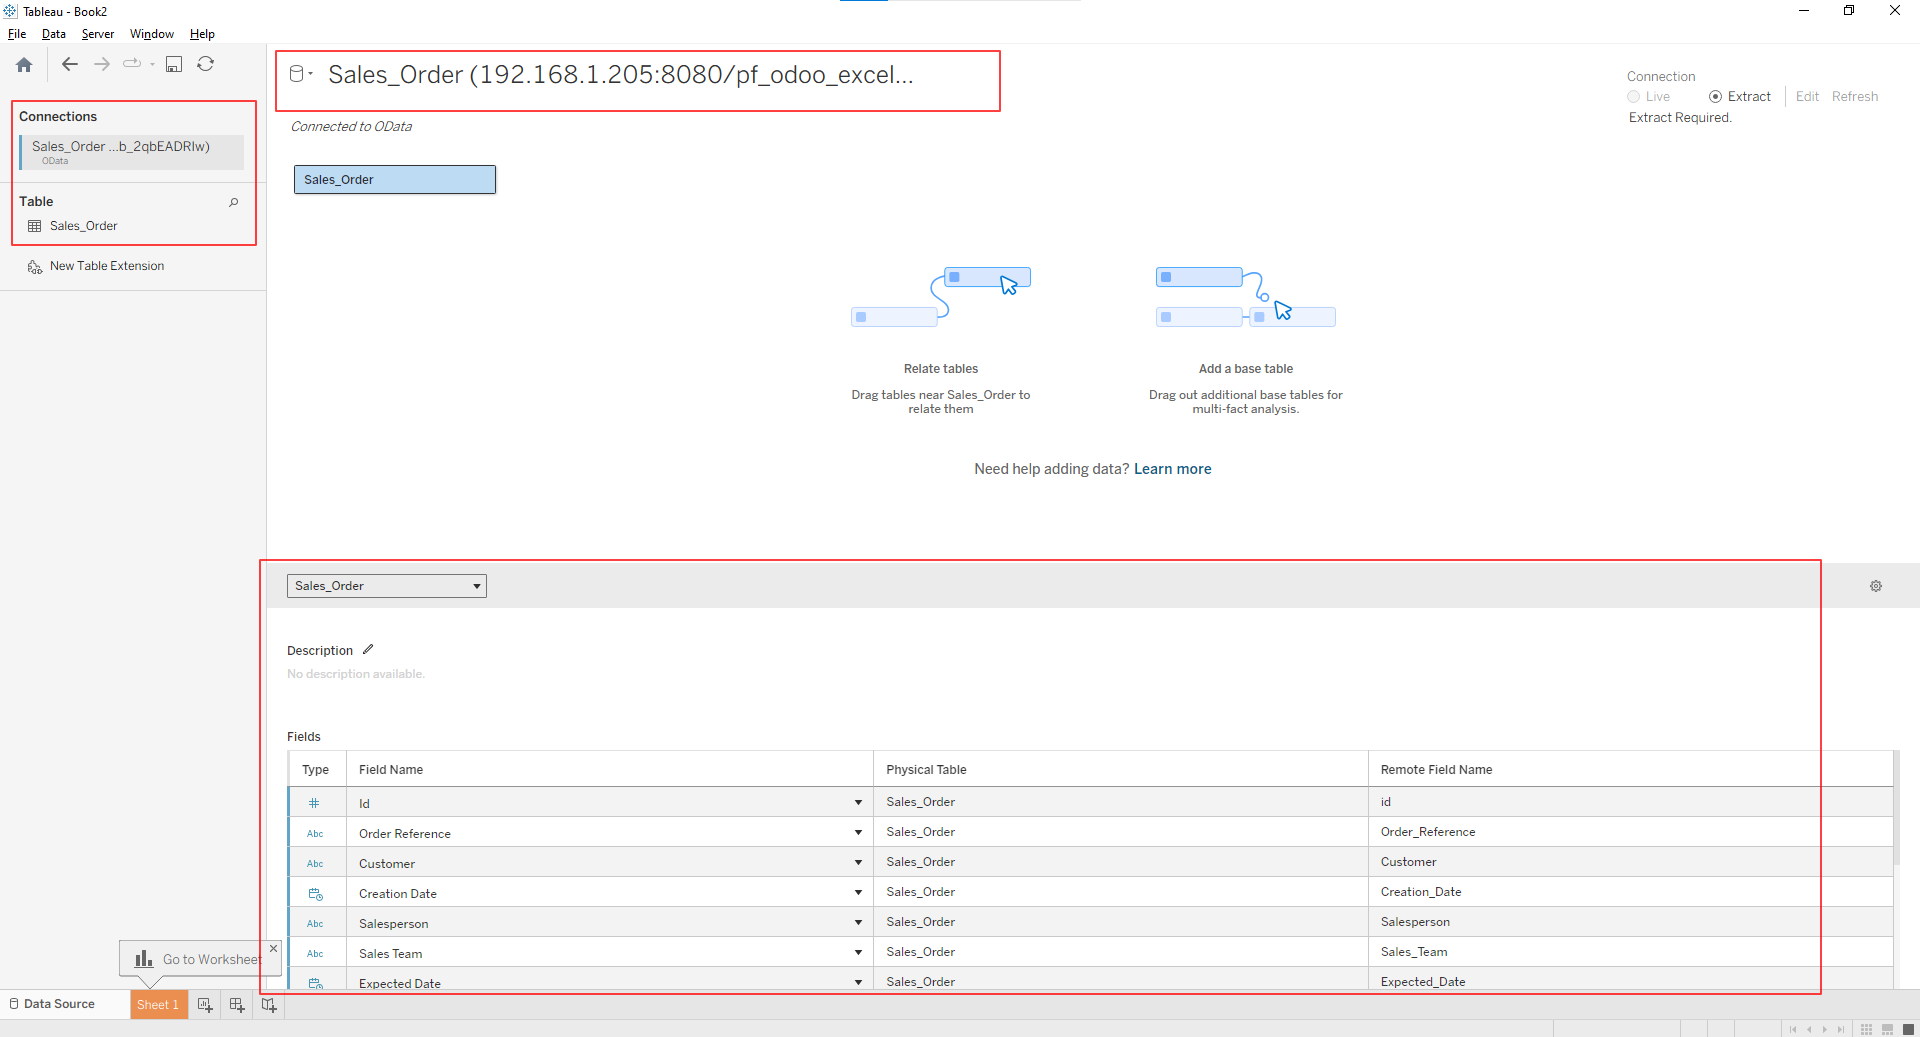
5. Once the live data feed successfully connects to Tableau, go to Sheet 1.
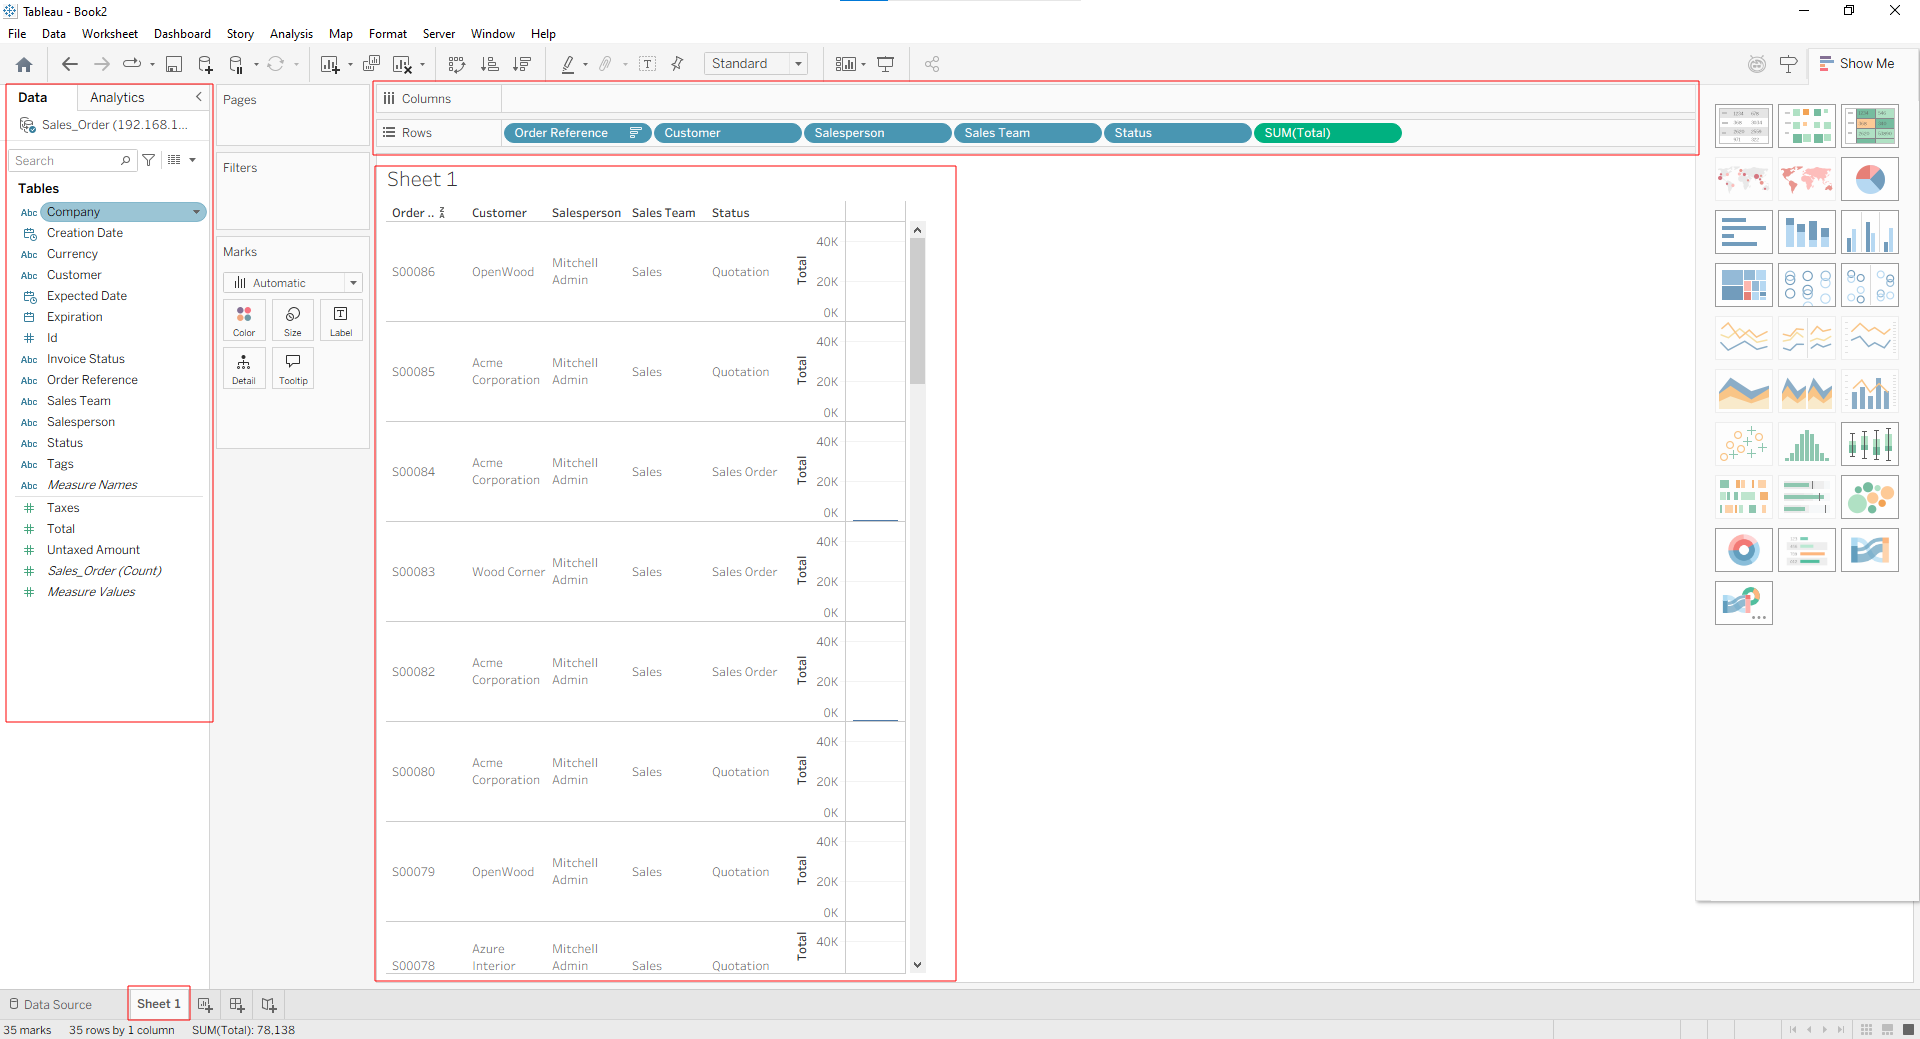
6. Now drag and drop fields into rows and columns based on your requirements.
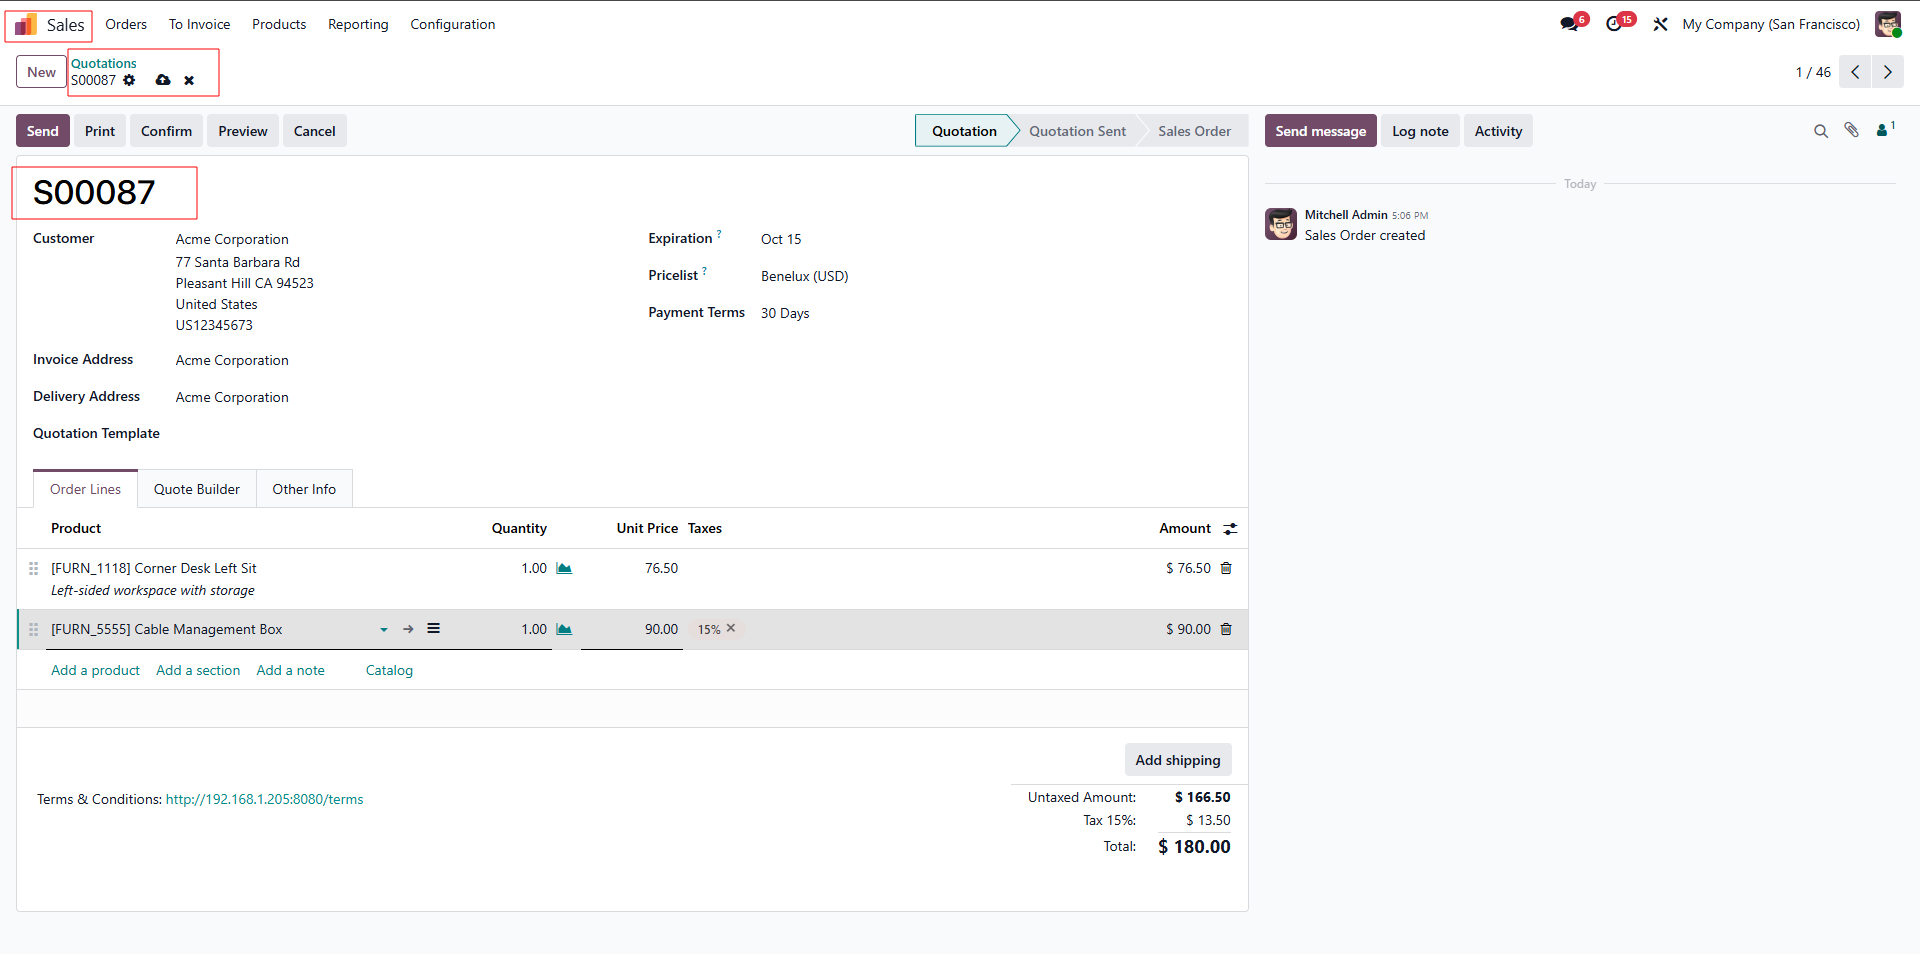
7. If you make a change in Odoo to the connected live data feed model (for example, Sales), create a new quotation in Odoo and save it.
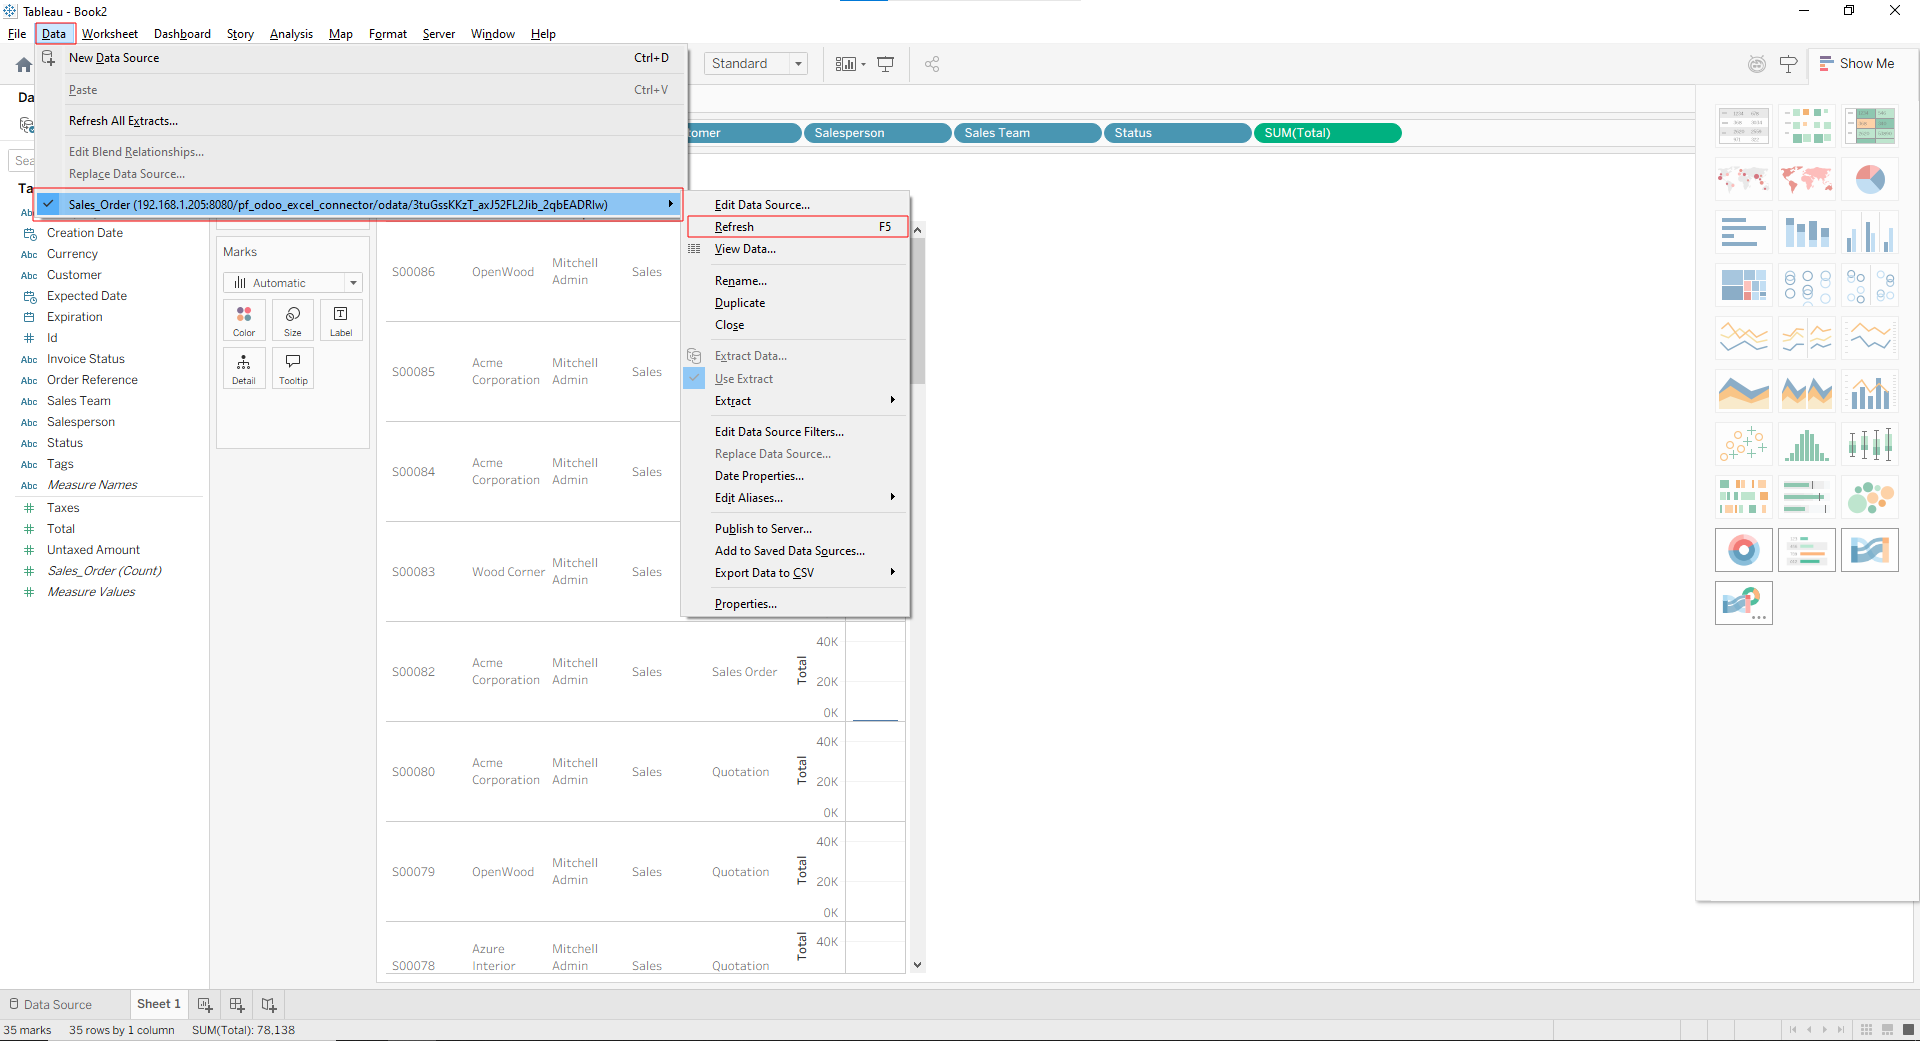
8. Go to Data → select your data source (named after your feed’s model, such as sale_order, which represents the feed model and OData URL) → Refresh.
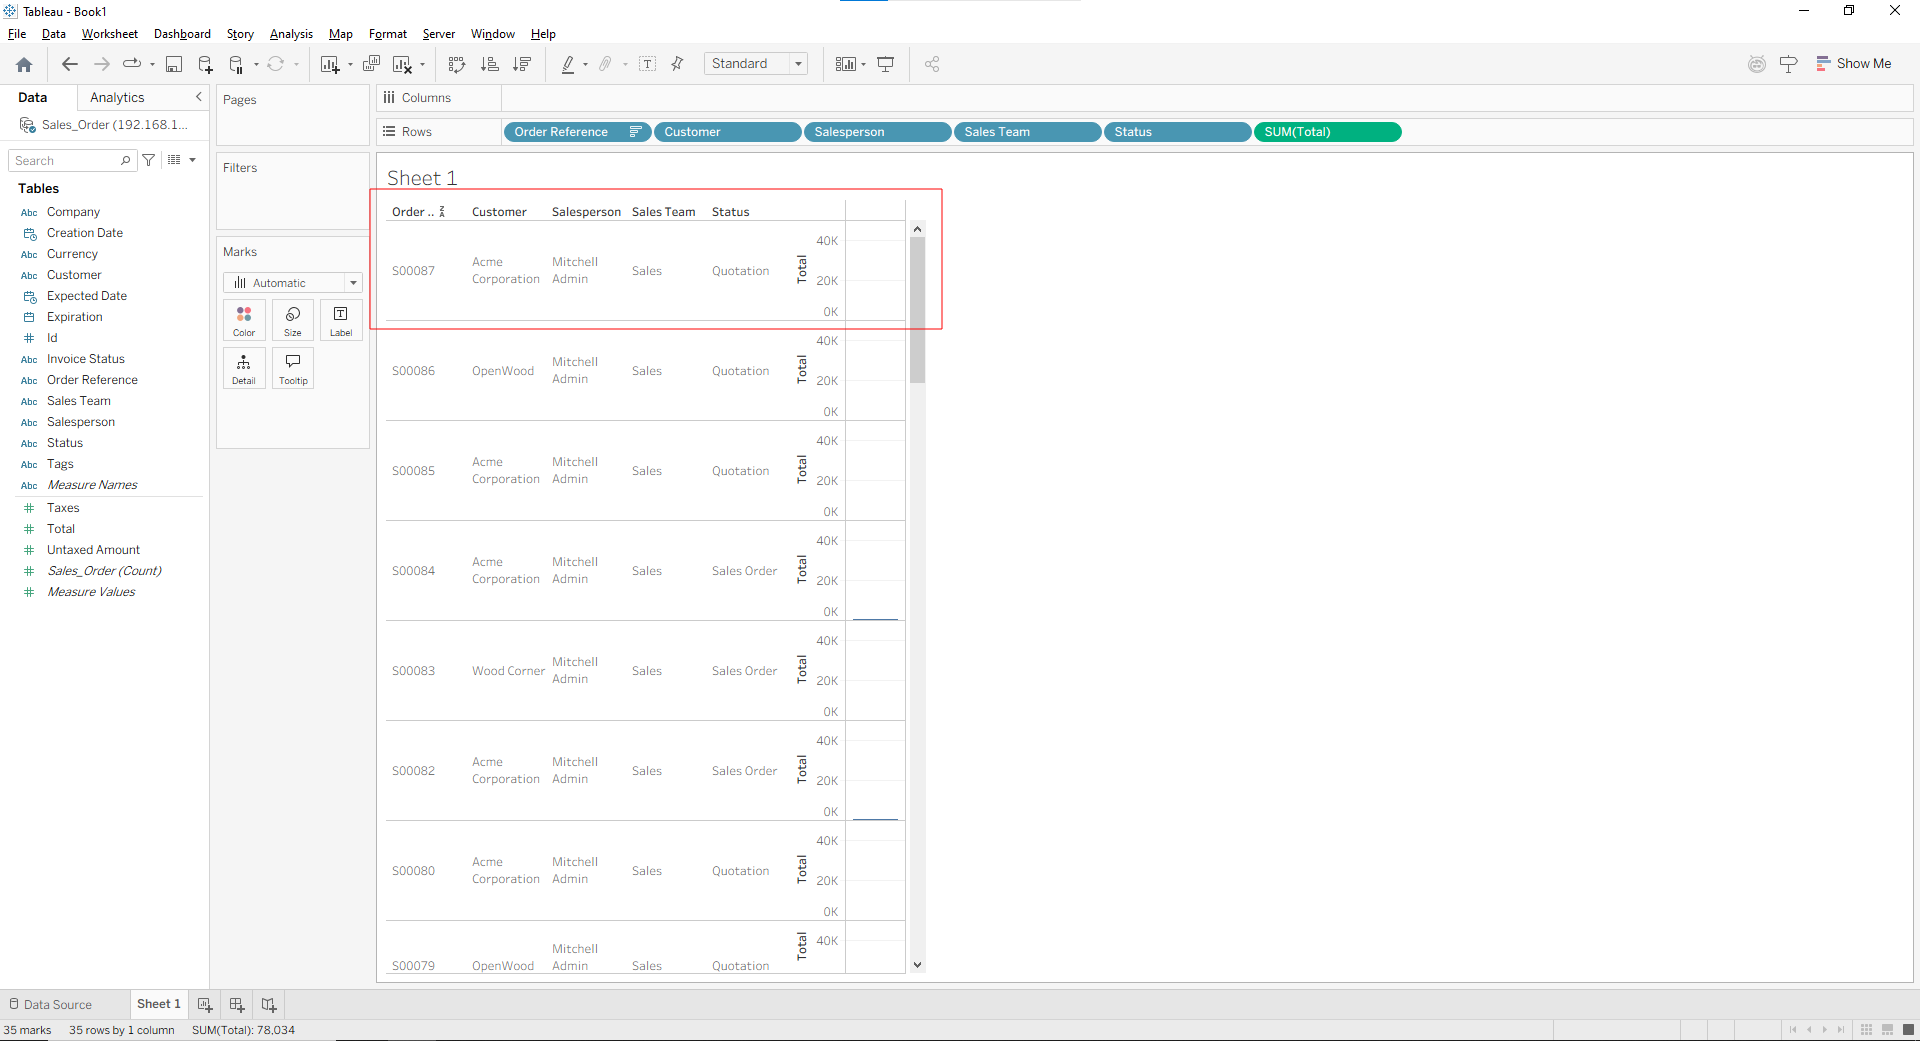
9. After refreshing Tableau, changes made to the data in Odoo are reflected in Tableau, allowing the updated records to be viewed. For example, the new quotation S00087 is displayed in the records.
Our solutions focus on your problems
- Odoo Implementation
- Odoo Customization
- ERP Development and Implementation
- Odoo Ipass Cloud
- AI for Odoo
- Odoo Apps
- Aws Marketplace Products
- Business Engines
Our Pricing includes User Manual, 90 Days Support (Monday-Friday 10am to 7pm IST) and One time Setup
• Works & tested on standard installations of Odoo with no third party apps,
• Free support only for odoo installations with no third party apps,
• Paid support available for Odoo installations with third party apps.

Prefortune is a Odoo Official Partner, Odoo Development company. Our philosophy is to use Open Source tools and technologies to provide cost effective and green solutions for our customers.
Prefortune Technologies LLP is working on web development, Mobile development, and Odoo ERP.
If you need any help or want more additional features, you may contact us through:
Alternative Products
These other products might interest you
Specifications
| Version | 20.0, 19.0, 18.0, 17.0, 16.0, 15.0, 14.0 |