Watch Quick Video
POS - Appointment Management System
Our
Odoo – POS - Appointment Management System module is a complete, all-inclusive solution that delivers full appointment scheduling to the Point of Sale, eliminating the need for a separate booking tool. Staff can open up a calendar on the POS screen, see open slots by team or employee, and book a new appointment with the customer details, selected services and preferred date/time. Allow booking, advance payments, booking receipts (print or email), automatic email confirmations per POS config with configurable settings. Managers can When a booking is created appointments flow into a dedicated backend model with draft/confirmed/done/cancel states. Appointments are directly linked to the resulting POS order for full traceability. The manager can create reports of appointment summaries (screen popup + pdf) filtered by date, team or employee. The module also adds appointment fields to products (toggle to be a “appointment product”, set duration) so the scheduling logic knows which products are services that can be booked.
POS - Appointment Management System Features
- Schedule customer appointments directly from the POS screen without disrupting the sale flow.
- Take a deposit at booking time, and apply it directly as a payment line on the eventual order.
- Send customers confirmation emails of their booking and give them a print or email receipt for their appointment.
- Generate summary reports by date, team or employee, viewable in POS and exportable as PDF.
- Allocate every booking to a designated service team or individual staff member.
Complete Workflow for Manage POS - Appointment Management System
Enable the POS - Appointment Management System Cashier opens POS → clicks "Book Appointment" → picks customer, service(s), team/employee, date & time (optionally takes advance payment) → appointment saved and, on the appointment date, staff opens it from the calendar to convert it straight into a POS order for checkout, with receipt/email confirmation sent automatically per settings.
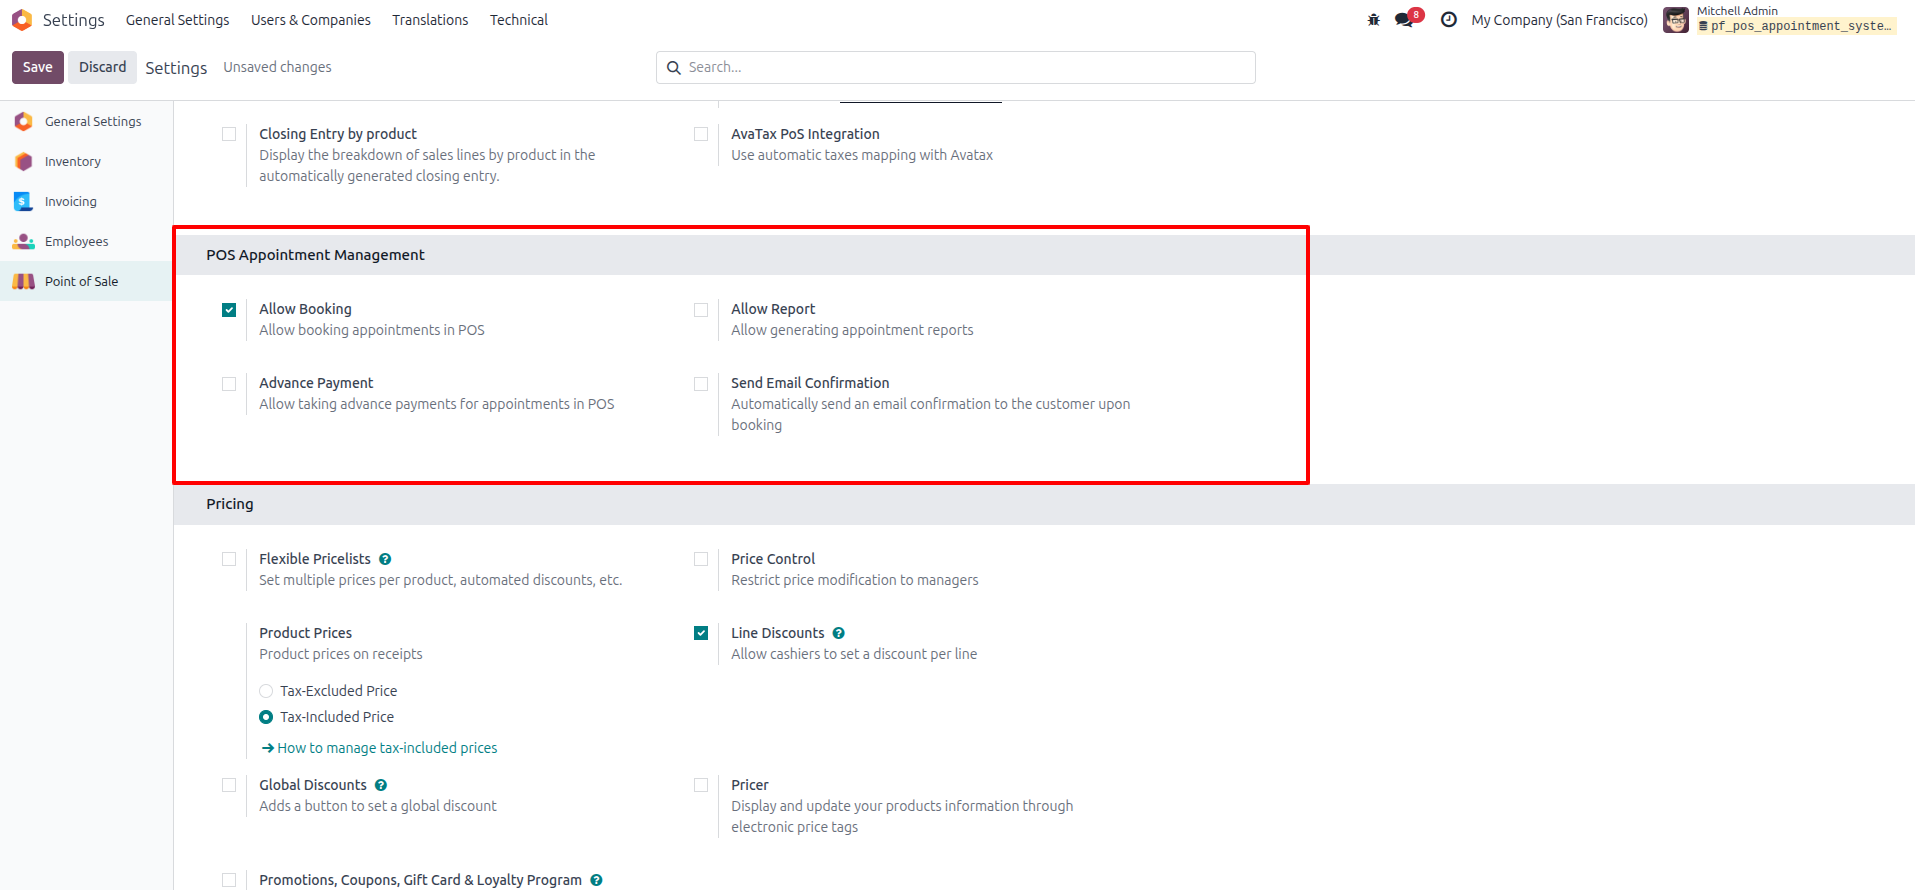
1.Go to the Point of Sale configuration settings. Under the POS Appointment Management section, check the box for Allow Booking to enable appointment bookings within your POS system.
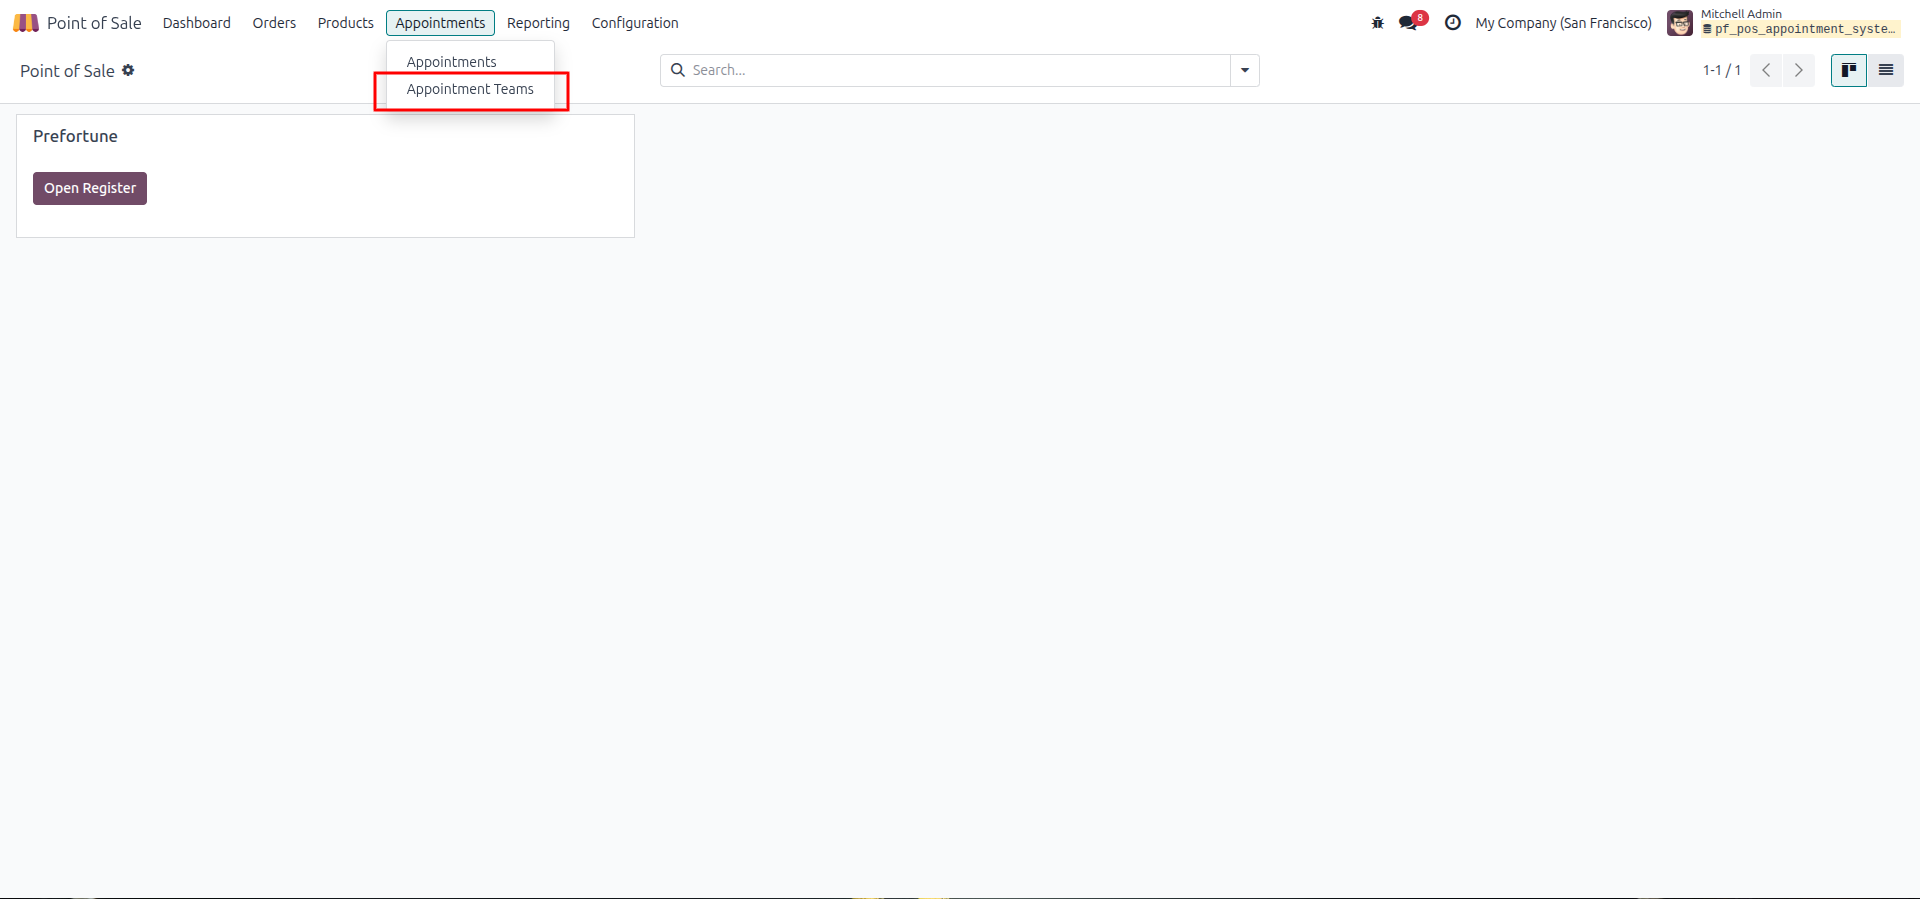
2.From the Point of Sale dashboard menu, navigate to Appointments and select Appointment Teams from the dropdown menu to manage your service staff.
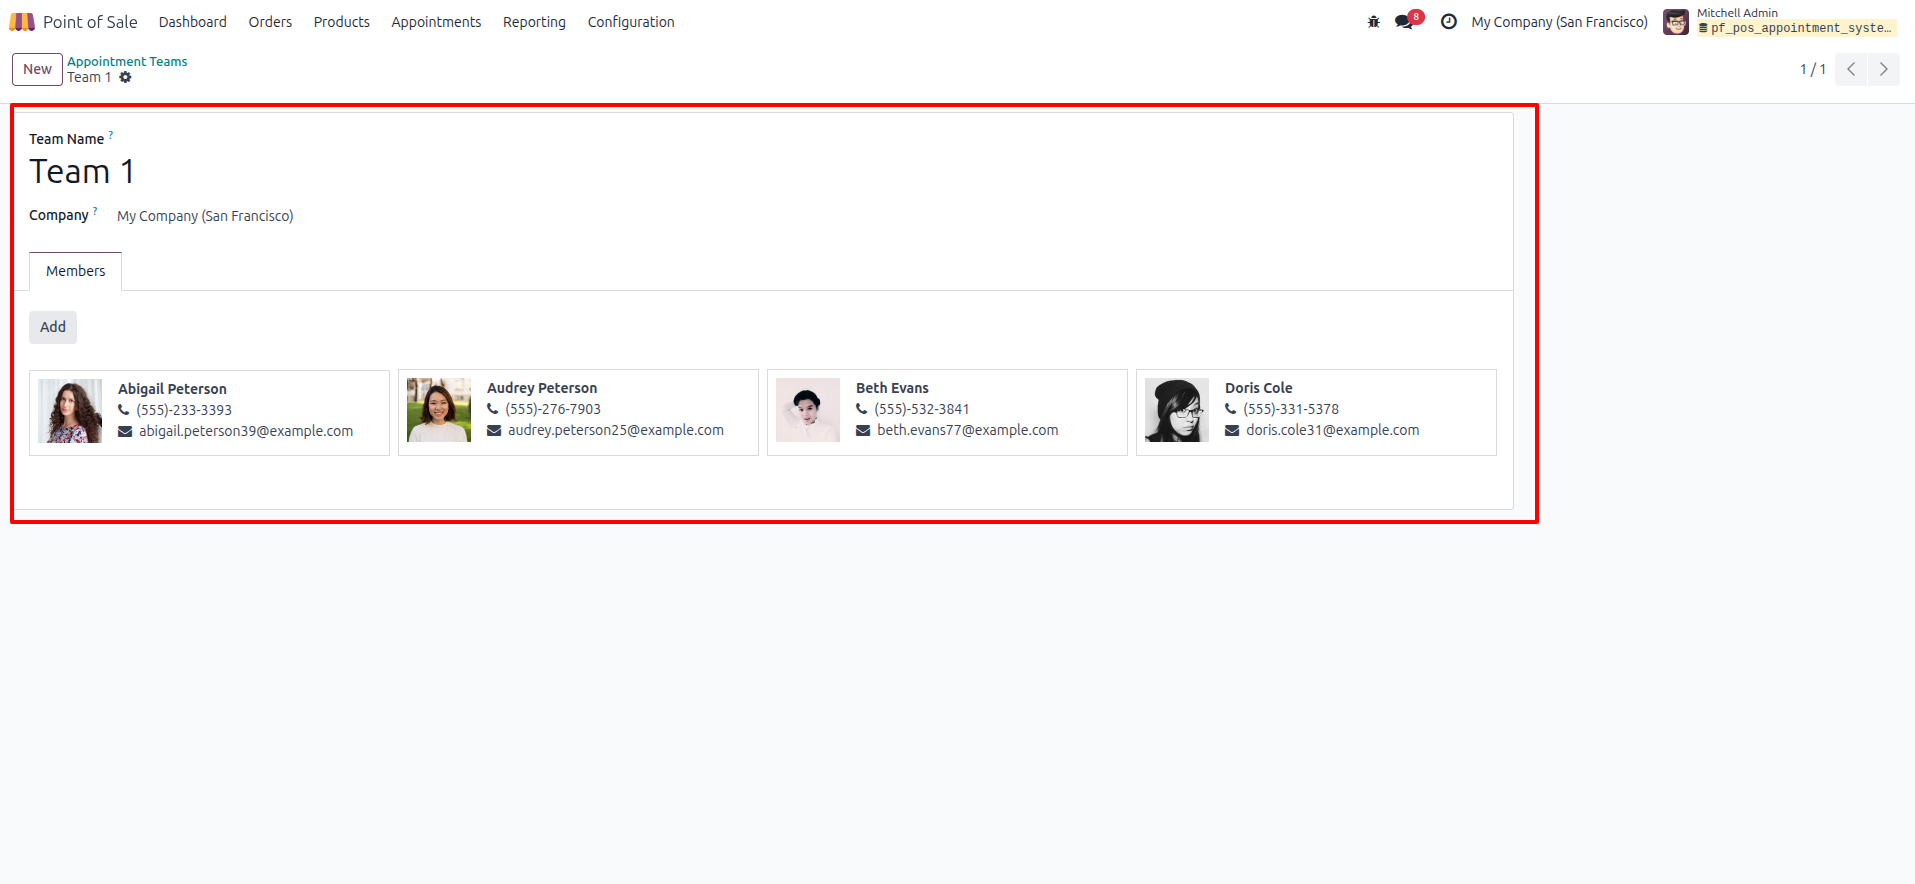
3.Create or edit a team (e.g., "Team 1"). Here, you can assign a Team Name and add individual employees to the Members list who will be responsible for handling the appointments for this team.
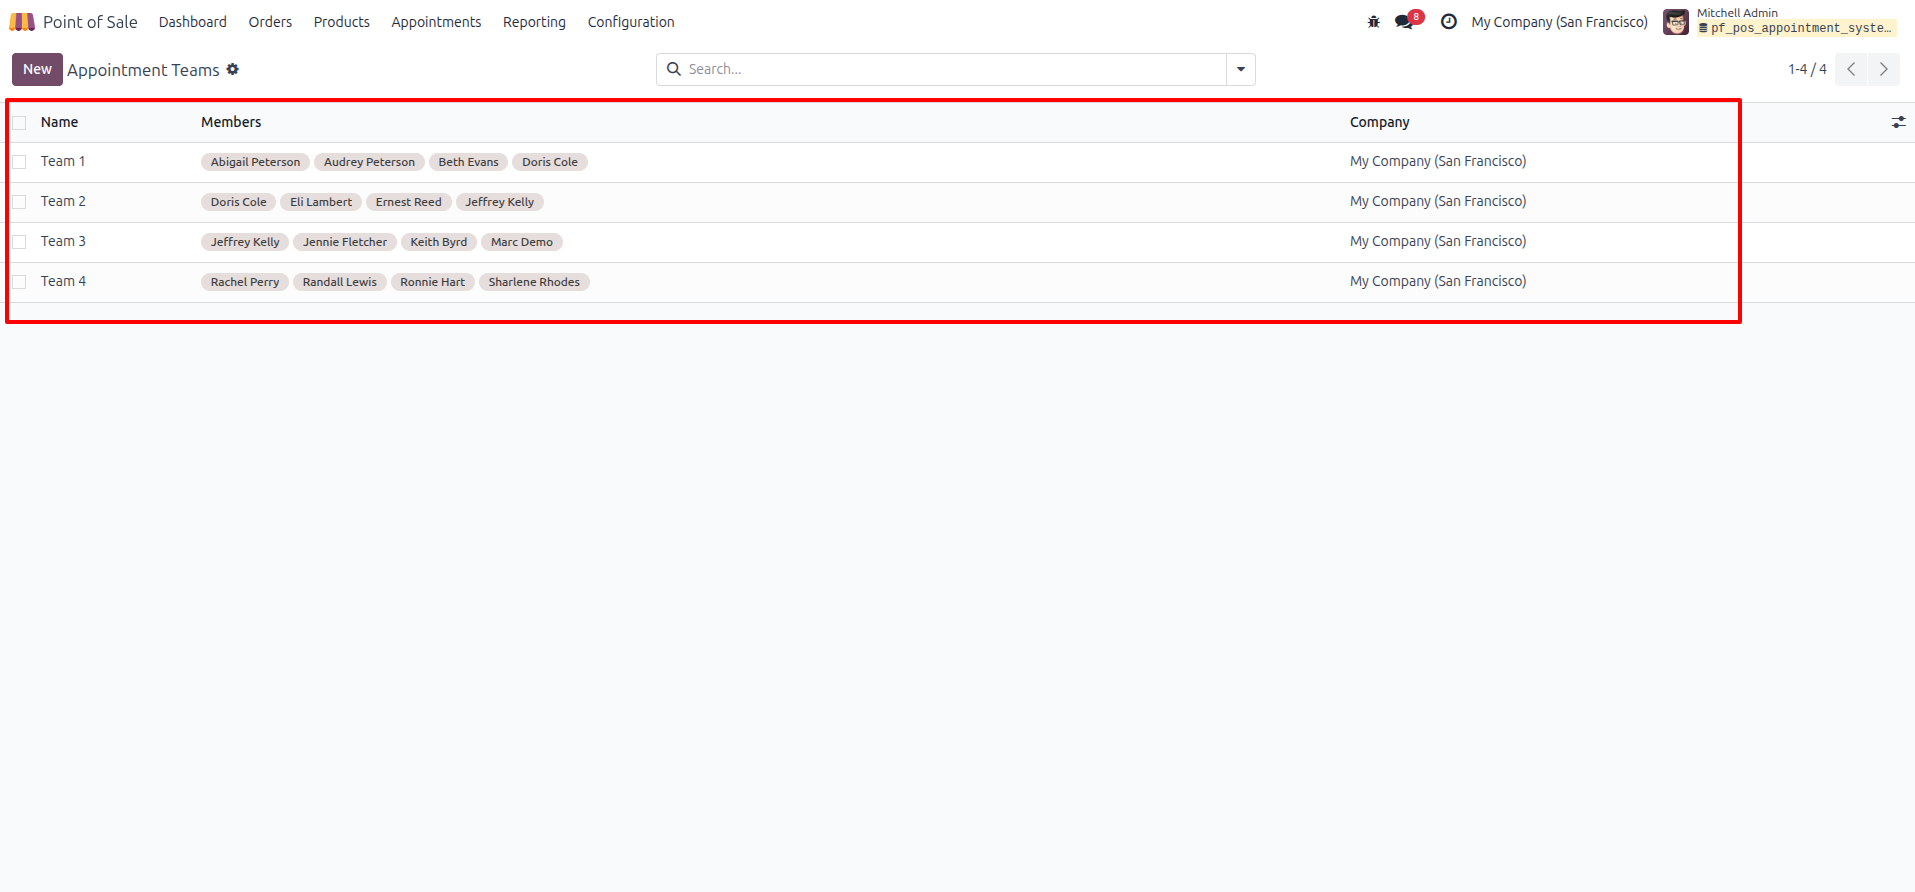
4.The list view displays all created Appointment Teams (e.g., Team 1, Team 2, Team 3, Team 4). This allows you to verify that all members and companies are correctly assigned across your organization.
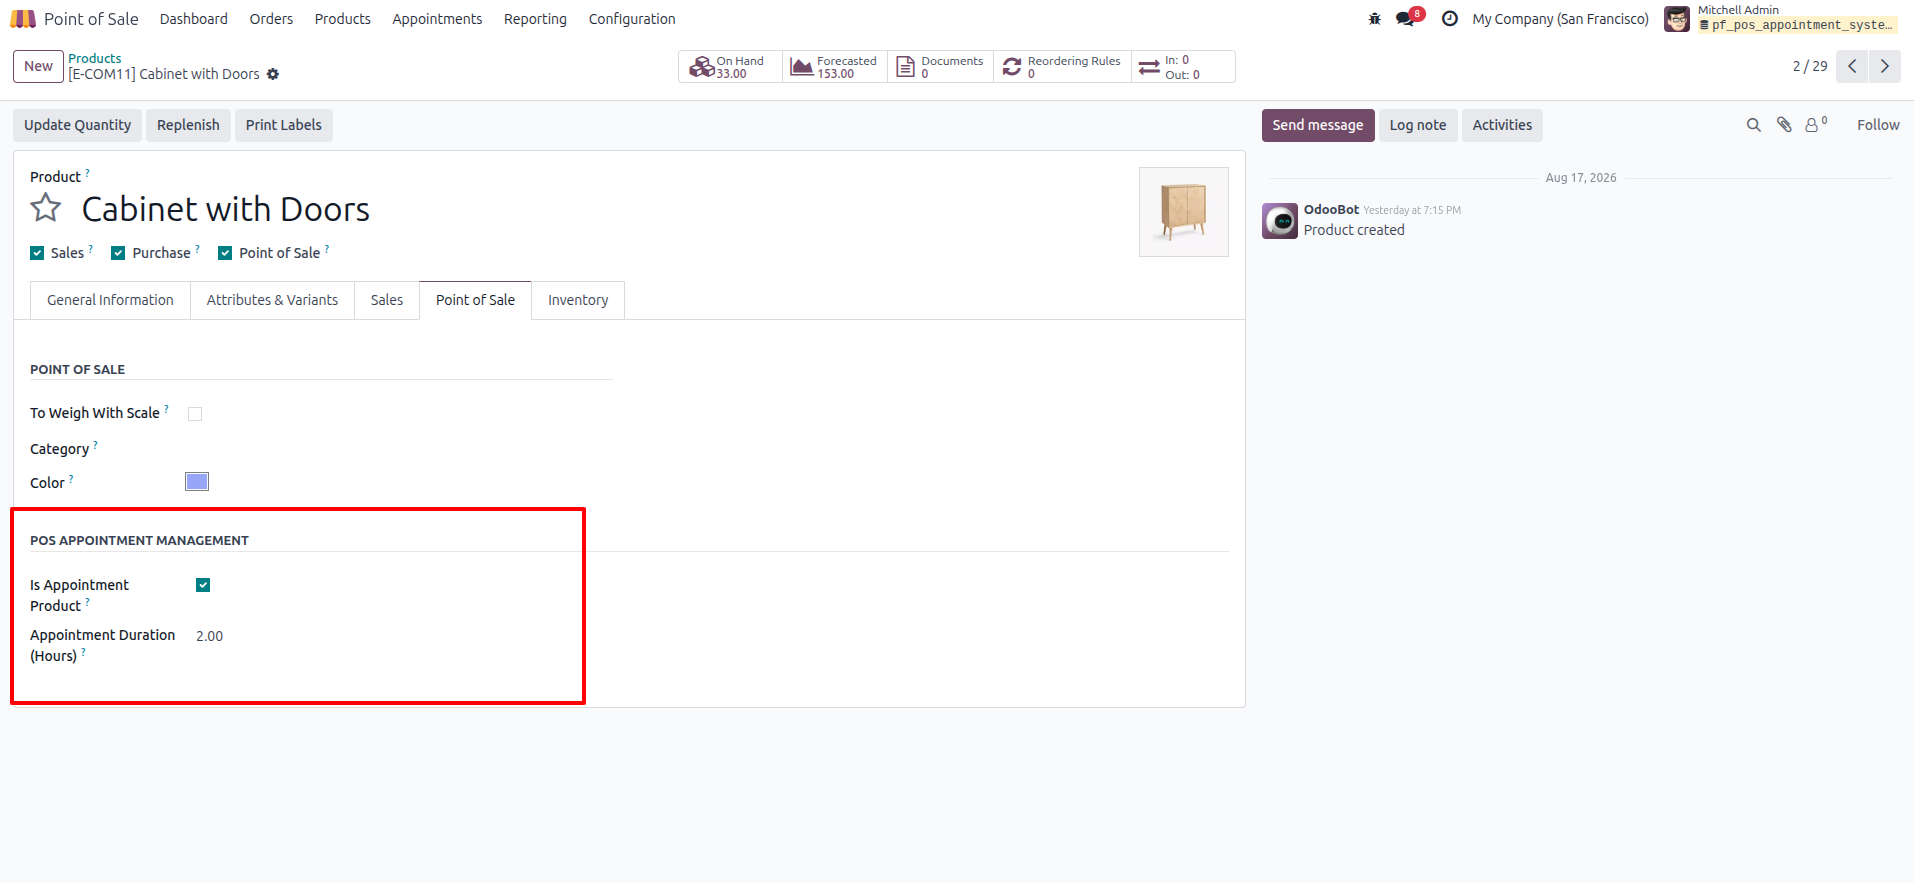
5.Open a product's configuration page (e.g., "Cabinet with Doors"). Navigate to the Point of Sale tab. Under the POS APPOINTMENT MANAGEMENT section, check the box for Is Appointment Product and define the standard Appointment Duration (e.g., 2.00 Hours).
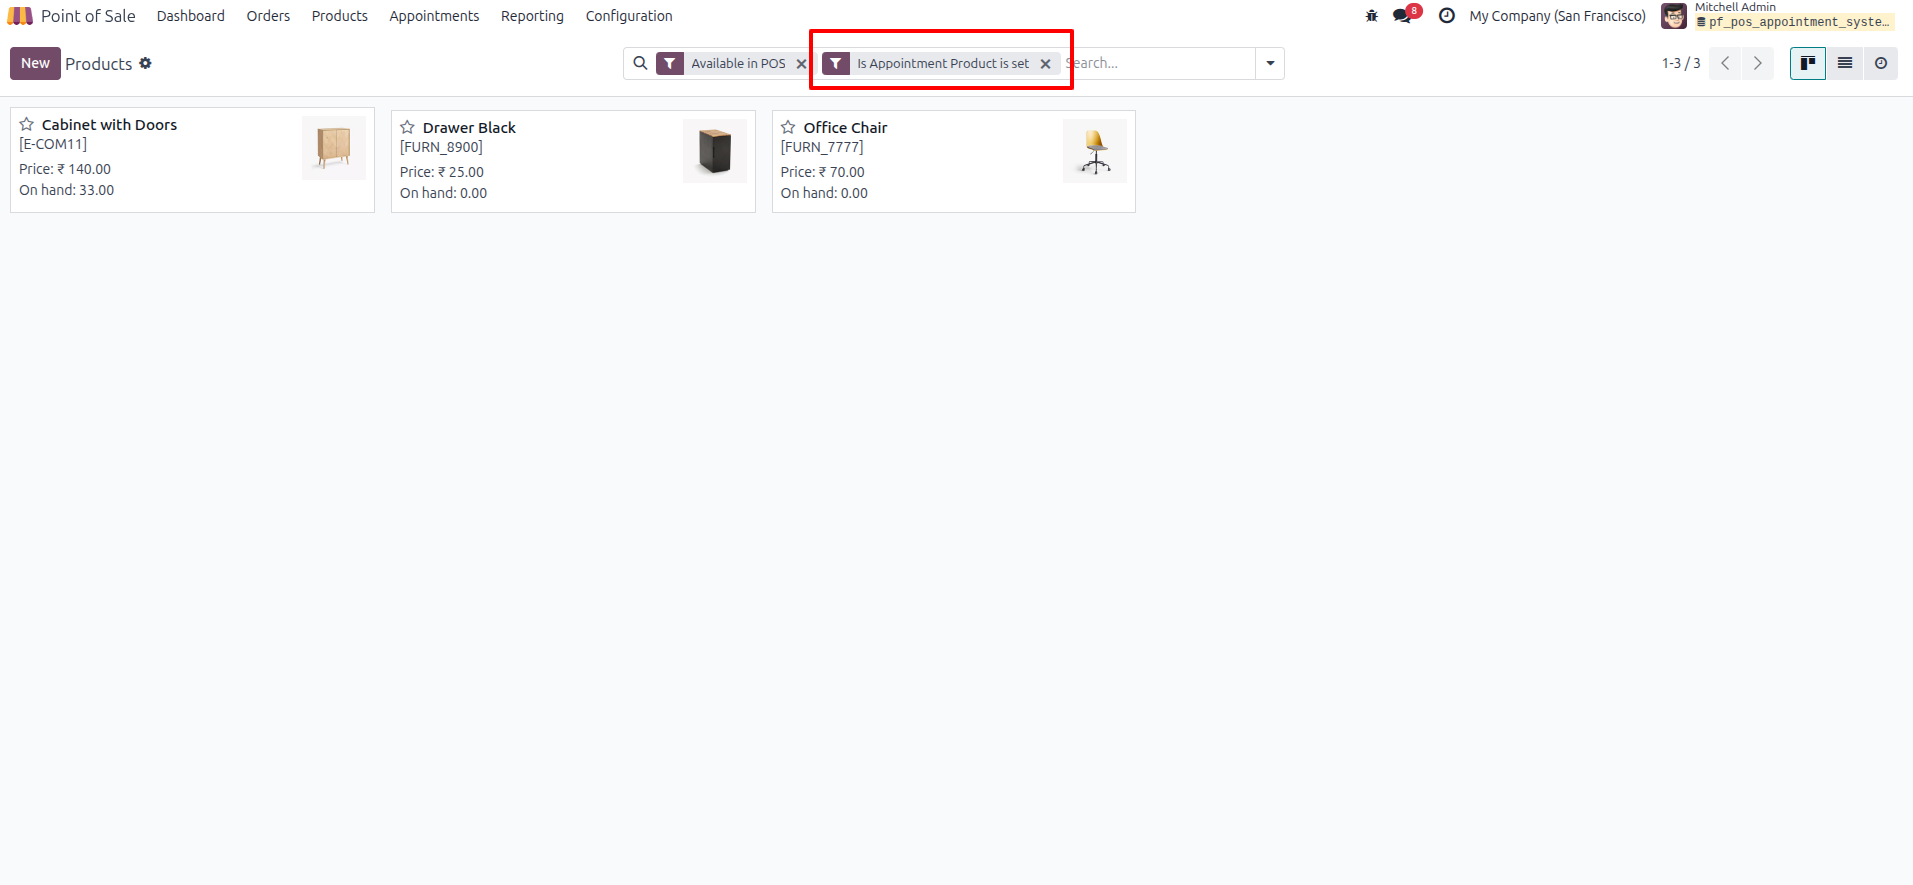
6.In your Products list, use the search bar filters to apply "Available in POS" and "Is Appointment Product is set". This verifies which products are successfully configured to be booked as appointments.
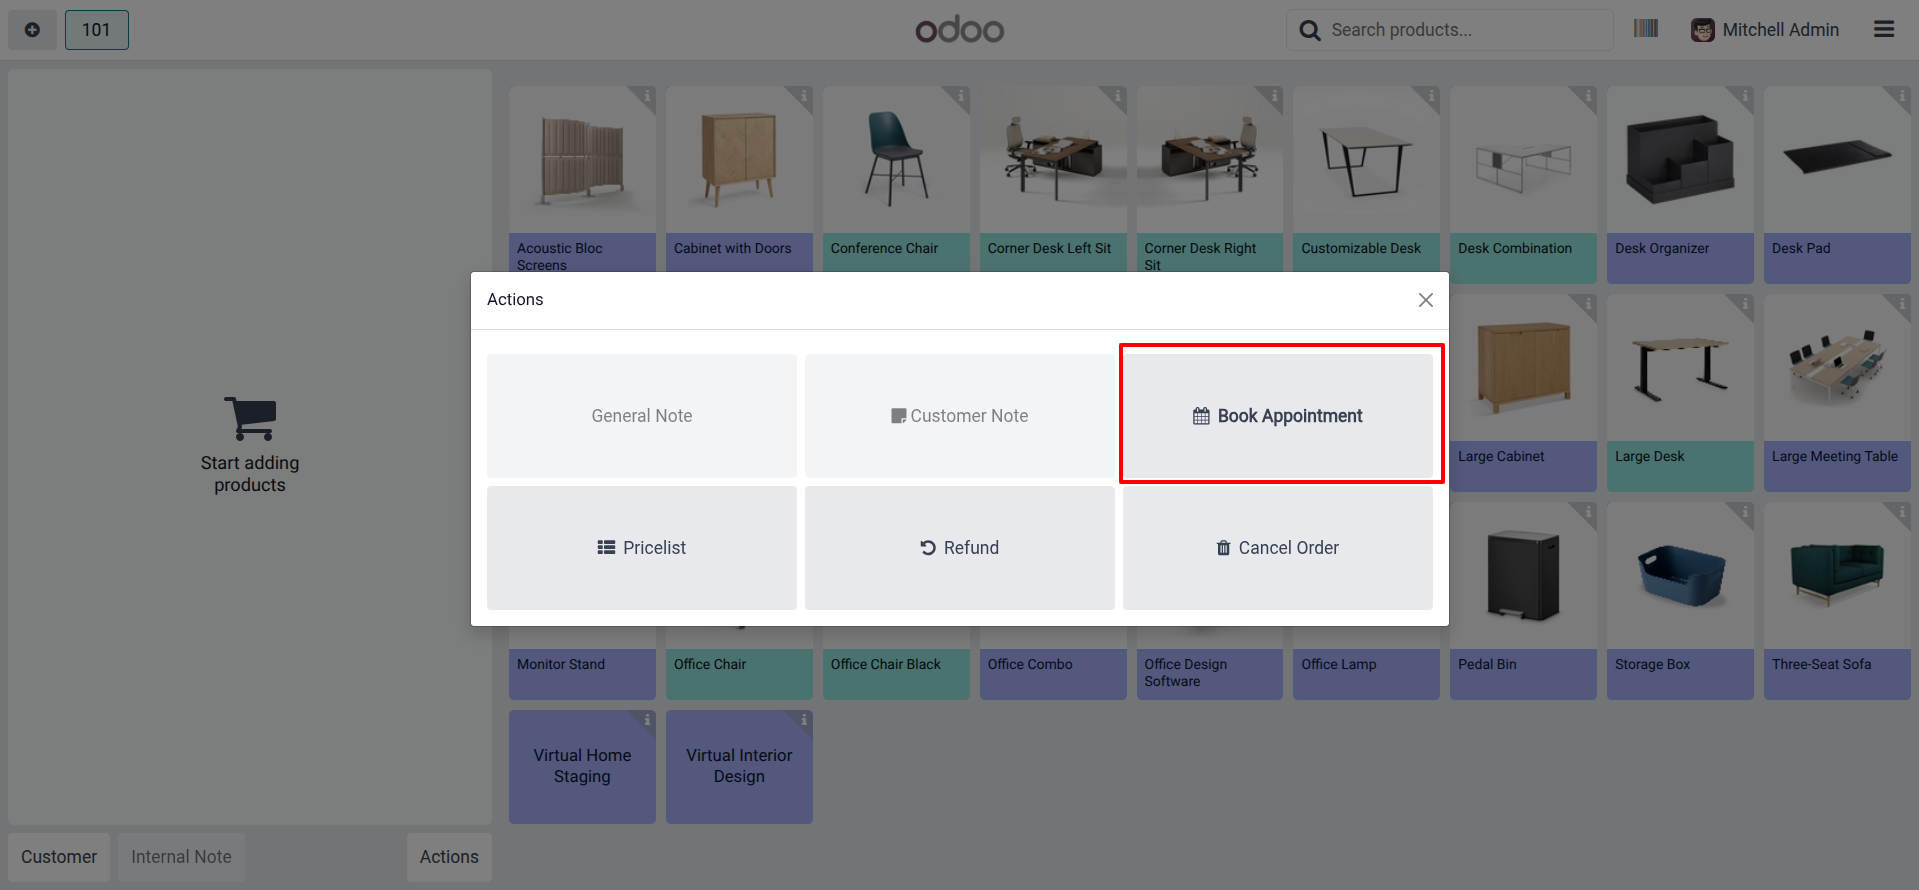
7.Open a Point of Sale session (frontend). Click the Actions button to open the action menu, and then click Book Appointment to access the scheduling calendar.
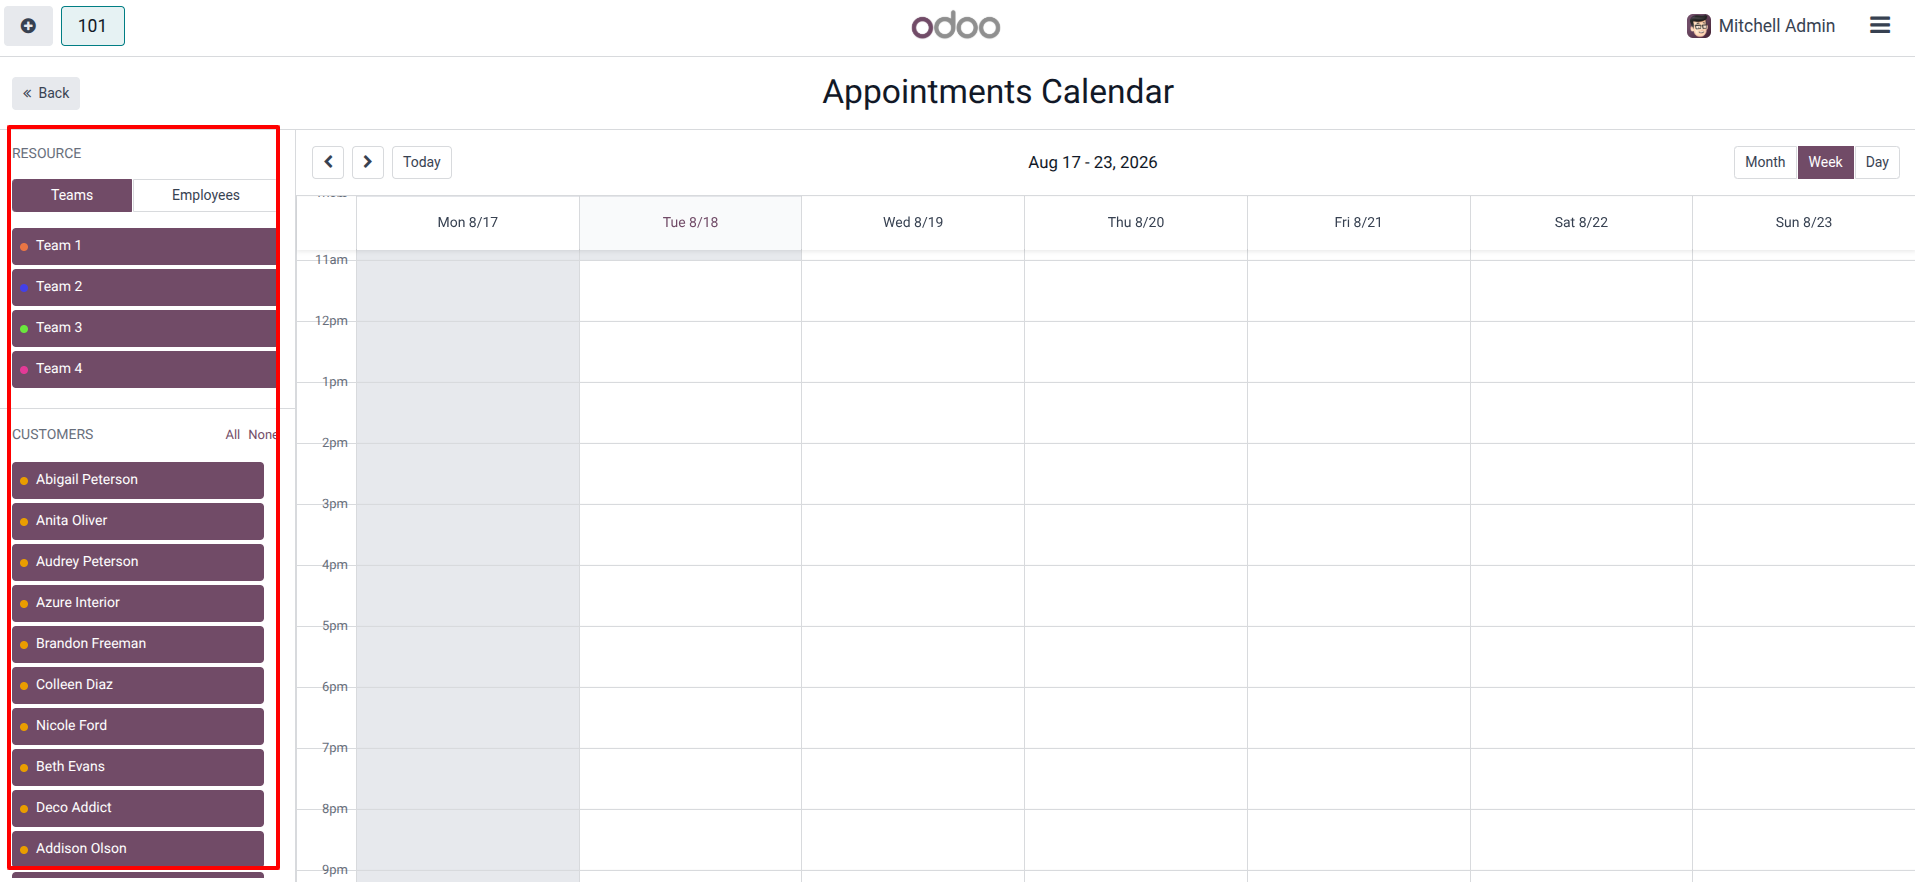
8.The POS Appointments Calendar will load. On the left-hand panel, you can filter the calendar schedule by RESOURCE (either by Teams or individual Employees) and by specific CUSTOMERS to see availability.
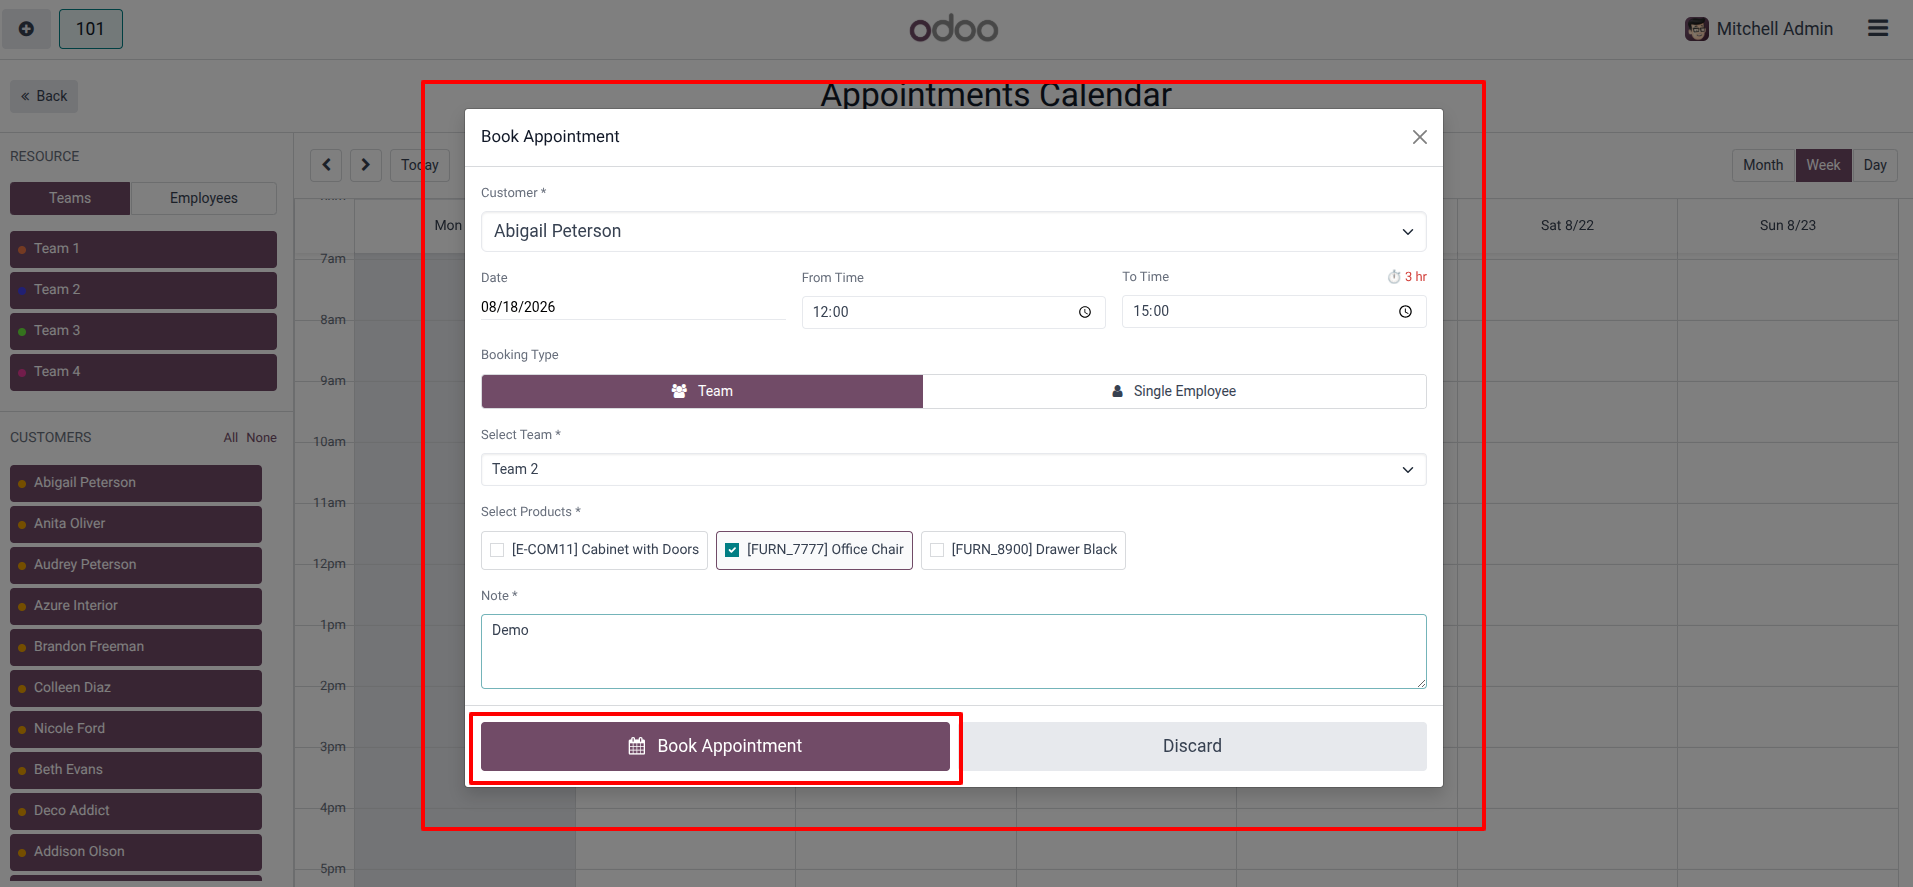
9.Click on an available time slot in the calendar to open the Book Appointment modal. Select the Customer, Date, Time, and Booking Type. Choose the designated Team and the Appointment Product you are booking. Add any necessary notes, and finally, click the Book Appointment button at the bottom to finalize the schedule.
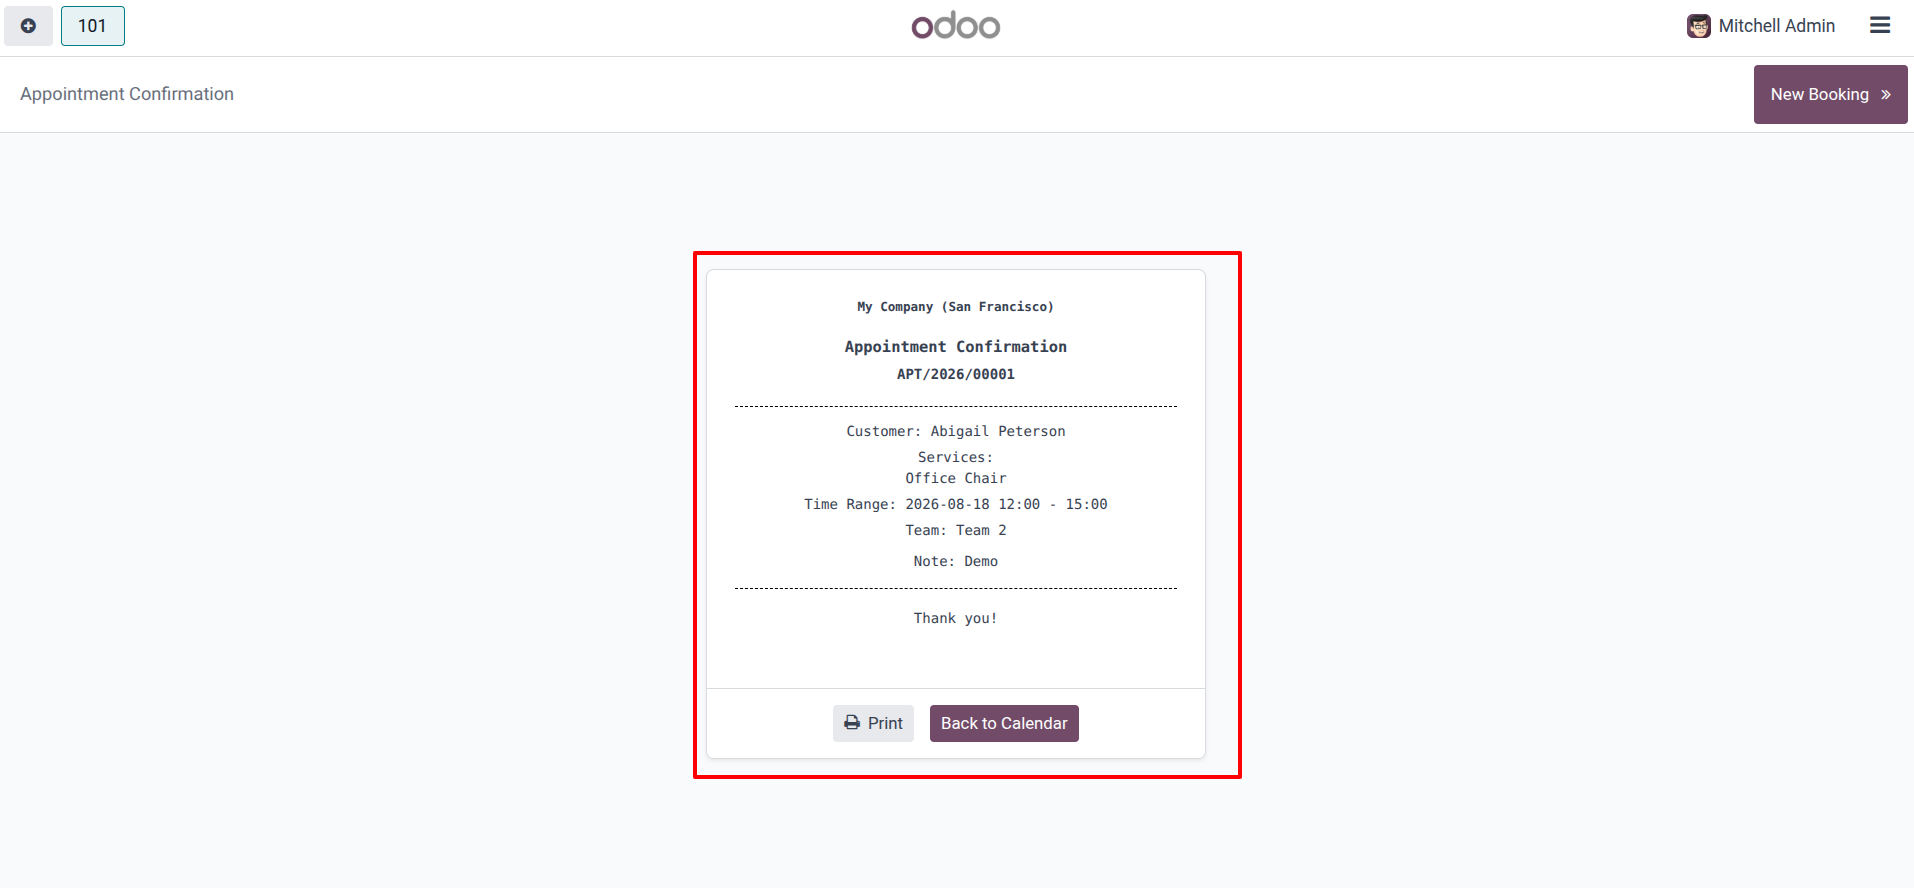
10.This ticket summarizes the booking, including the Reference number (e.g., APT/2026/00001), Customer, Services, Time Range, Team, and any Notes. You can choose to Print this confirmation or go Back to Calendar.
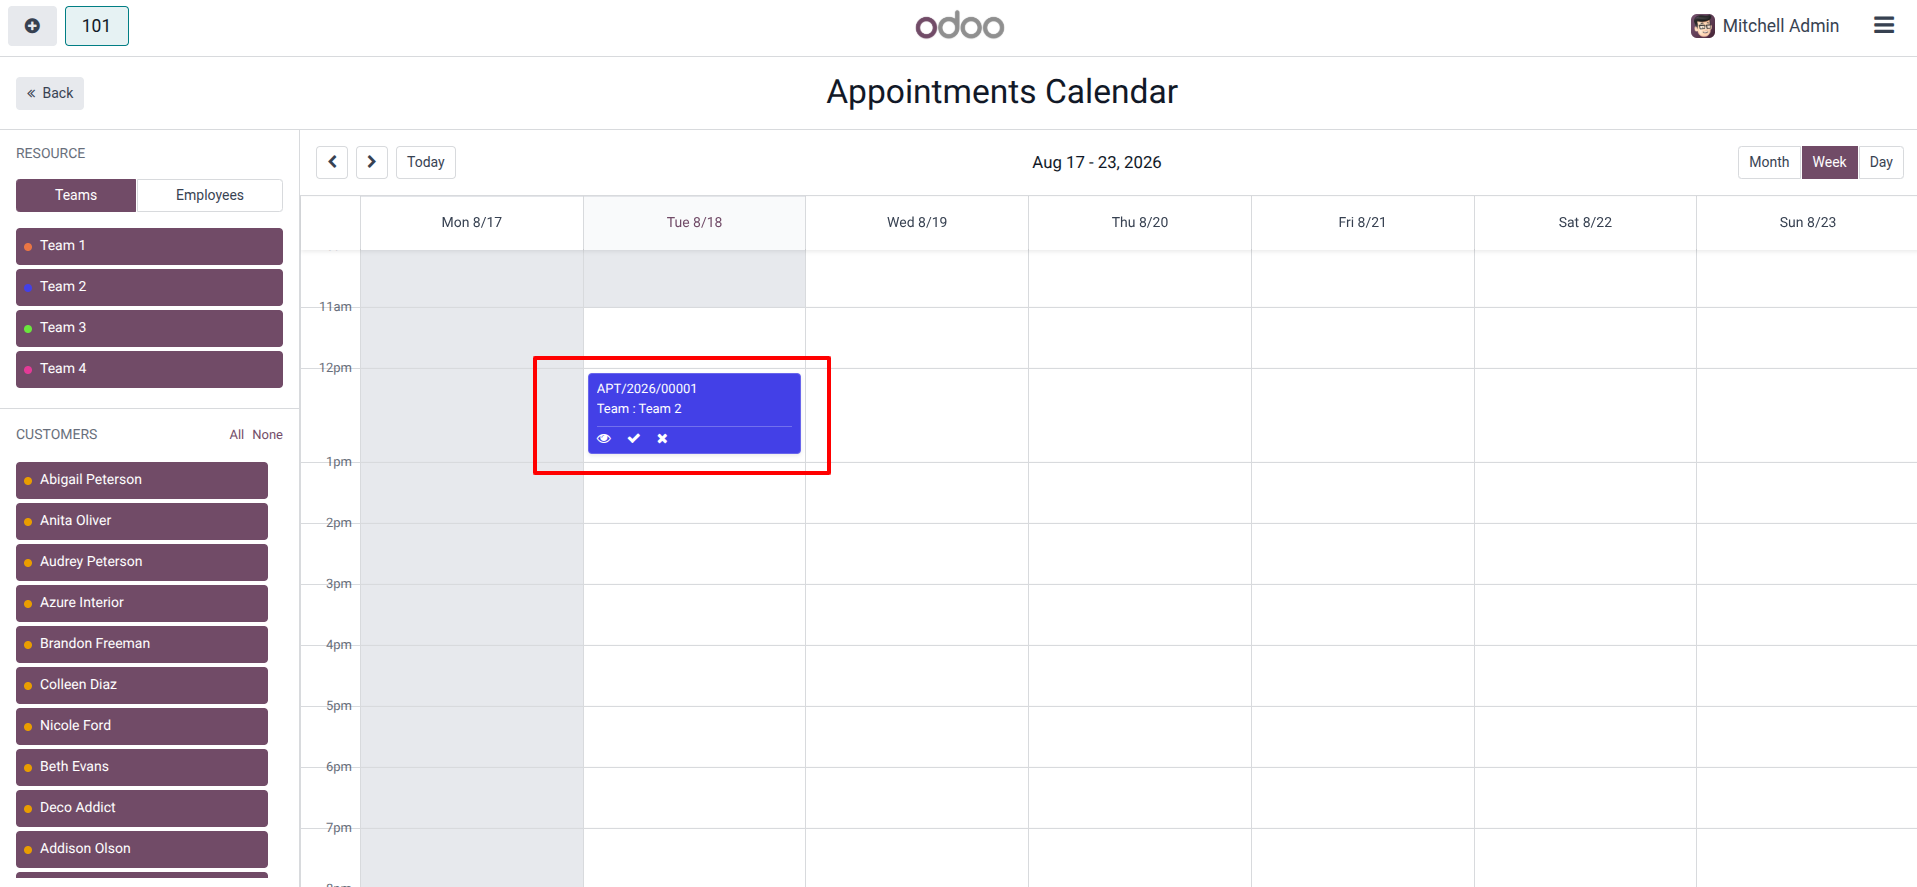
11.Returning to the frontend Appointments Calendar, the newly booked appointment is visible as a colored block on the schedule.
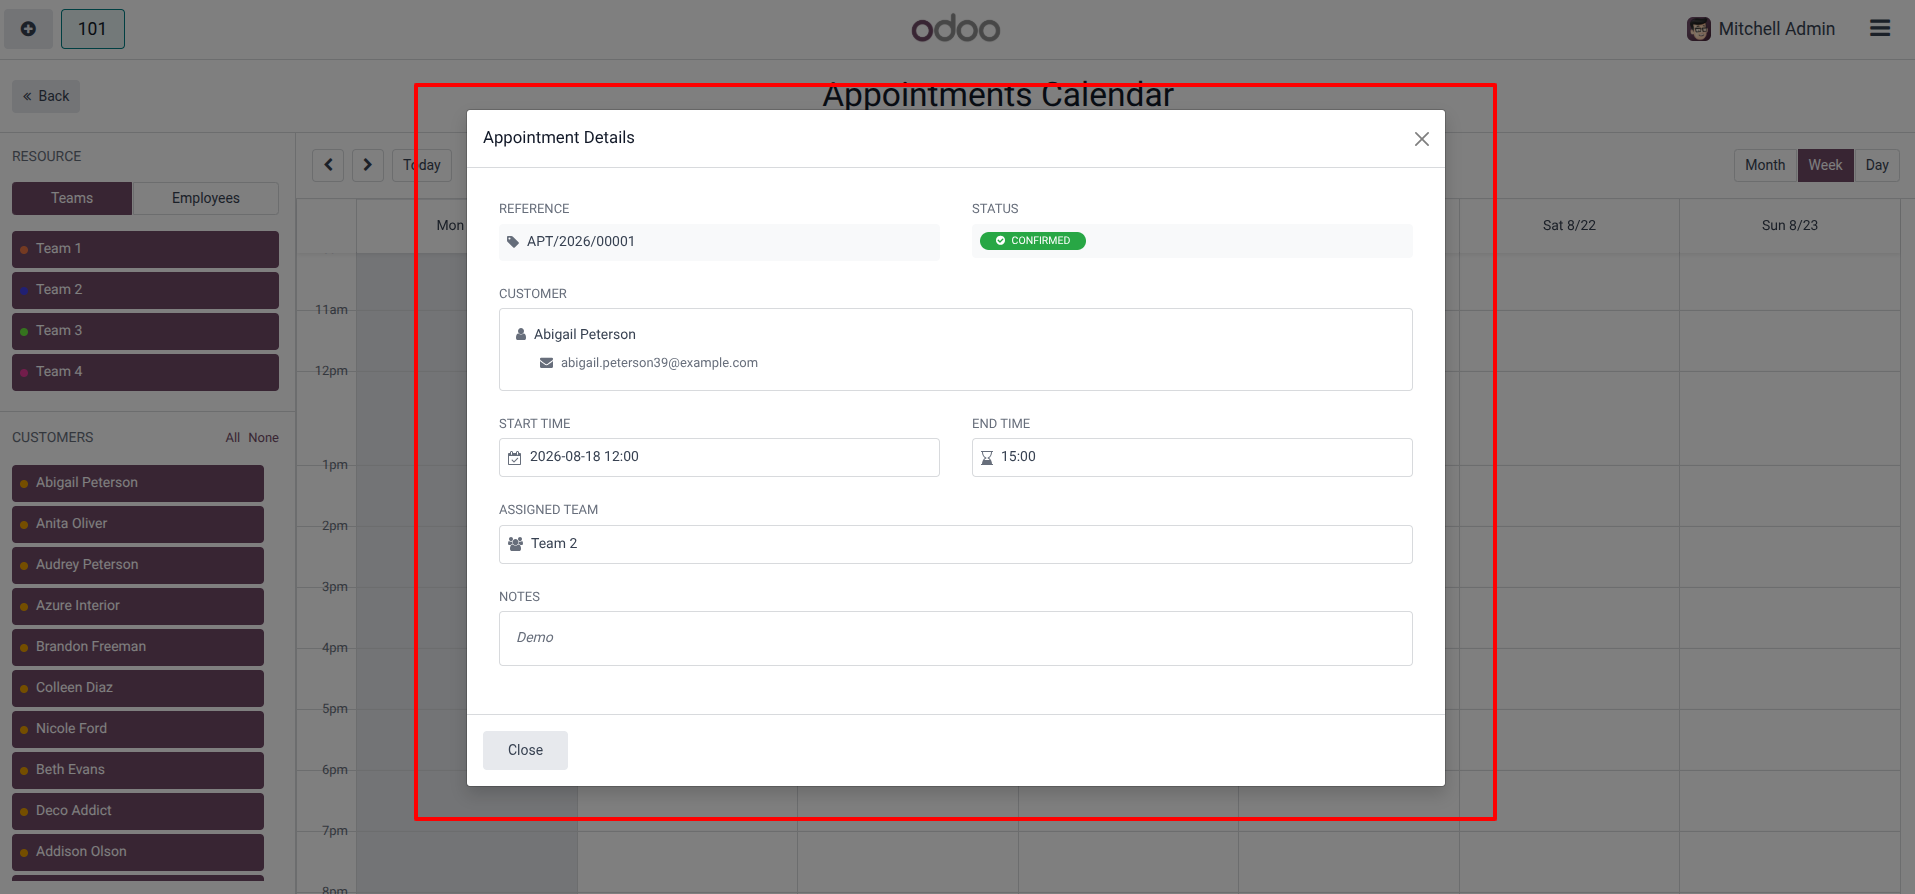
12.Clicking the view icon on the calendar block opens the Appointment Details popup.
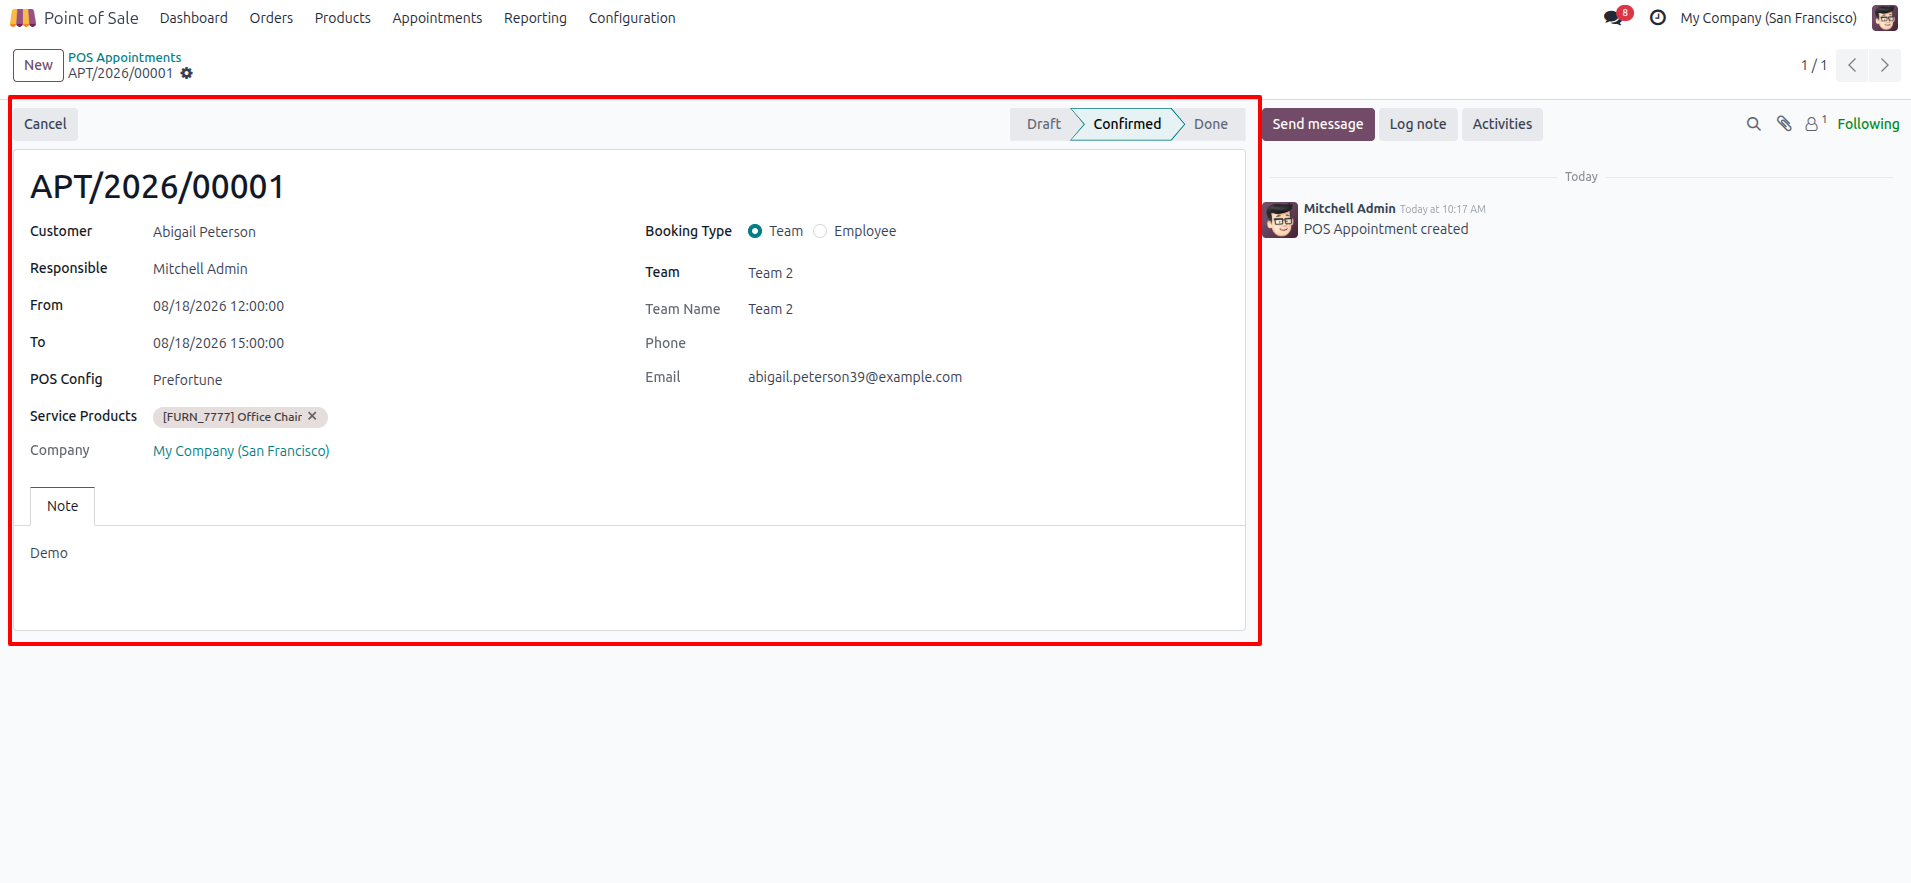
13.In the backend system, you can view the corresponding POS Appointments record.
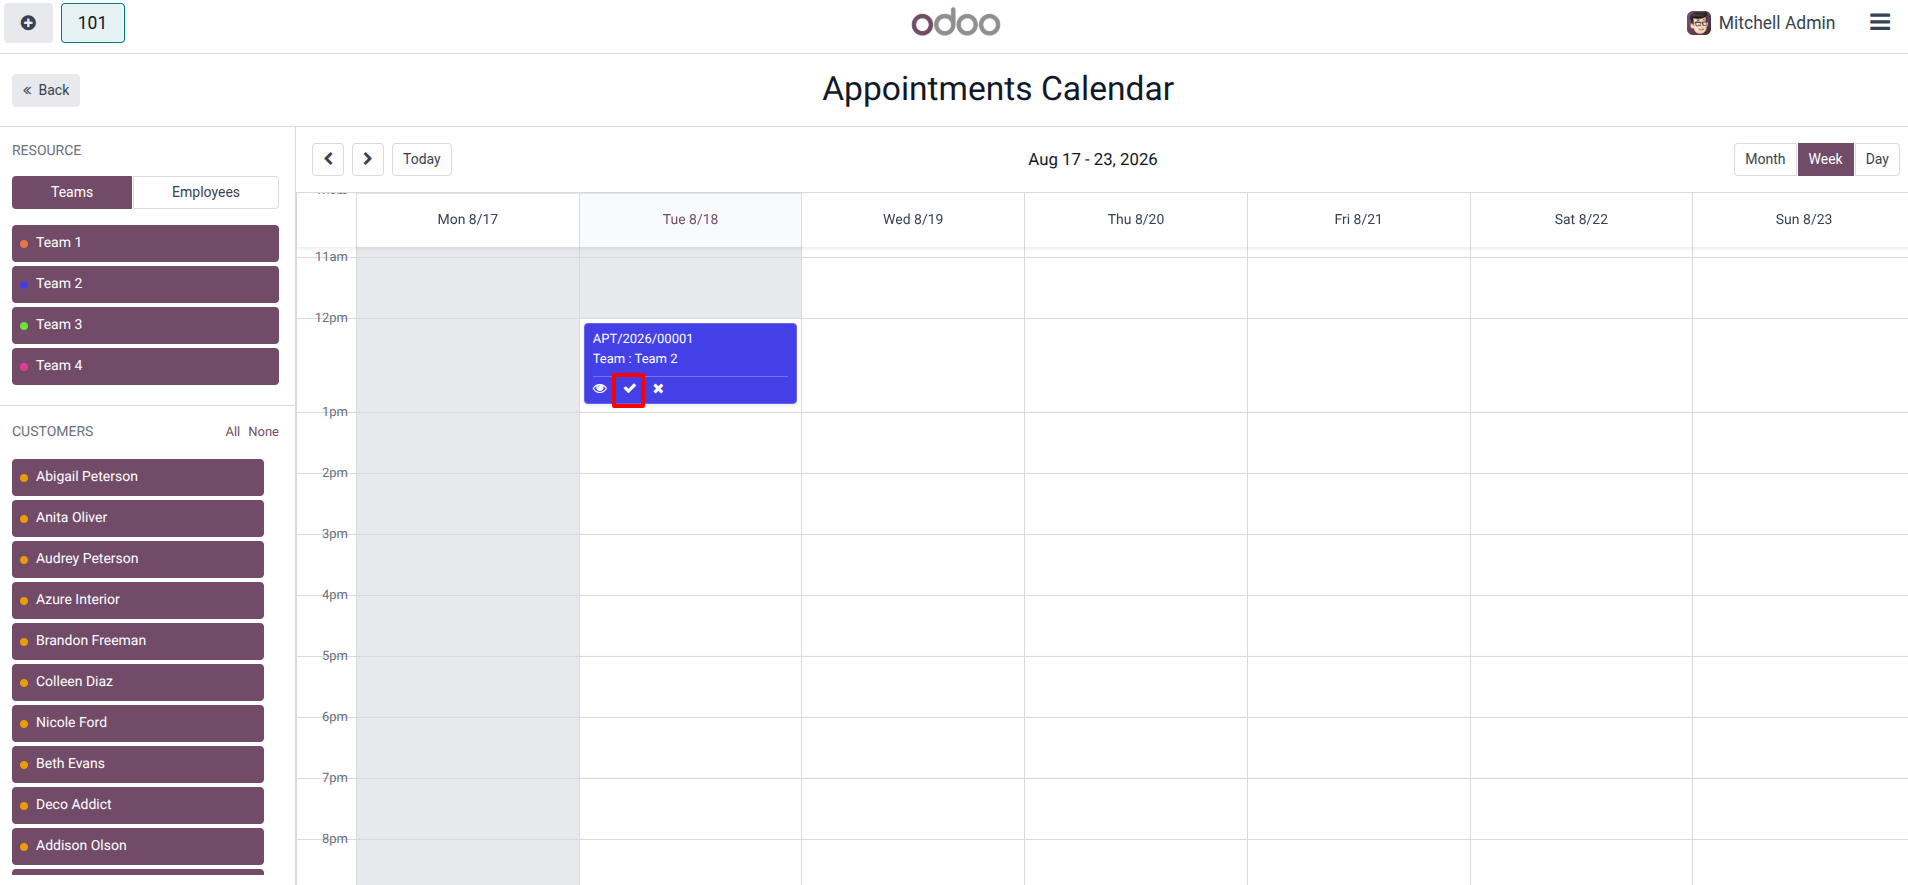
14.To charge the customer for the service, navigate back to the frontend calendar and click the checkmark icon (✓) located on the appointment block. This action pushes the appointment into the POS cart for checkout.
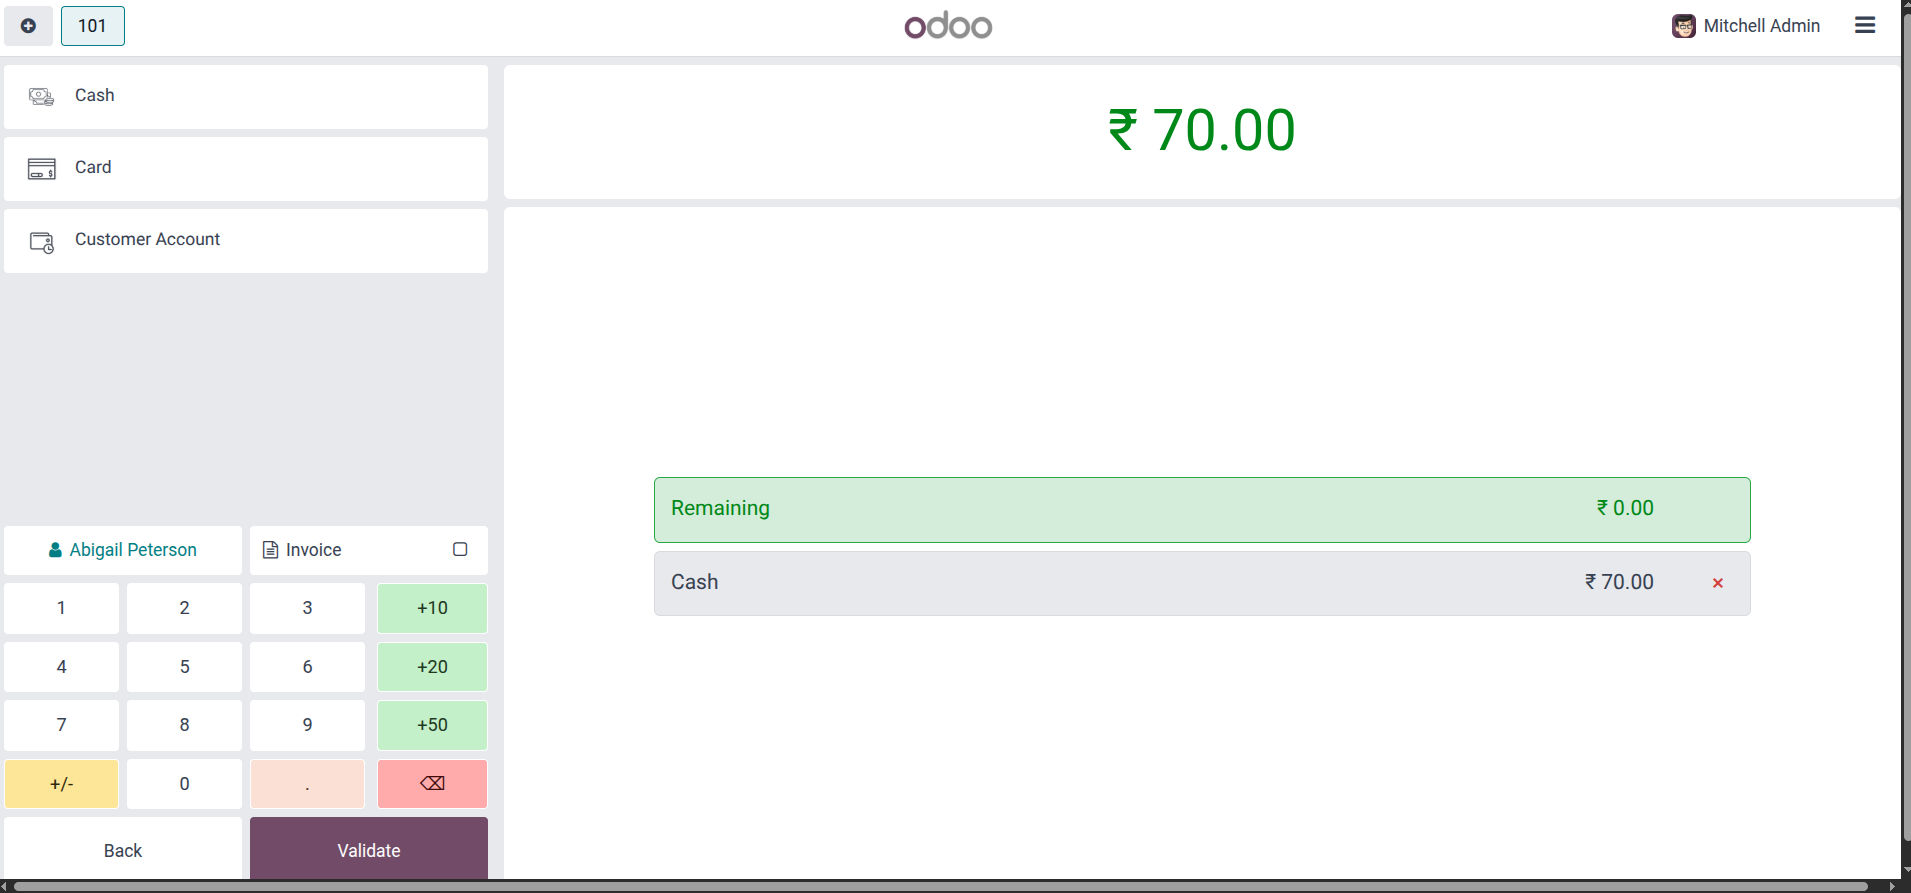
15.The POS payment screen will appear, displaying the total amount due (e.g., ₹ 70.00).Select the payment method (e.g., Cash), ensure the tendered amount covers the total, and click Validate to complete the transaction.
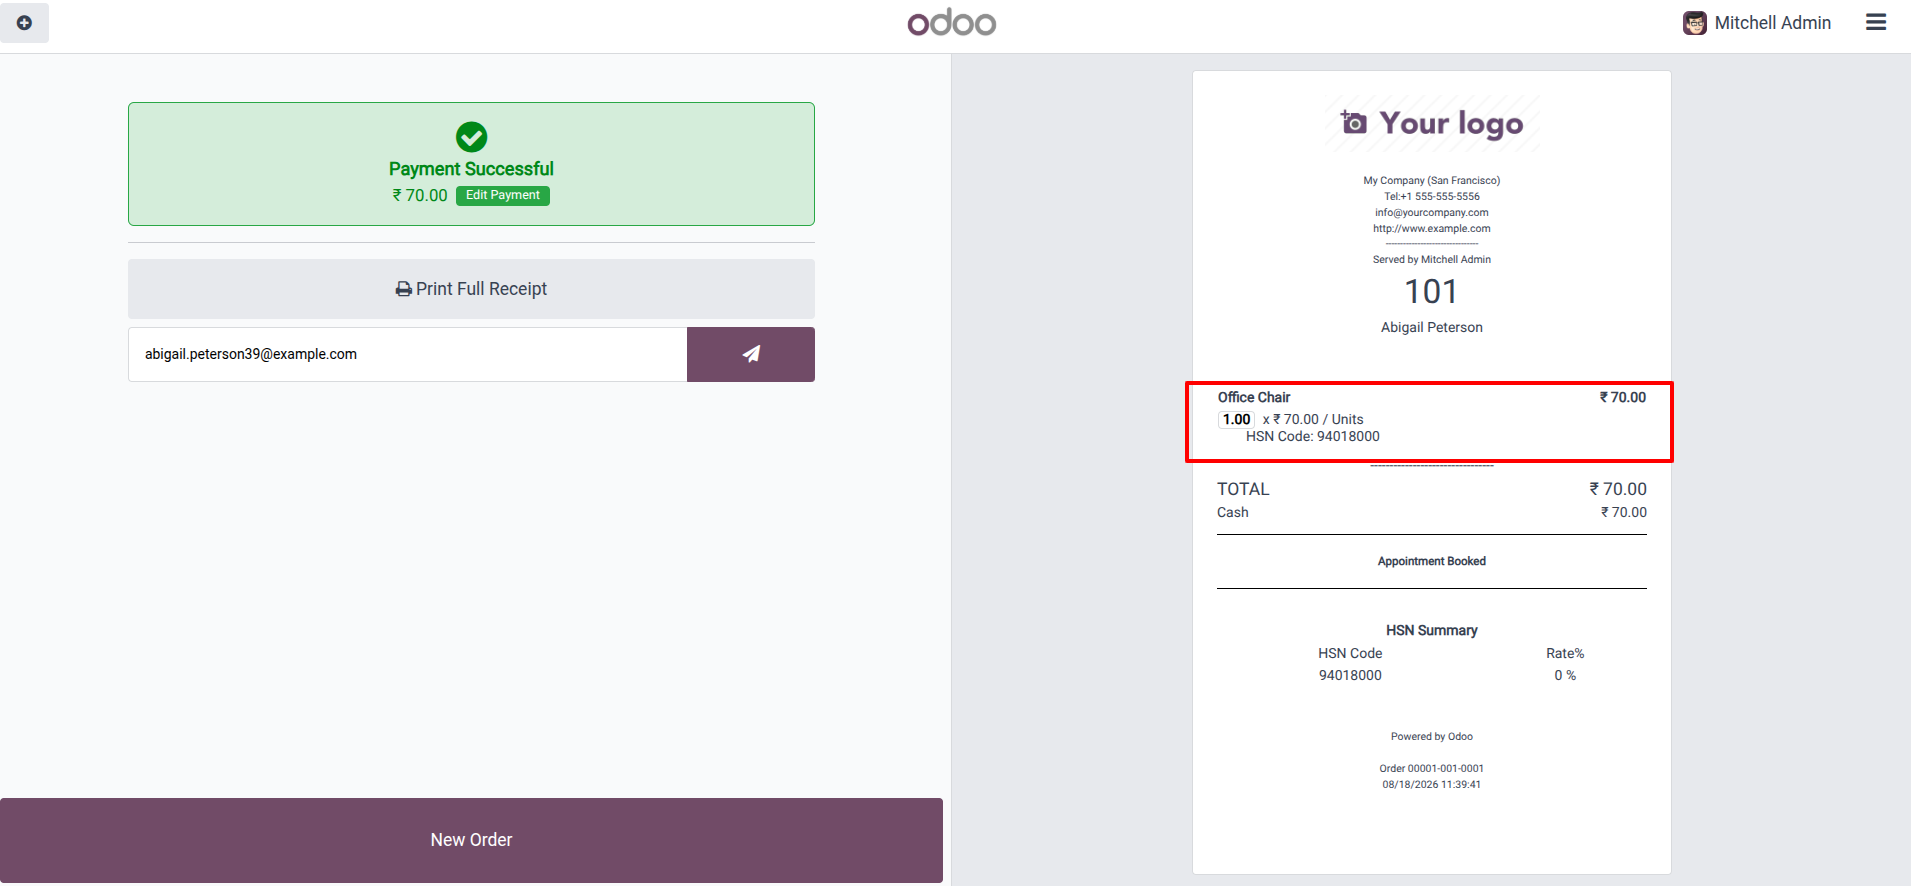
16.Once validated, a Payment Successful screen is displayed alongside the generated receipt.
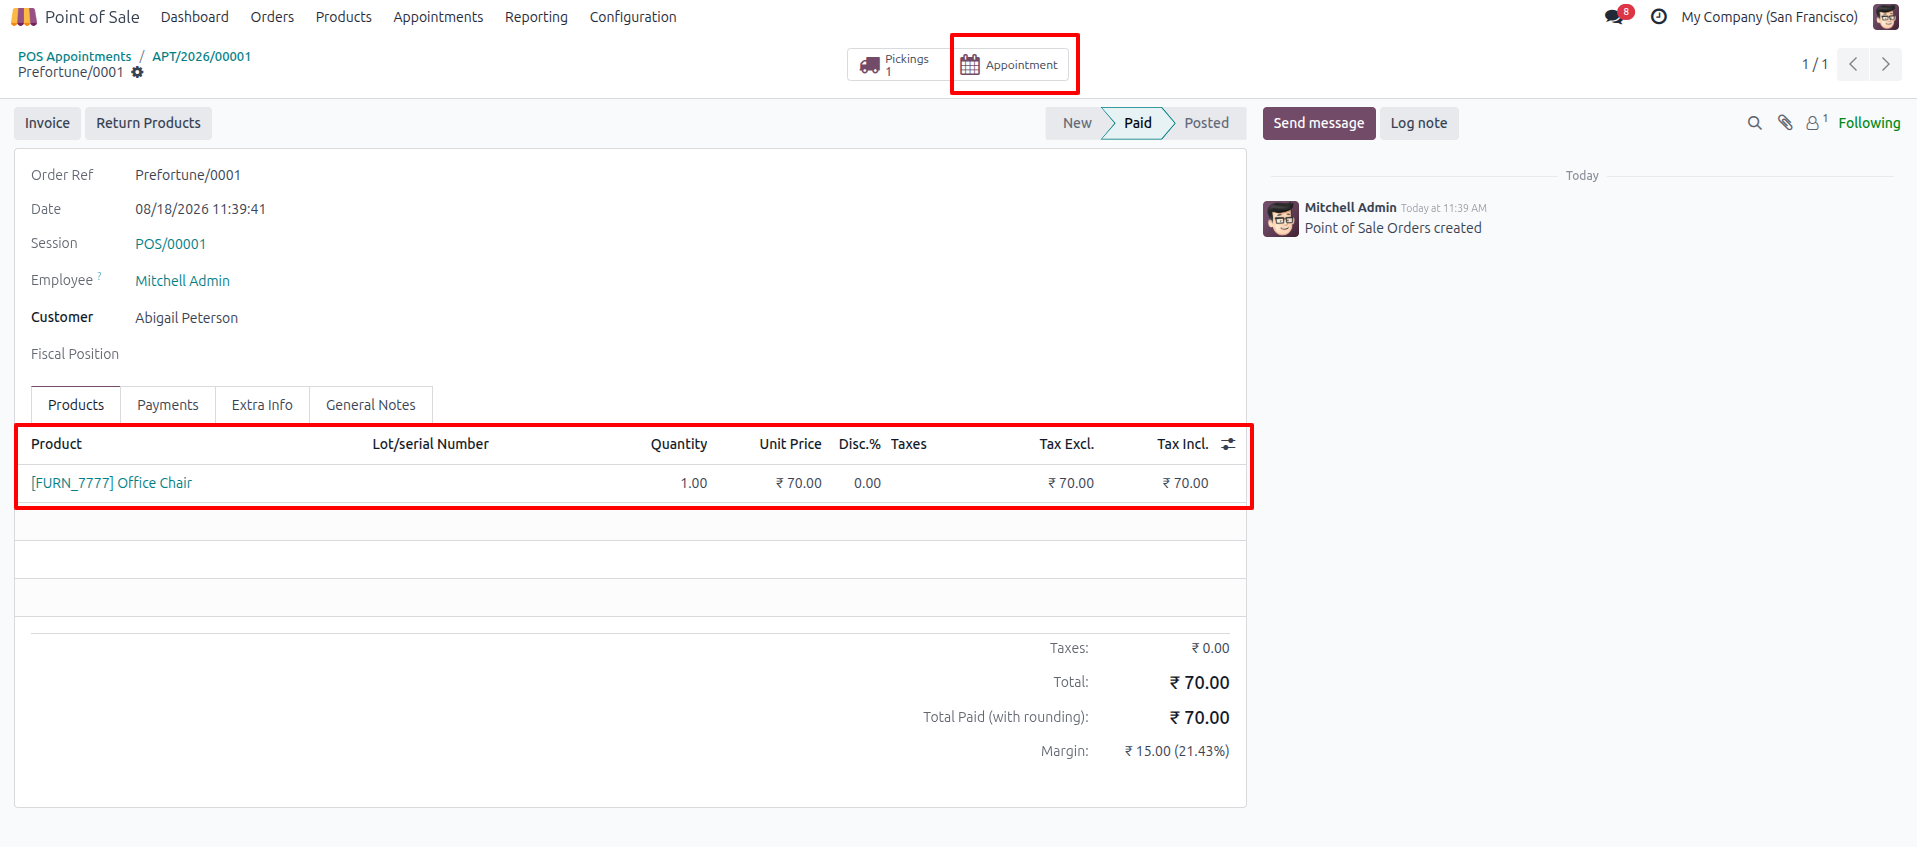
17.In the backend Point of Sale app, locate the completed order (e.g., Prefortune/0001).
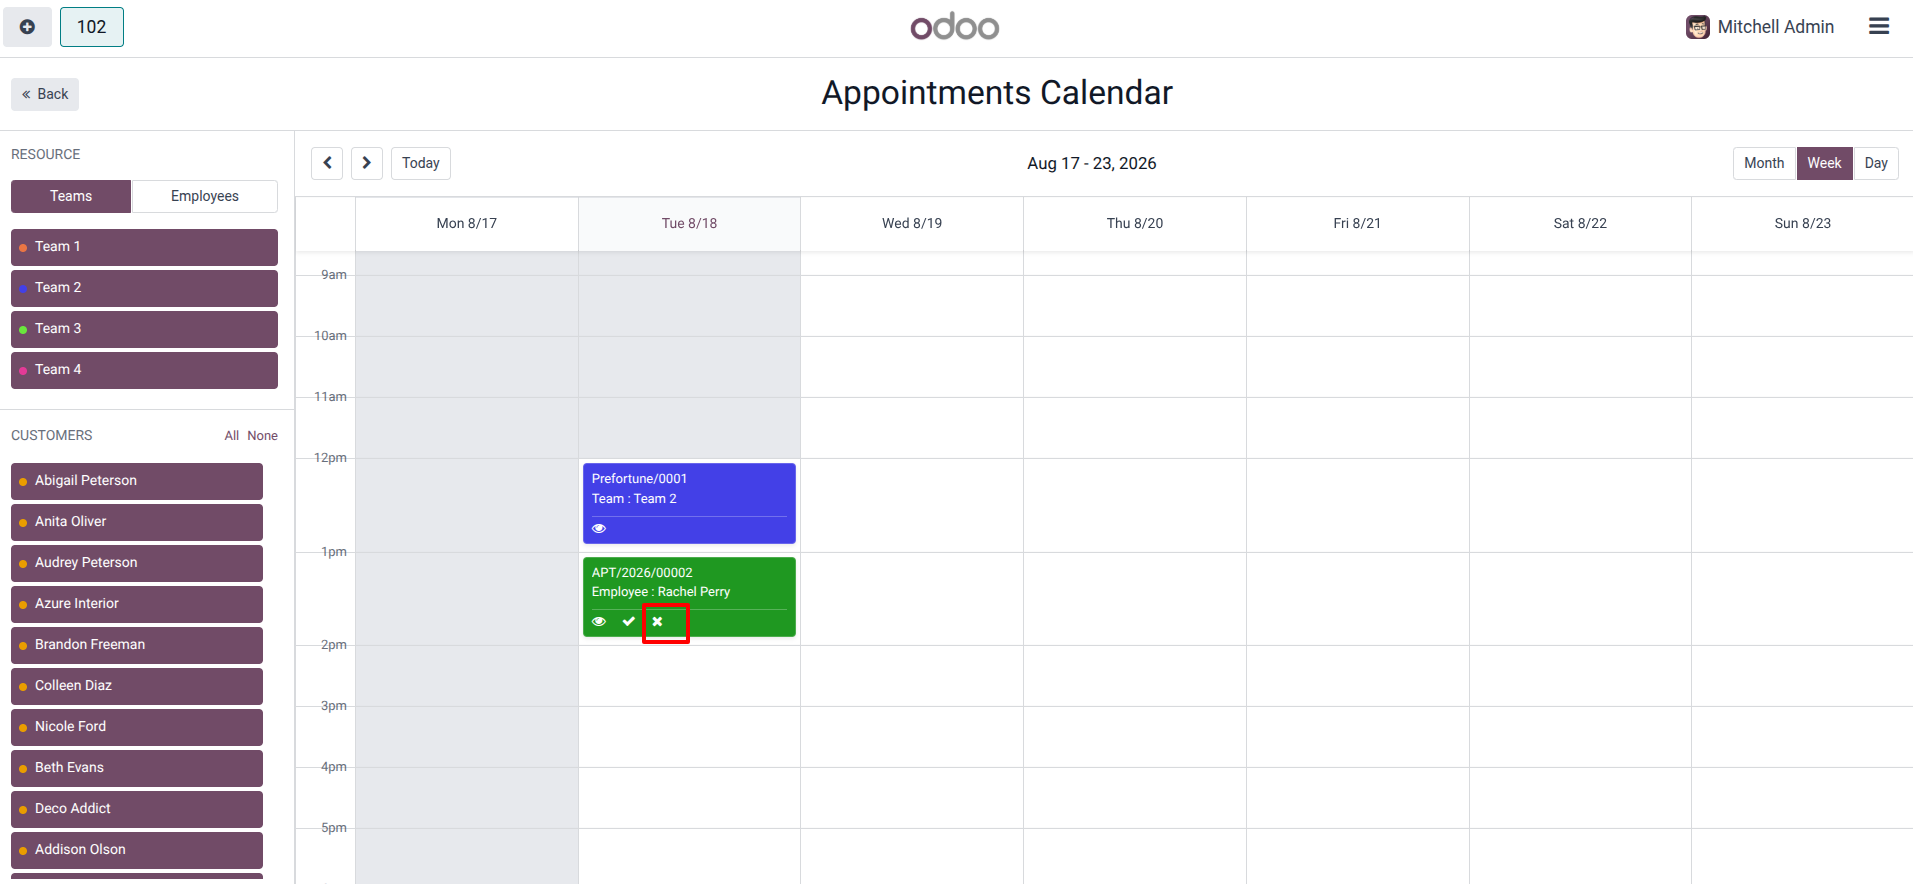
18.On the frontend Appointments Calendar, locate the appointment you wish to cancel (e.g., APT/2026/00002). Click the 'X' icon directly on the colored appointment block.
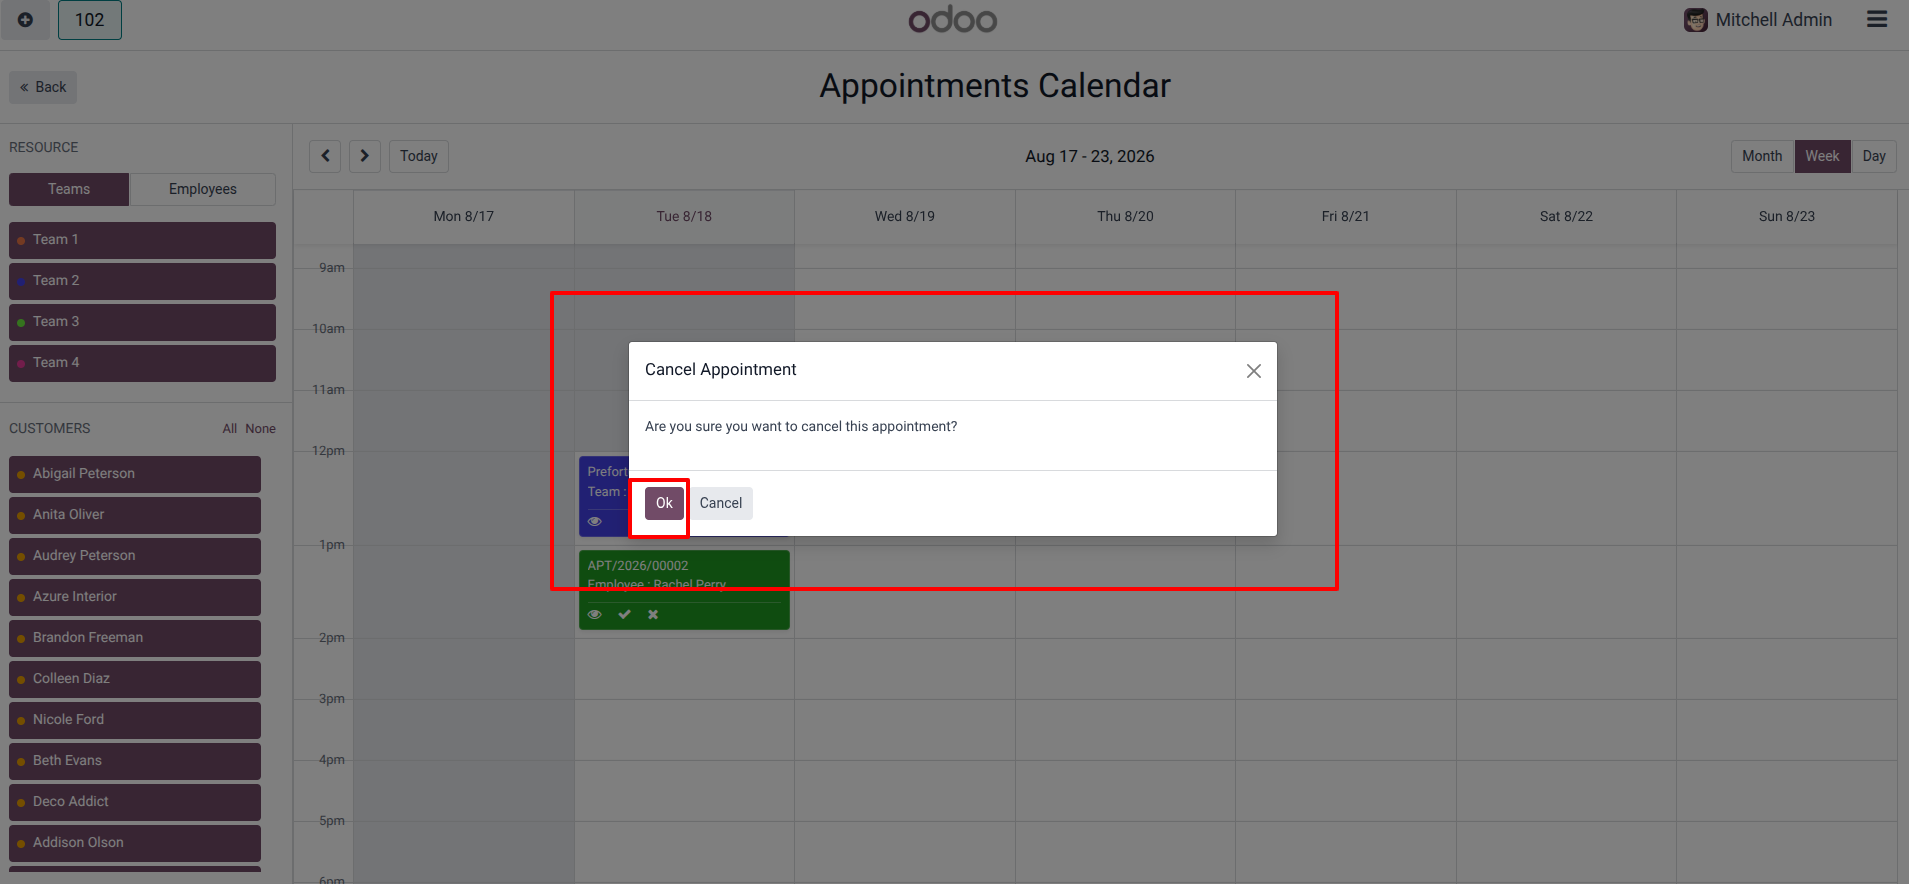
19.A confirmation dialog will appear asking, "Are you sure you want to cancel this appointment?" Click OK to proceed.
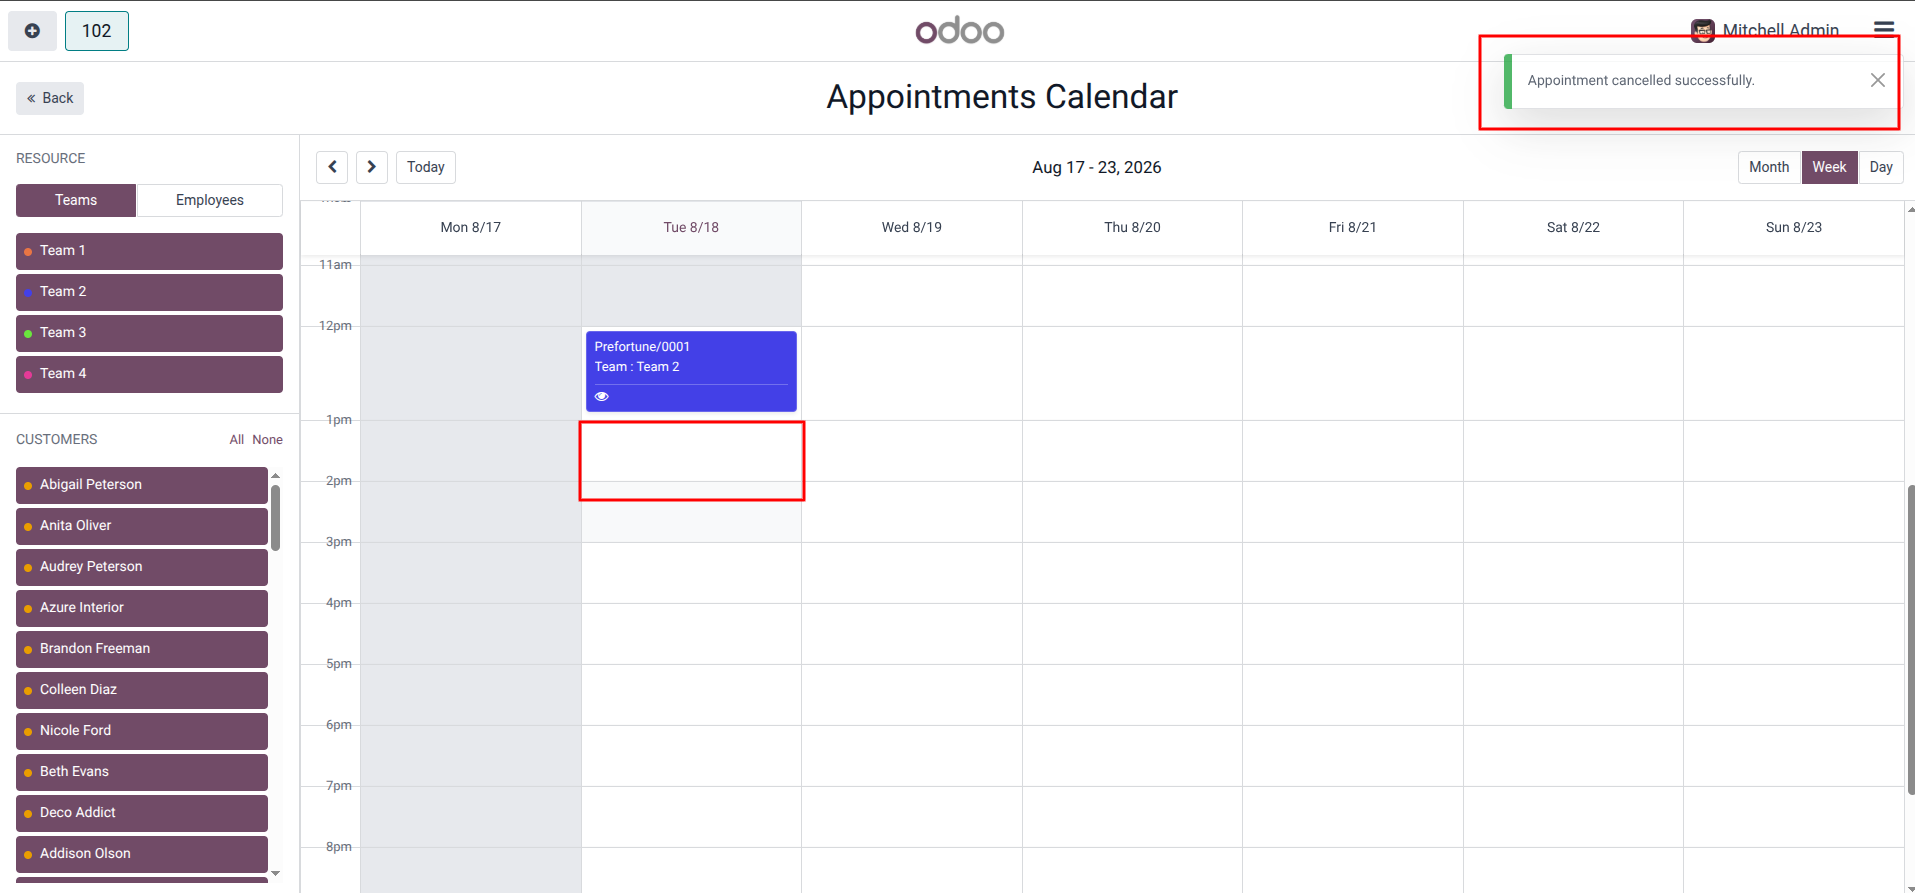
20.The system will display a success message at the top right: "Appointment cancelled successfully." Ensure the appointment block has disappeared from its scheduled time slot on the calendar.
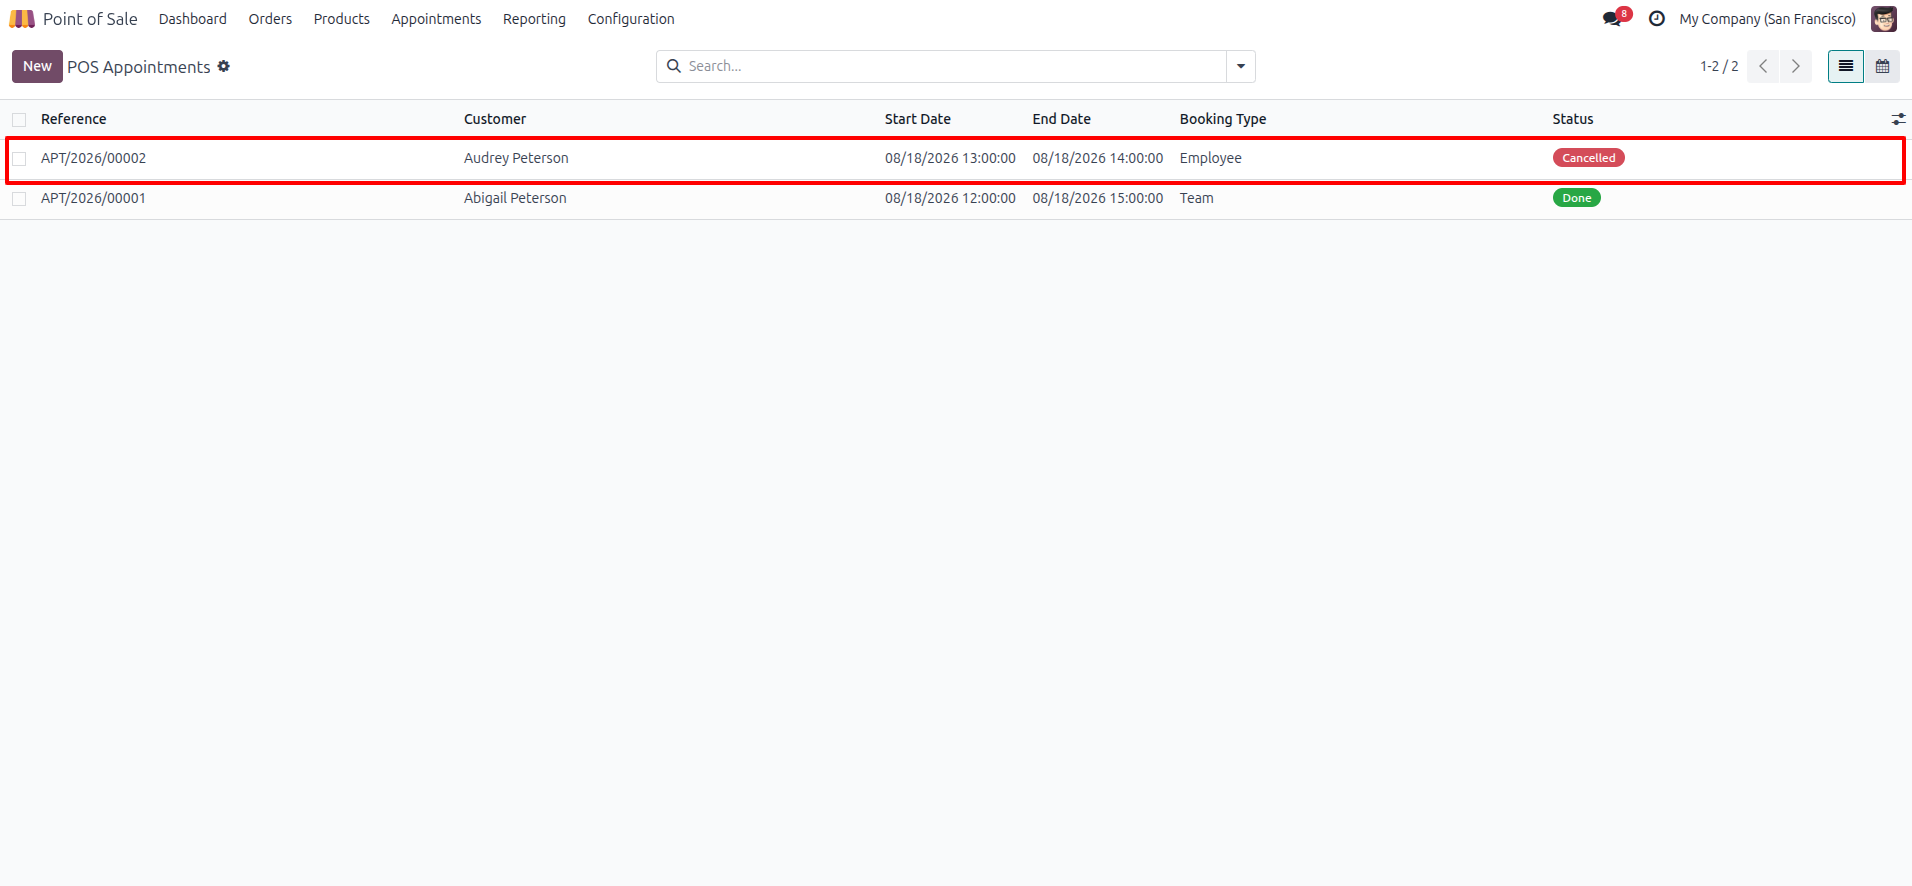
21.Navigate to the backend POS Appointments list view. Locate the specific appointment reference (APT/2026/00002) and check the Status column, which should now indicate it is Cancelled.
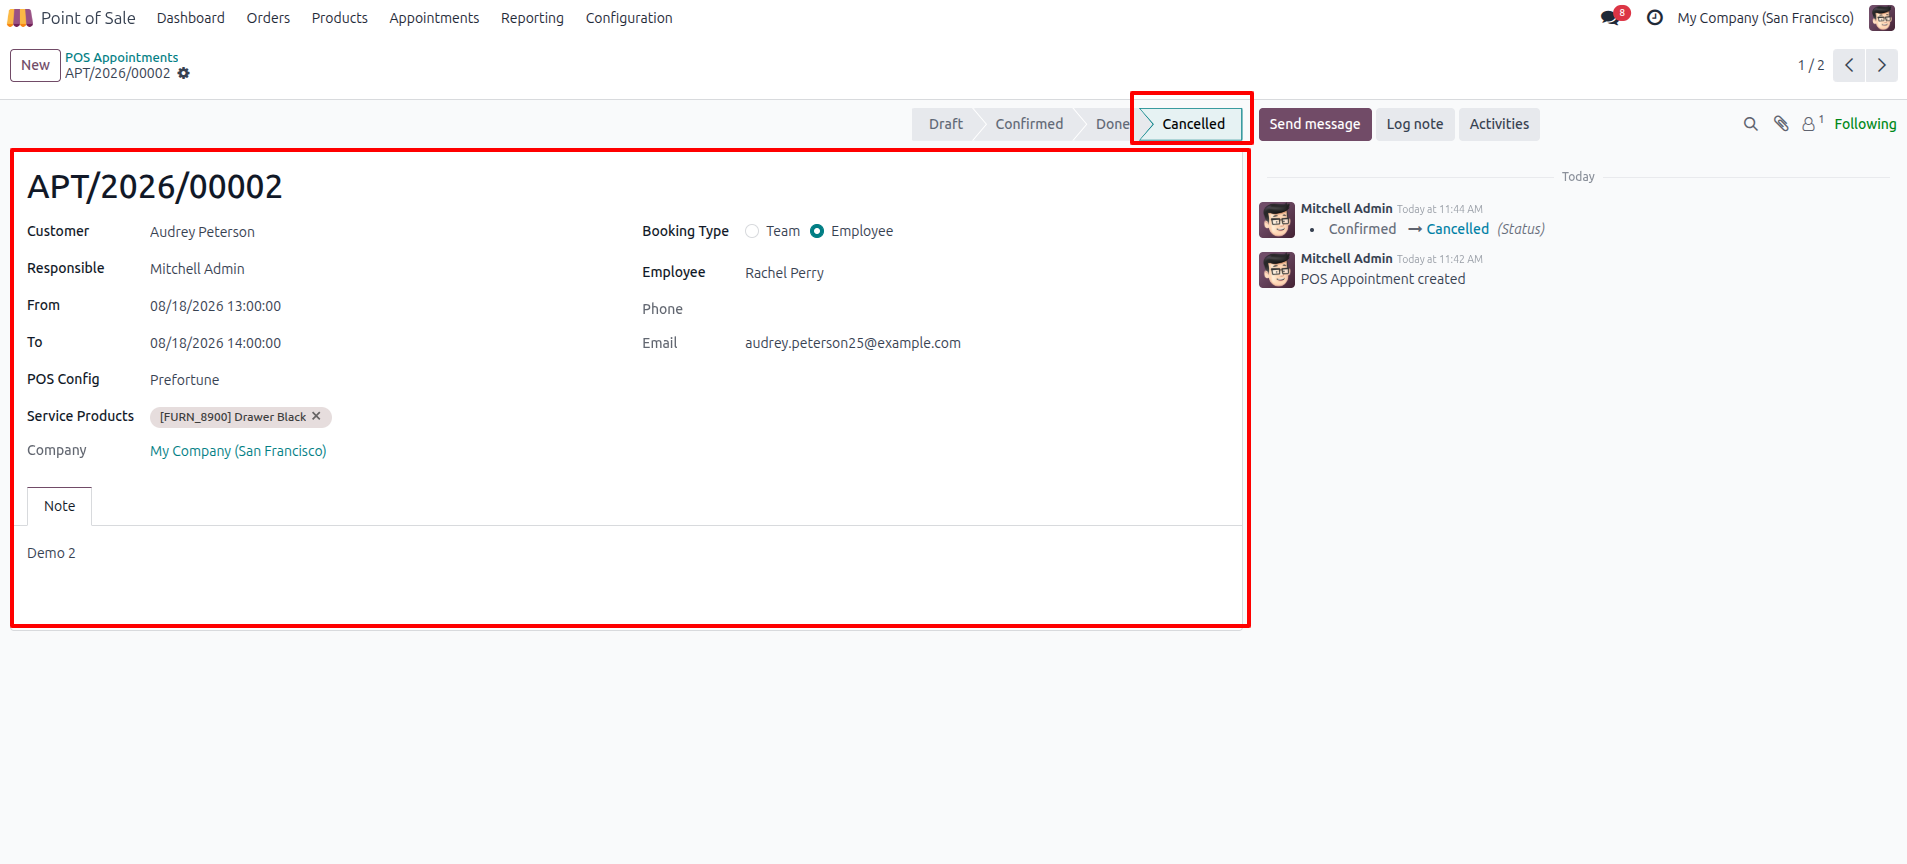
22.Open the specific backend record for the cancelled appointment (APT/2026/00002). The status bar at the top will clearly show it is in the Cancelled stage, and the chatter on the right will log the status change.
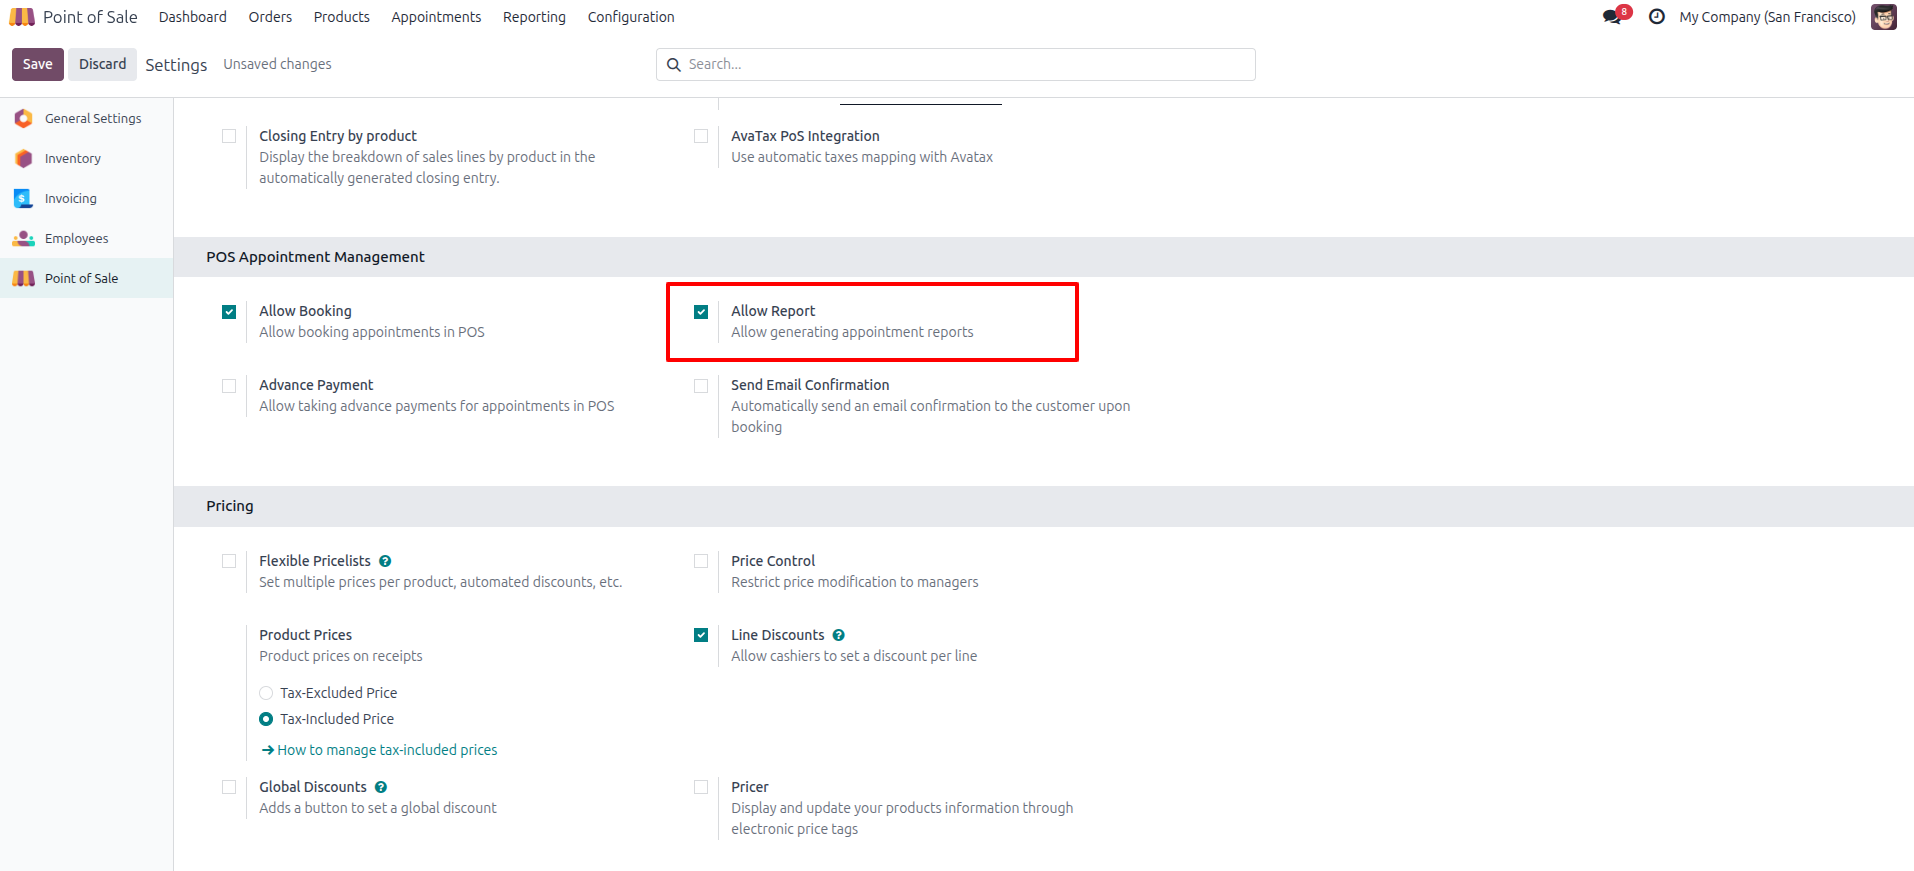
23.Before generating reports, ensure the feature is active. Go to the Point of Sale configuration settings. Under the POS Appointment Management section, check the box for Allow Report to enable report generation.
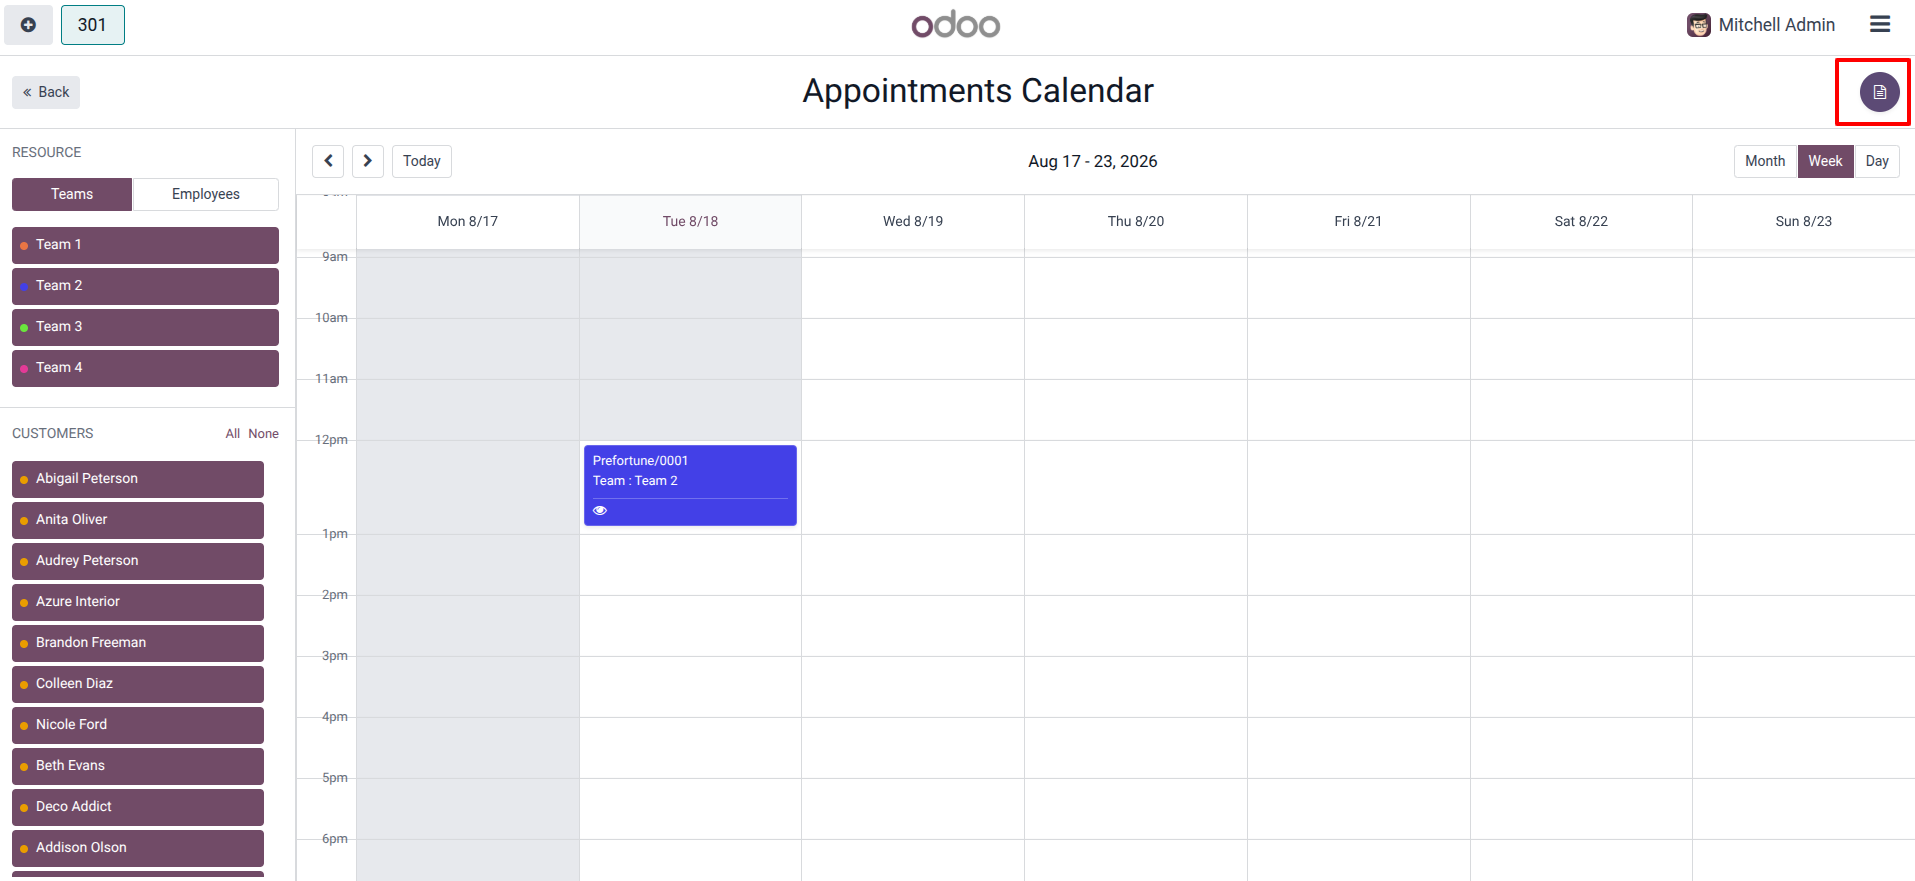
24.Return to the frontend Appointments Calendar. Click the document/report icon located in the top right corner of the screen to open the reporting tool.
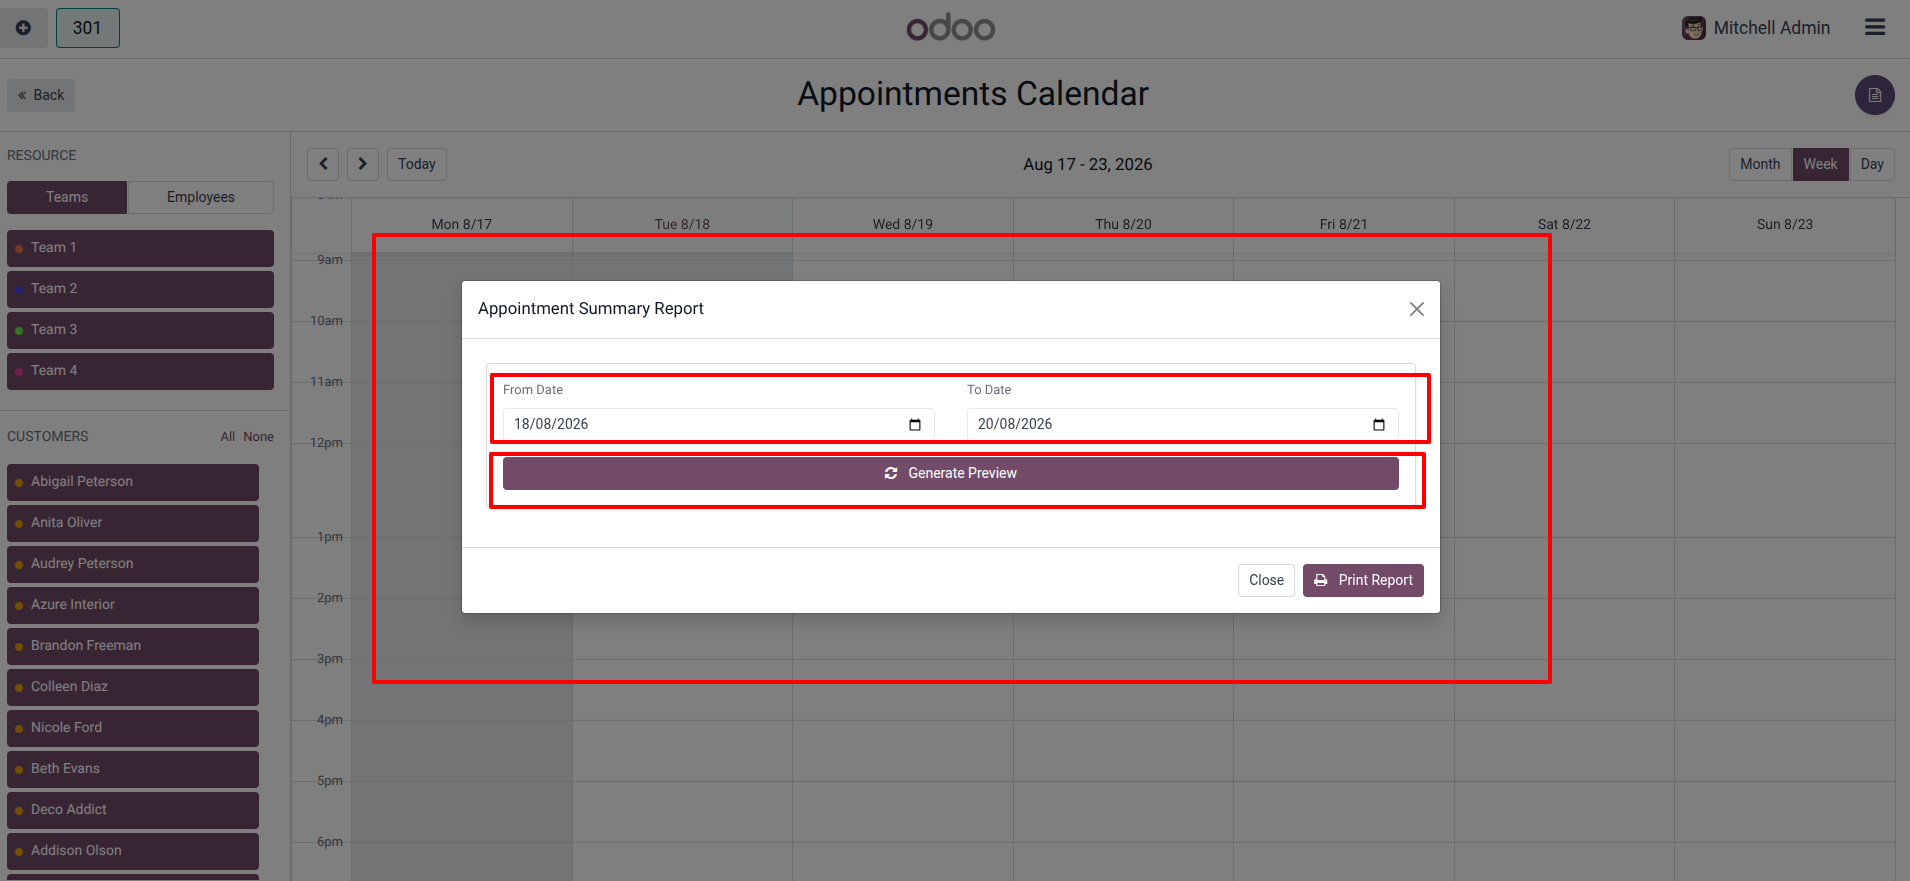
25.The Appointment Summary Report modal will open. Select the specific From Date and To Date for the period you wish to analyze, and click Generate Preview.
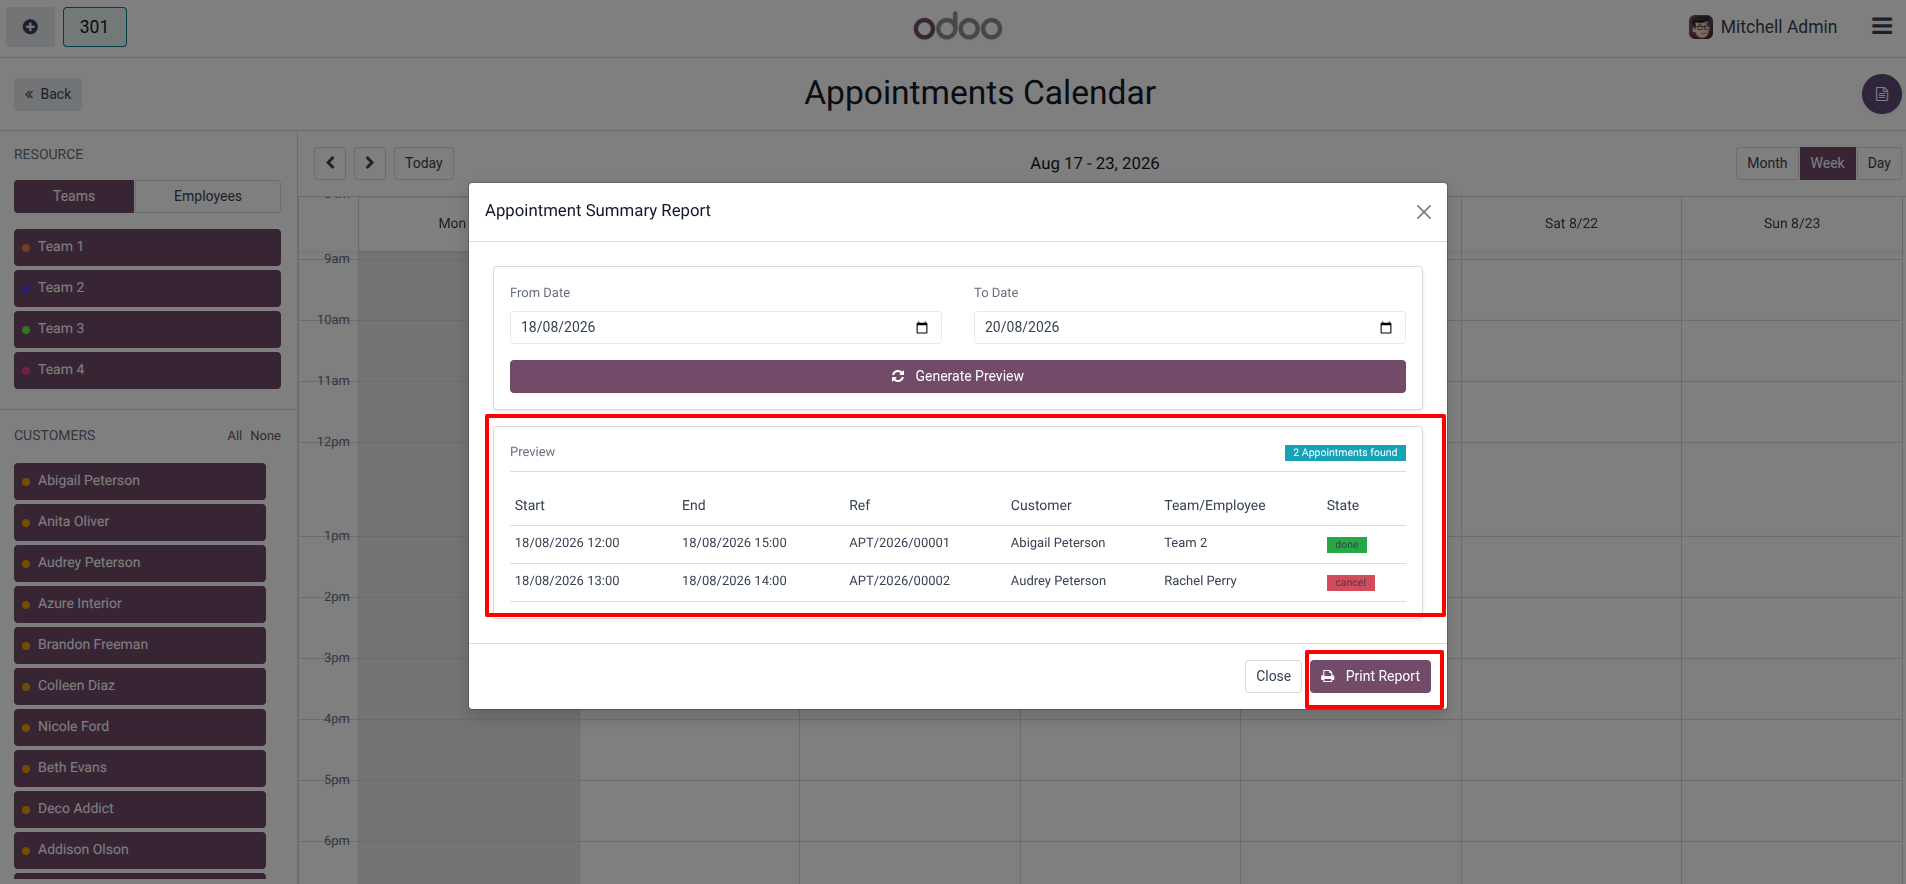
26.A Preview list will populate, showing all appointments within the selected date range, including their Start/End times, References, Customers, assigned Teams/Employees, and their current State (e.g., 'done' or 'cancel'). Click the Print Report button at the bottom to export or print this summary.
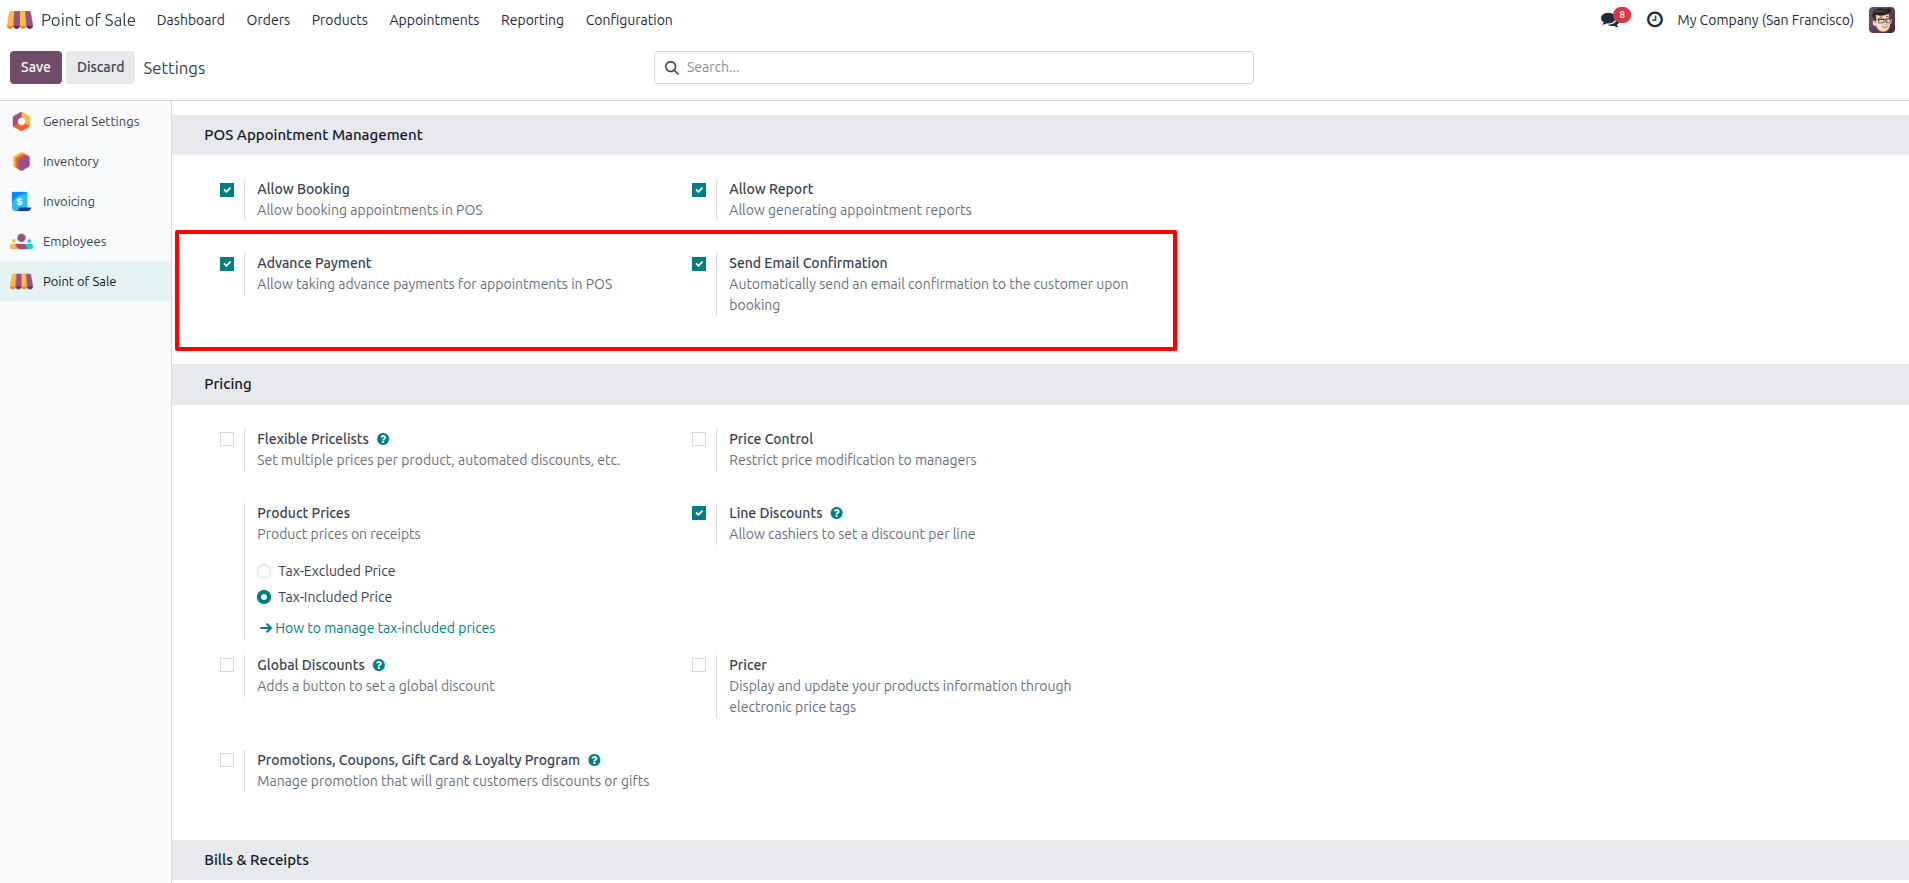
27.Navigate to the Point of Sale configuration settings. Under the POS Appointment Management section, check the boxes for Advance Payment and Send Email Confirmation.
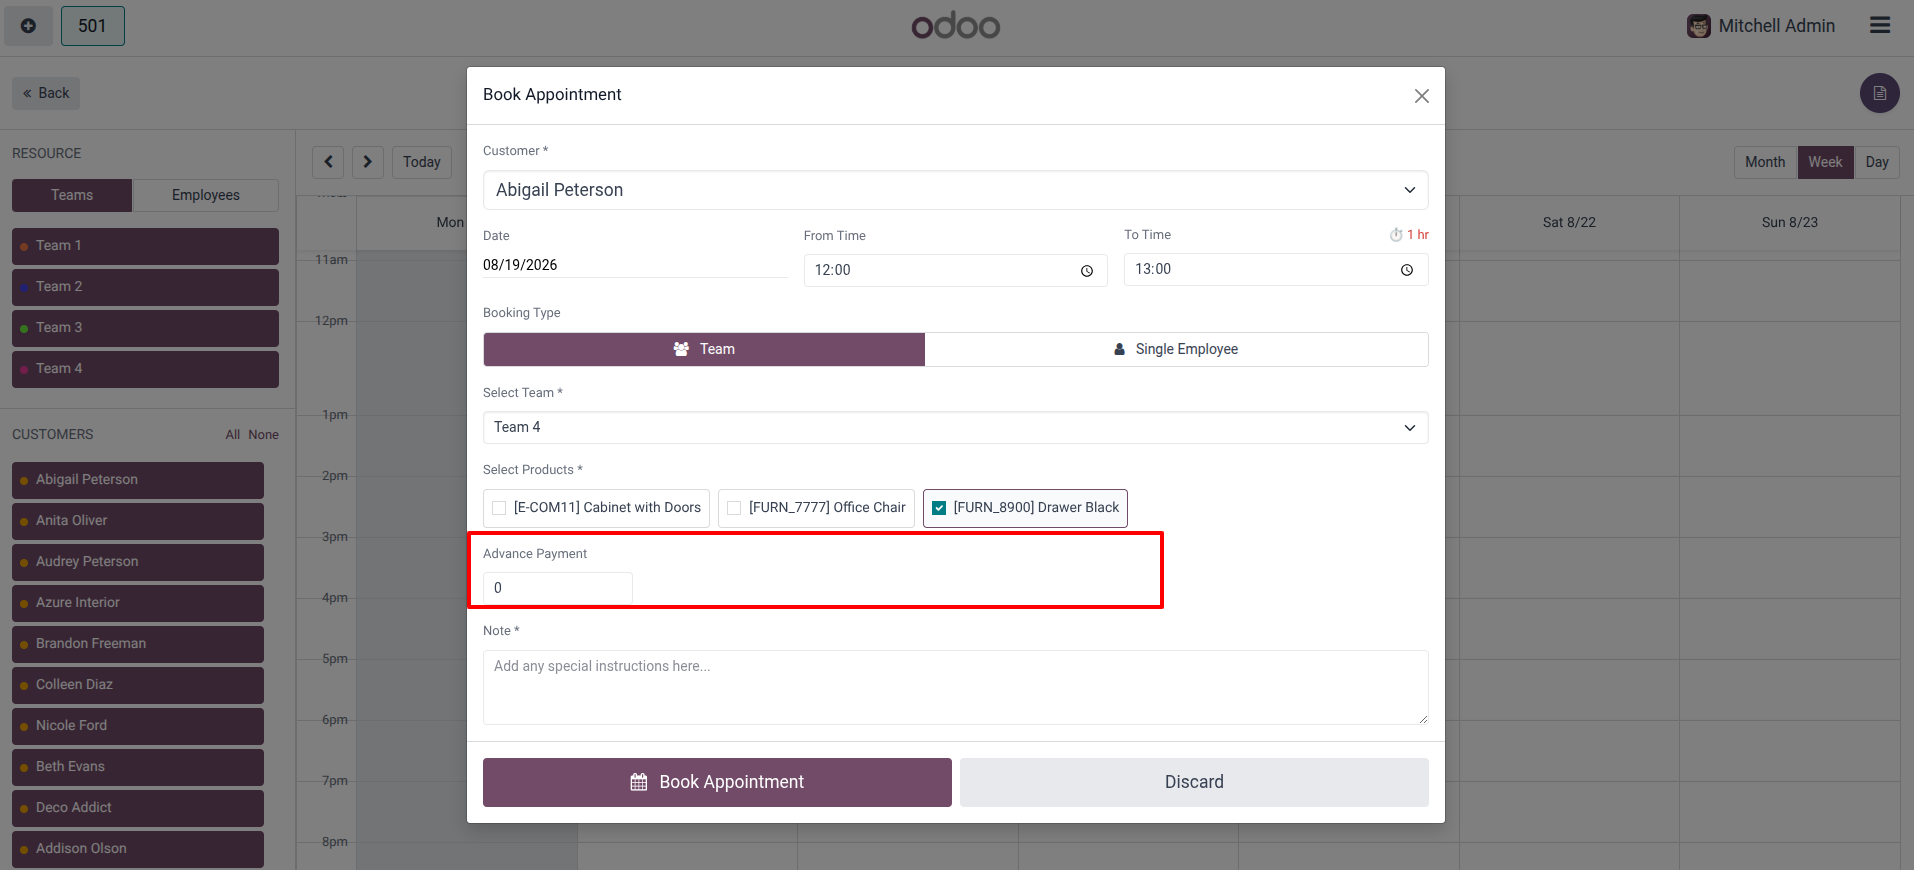
28.On the frontend Appointments Calendar, open the Book Appointment modal and fill out the customer and scheduling details.
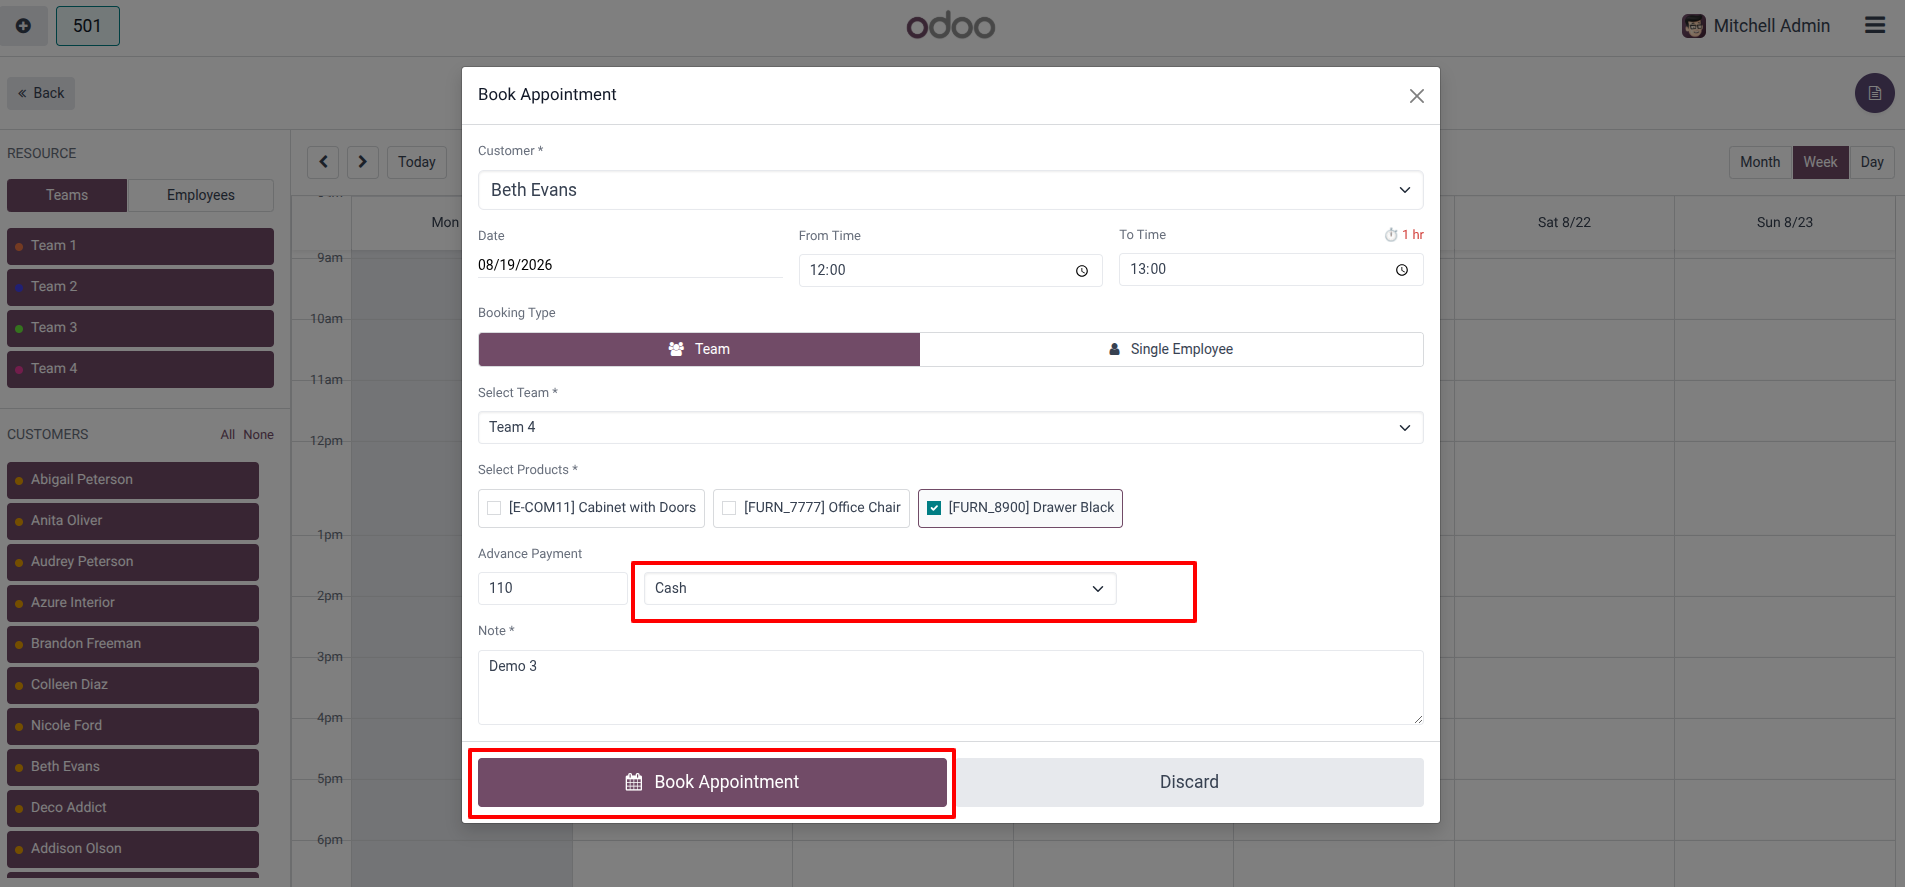
29.Input the desired advance payment amount (e.g., 110) and select the payment method from the dropdown menu (e.g., Cash). Click Book Appointment to proceed.
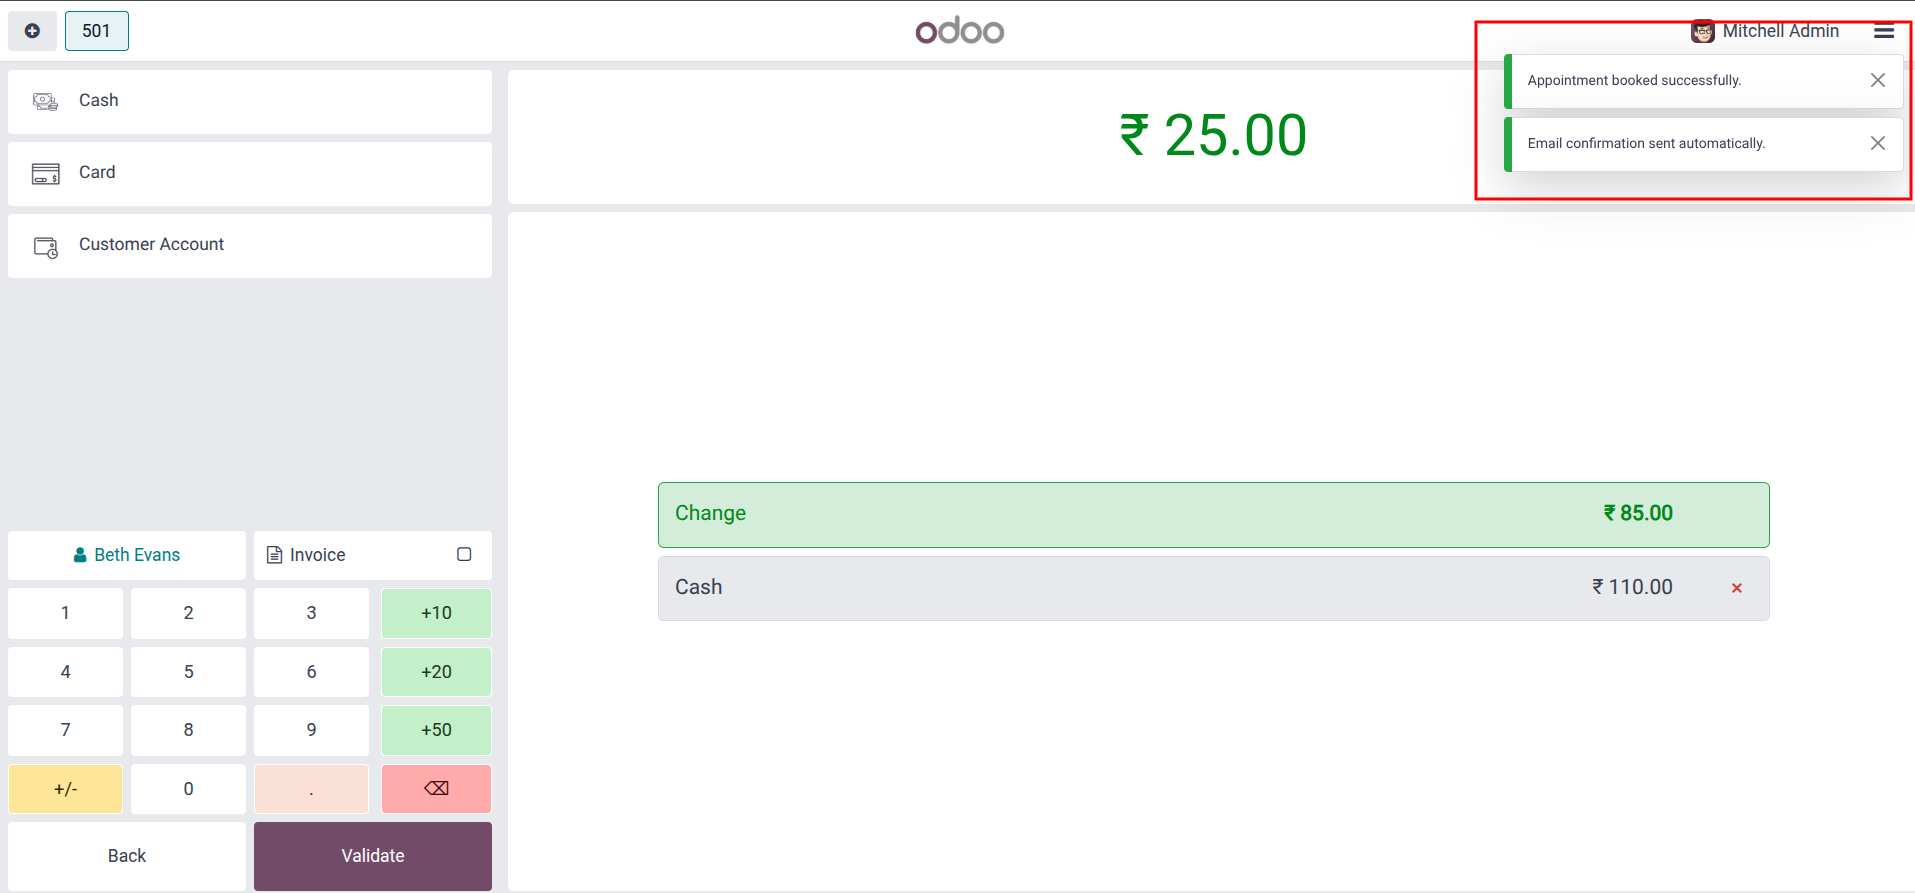
30.The POS payment screen will launch to process the transaction. Once the payment is validated, look at the top right of the screen.Success notifications will appear confirming "Appointment booked successfully." and "Email confirmation sent automatically."
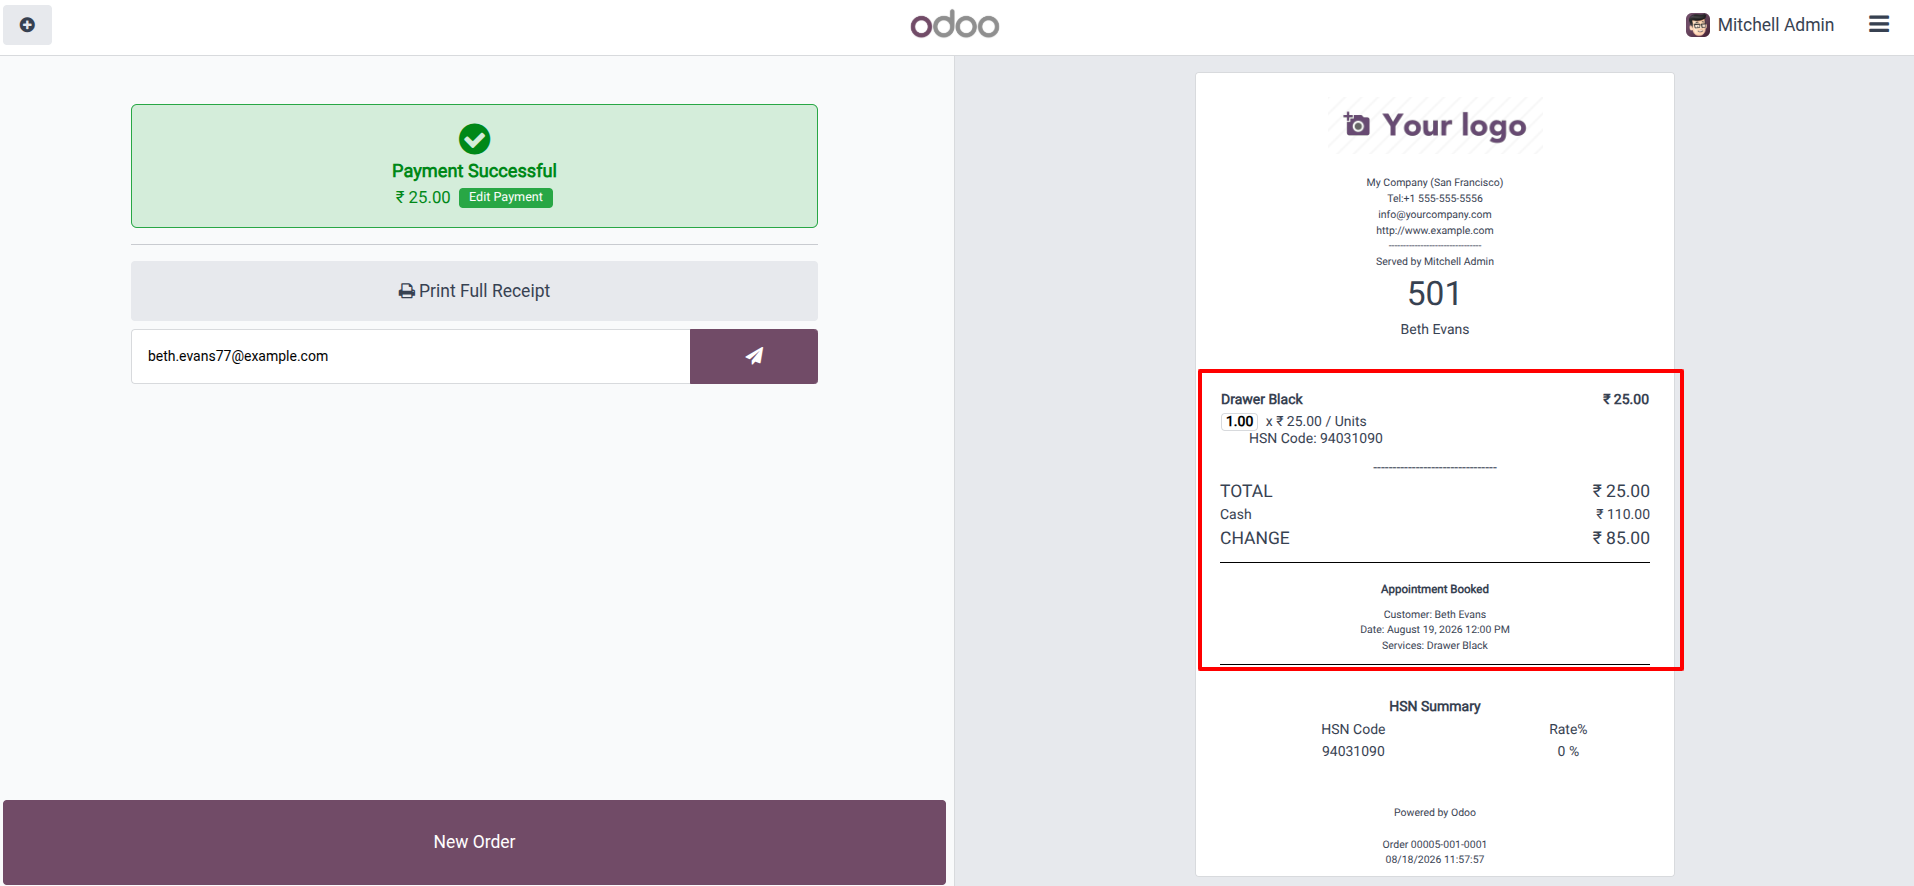
31.View the Payment Successful screen and the generated receipt.
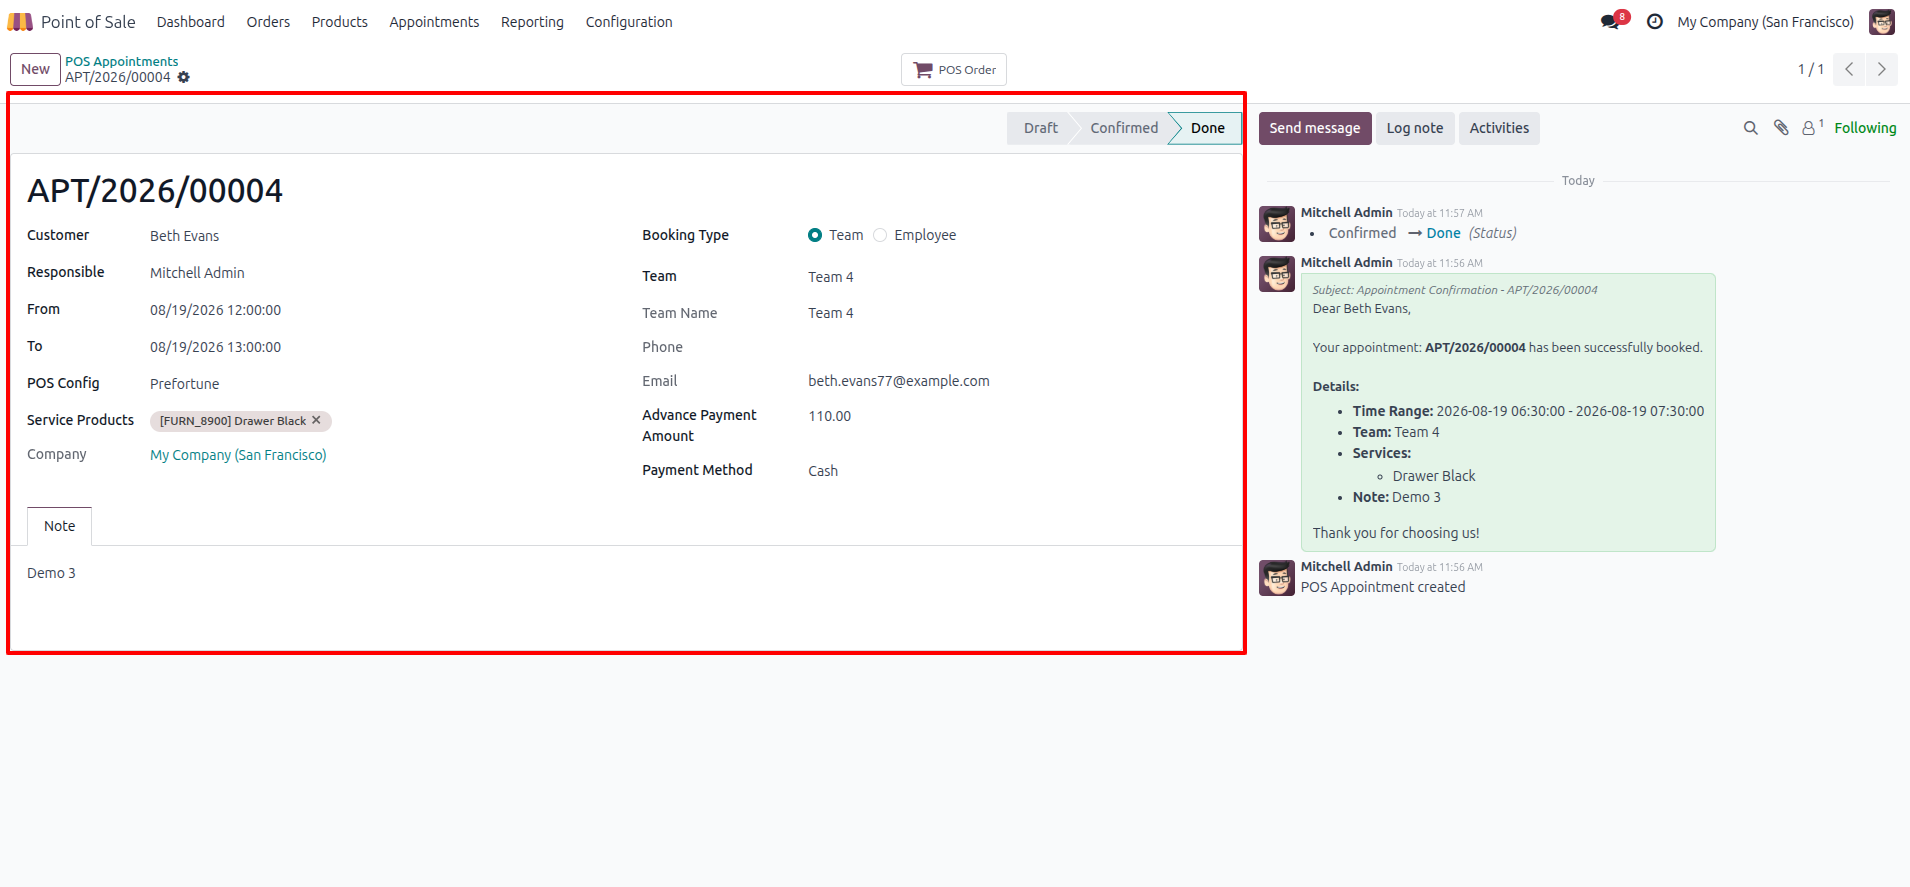
32.In the backend, open the newly created appointment record (e.g., APT/2026/00004).
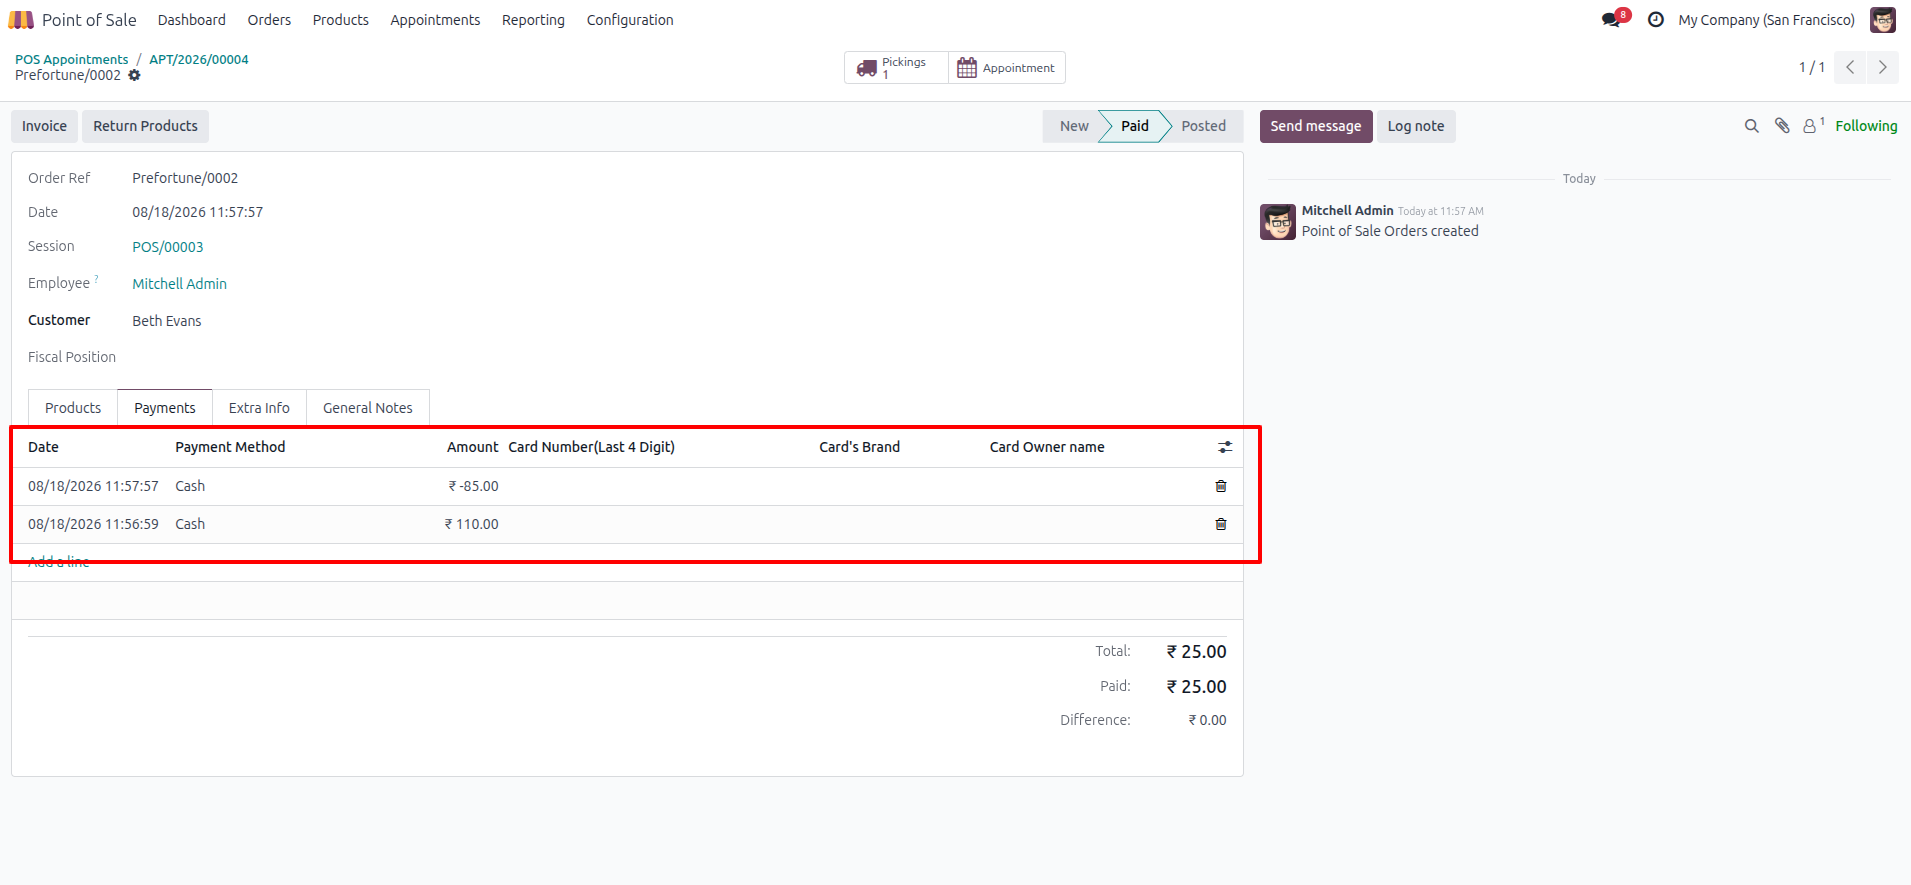
33.Navigate to the linked POS Order (e.g., Prefortune/0002) in the backend and click on the Payments tab.
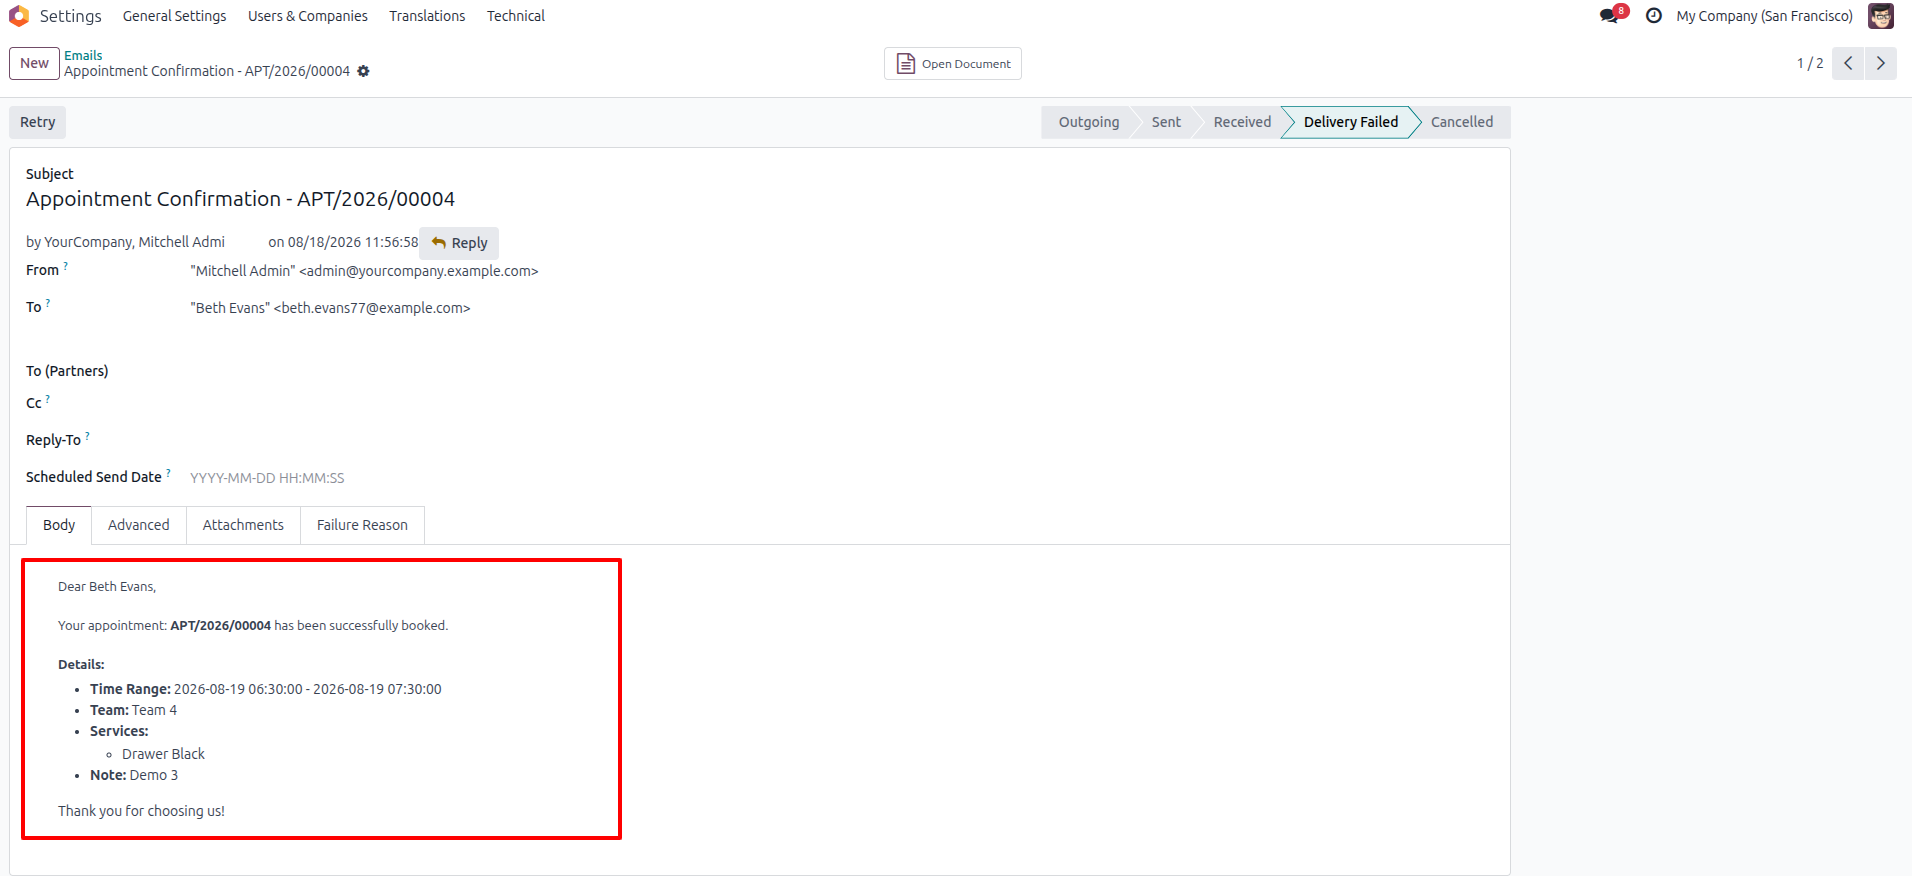
34.Open the actual email document generated by the system.ou can verify the exact Body text sent to the customer, which includes their reference number, time range, assigned team, and booked services.
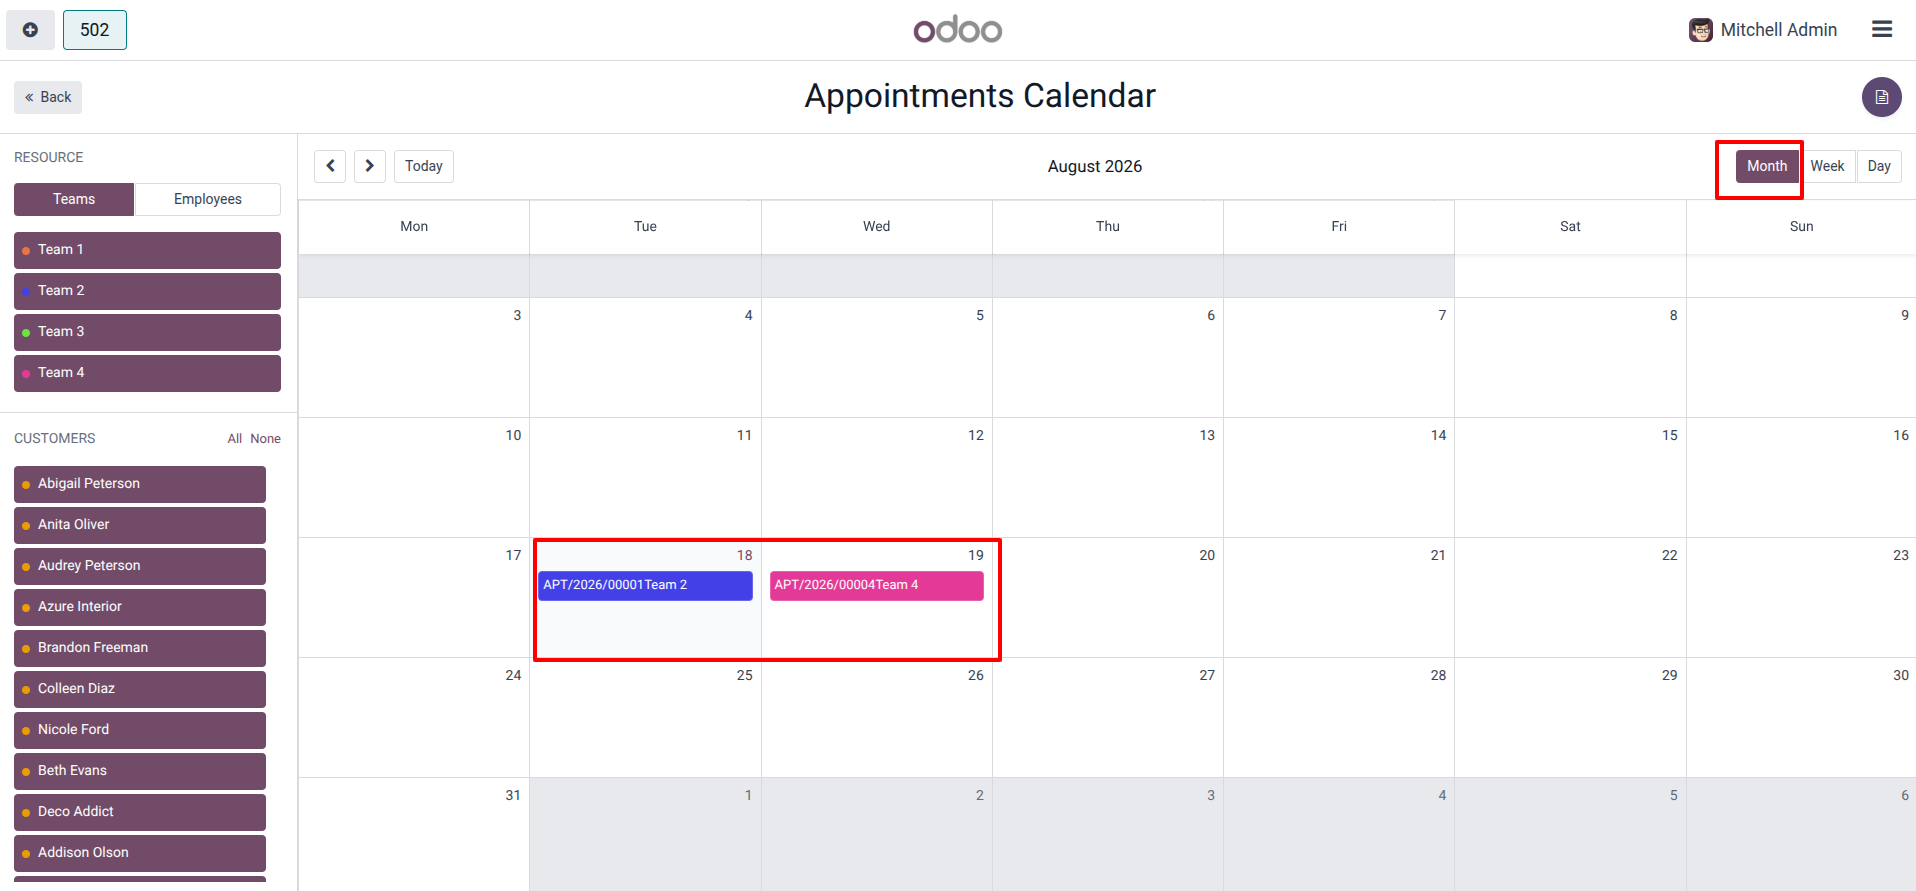
35.This switches the view from weekly/daily to a full monthly overview, allowing you to easily see all booked appointments across different dates (e.g., the 18th and 19th).
Our solutions focus on your problems
- Odoo Implementation
- Odoo Customization
- ERP Development and Implementation
- Odoo Ipass Cloud
- AI for Odoo
- Odoo Apps
- Aws Marketplace Products
- Business Engines
Our Pricing includes User Manual, 90 Days Support (Monday-Friday 10am to 7pm IST) and One time Setup
• Works & tested on standard installations of Odoo with no third party apps,
• Free support only for odoo installations with no third party apps,
• Paid support available for Odoo installations with third party apps.

Prefortune is a Odoo Official Partner, Odoo Development company. Our philosophy is to use Open Source tools and technologies to provide cost effective and green solutions for our customers.
Prefortune Technologies LLP is working on web development, Mobile development, and Odoo ERP.
If you need any help or want more additional features, you may contact us through:
Alternative Products
These other products might interest you
Specifications
| Version | 19.0, 18.0, 17.0, 16.0 |