Watch Quick Video
All In One Chatter Toolkit Odoo App
All In One Chatter Toolkit Odoo App
is a powerful set of tools to enhance your Odoo Chatter experience for managing communication, messages
and record activity. Users can hide or show the Chatter to maximise workspace, pin important messages,
customise the Chatter position, reply directly to Chatter messages for a more flexible communication.
The toolkit also allows message editing and history management so users can track changes made to Chatter
messages. Advanced filters enable you to search for messages, notes and logs by user, recipient, date or
search terms so users can quickly find the Chatter information they need.
Users can set default Email CC, BCC and Reply-To values, download all Chatter attachments as a ZIP file
and monitor changes to selected fields right in the Chatter. These features will better improve
communication, help you keep a better track of activities and grant you more control over Chatter
management within Odoo.
All In One Chatter Toolkit Odoo App Features
- Show or hide the Chatter section from the form view for a cleaner and more spacious workspace
- Pin important messages in Chatter and unpin them easily whenever required for better visibility.
- Customise the Chatter position and adjust its width based on your desired layout. Directly reply to Chatter messages from a dedicated Reply Message window to reply faster.
- Edit Chatter messages and log notes with a complete history of changes made before.
- Filter the Chatter entries by messages, notes, logs, users or recipients to find what you need faster.
- Set default CC, BCC and Reply-To addresses to auto-fill every time you compose an e-mail.
- Set default CC, BCC, and Reply-To addresses so they auto-fill every time you compose an email.
- Configurable access settings to restrict Chatter visibility to specific users, groups or models.
- Download all Chatter attachments in one ZIP file to make it easier to manage files.
- Track changes to selected fields and see them as detailed logs right in the Chatter.
Complete Workflow for Manage All In One Chatter Toolkit Odoo App
Install the All In One Chatter Toolkit Odoo App module and open any Odoo form view that contains the Chatter. Use the Hide Chatter option to hide the Chatter and expand the form view when you need more workspace. Click Show Chatter to restore the Chatter section. You can pin important Chatter messages using the message menu and unpin them whenever required. From My Preferences, configure the Chatter position and choose how the Chatter should be displayed. You can also adjust the Chatter width according to your preferred layout. Enable the available Chatter options to reply directly to messages, edit messages and log notes, and maintain a history of changes. Use the Chatter filters to quickly find messages, notes or logs by users, recipients, time period or search terms. Configure default Email CC, BCC & Reply-To values from the settings so they are automatically available when composing emails. You can also enable Chatter Attachment Download as ZIP to download all Chatter attachments together as a ZIP file. Finally, enable Custom Field Tracking and configure the fields you want to track for a selected model. Changes made to the configured fields will then be displayed as change logs directly in the Chatter.
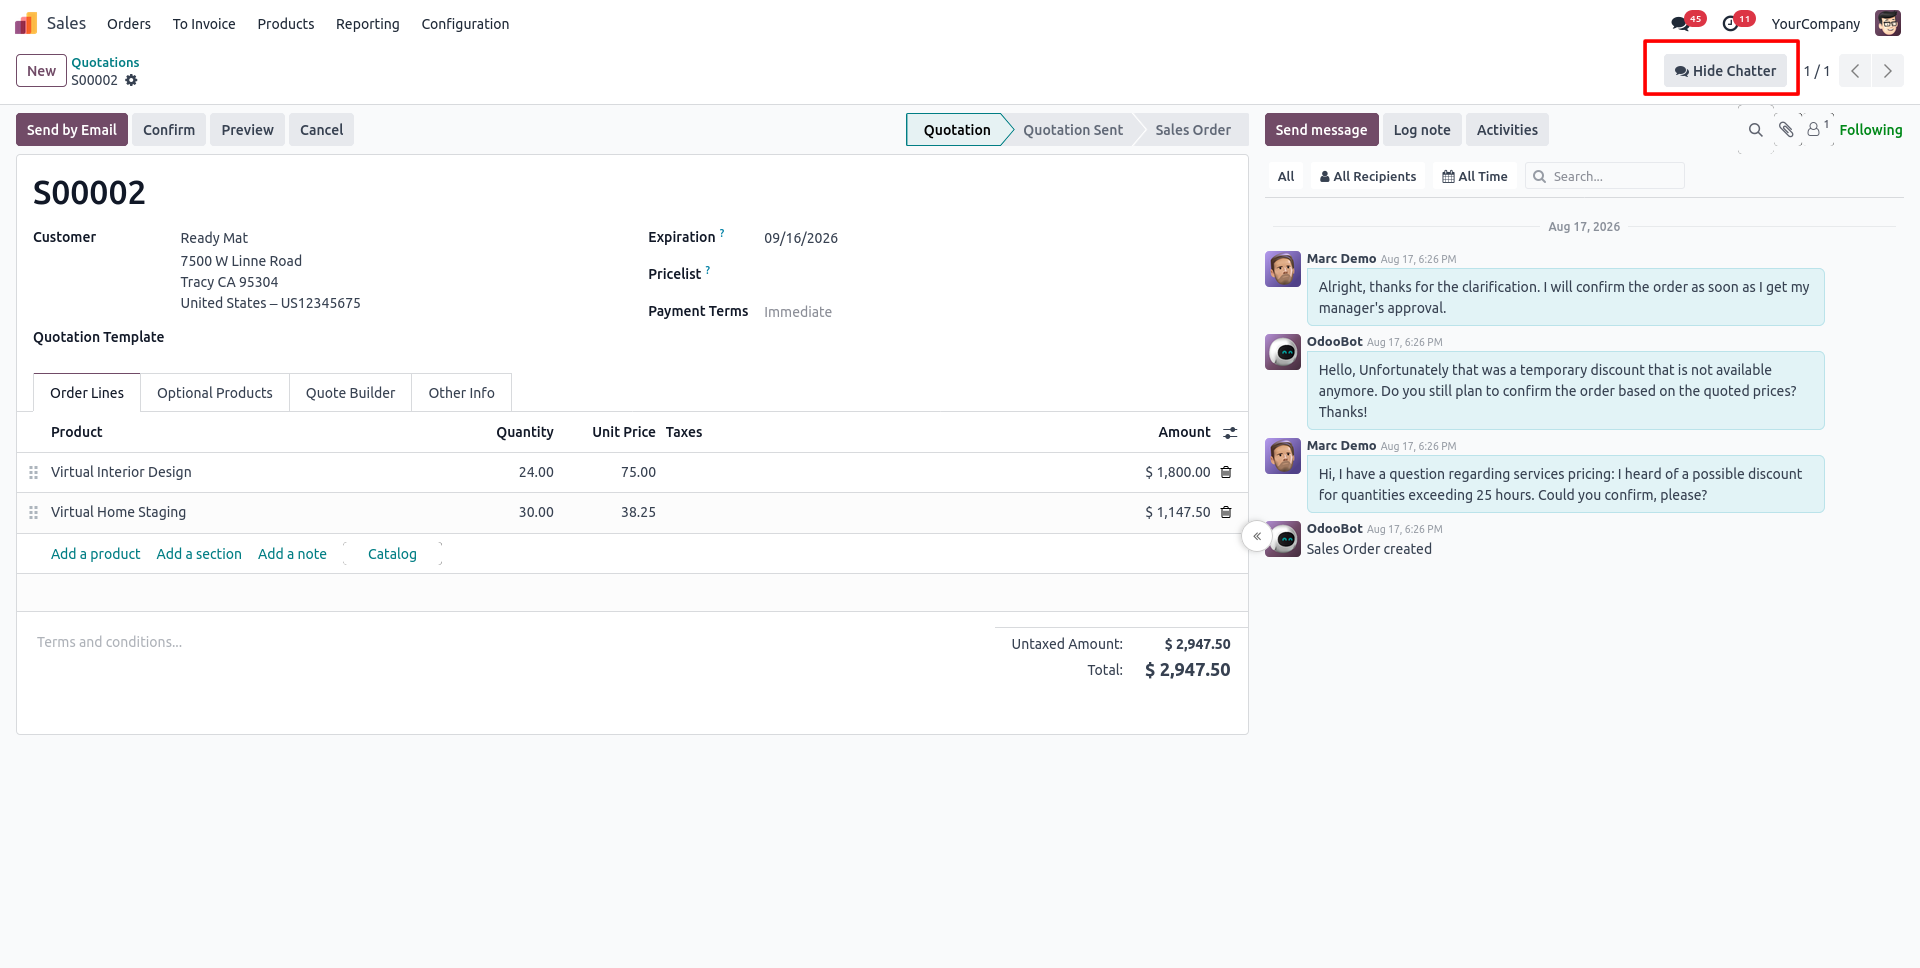
1. Click the Hide Chatter button located in the top right corner of the form view to hide the communication history.
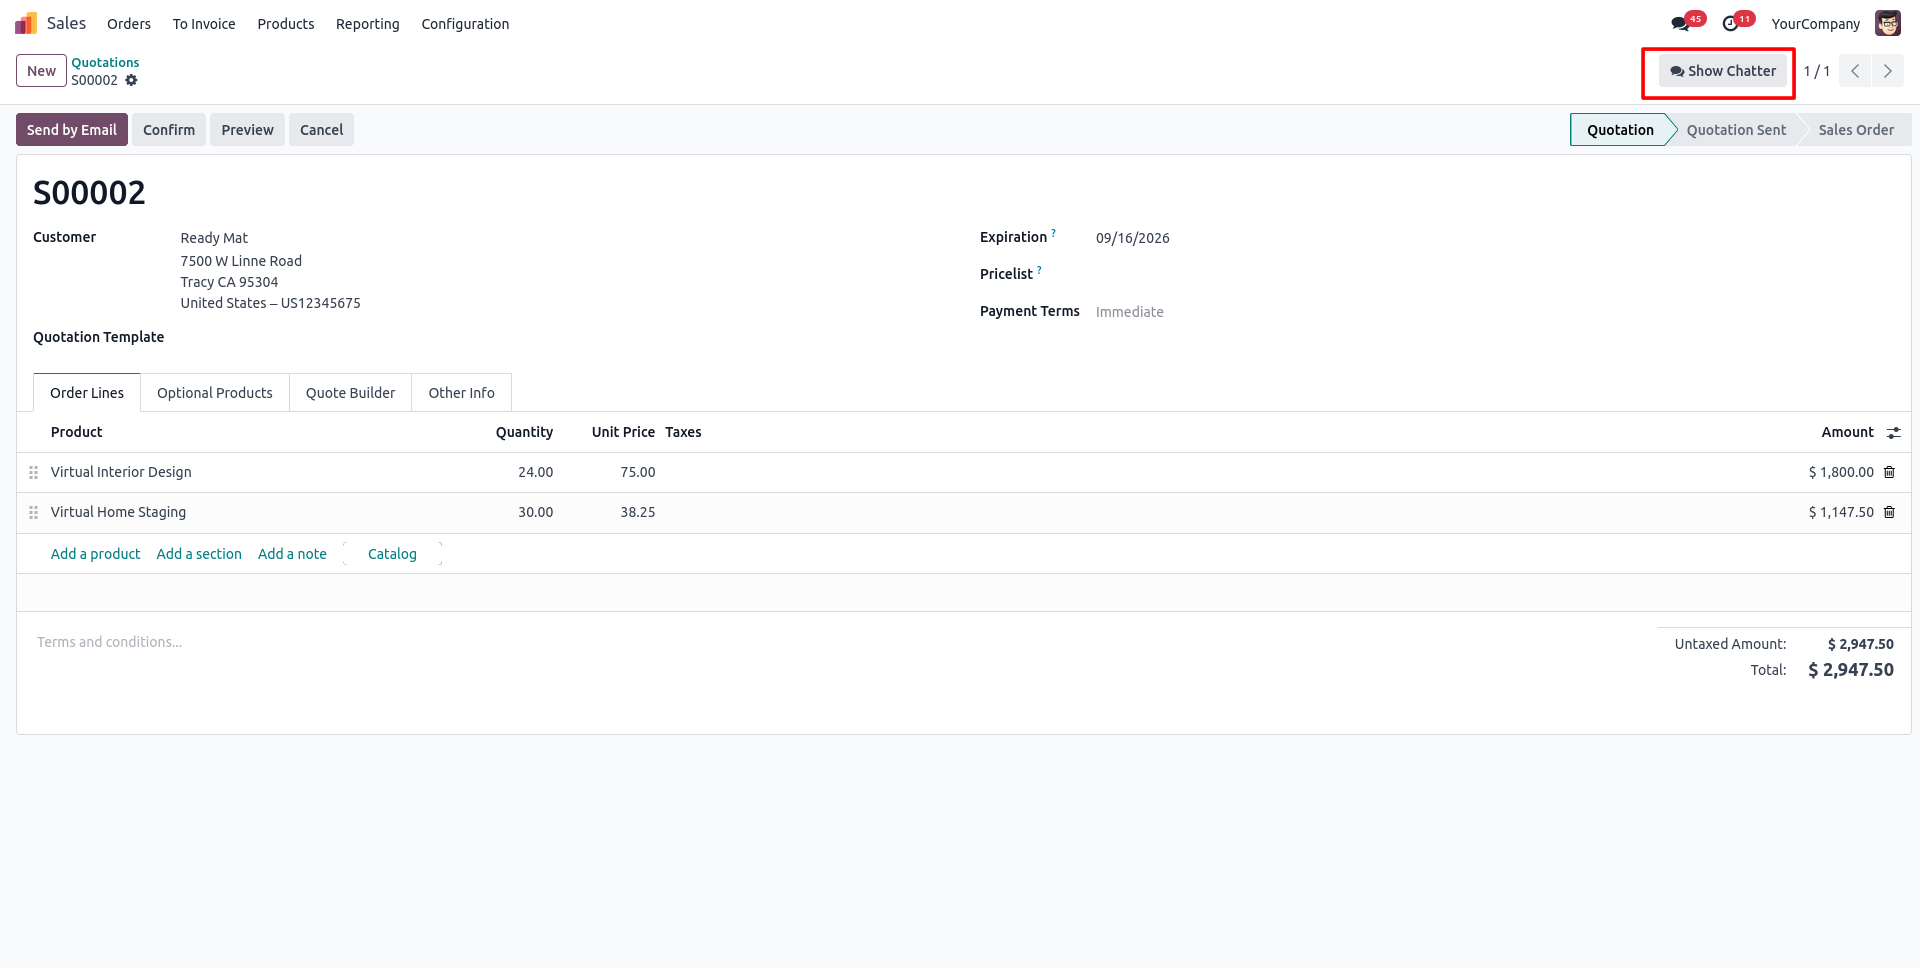
2. The Chatter panel disappears and the form expands to occupy the full width of the screen. The button label updates to Show Chatter.
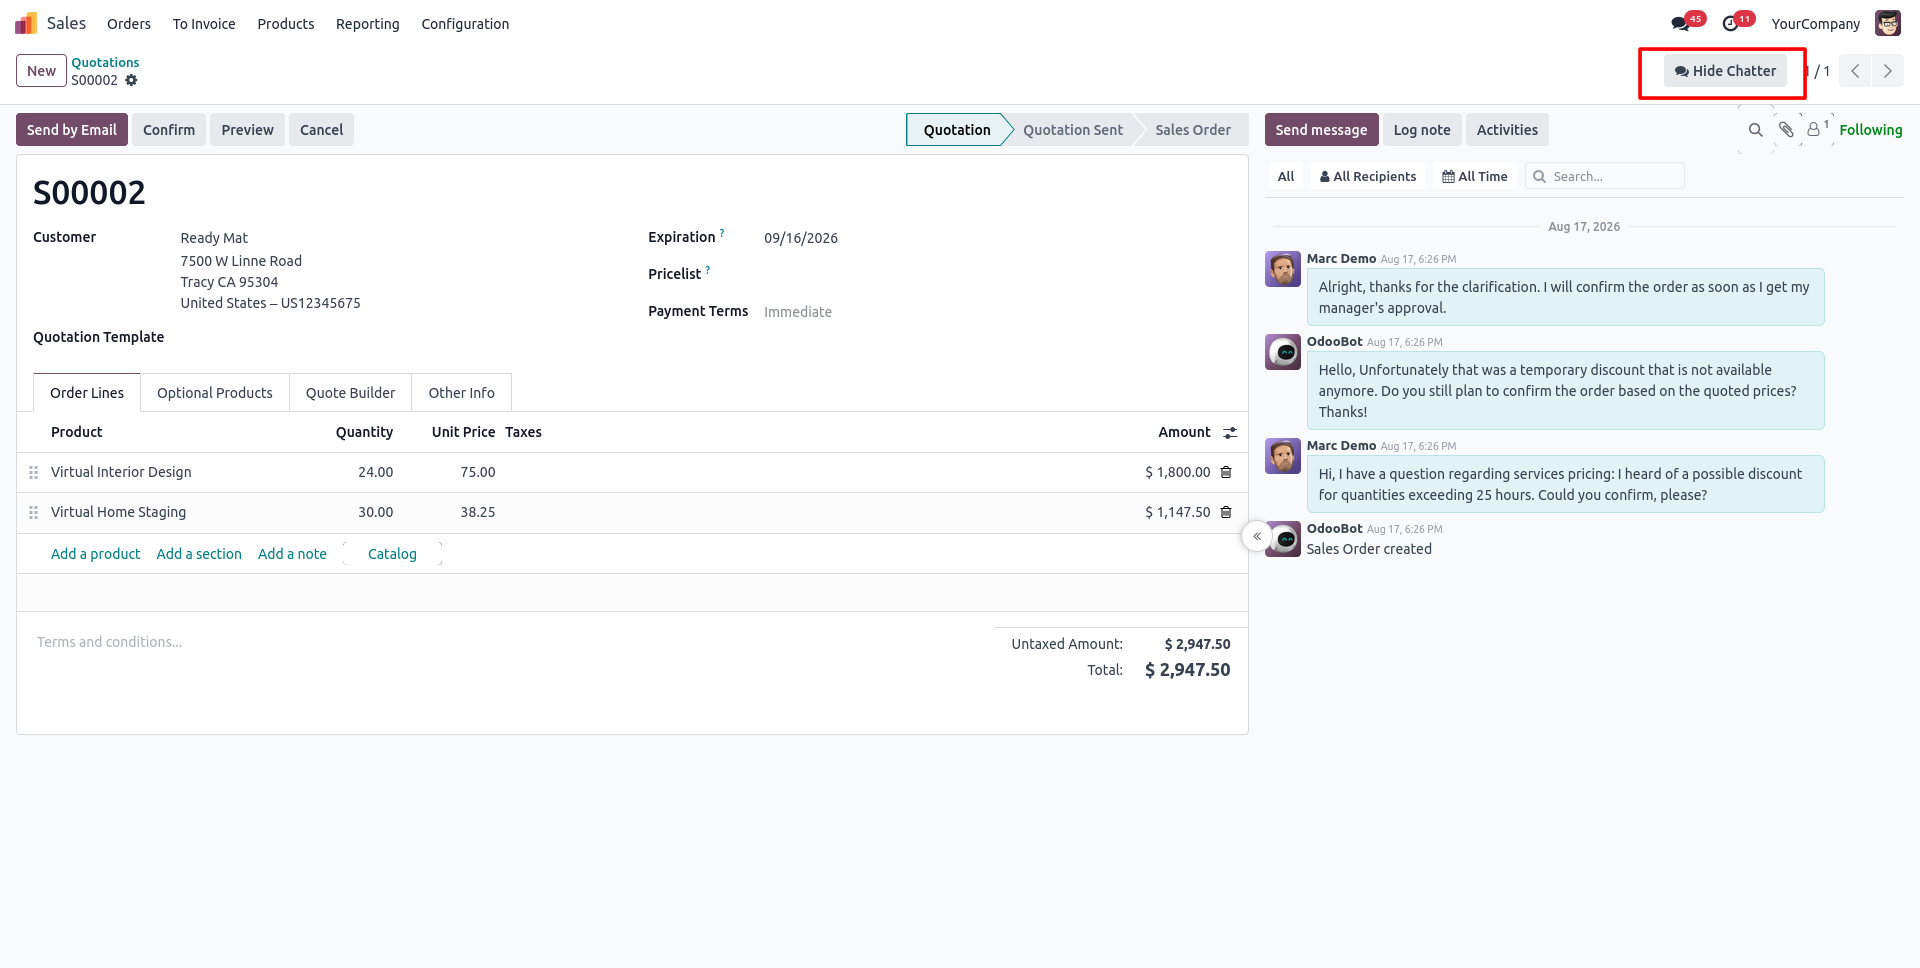
3. Click Show Chatter to restore the panel — the form returns to its original width and the communication history becomes visible again.
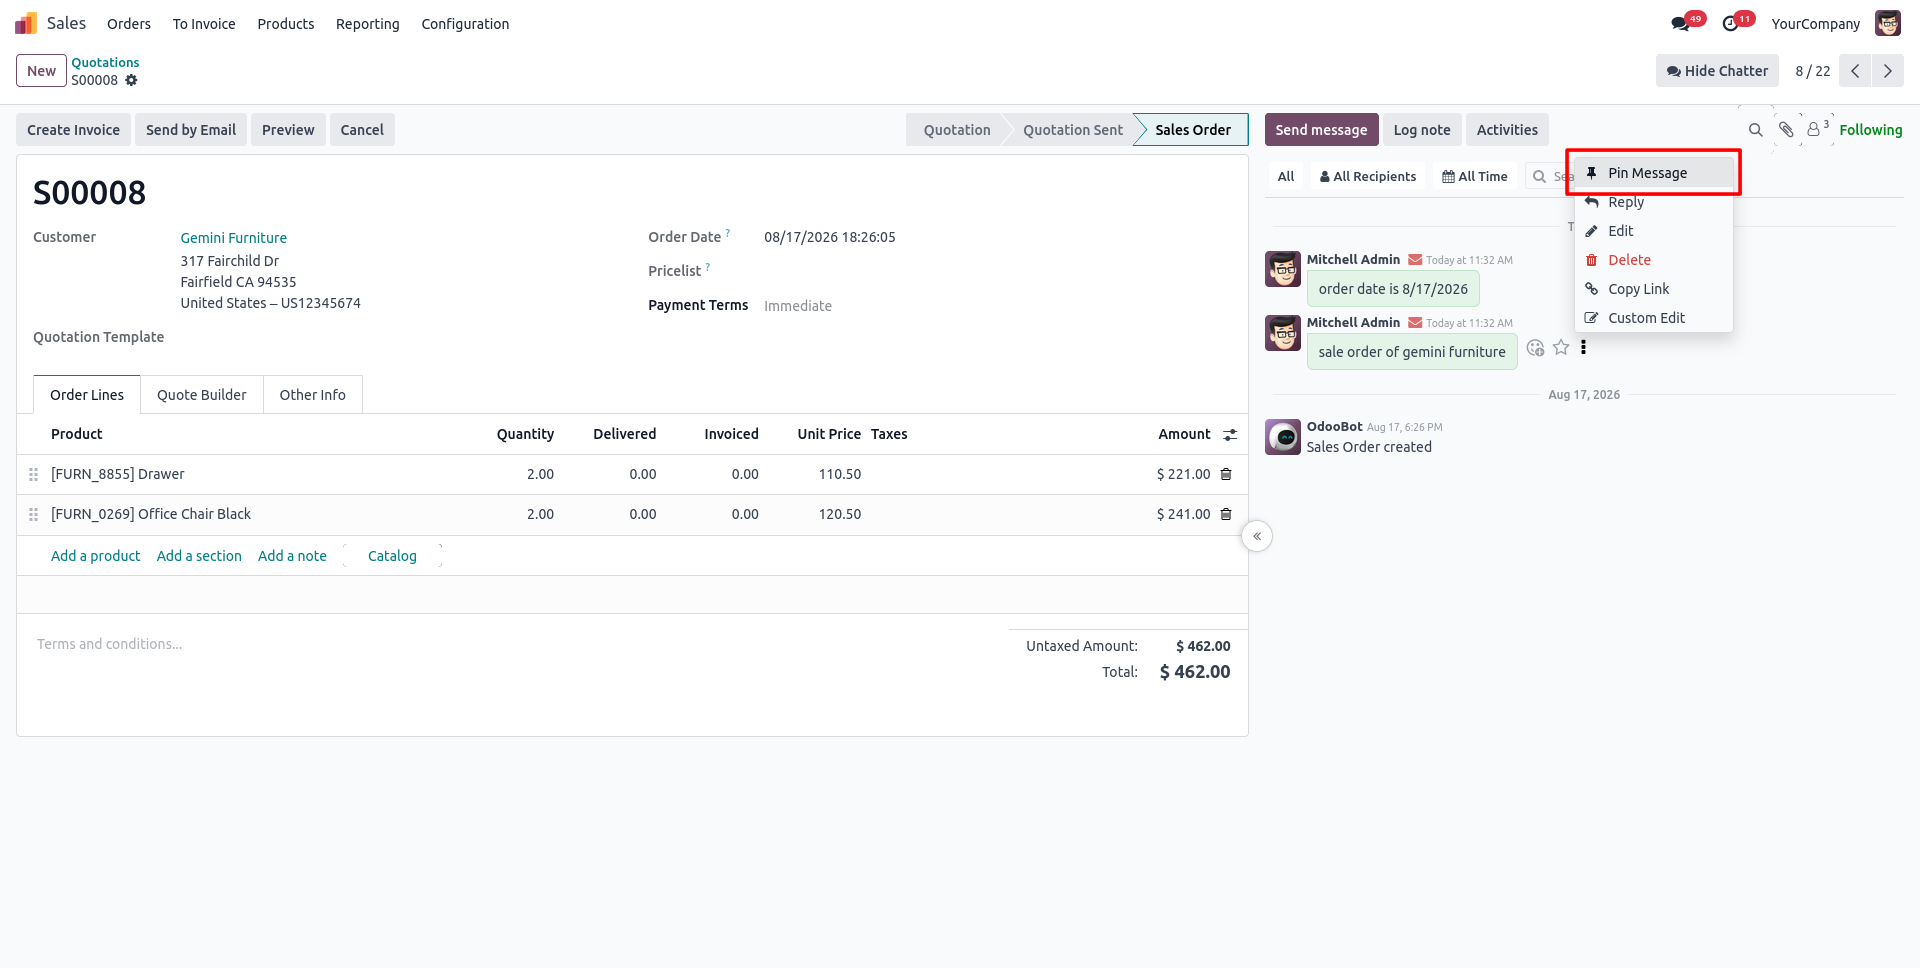
4. Click the three dots on any Chatter message and select Pin Message to mark it as important.
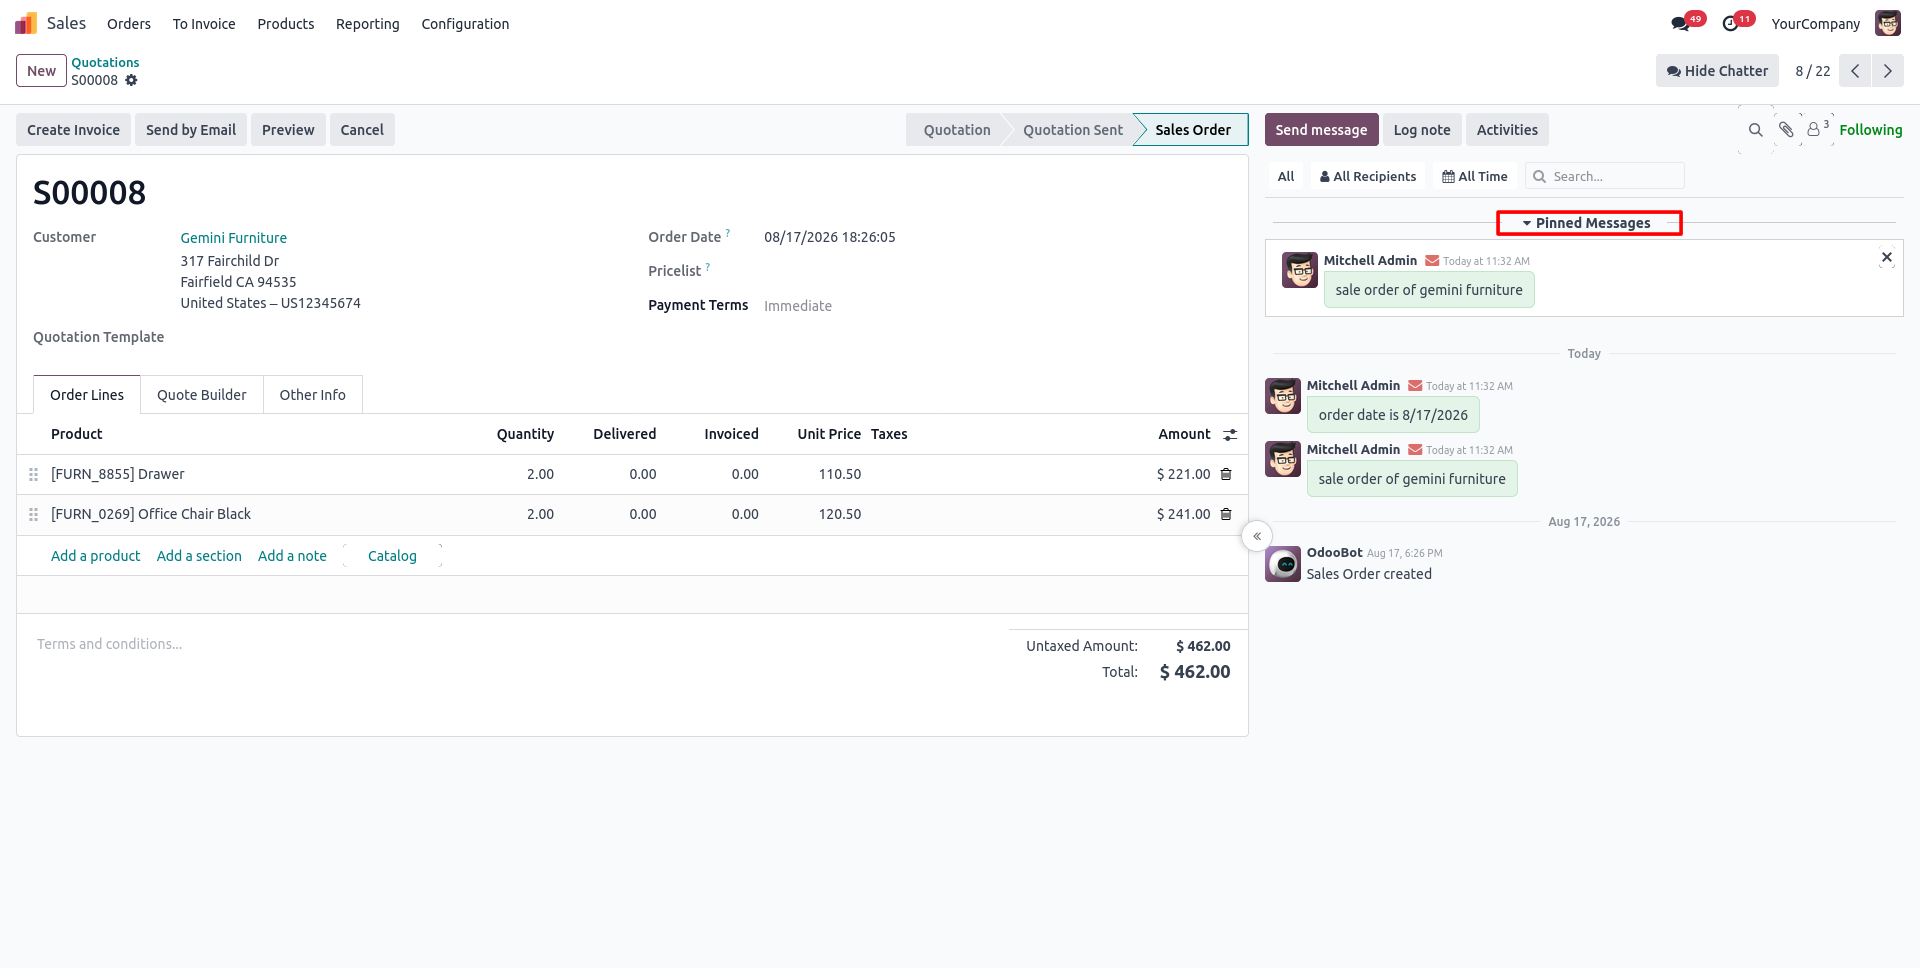
5. The message is added to the Pinned Messages section at the top of the Chatter for quick access.
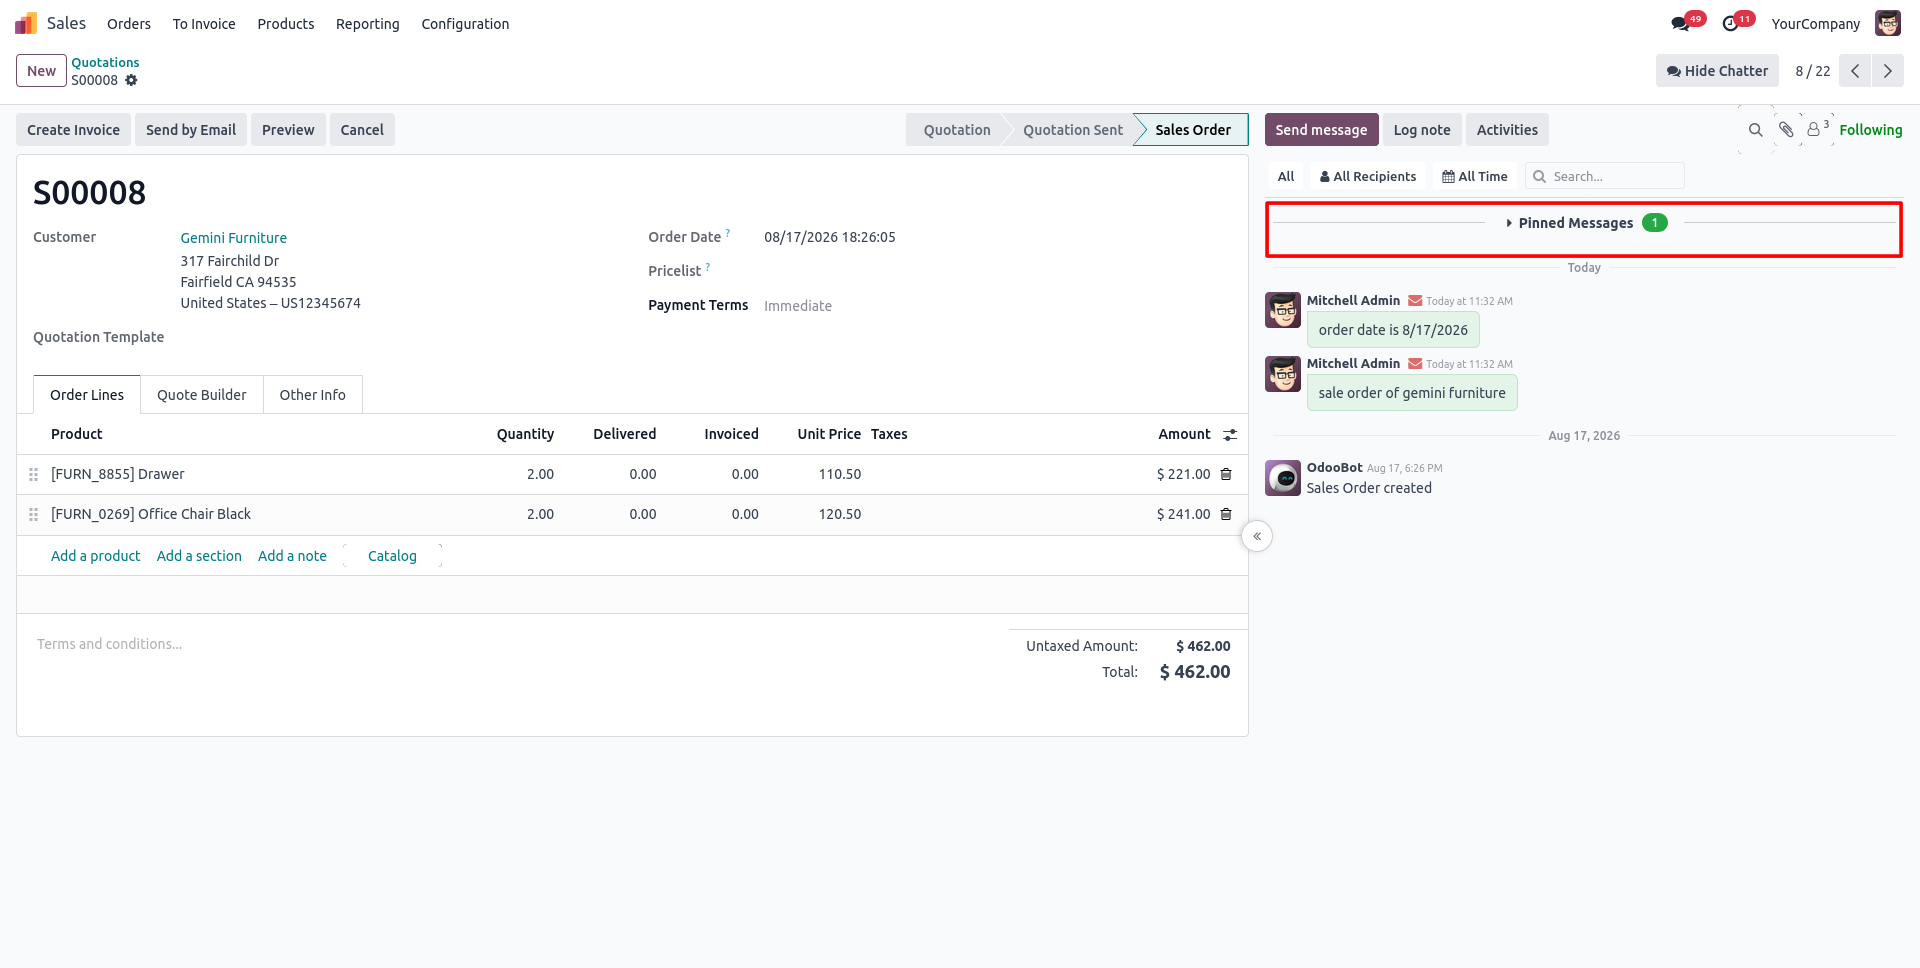
6. Click Pinned Messages to collapse or expand the section and see how many messages are currently pinned.
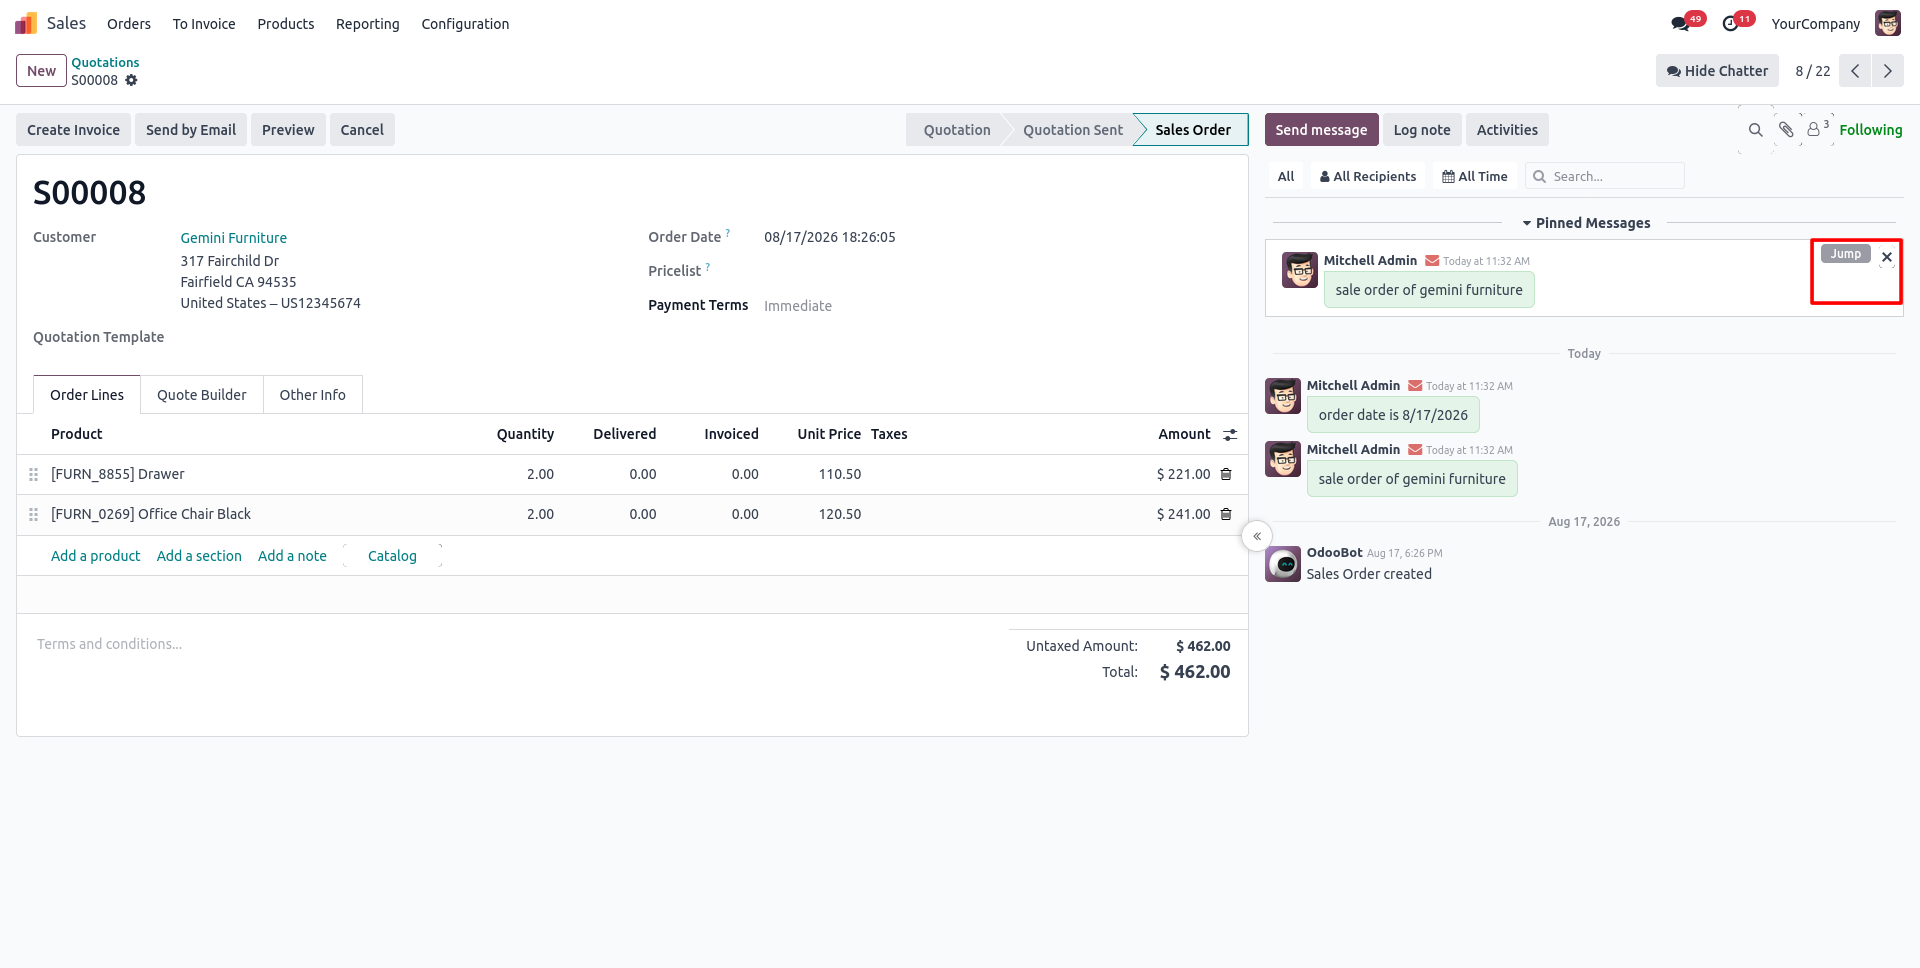
7. Use the Jump button on a pinned message to instantly scroll to its original position in the conversation.
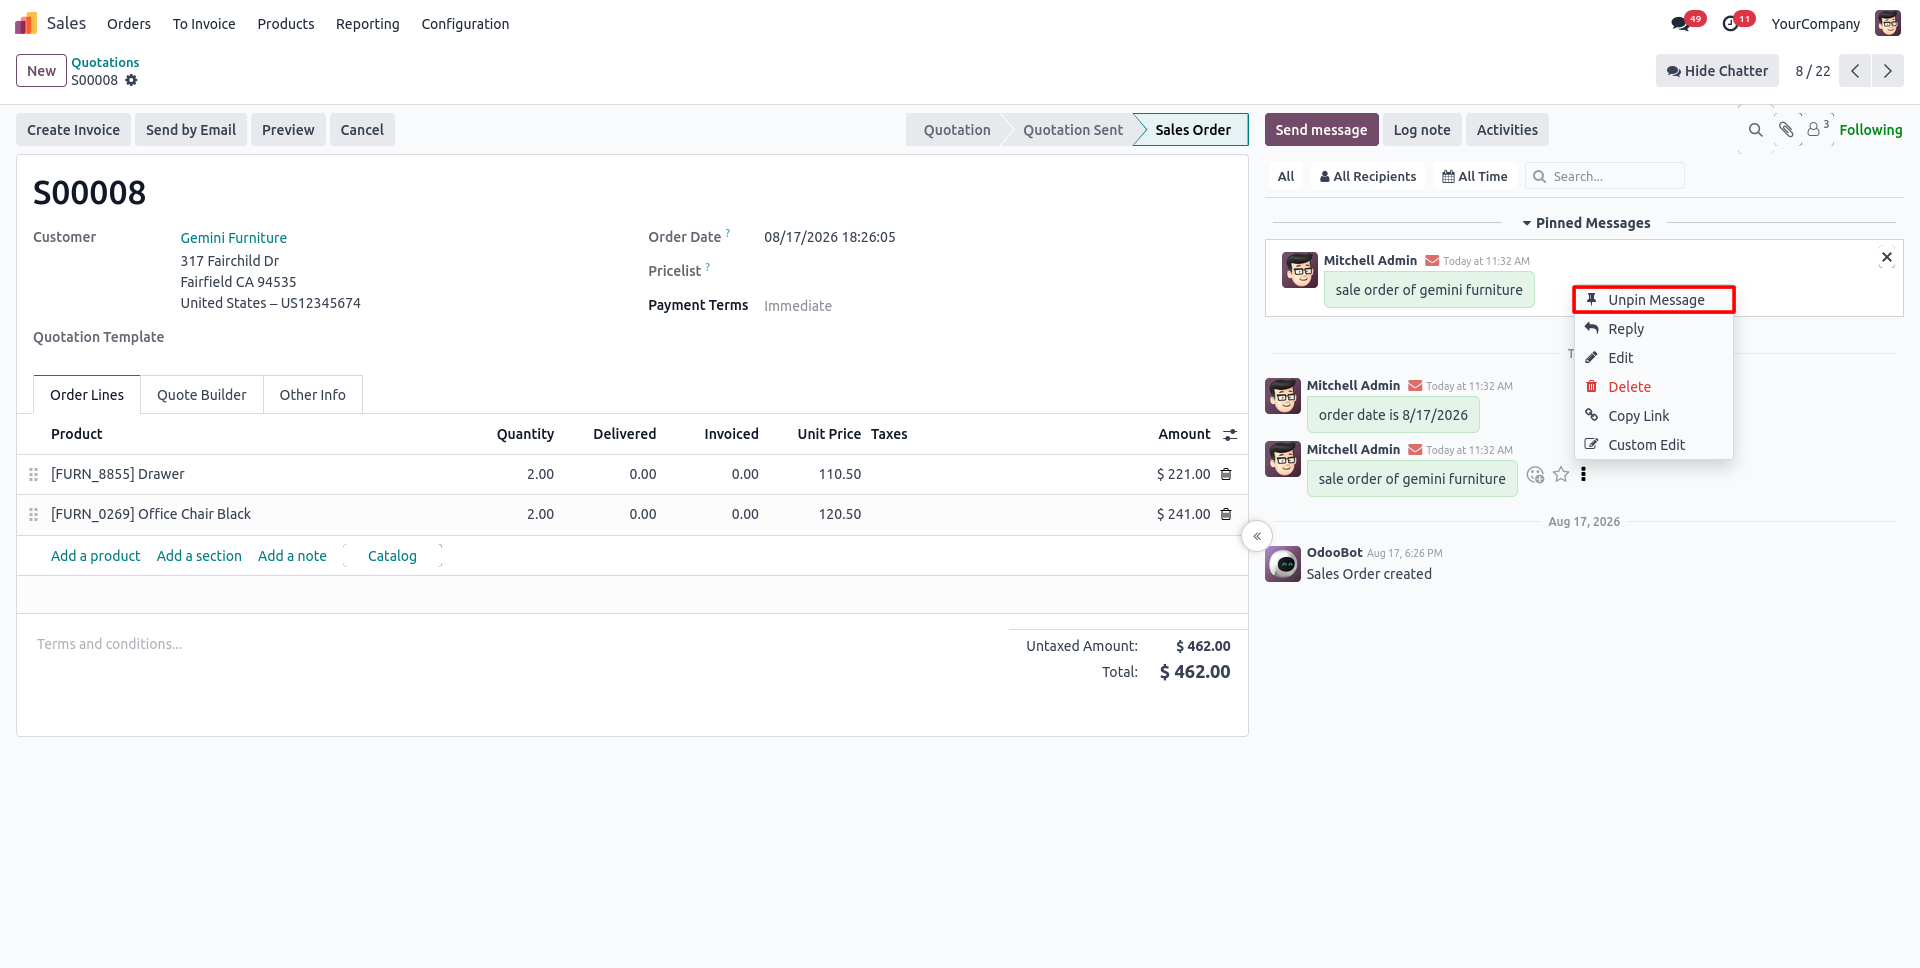
8. Click the three dots on a pinned message and select Unpin Message whenever it's no longer needed.
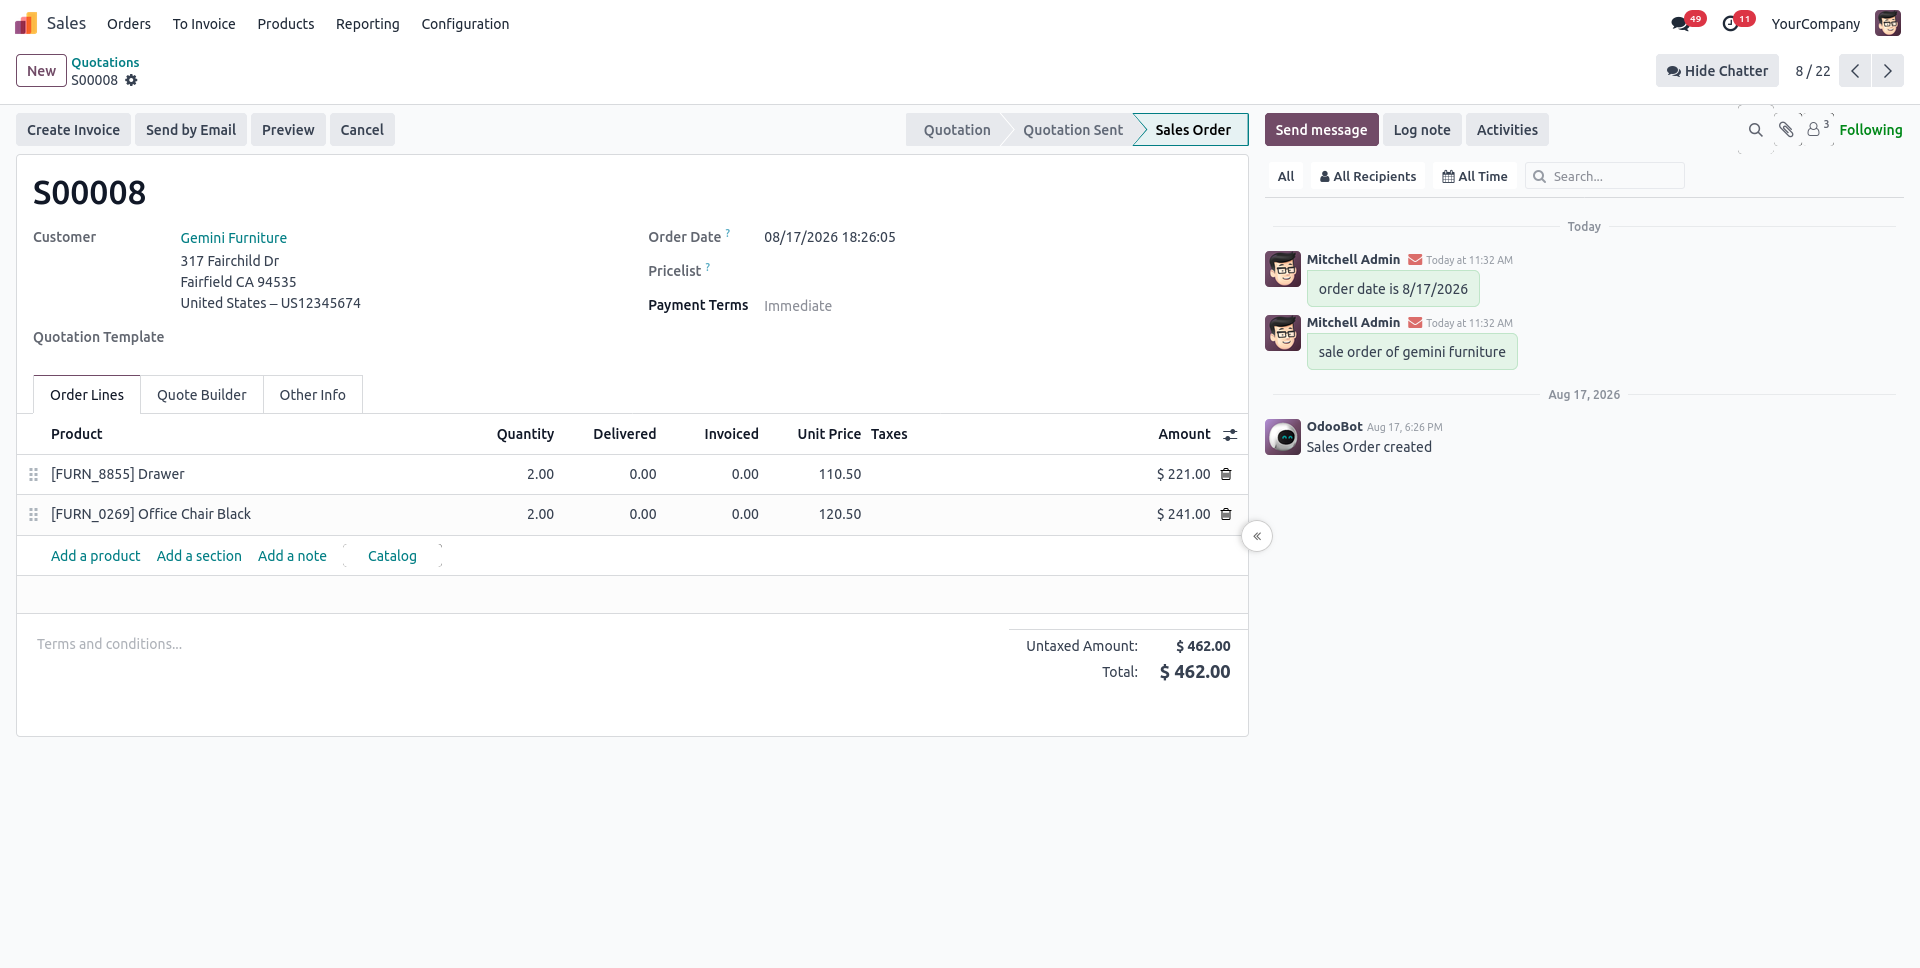
9. Once unpinned, the message is removed from the Pinned Messages section and returns to the regular Chatter timeline.
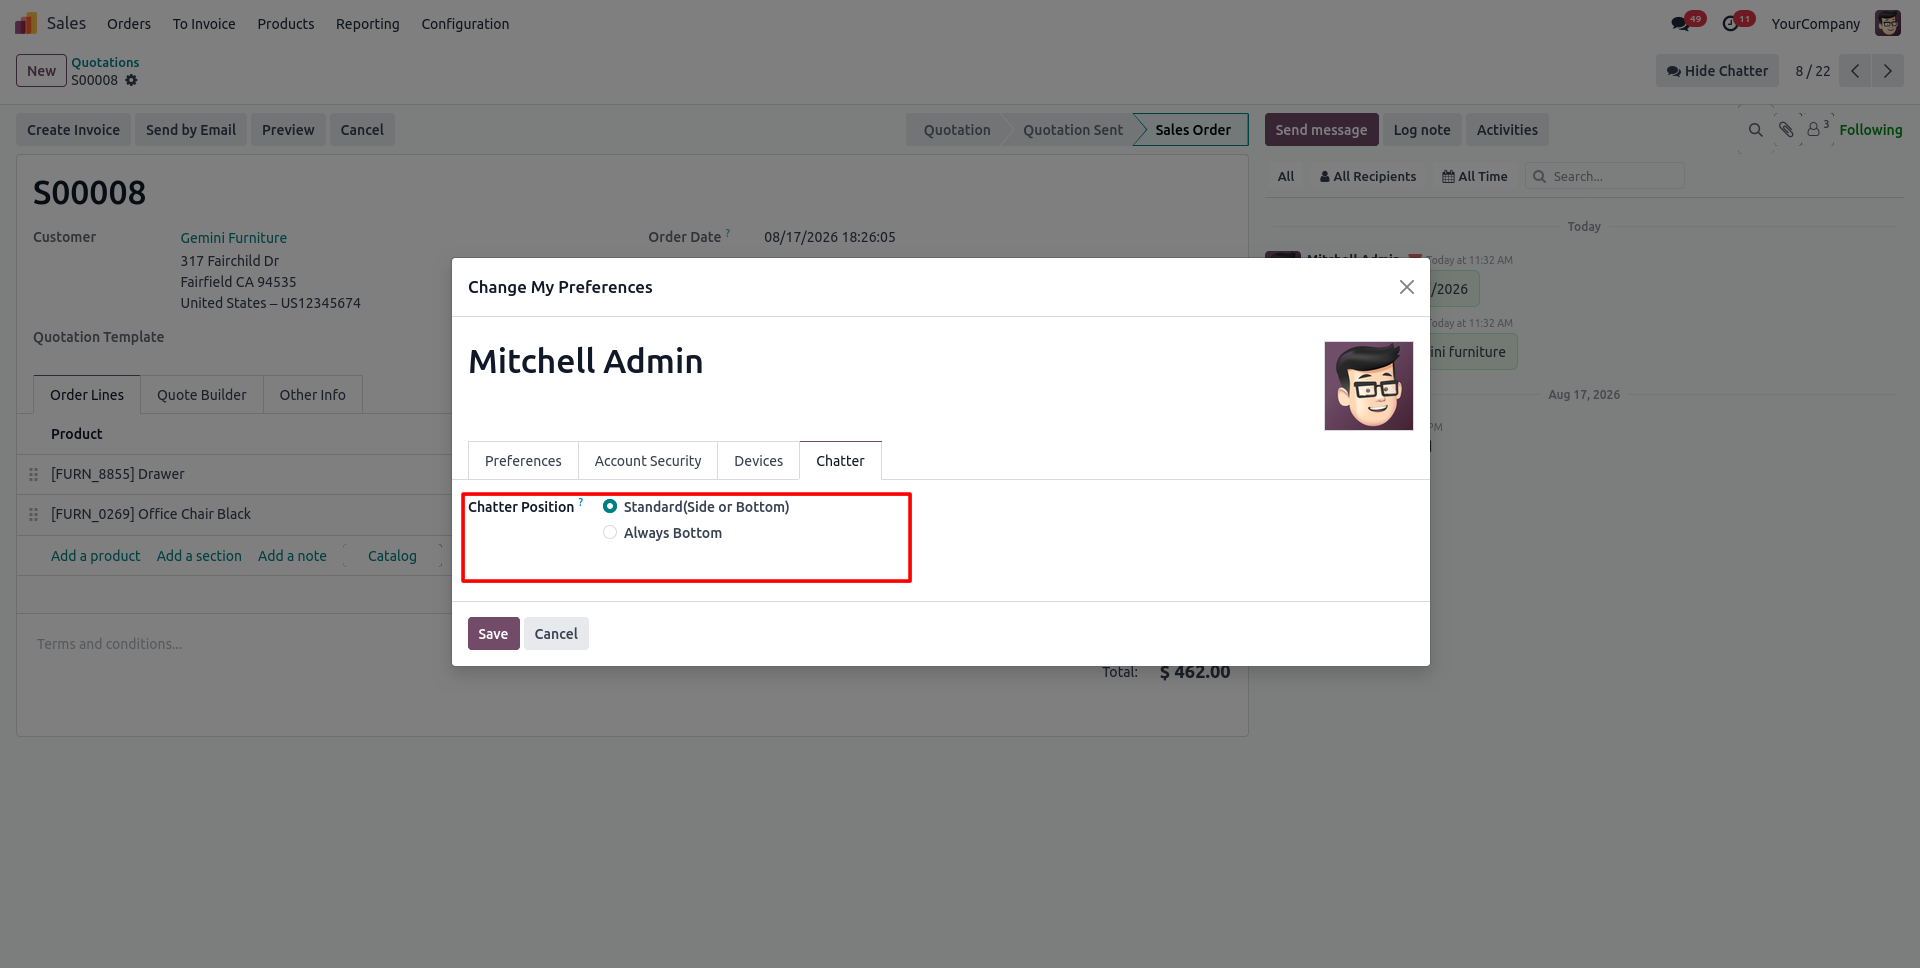
10. Go to My Preferences and open the Chatter tab to choose your preferred Chatter Position — Standard (Side or Bottom) or Always Bottom.
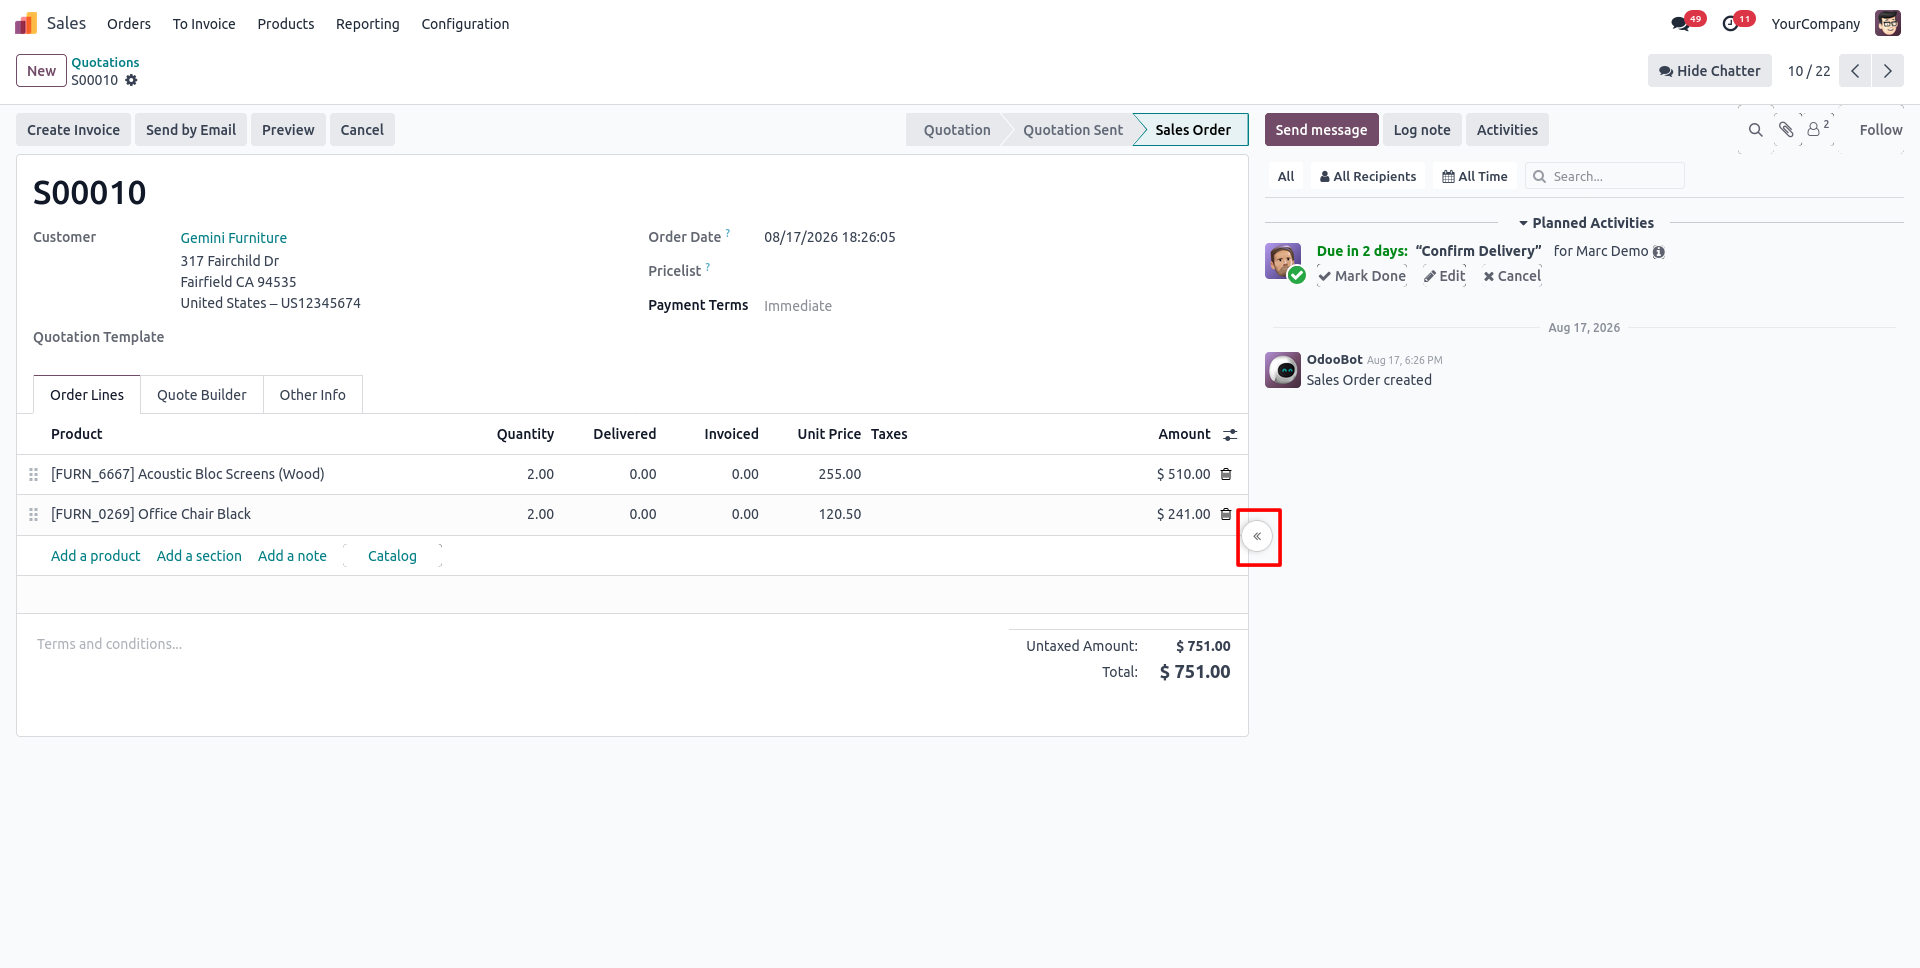
11. With the Standard position selected, click the arrow icon to collapse the Chatter panel and expand the form.
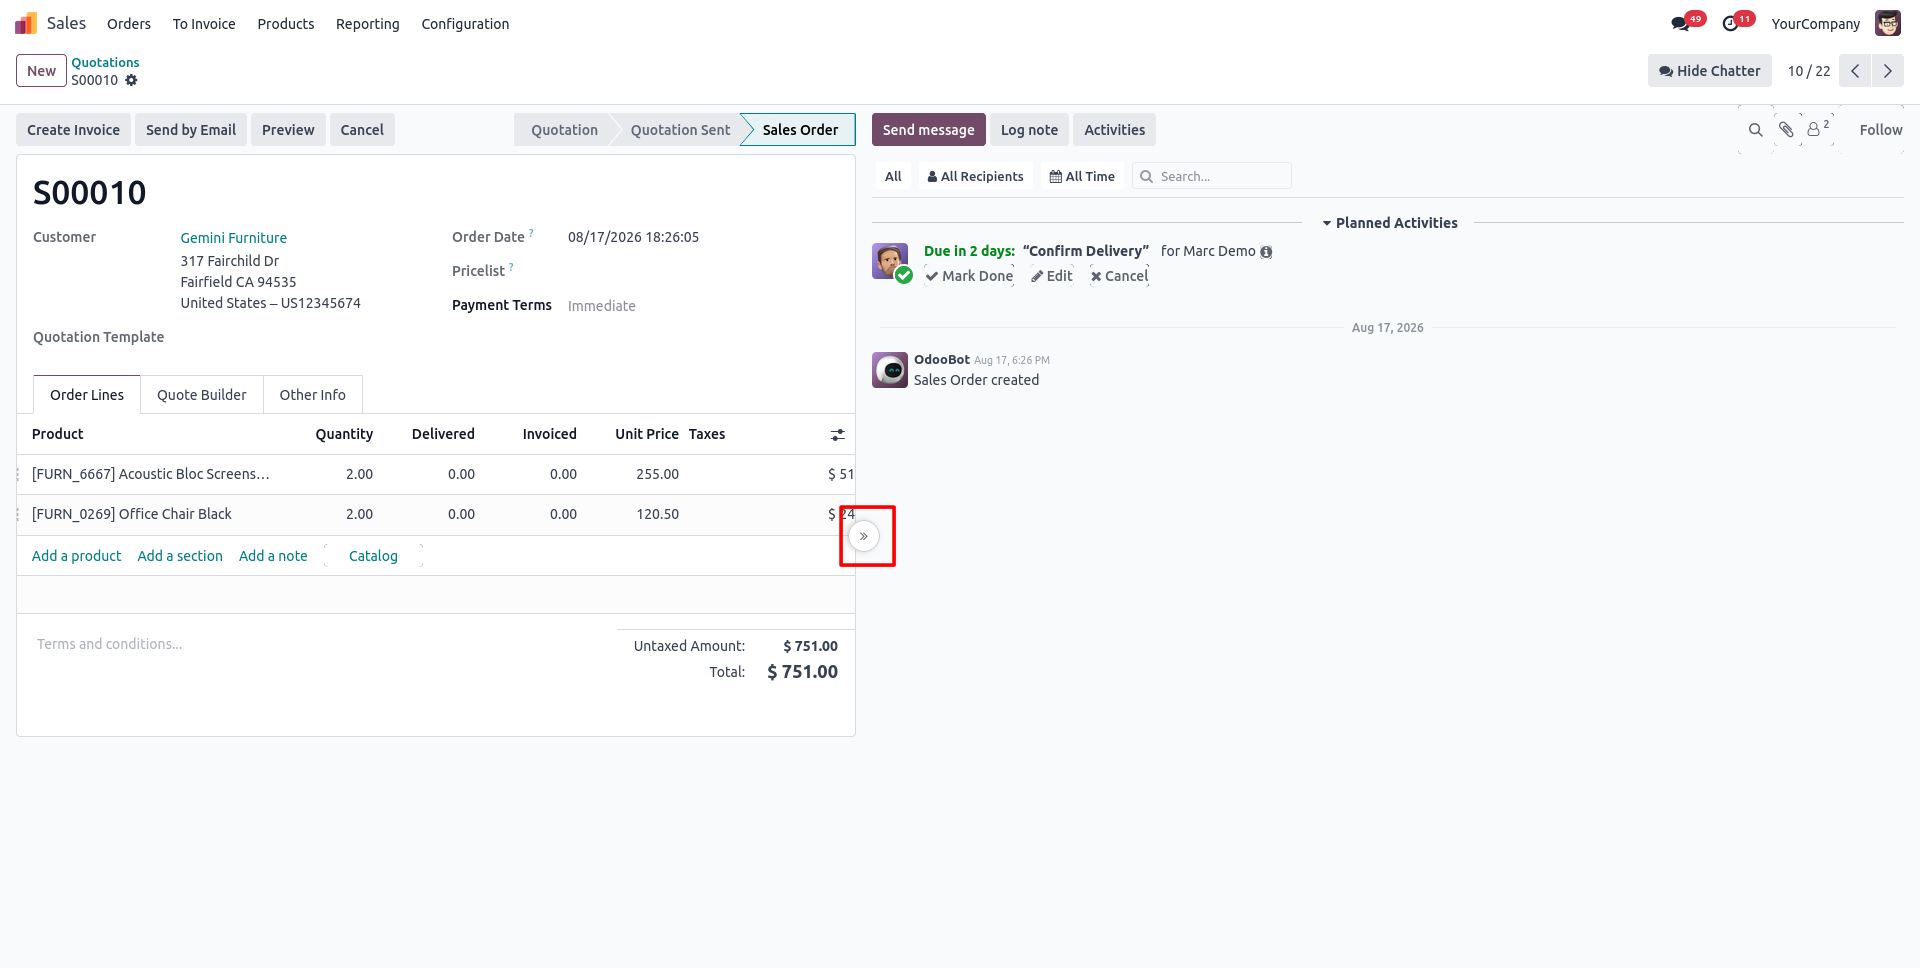
12. Click the arrow again to expand the Chatter panel back to its original width whenever you need it.
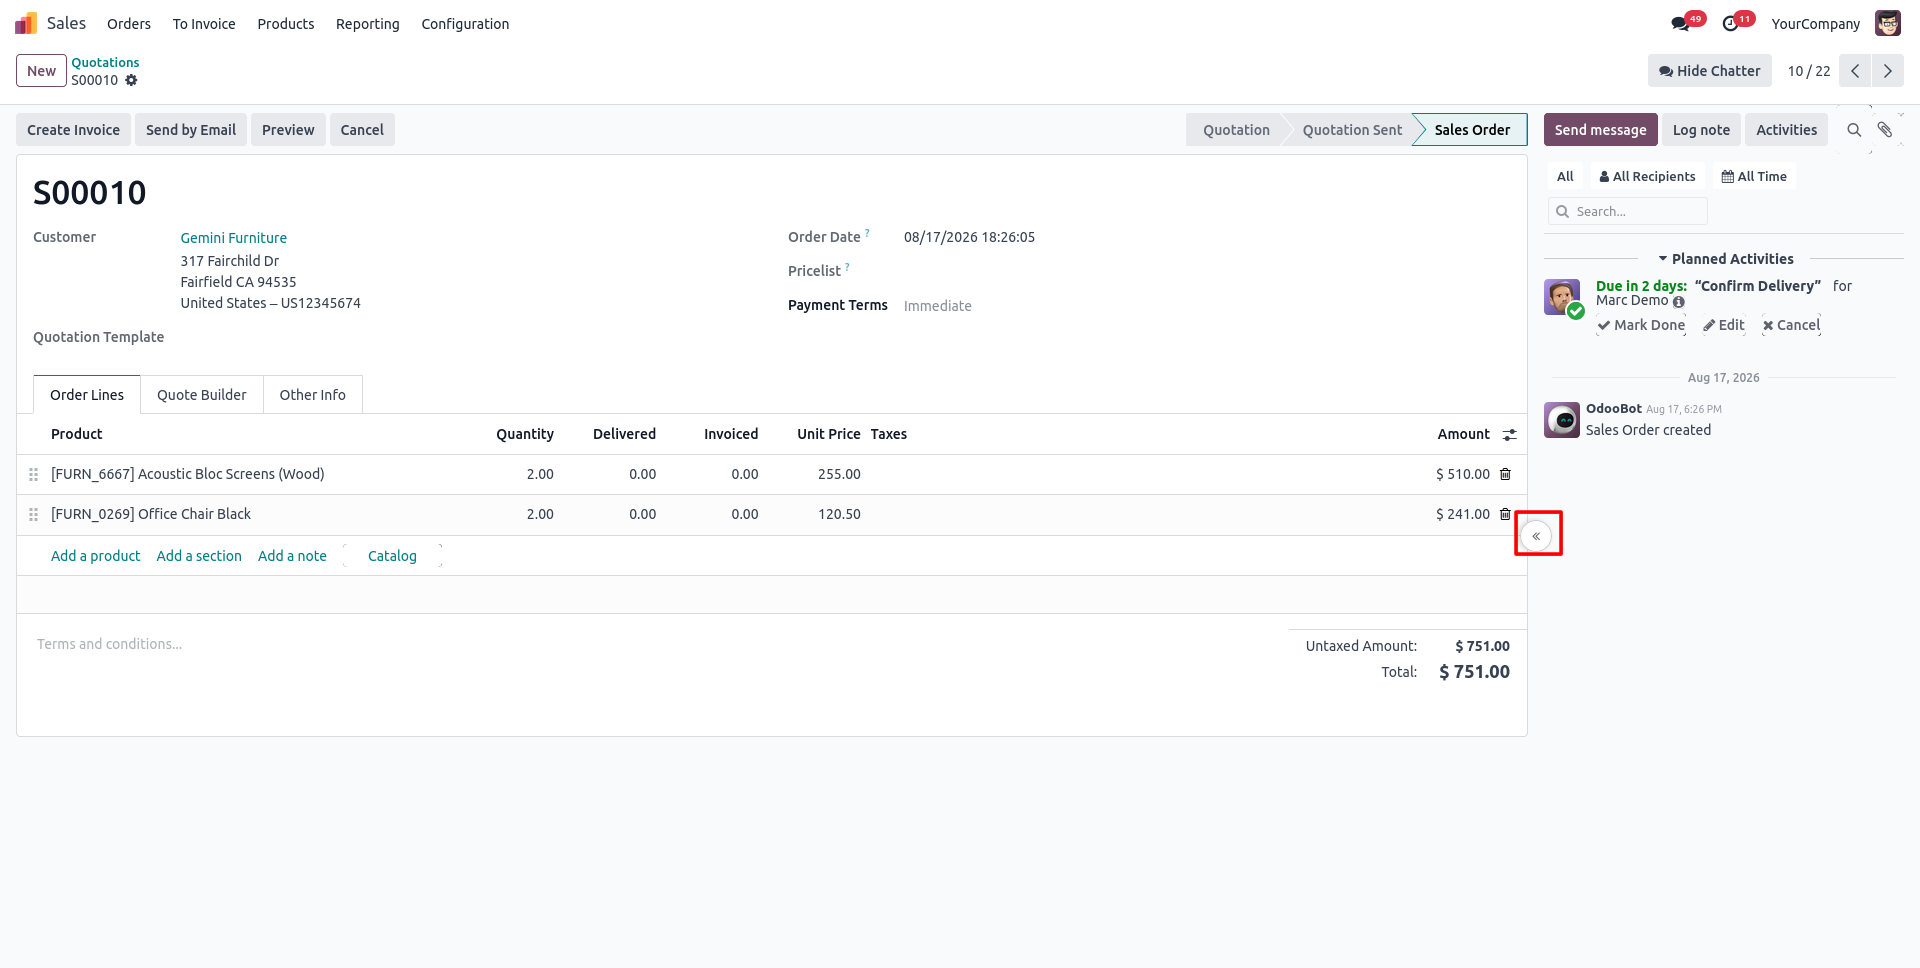
13. Adjust the Chatter panel's width freely to match your preferred workspace layout.
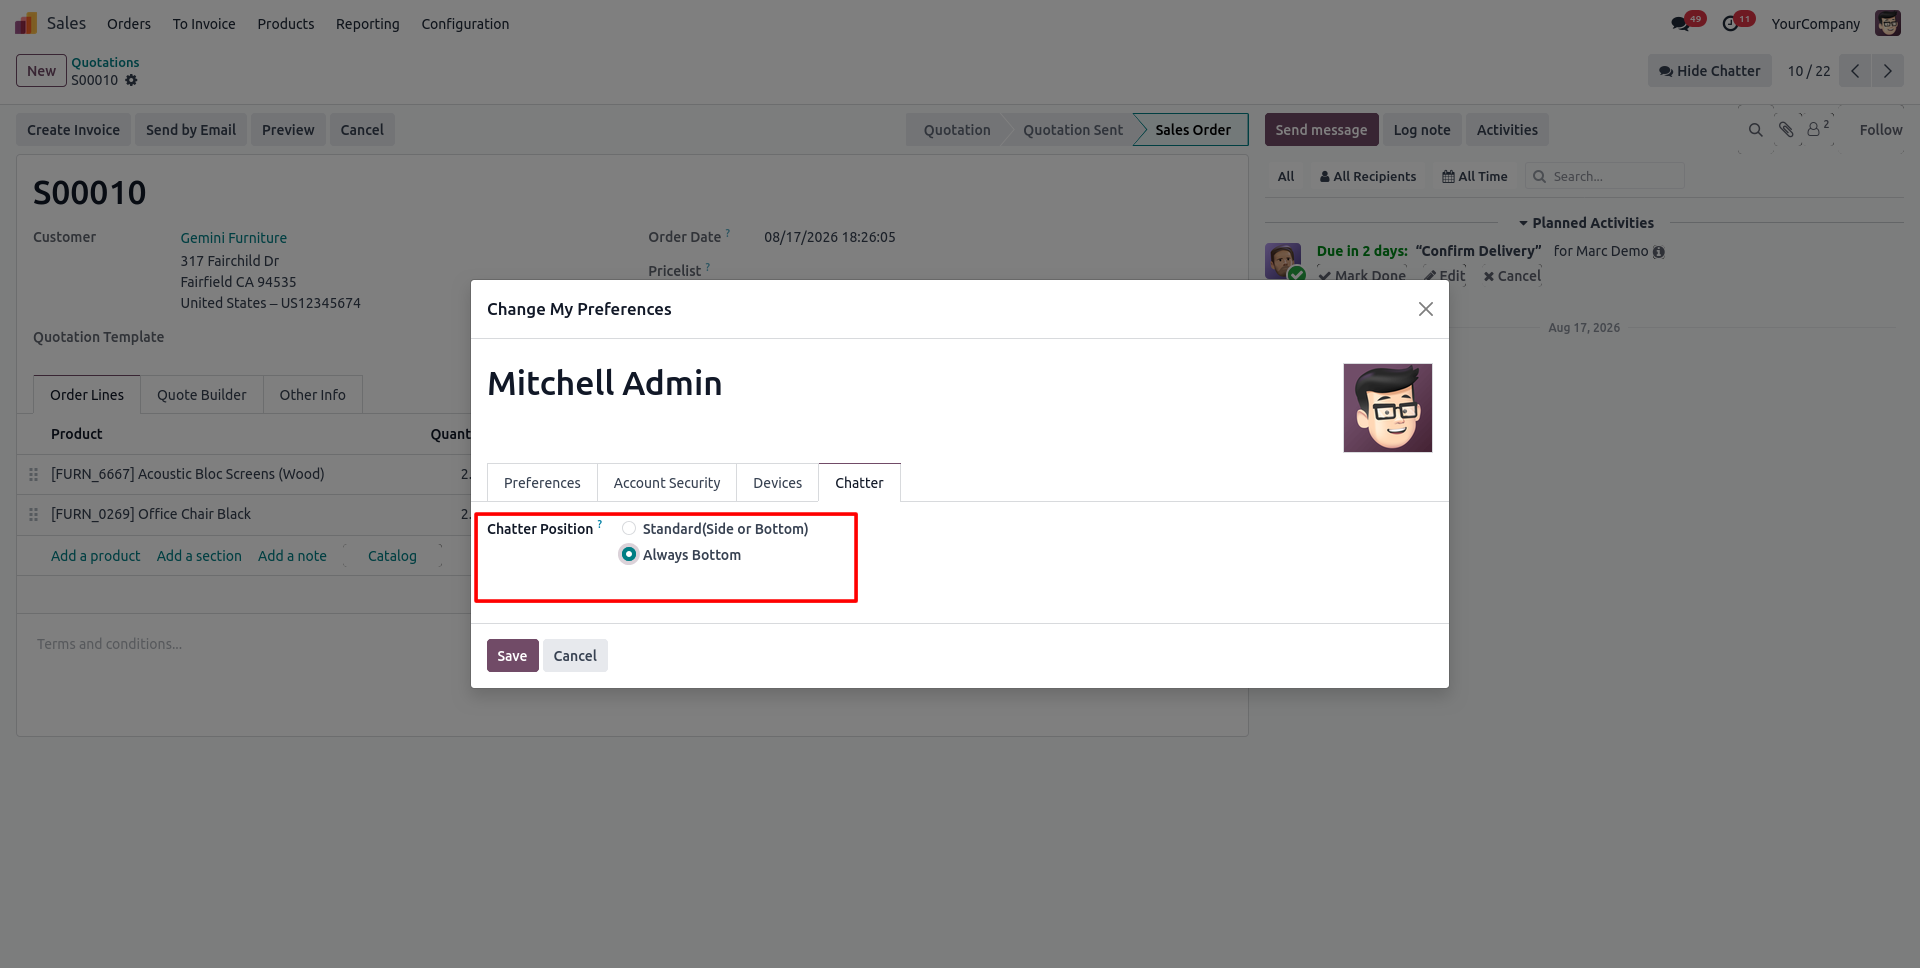
14. Select Always Bottom in the Chatter tab and click Save to always display the Chatter below the form.
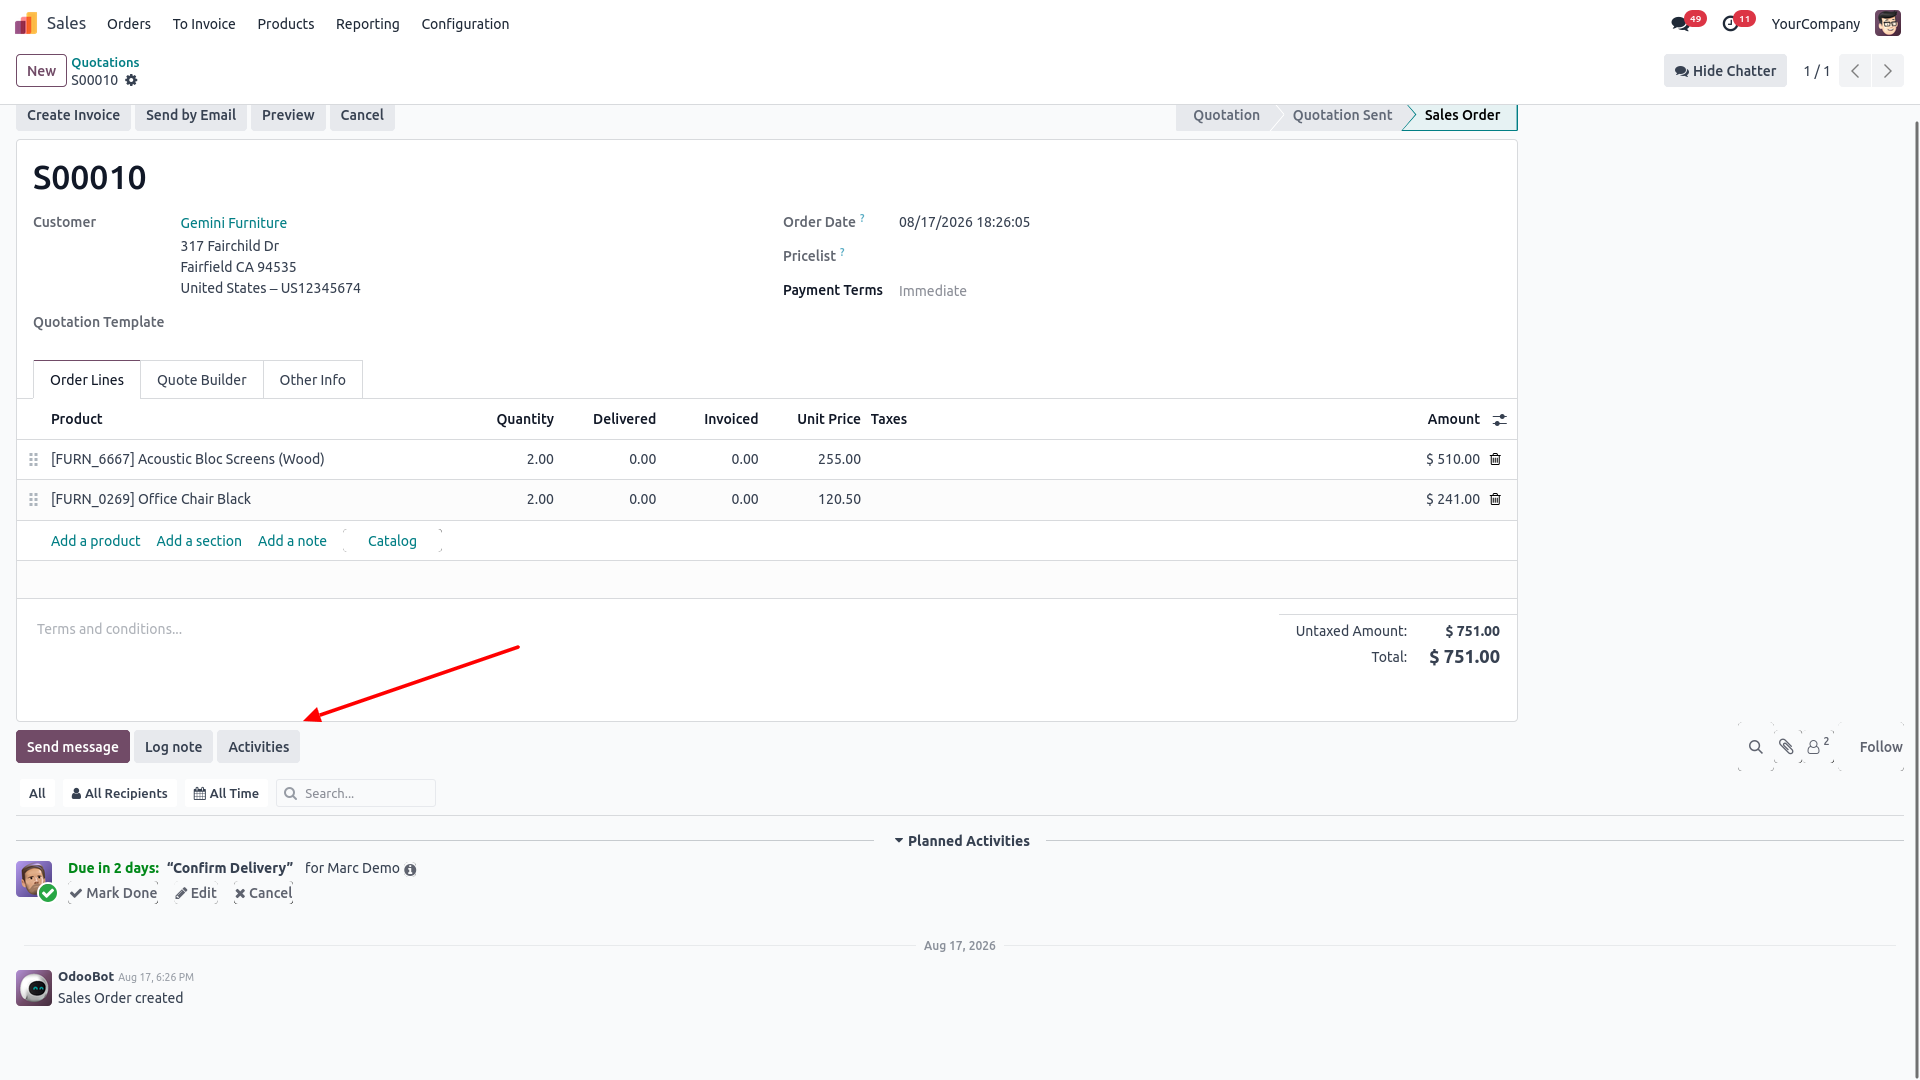
15. The Chatter now appears at the bottom of the form view instead of the side, based on your saved preference.
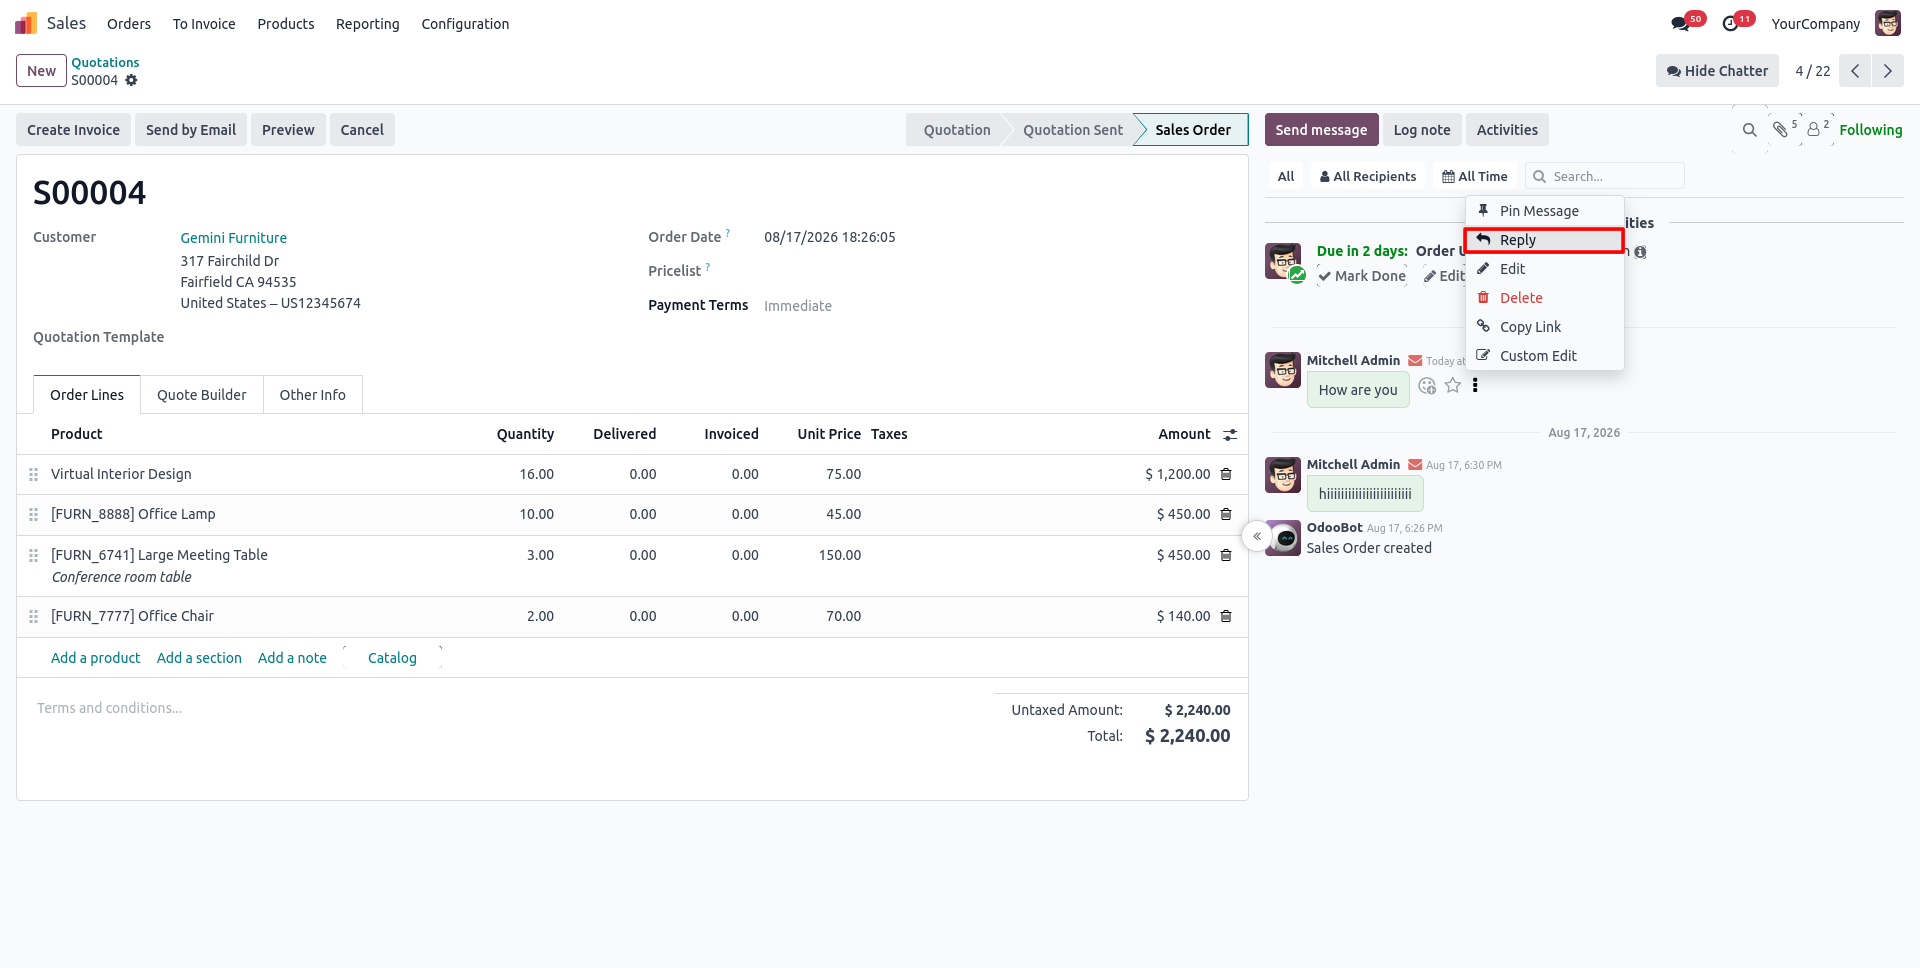
16. Click the three dots on any Chatter message and select Reply to respond directly to that specific message.
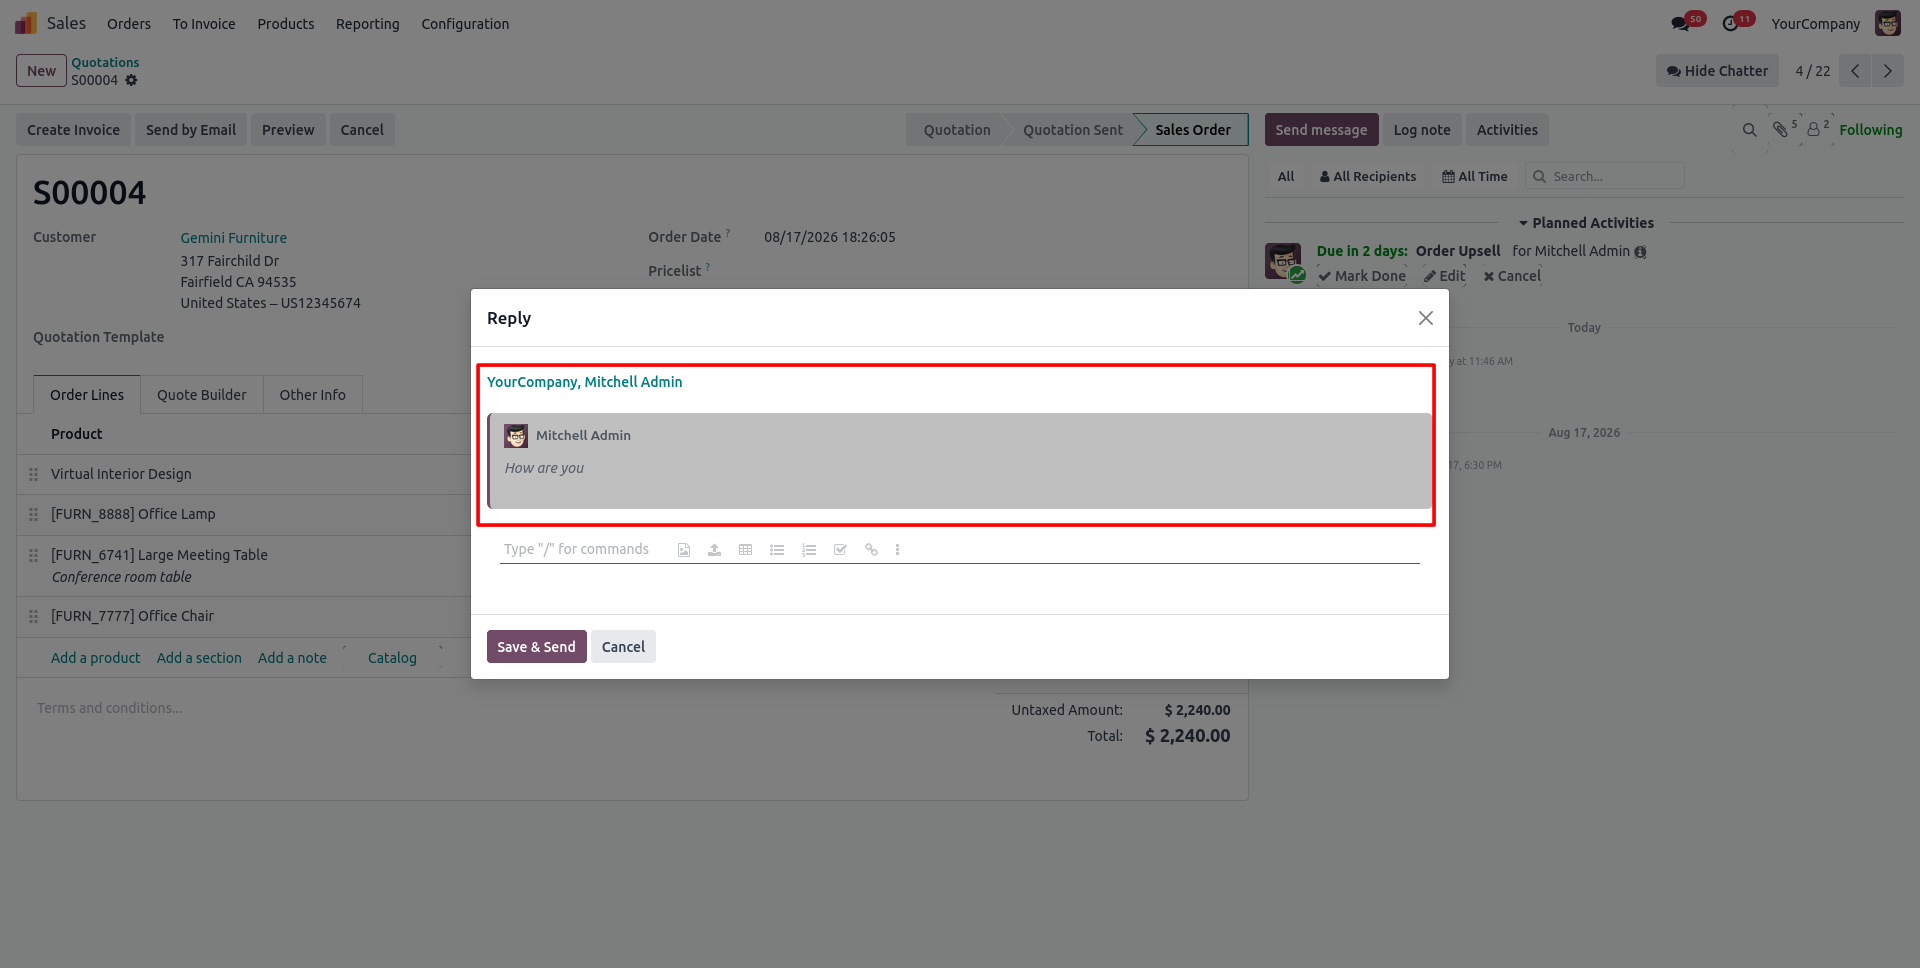
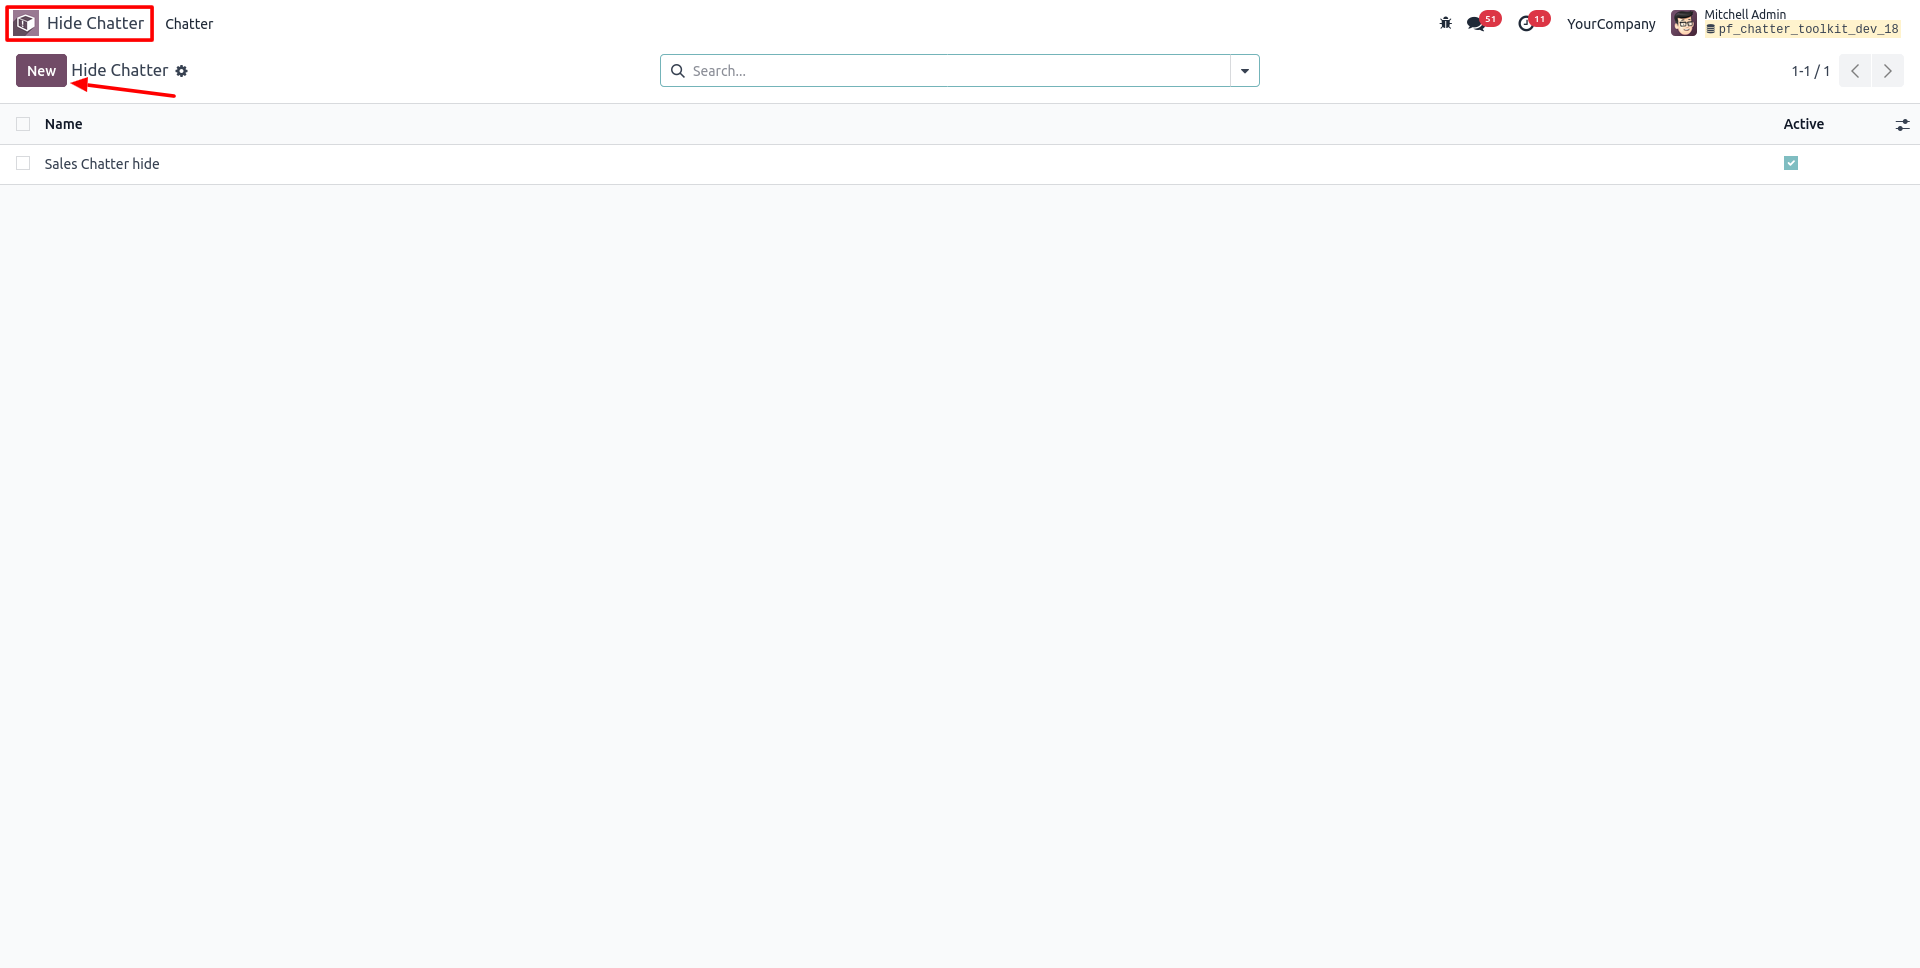
17. A Reply window opens showing the original message, ready for you to type your response.
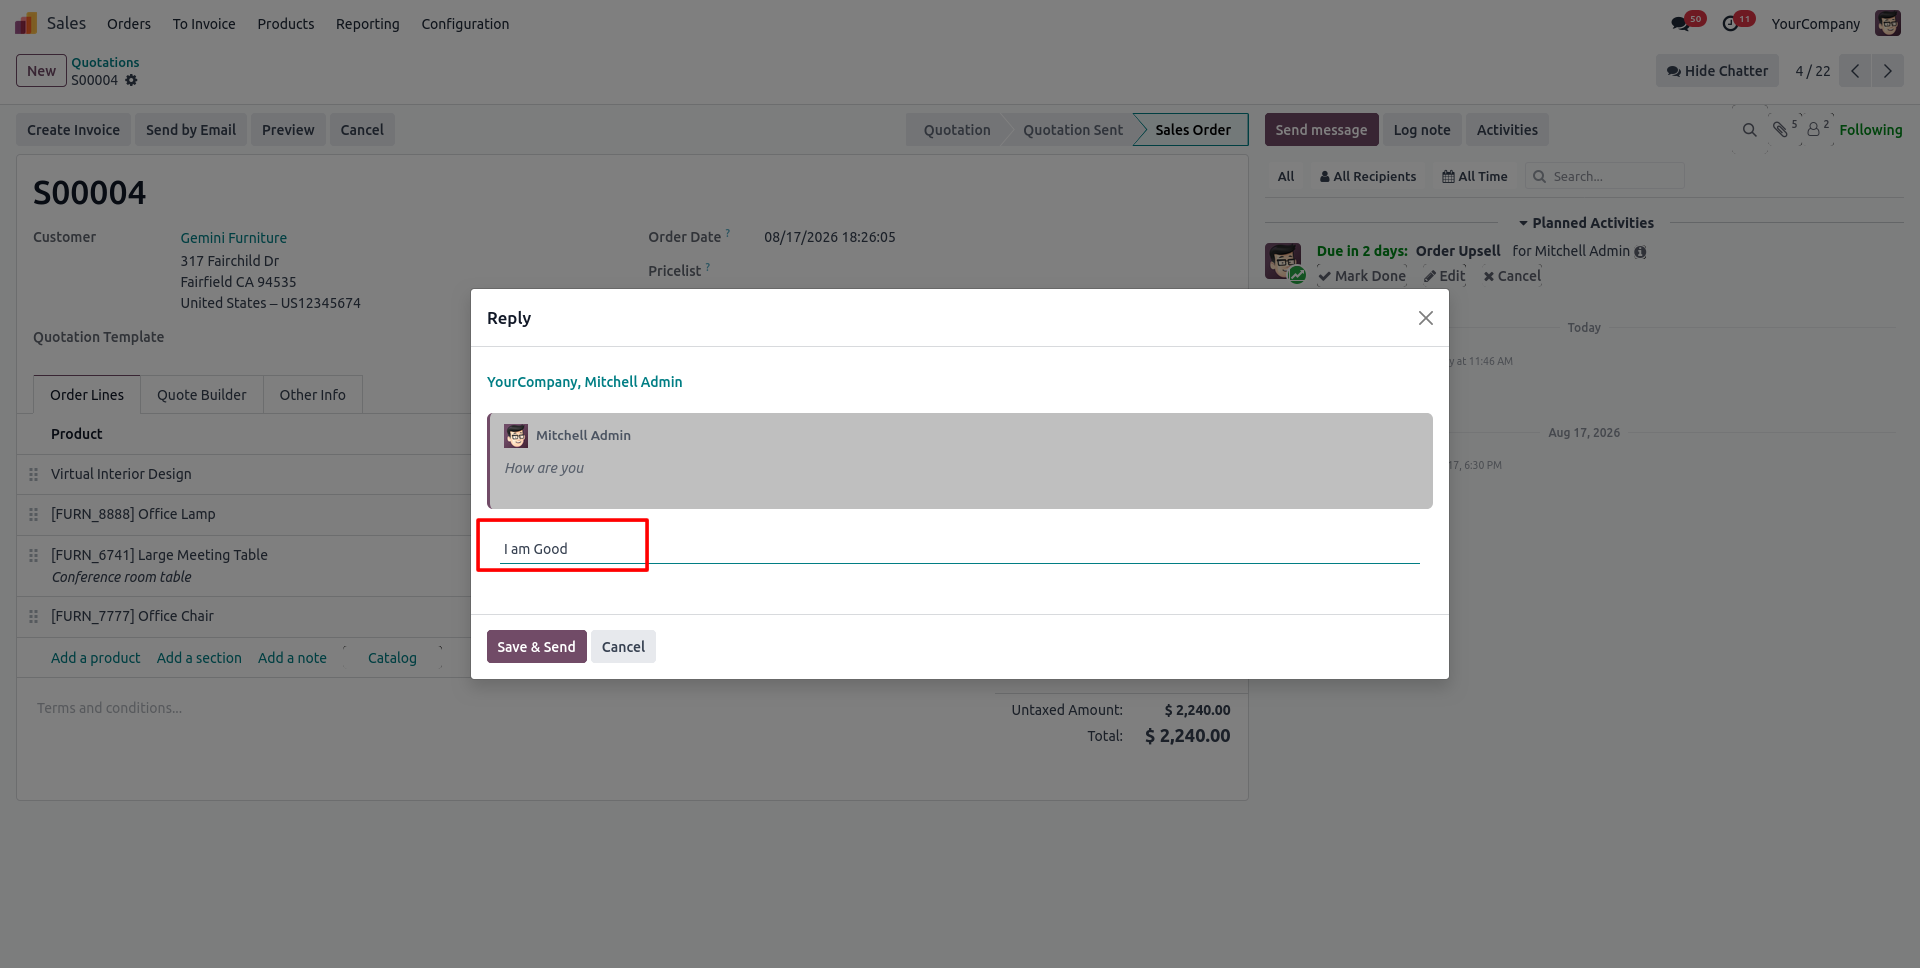
18. Type your reply in the text field and click Save & Send to post it in the Chatter.
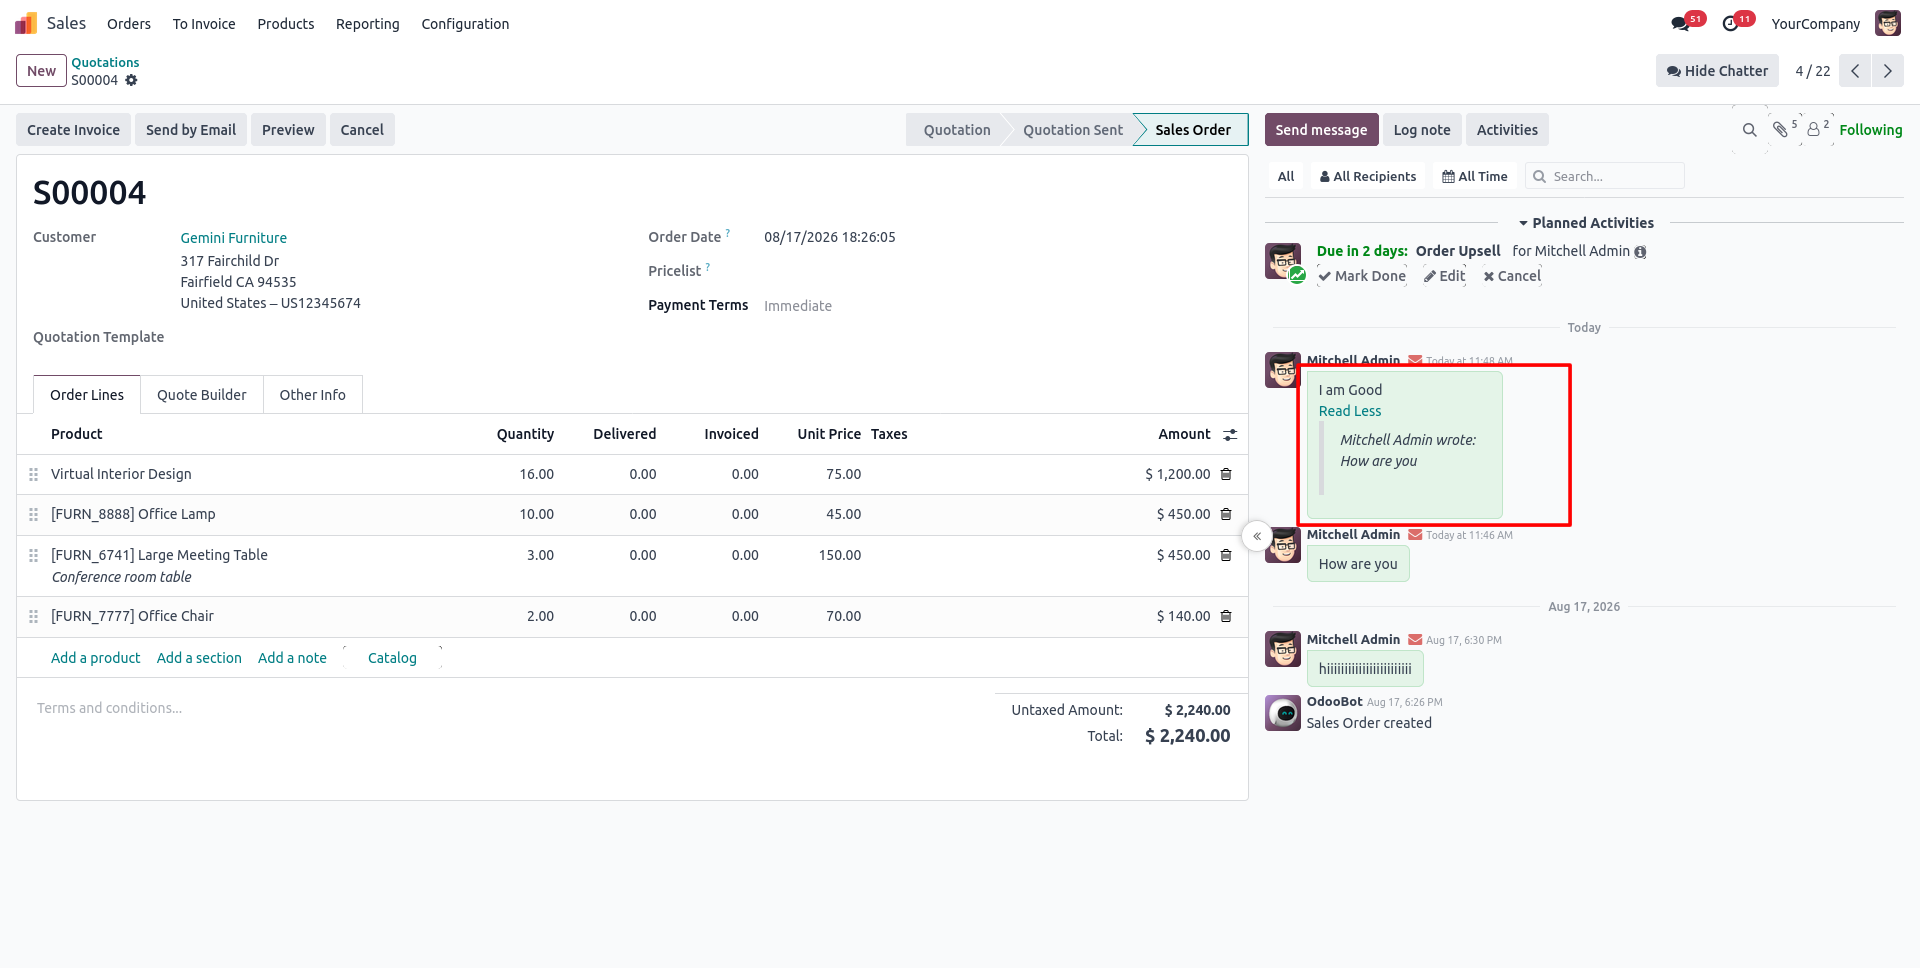
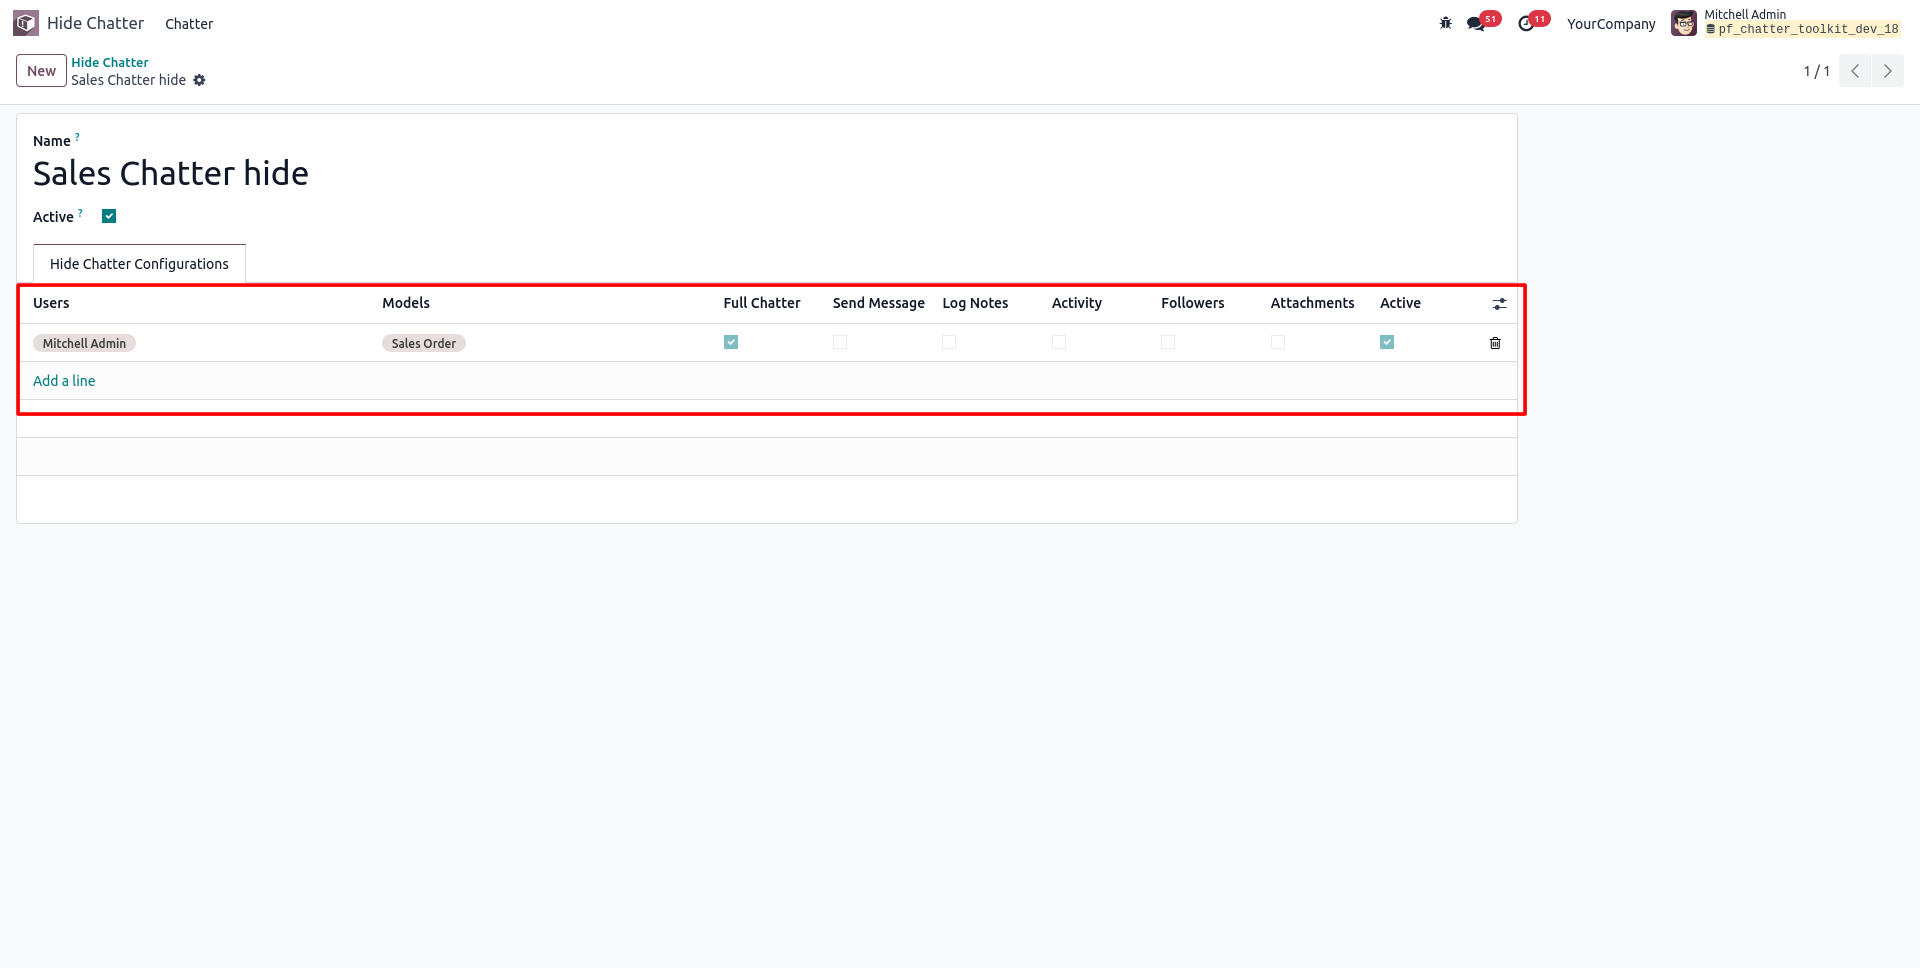
19. The reply appears in the Chatter with the original message quoted above it, keeping the conversation organized in context.
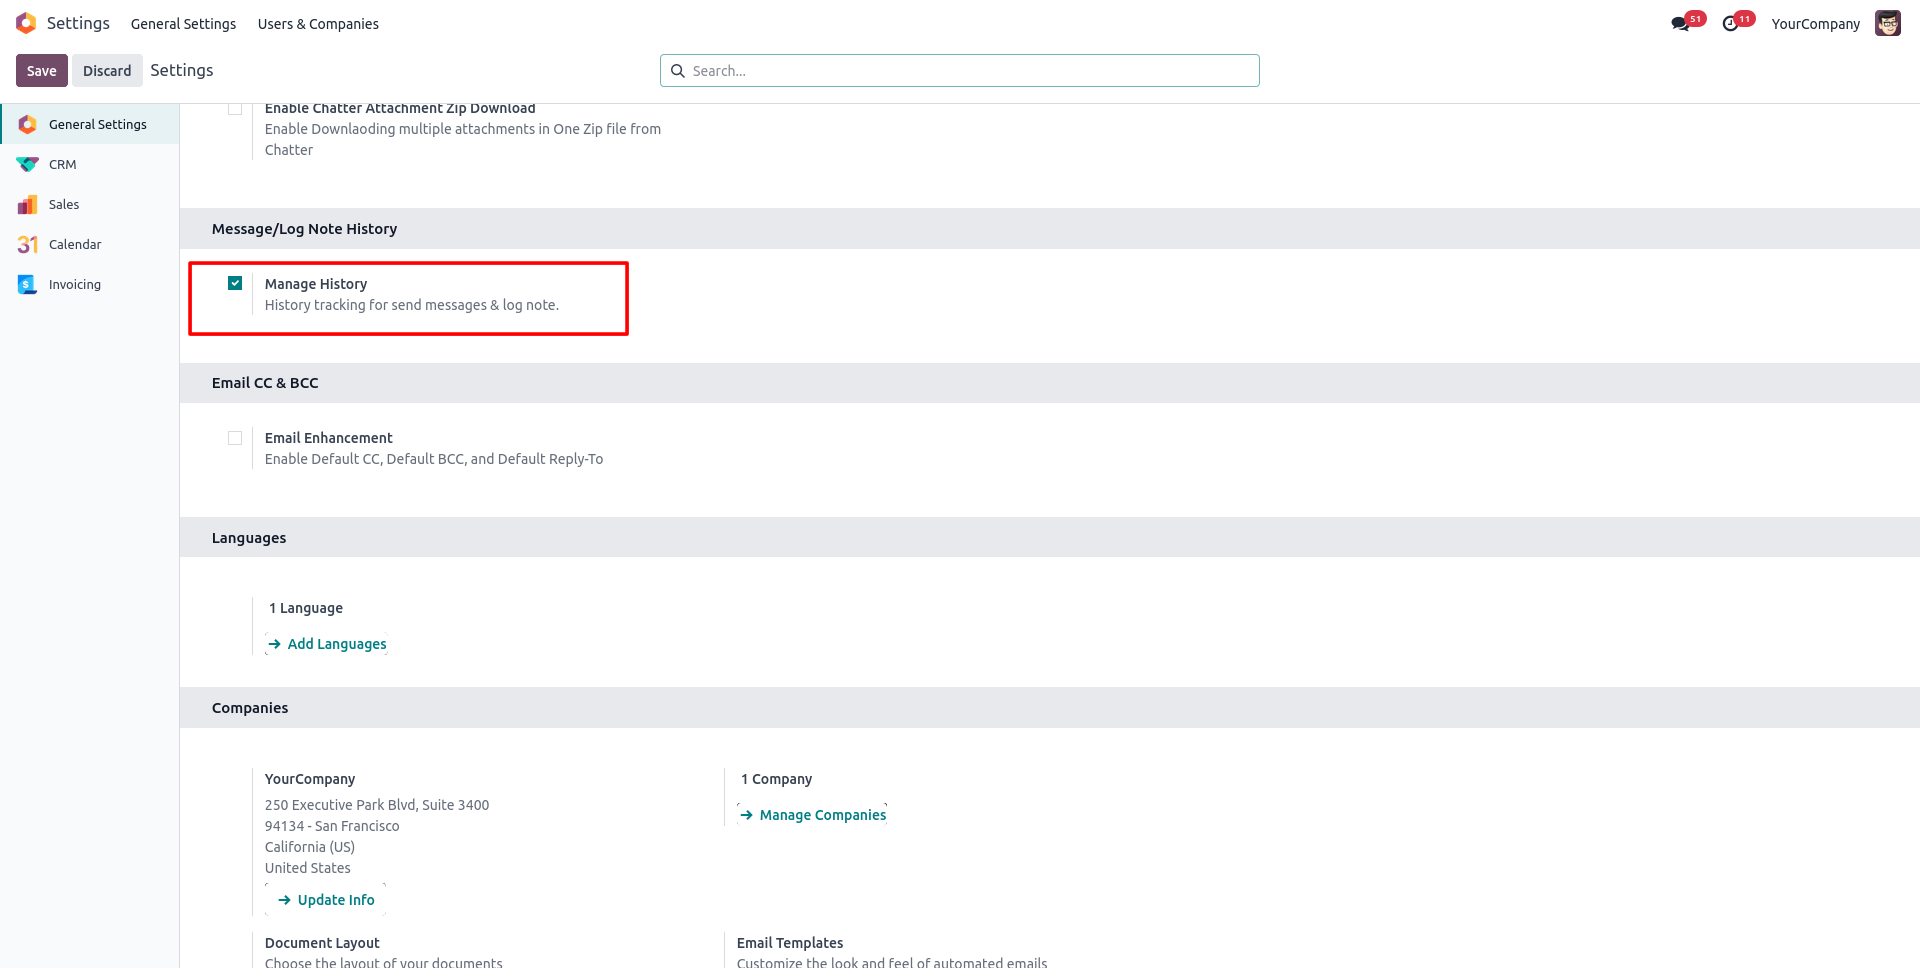
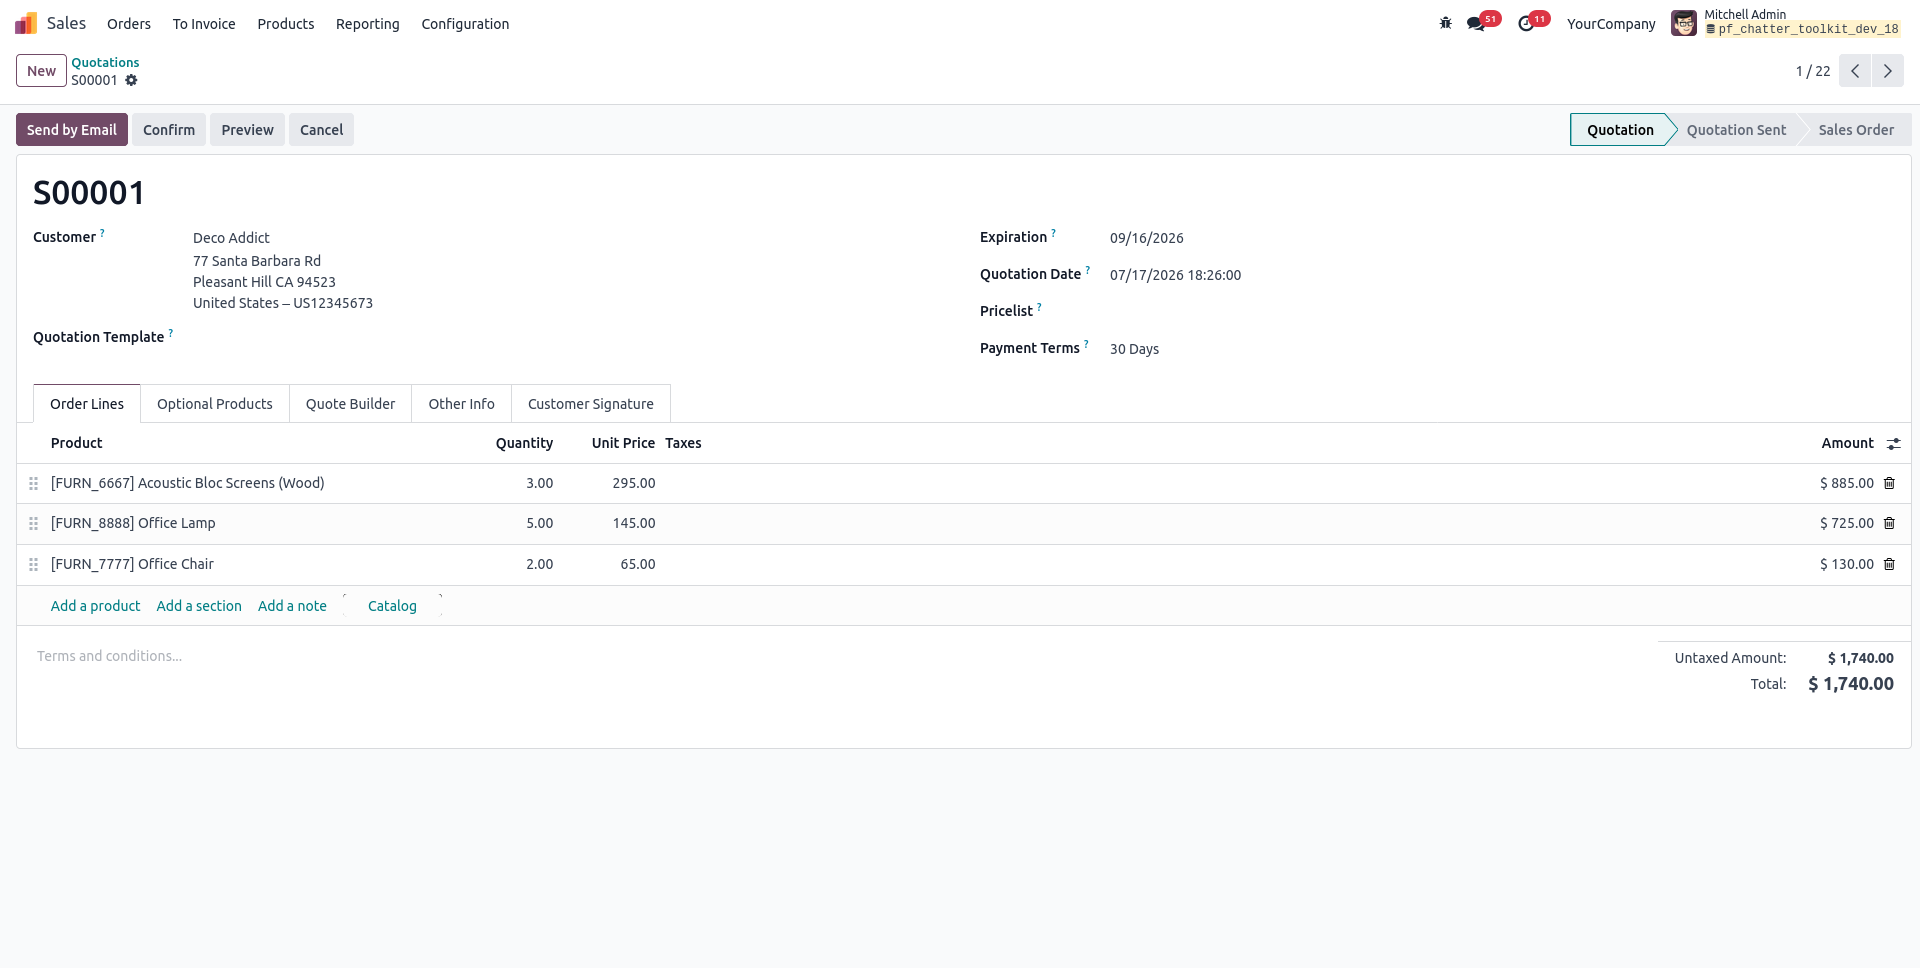
20. Go to Settings → General Settings and enable Manage History under the Message/Log Note History section to start tracking chatter changes.
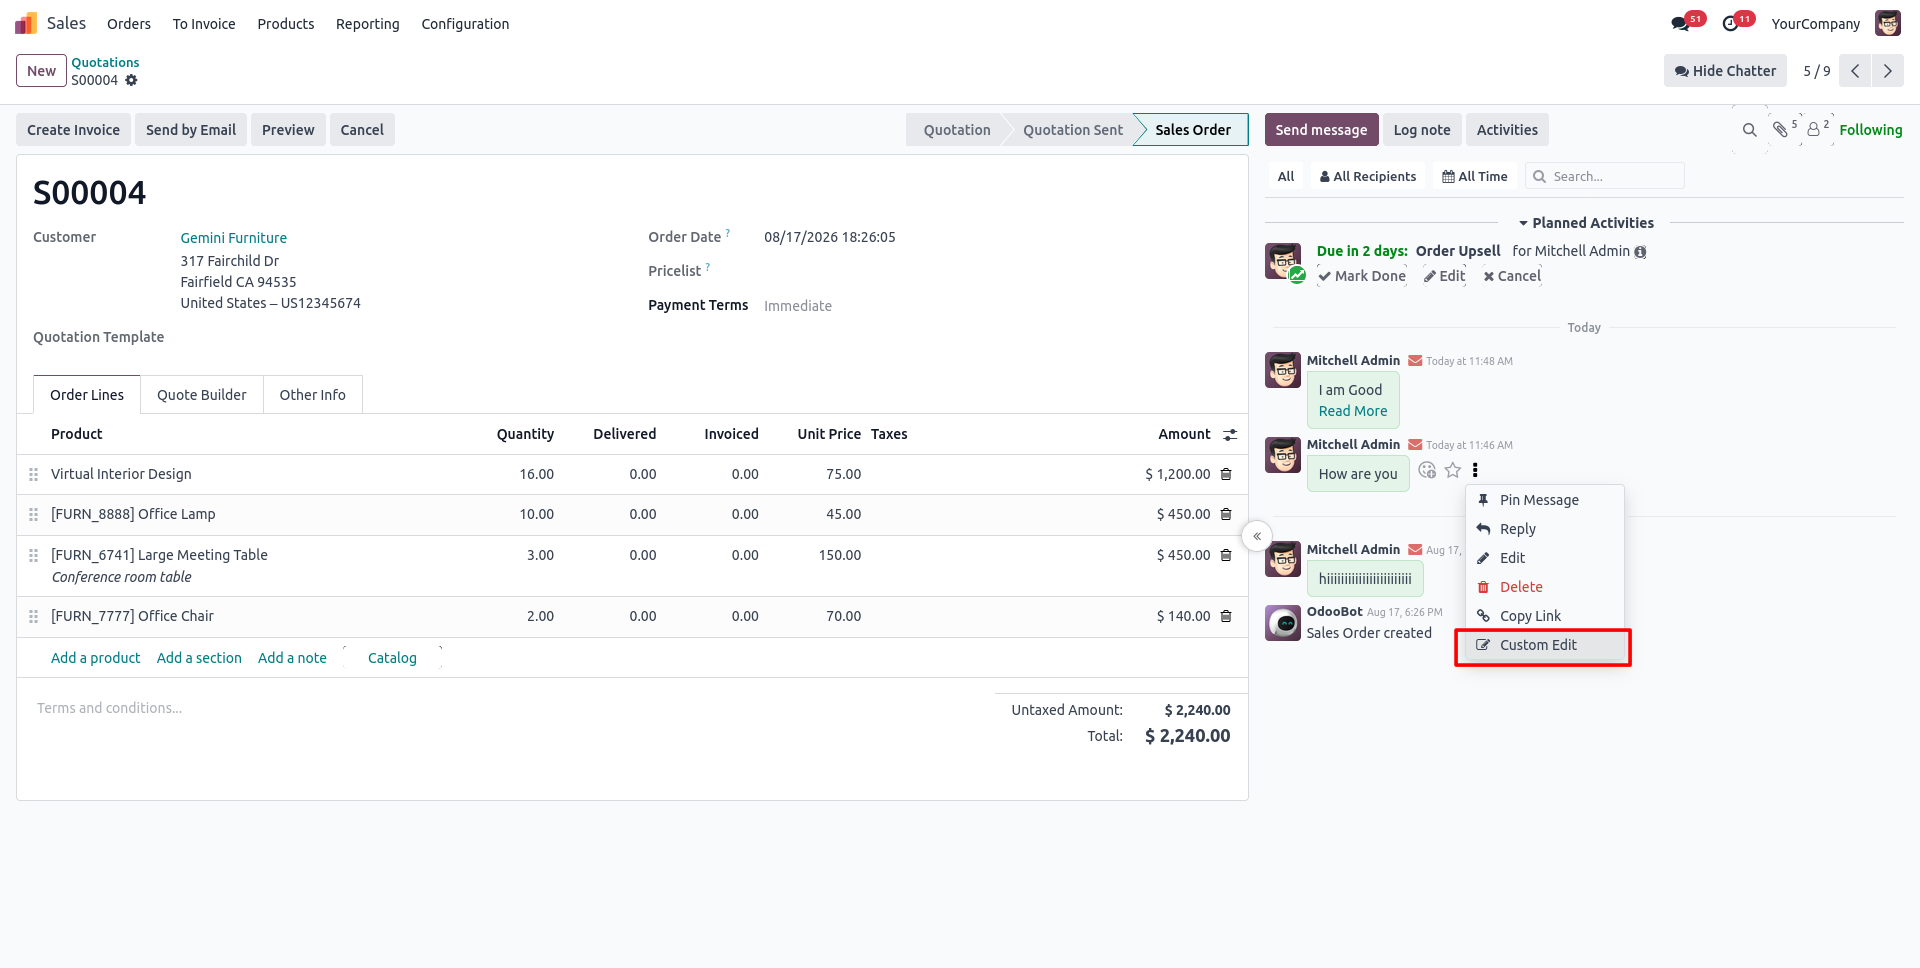
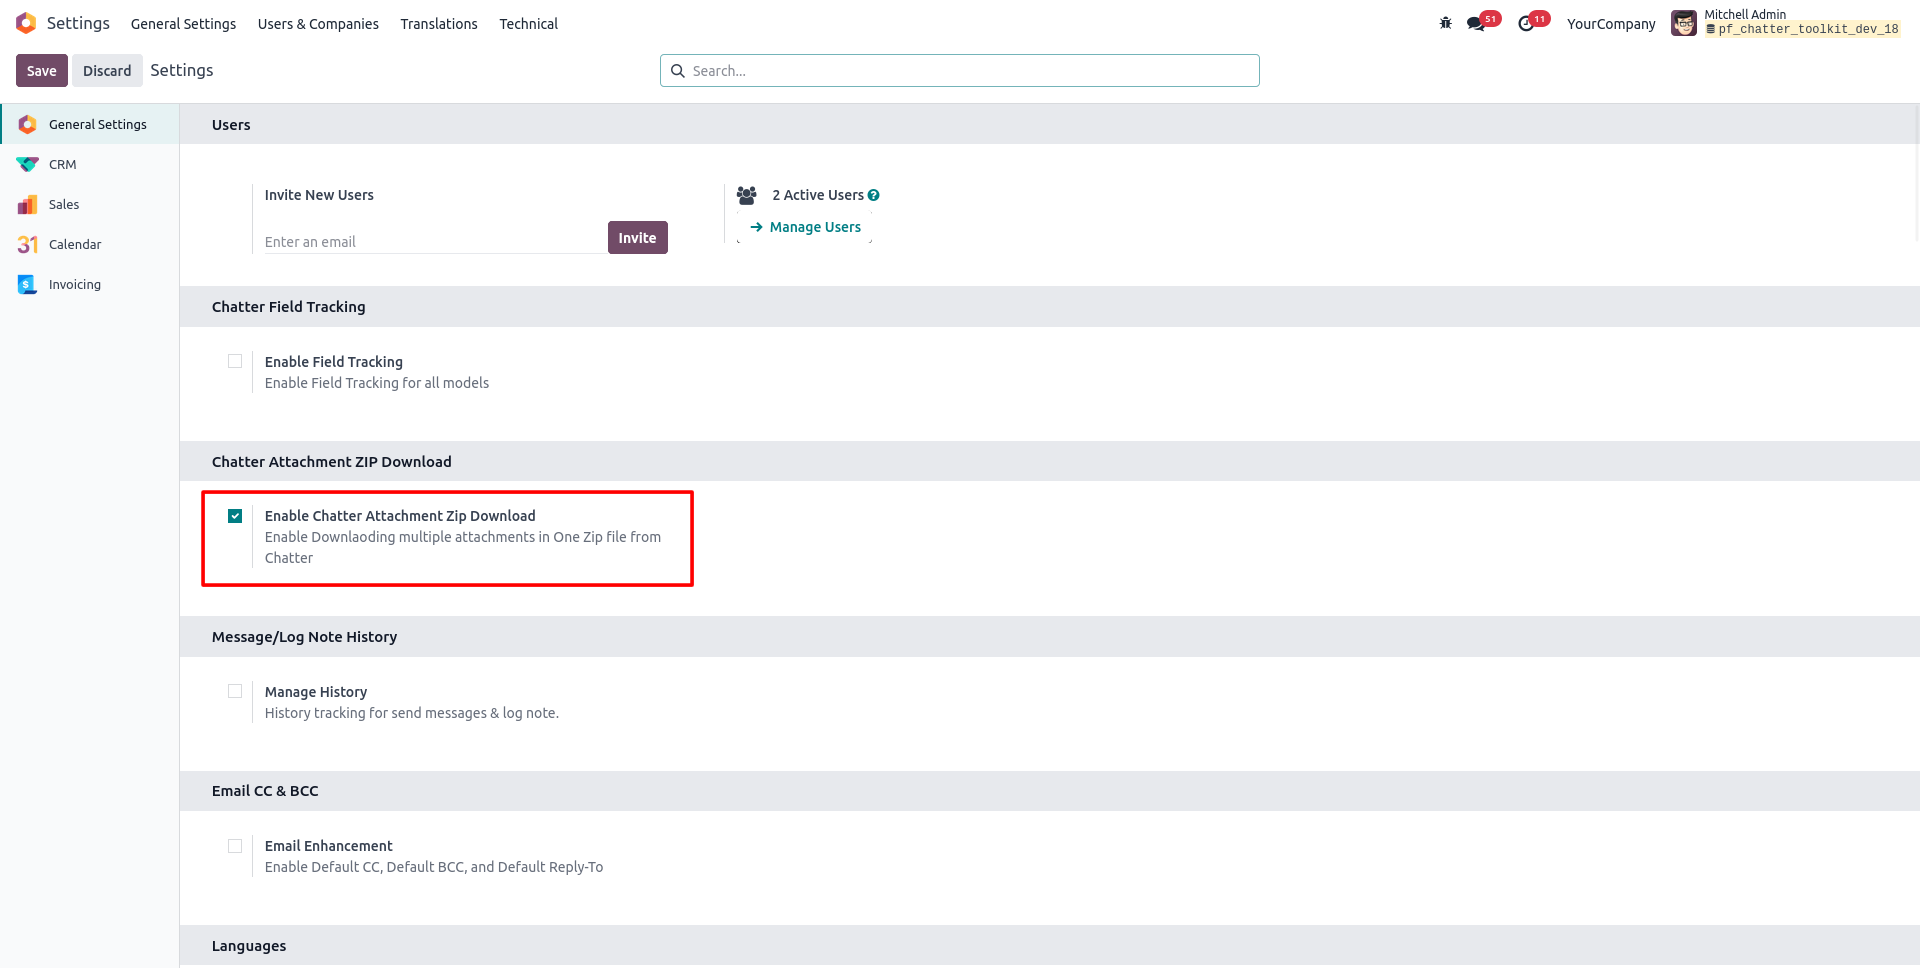
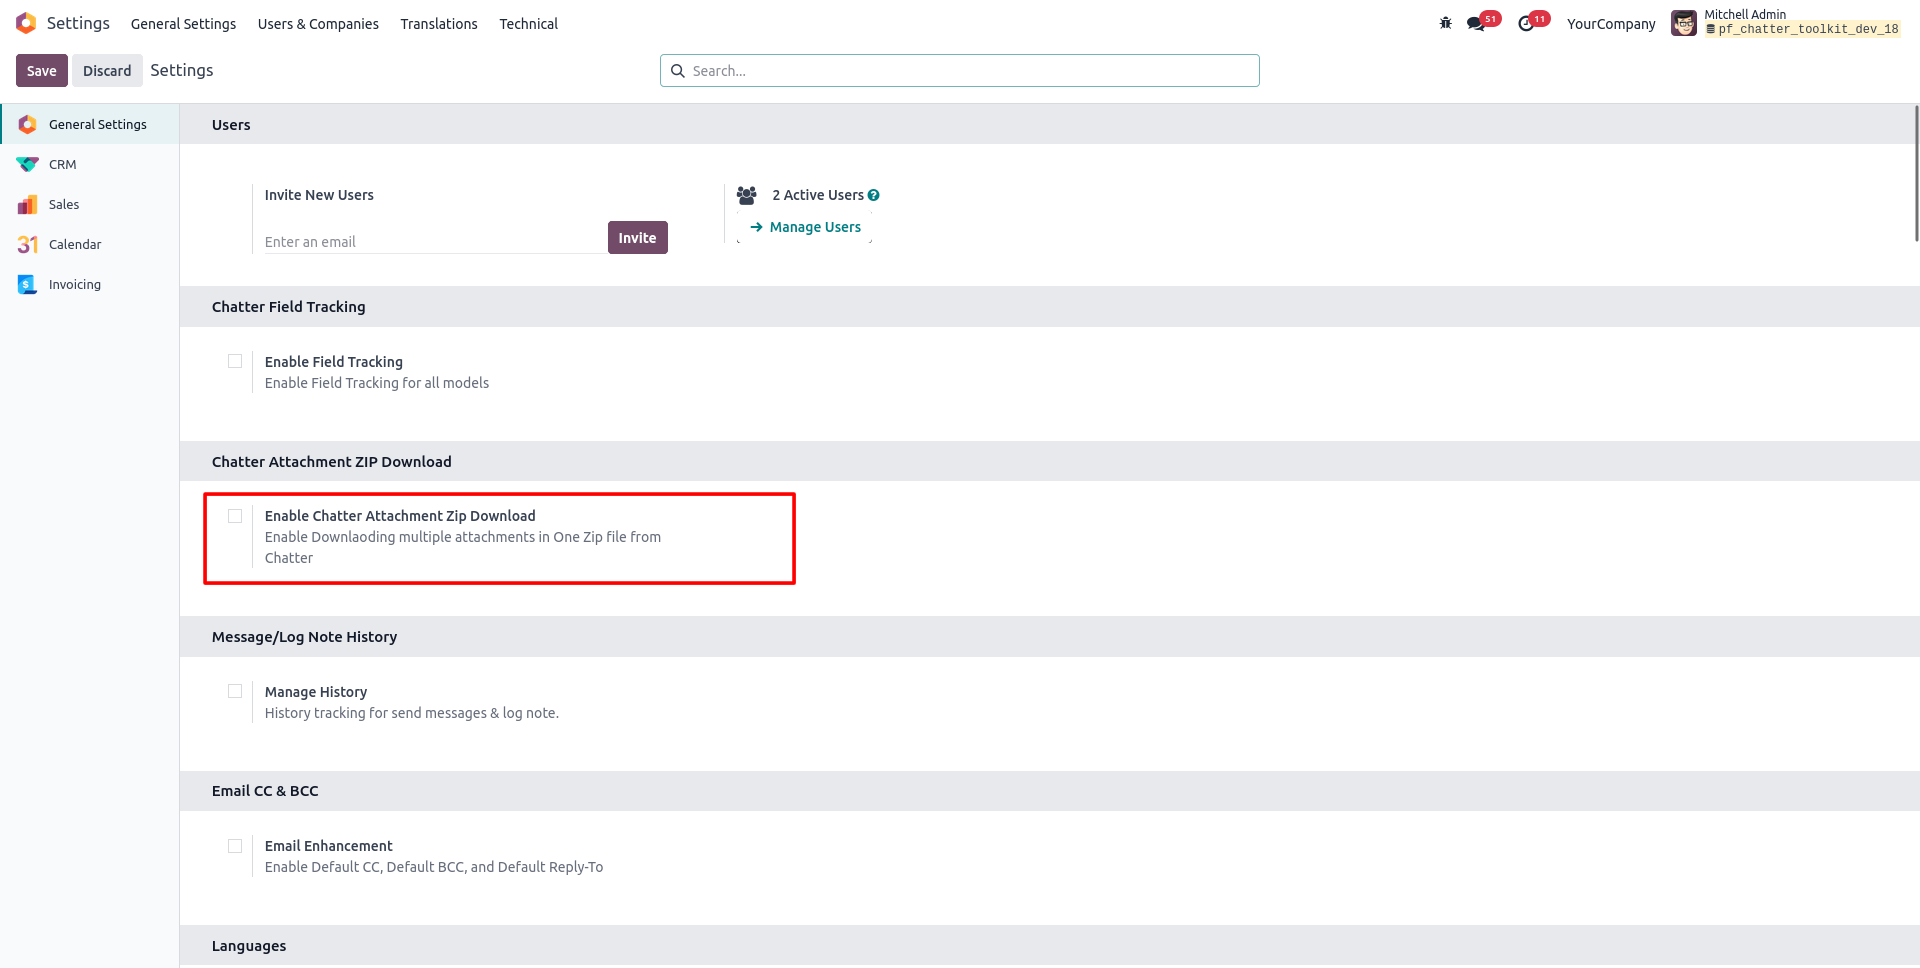
21. Click the three dots on any Chatter message and select Custom Edit to modify its content.
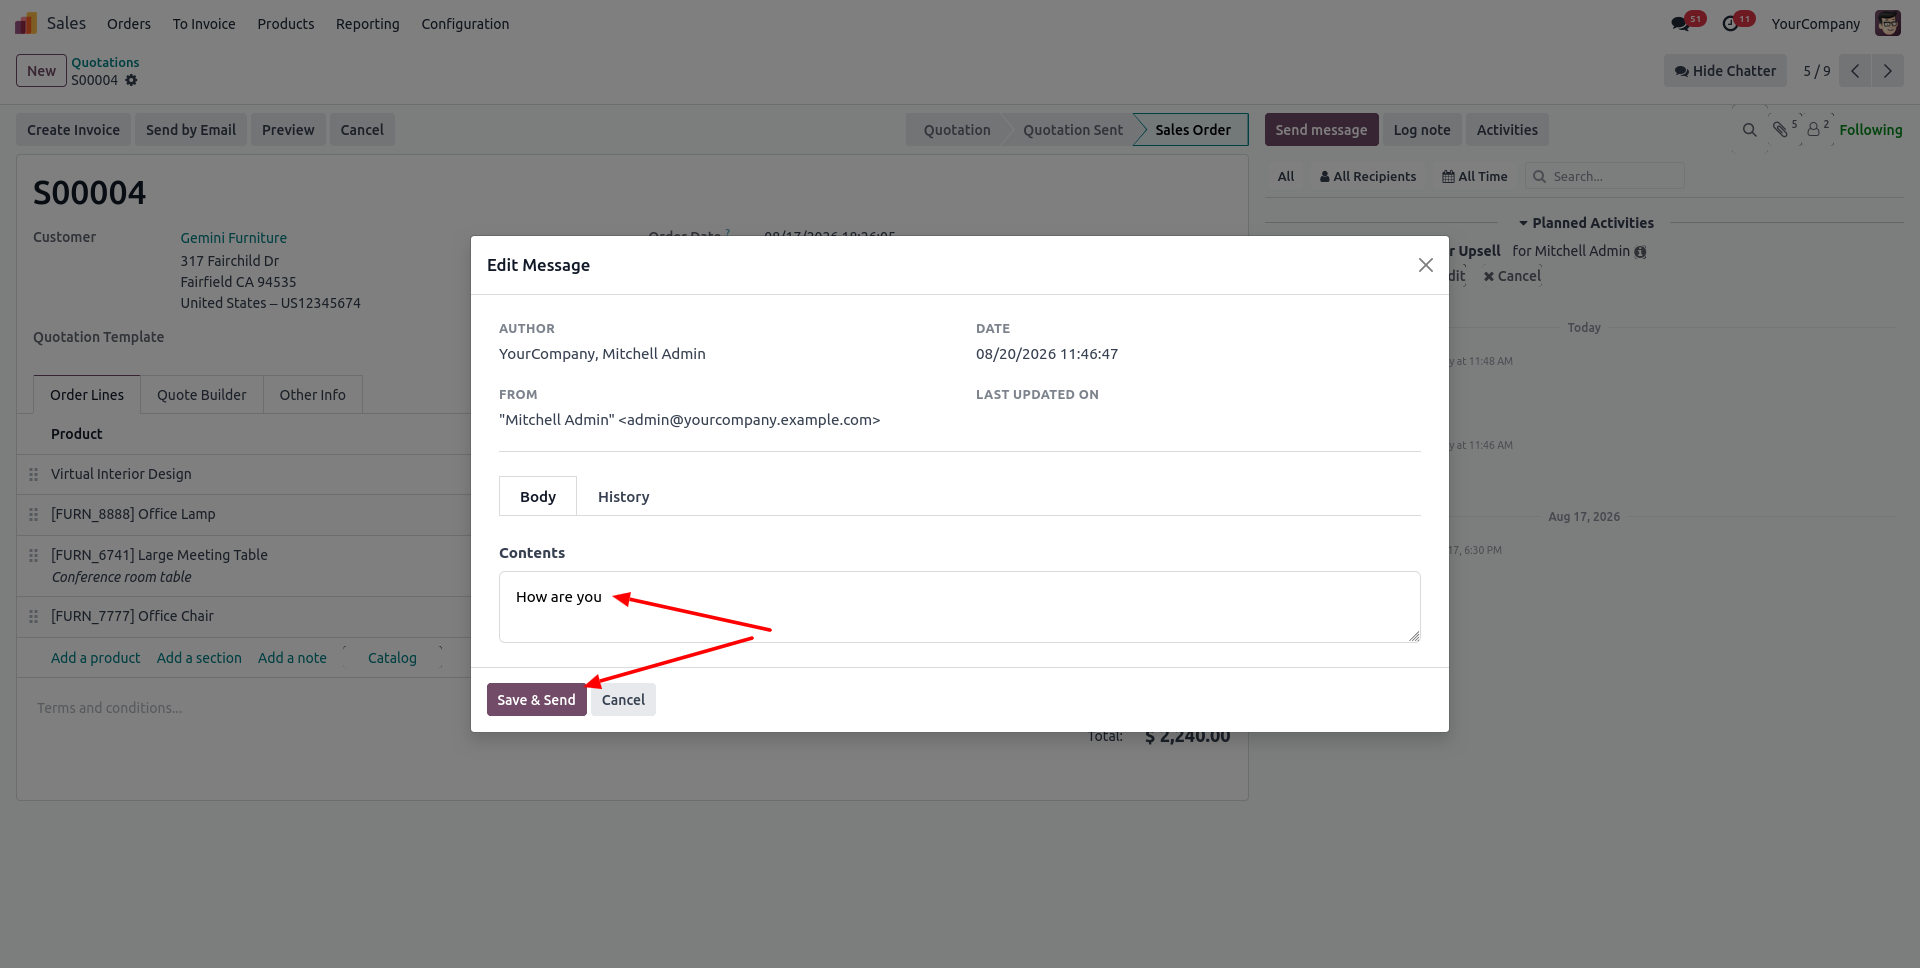
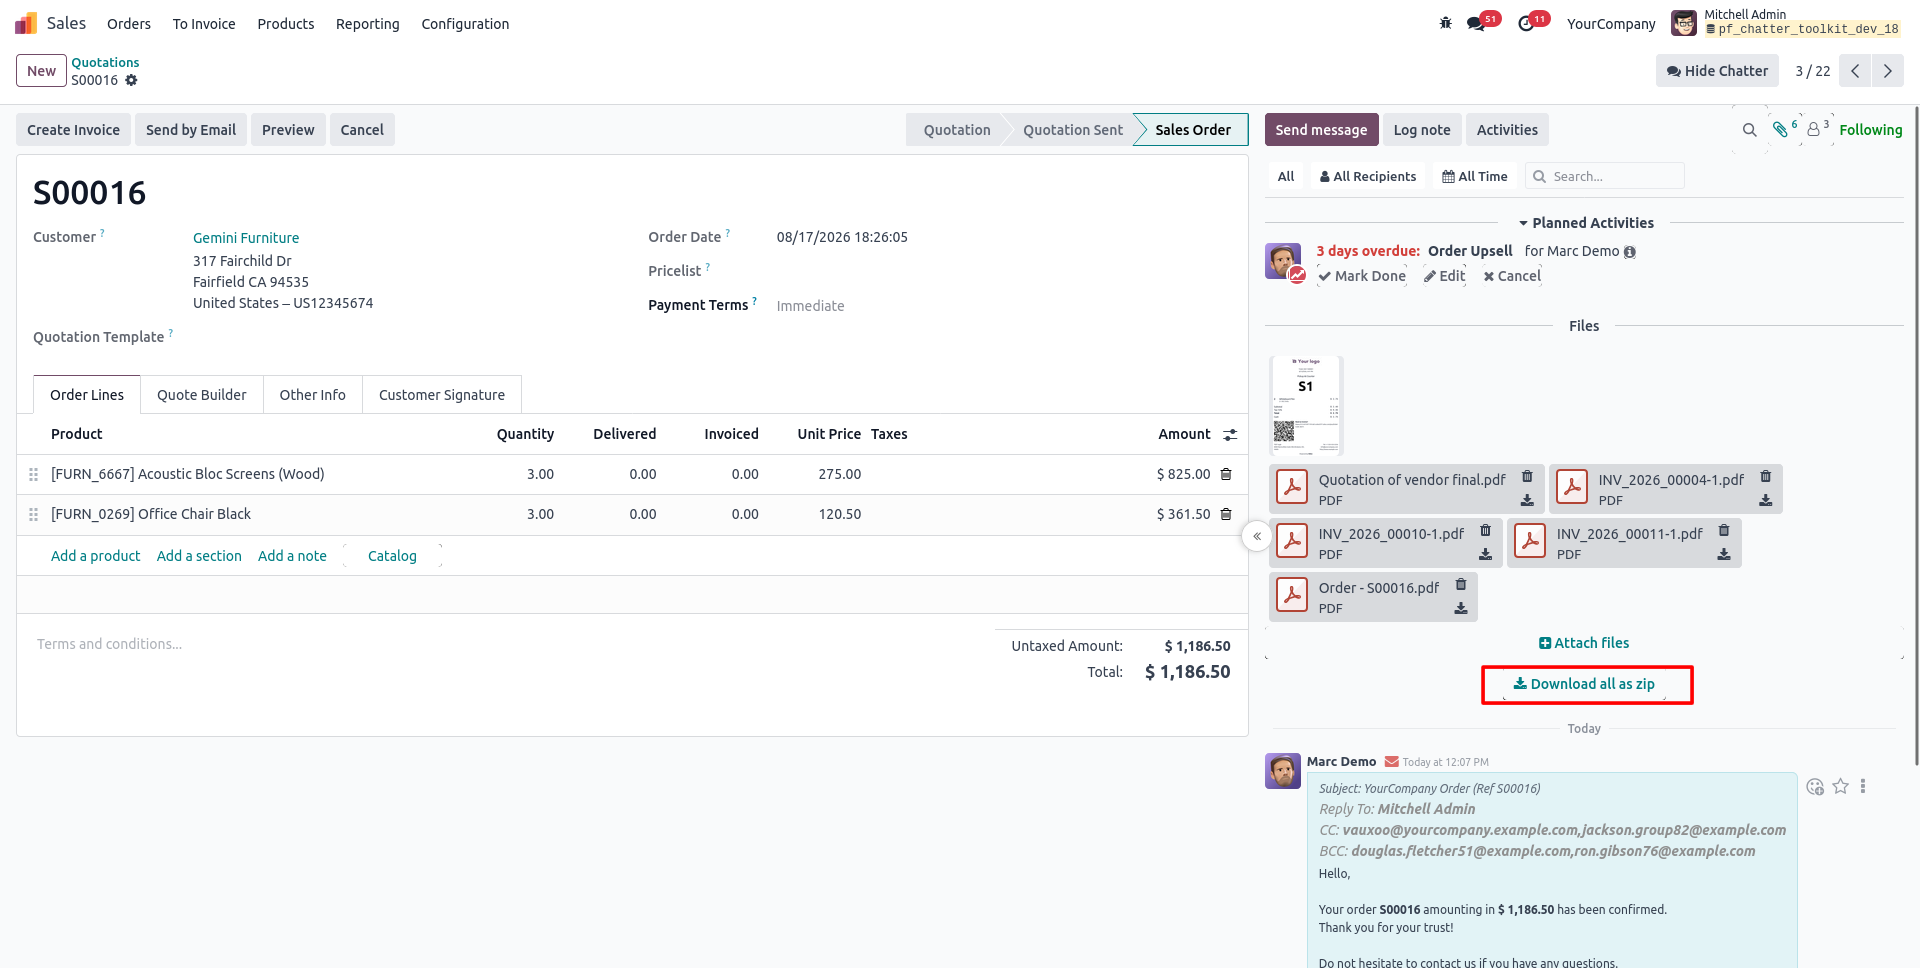
22. The Edit Message window opens with the current content displayed in the Body tab, ready to be updated.Update the message content and click Save & Send to apply the changes.
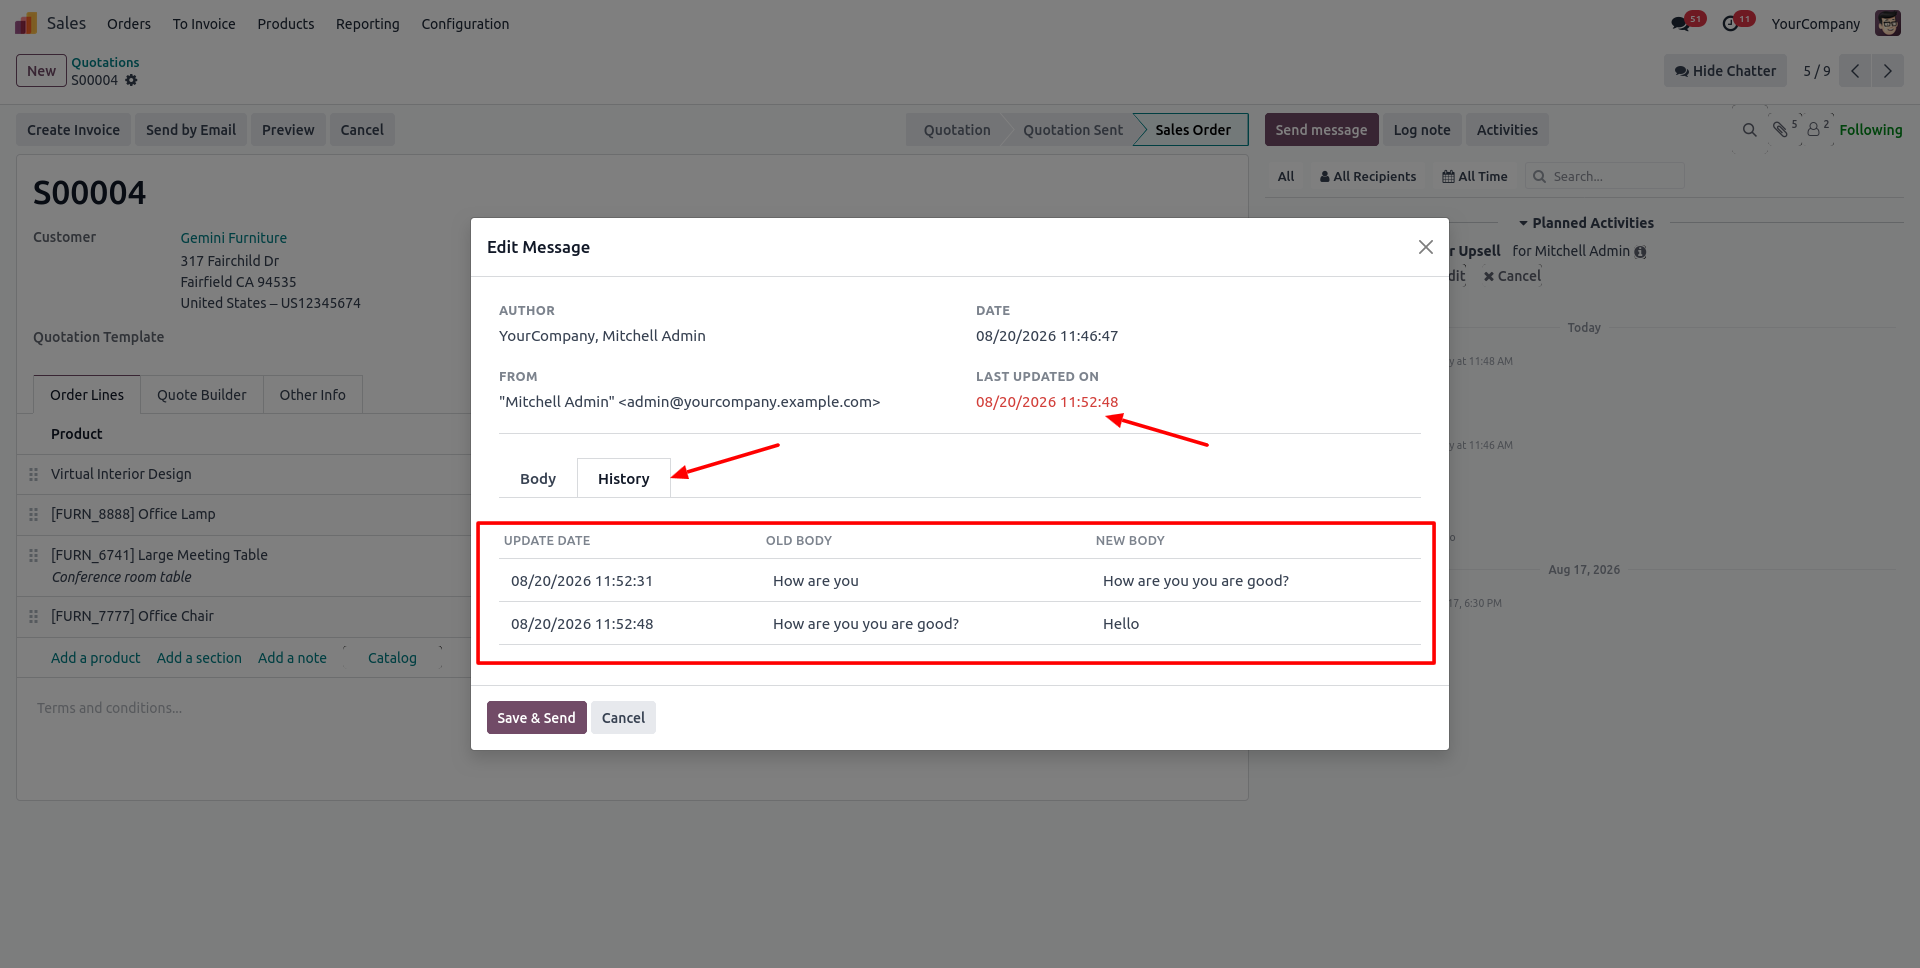
23. Open the History tab in the Edit Message window to view a complete log of all previous changes, including old and new content.
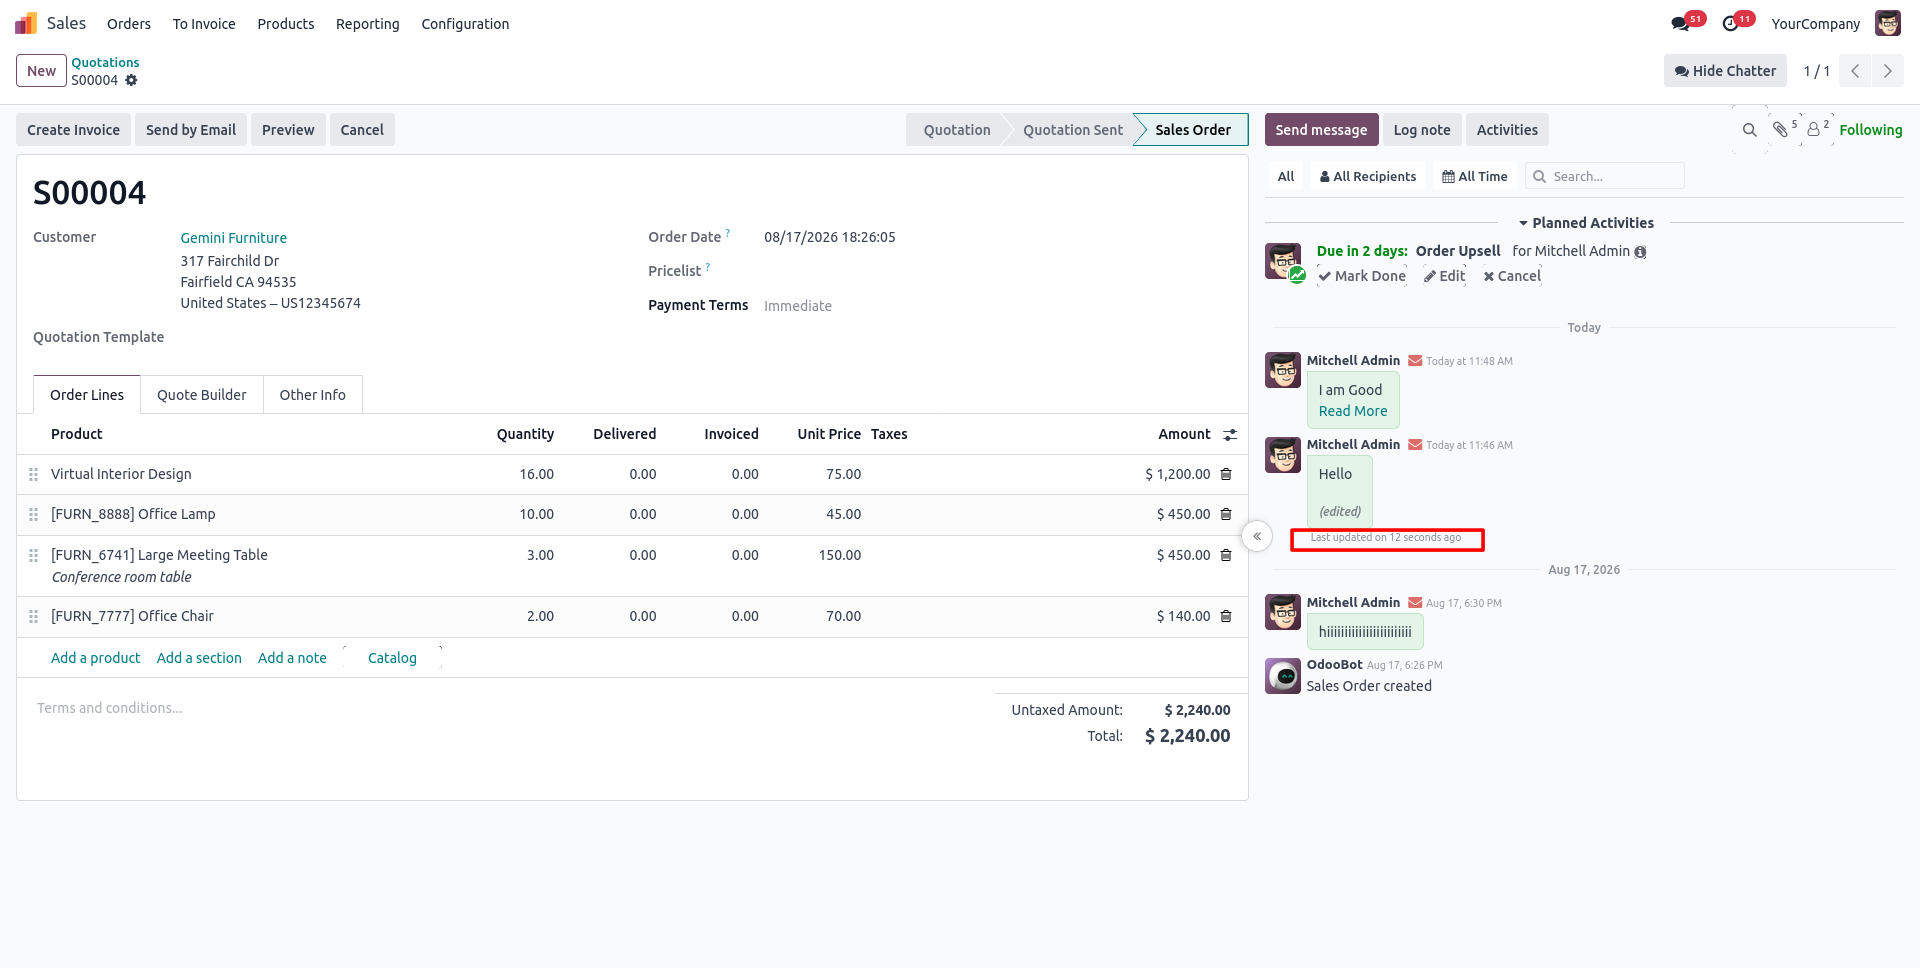
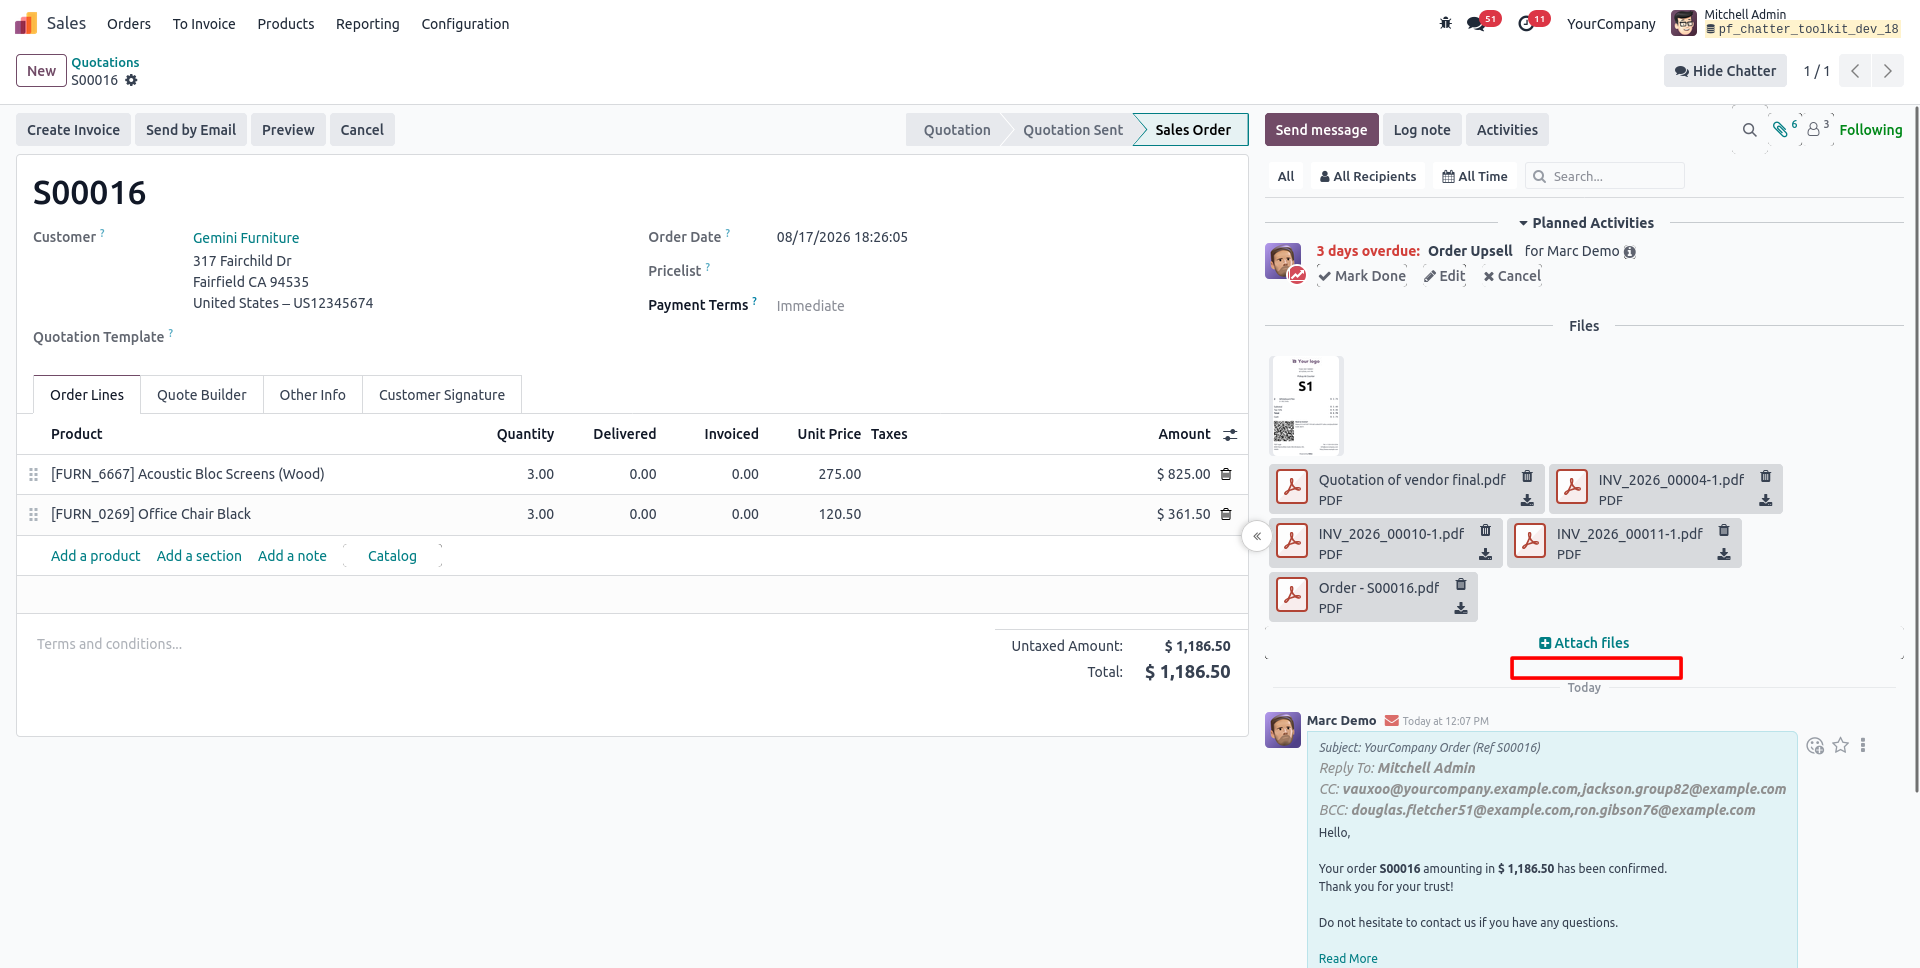
24. Edited messages are marked with an (edited) label and show exactly when they were last updated.
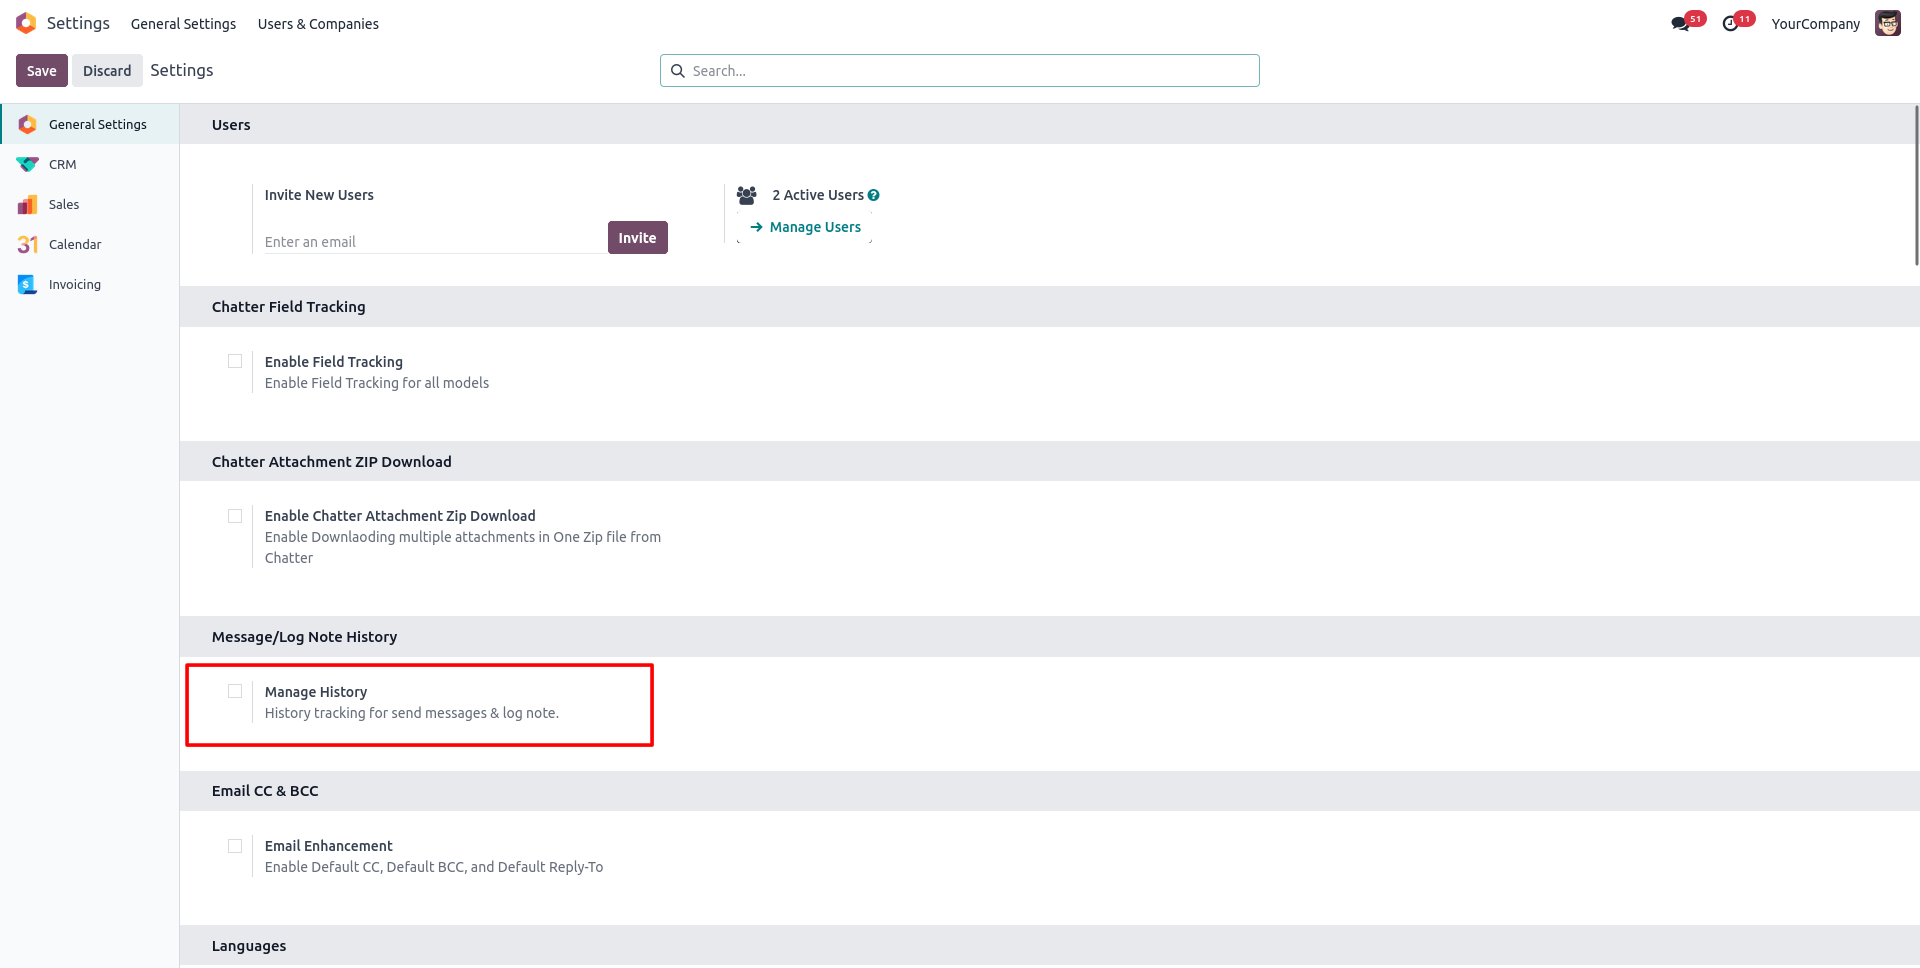
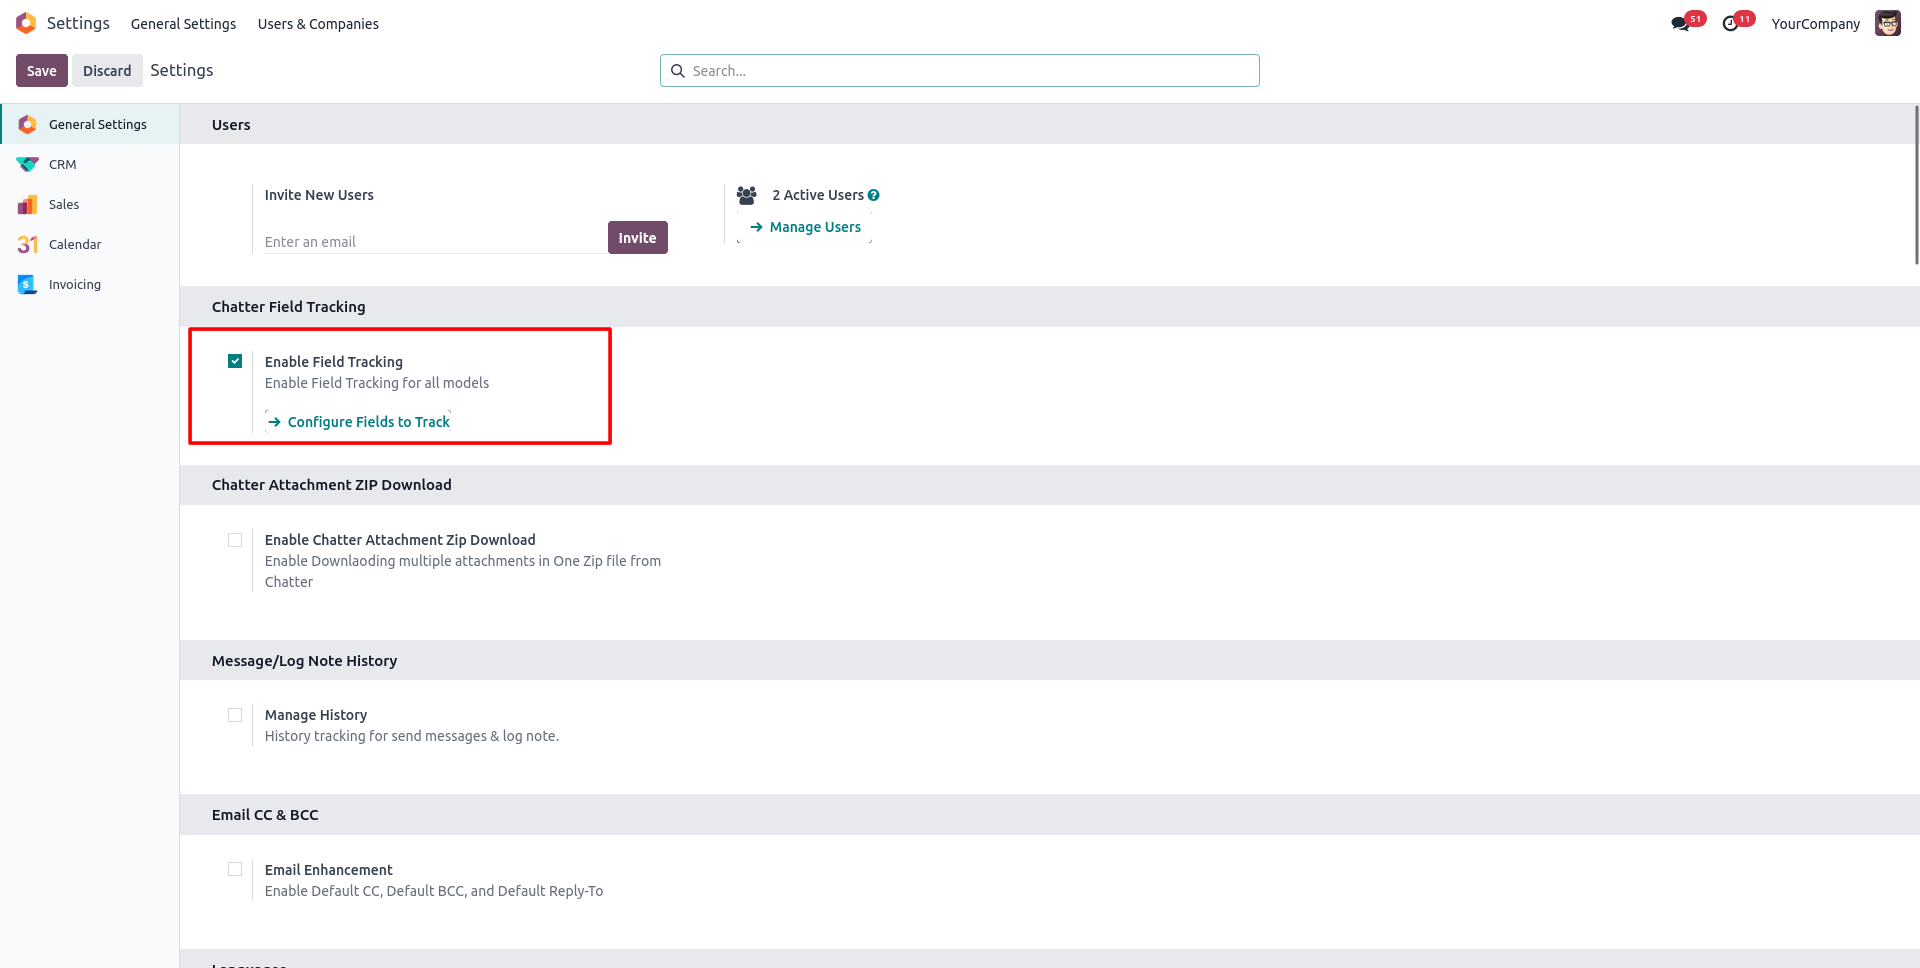
25. Disable Manage History in General Settings anytime to stop tracking History tab and last updated on
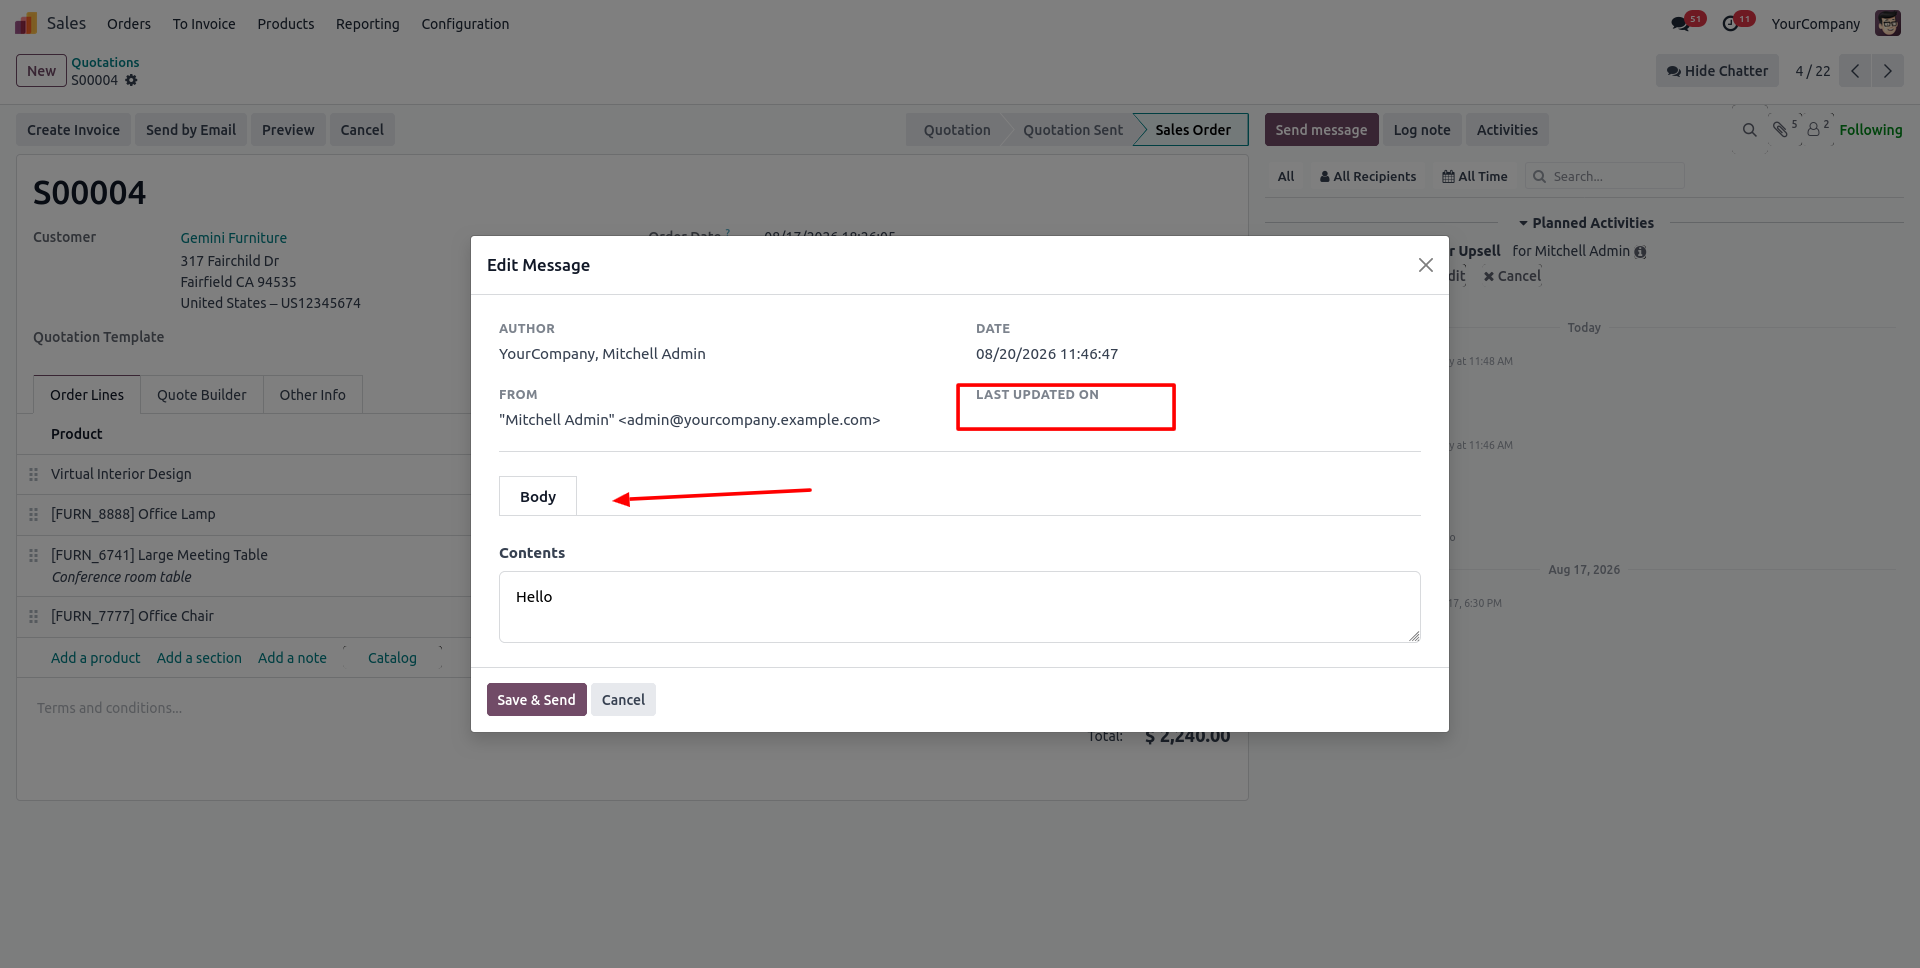
26.Now History tab and last updated on will not show
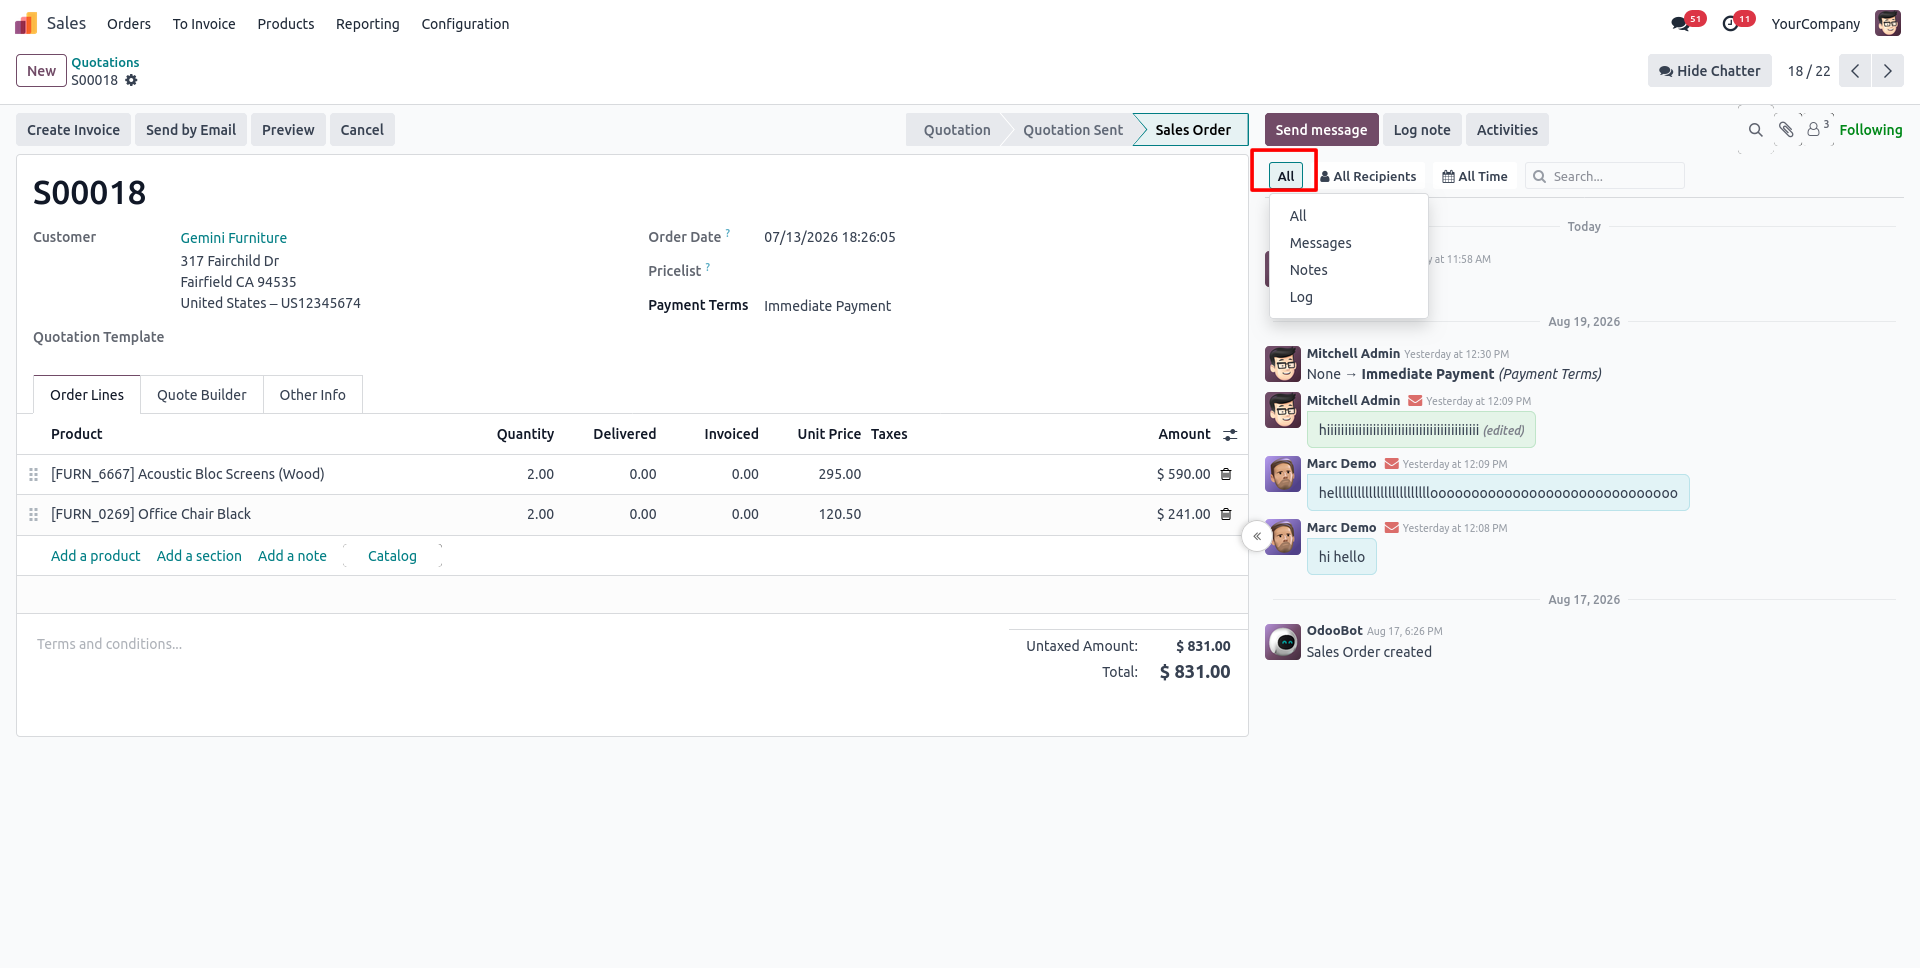
27. Click the All filter dropdown in the Chatter bar to filter entries by Messages, Notes, or Log.
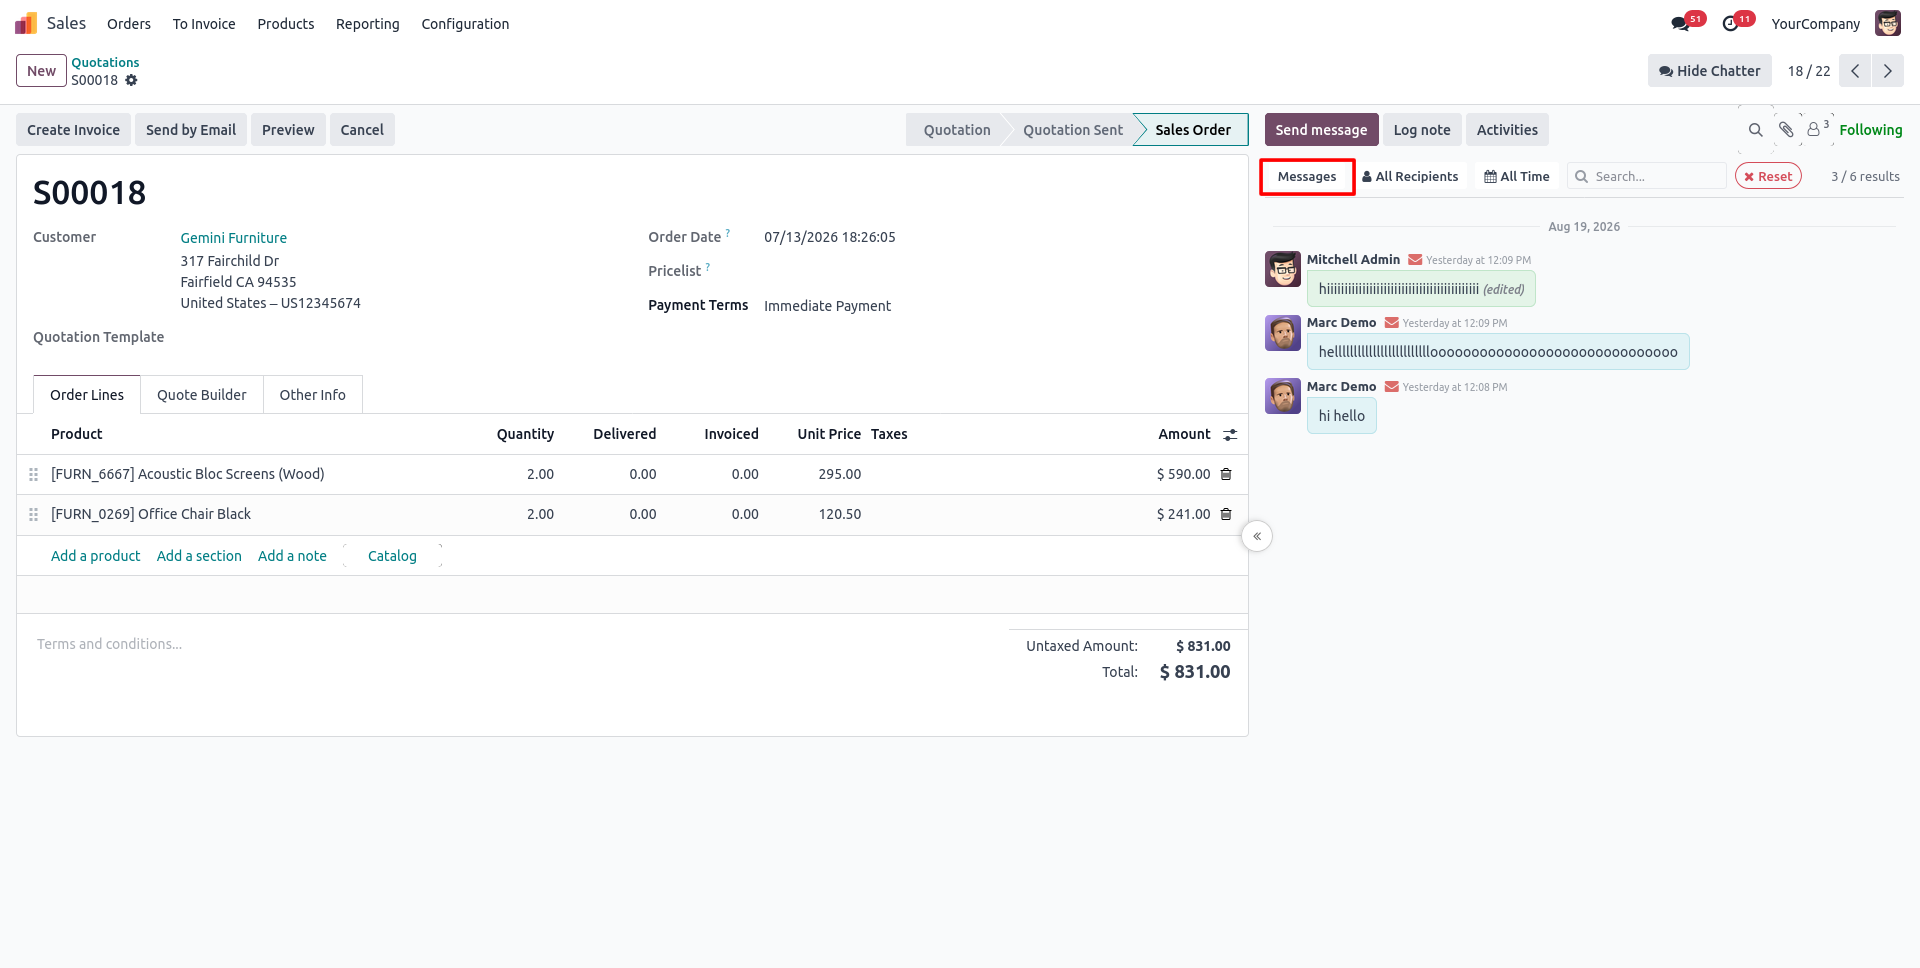
28. Select Messages to display only user-to-user interactions and direct replies.
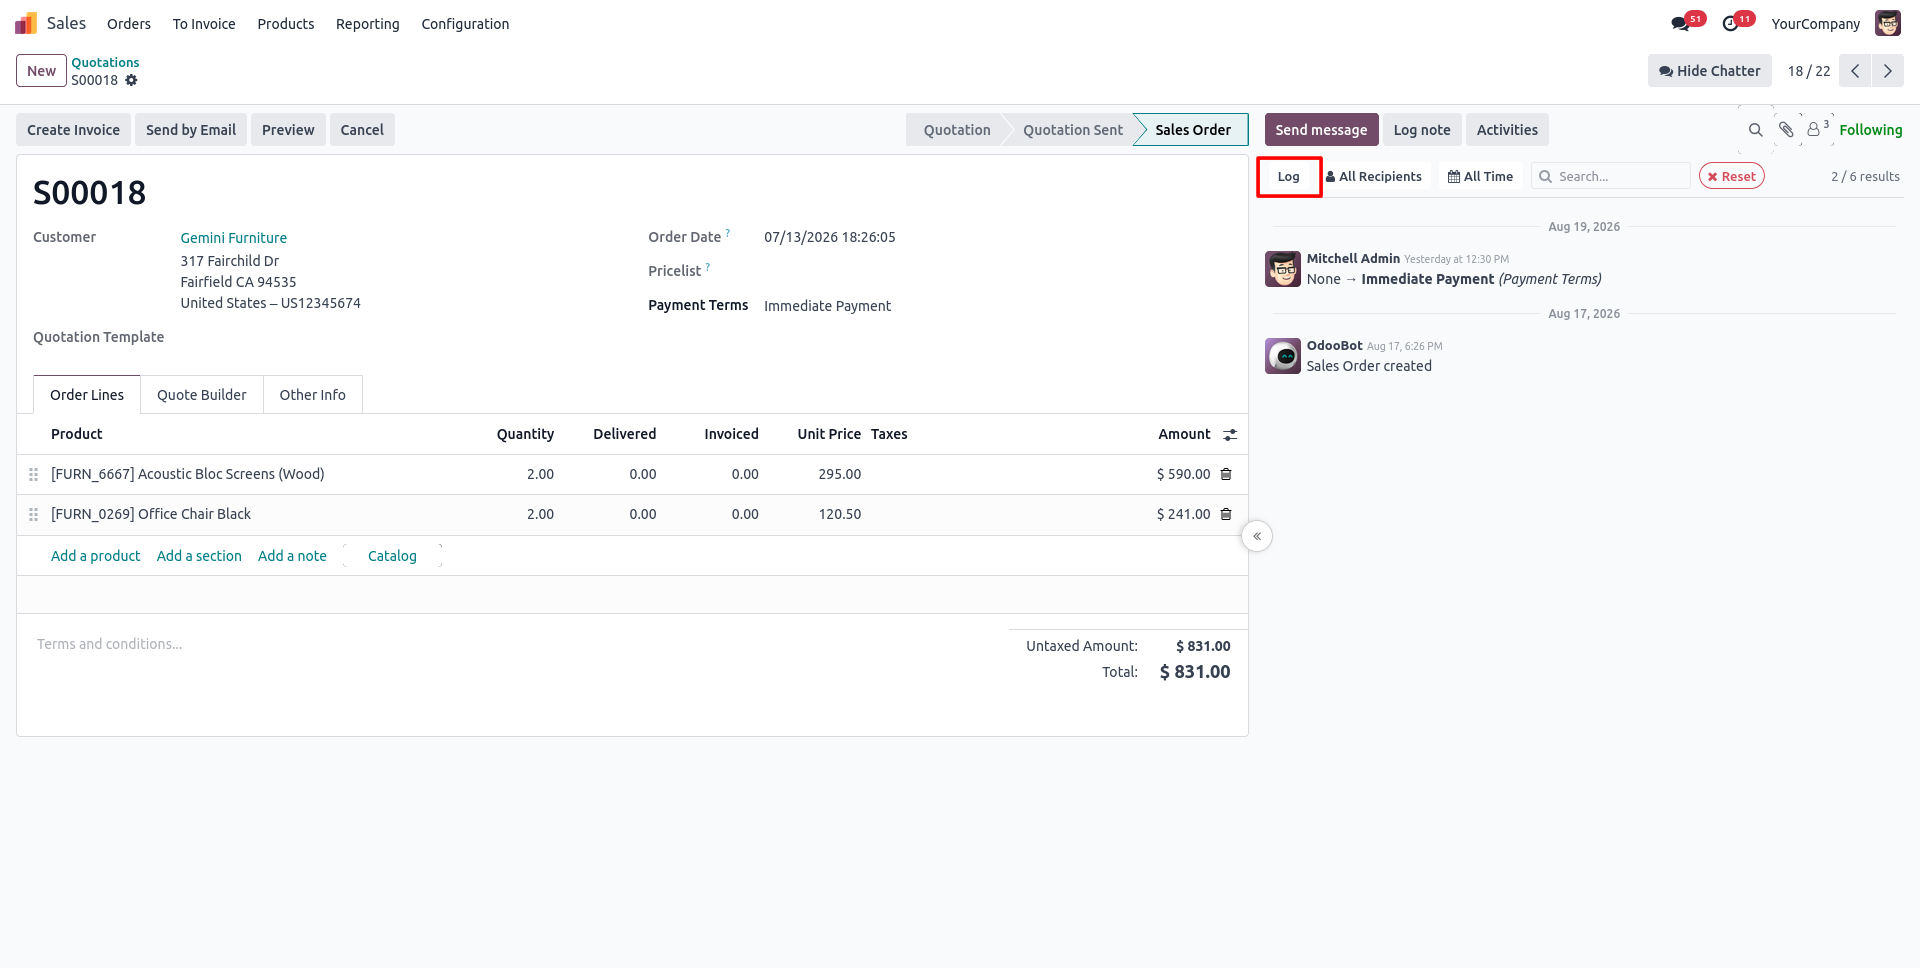
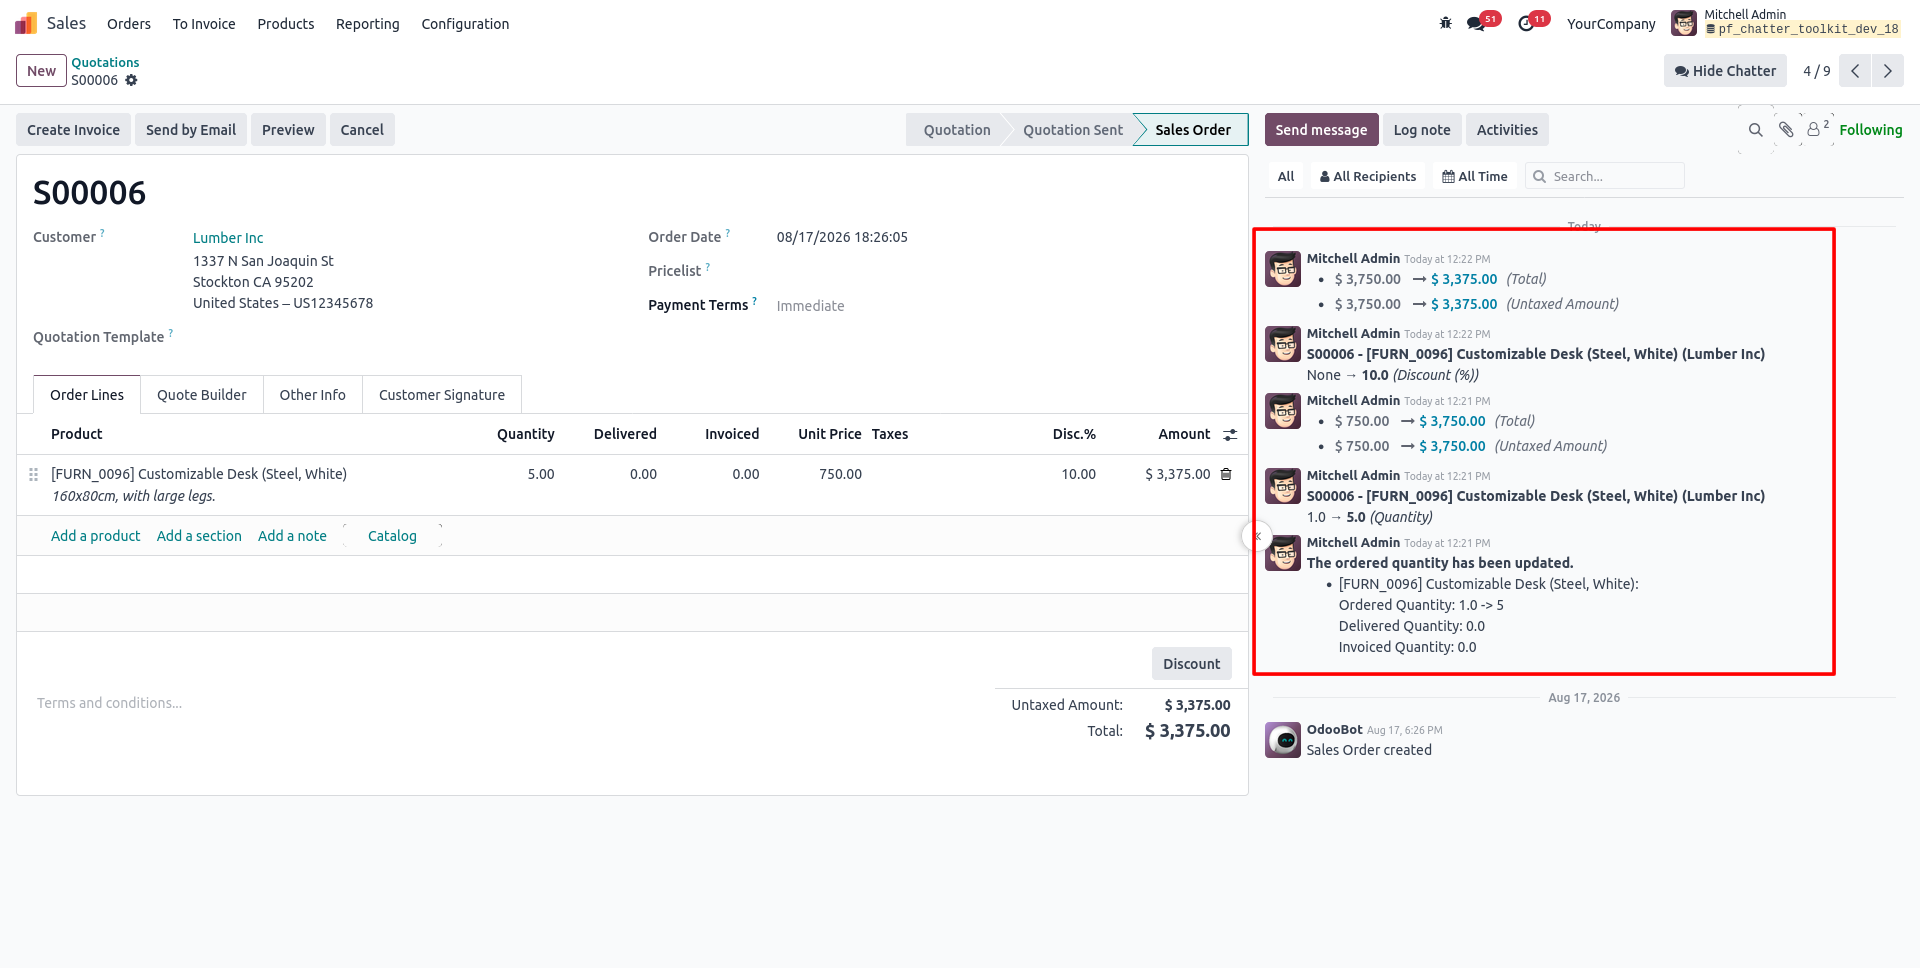
29. Select Log to view system-generated changes and track the audit trail of the record.
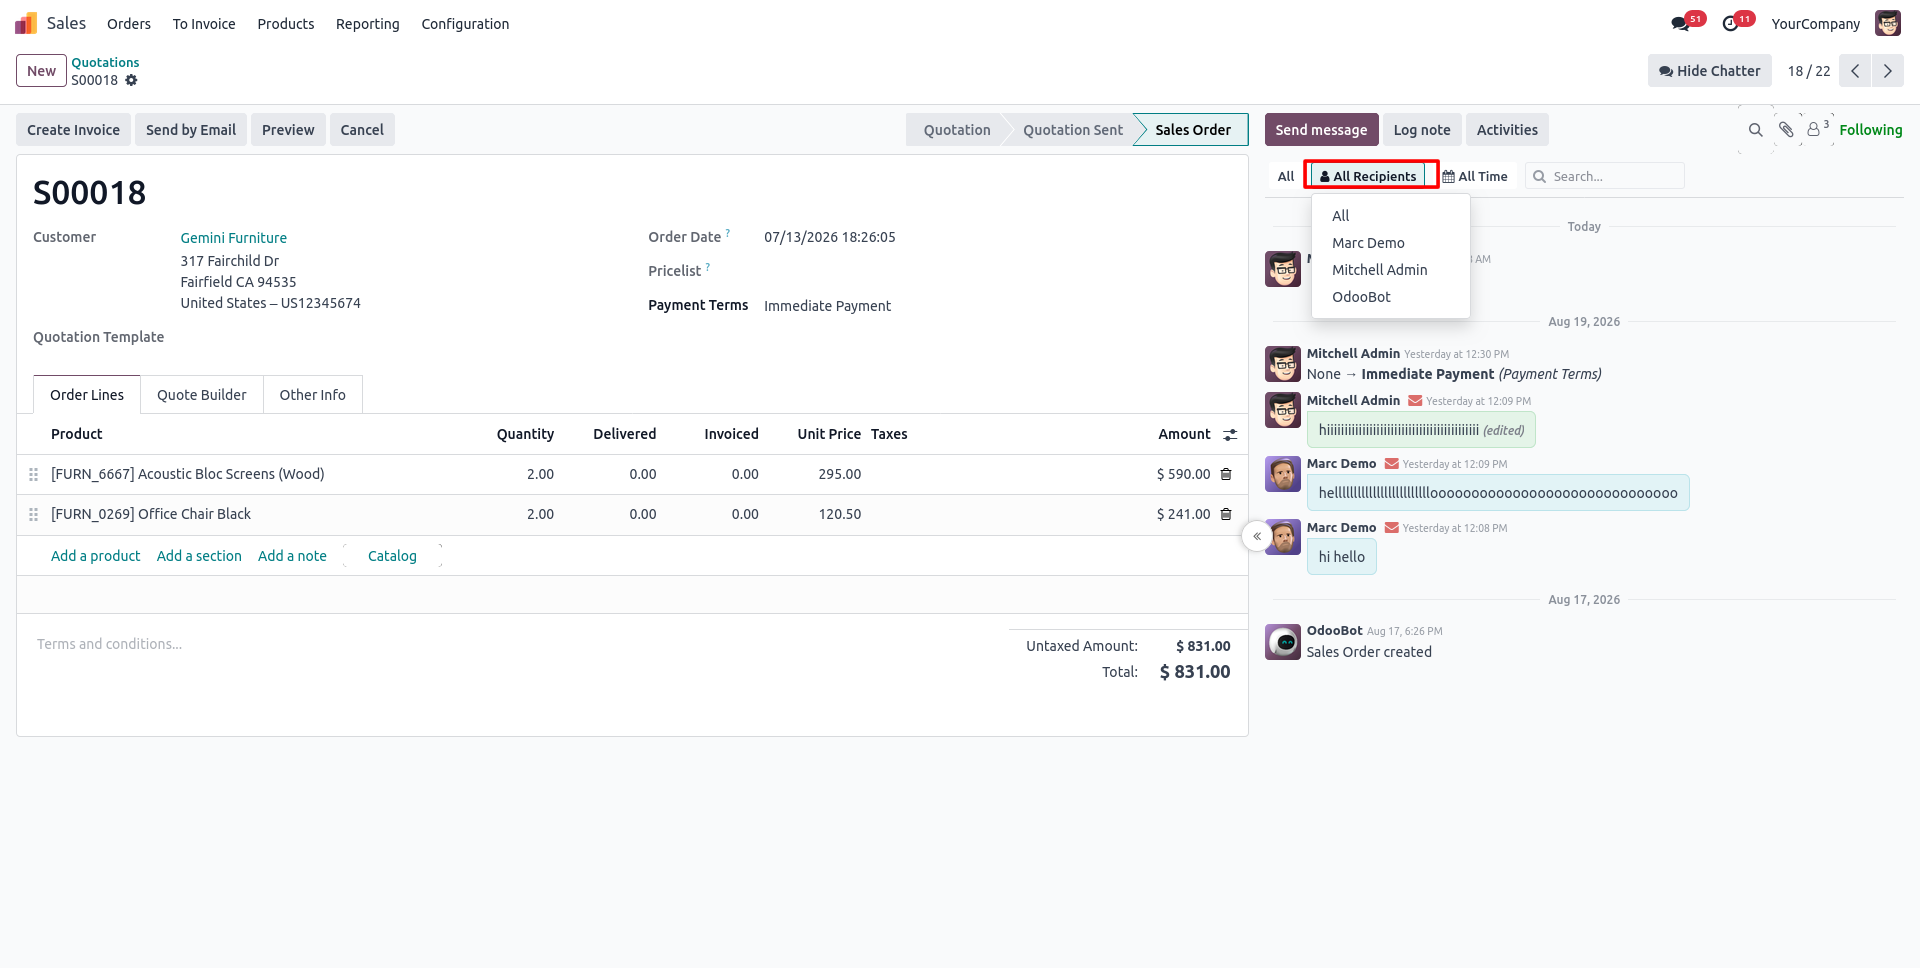
30. Click All Recipients to see the list of followers and users involved in the Chatter conversation.
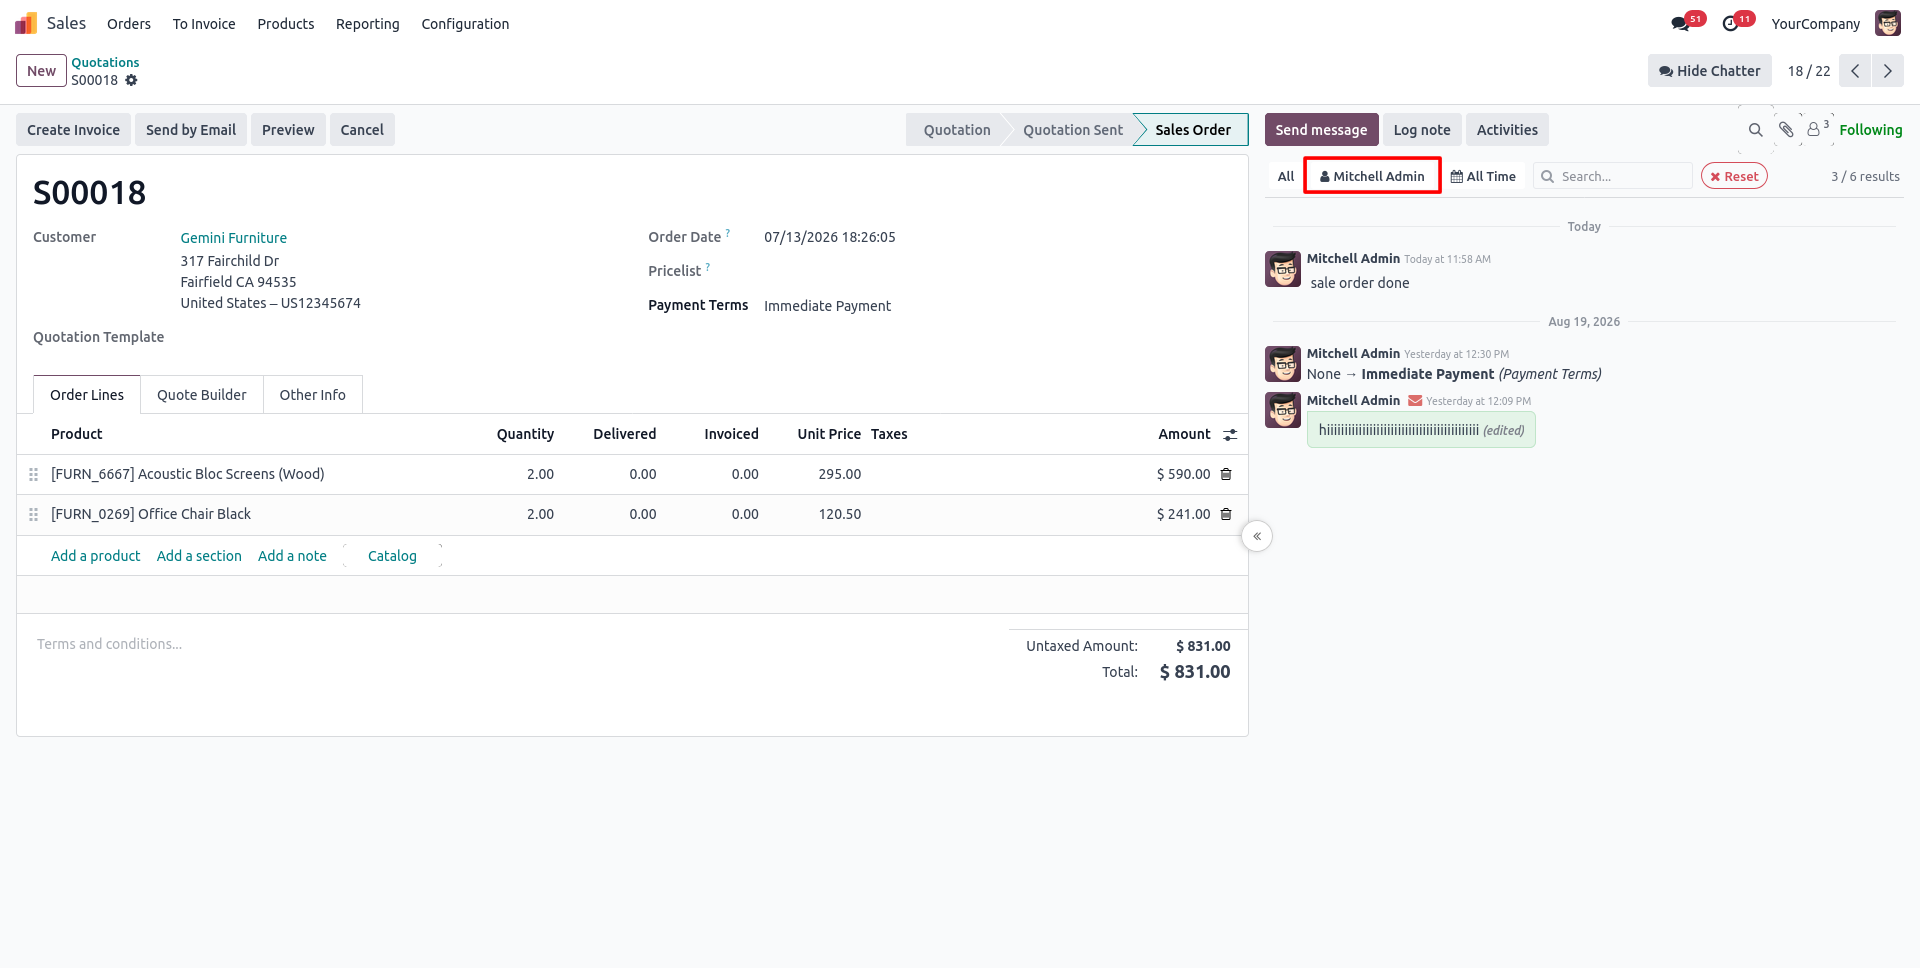
31. Select a specific recipient, such as Mitchell Admin, to instantly view only their Chatter entries.
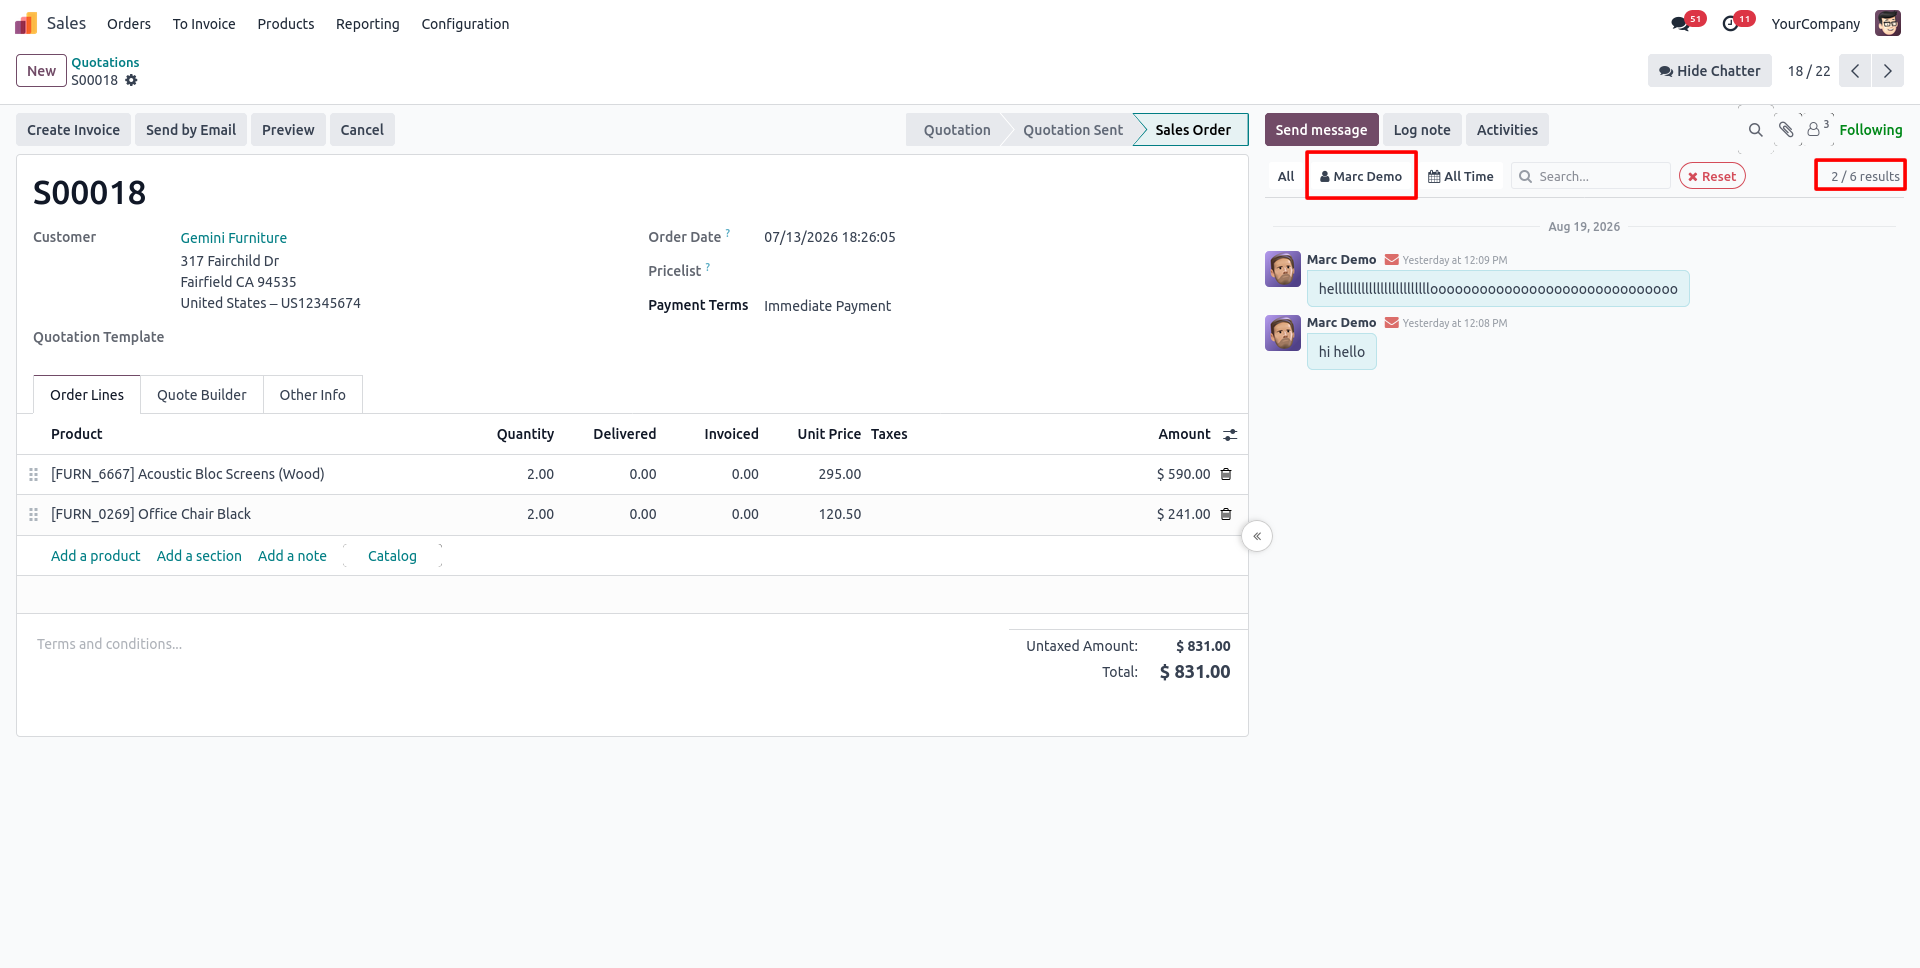
32. Switch to another recipient, like Marc Demo, to quickly view their individual messages.
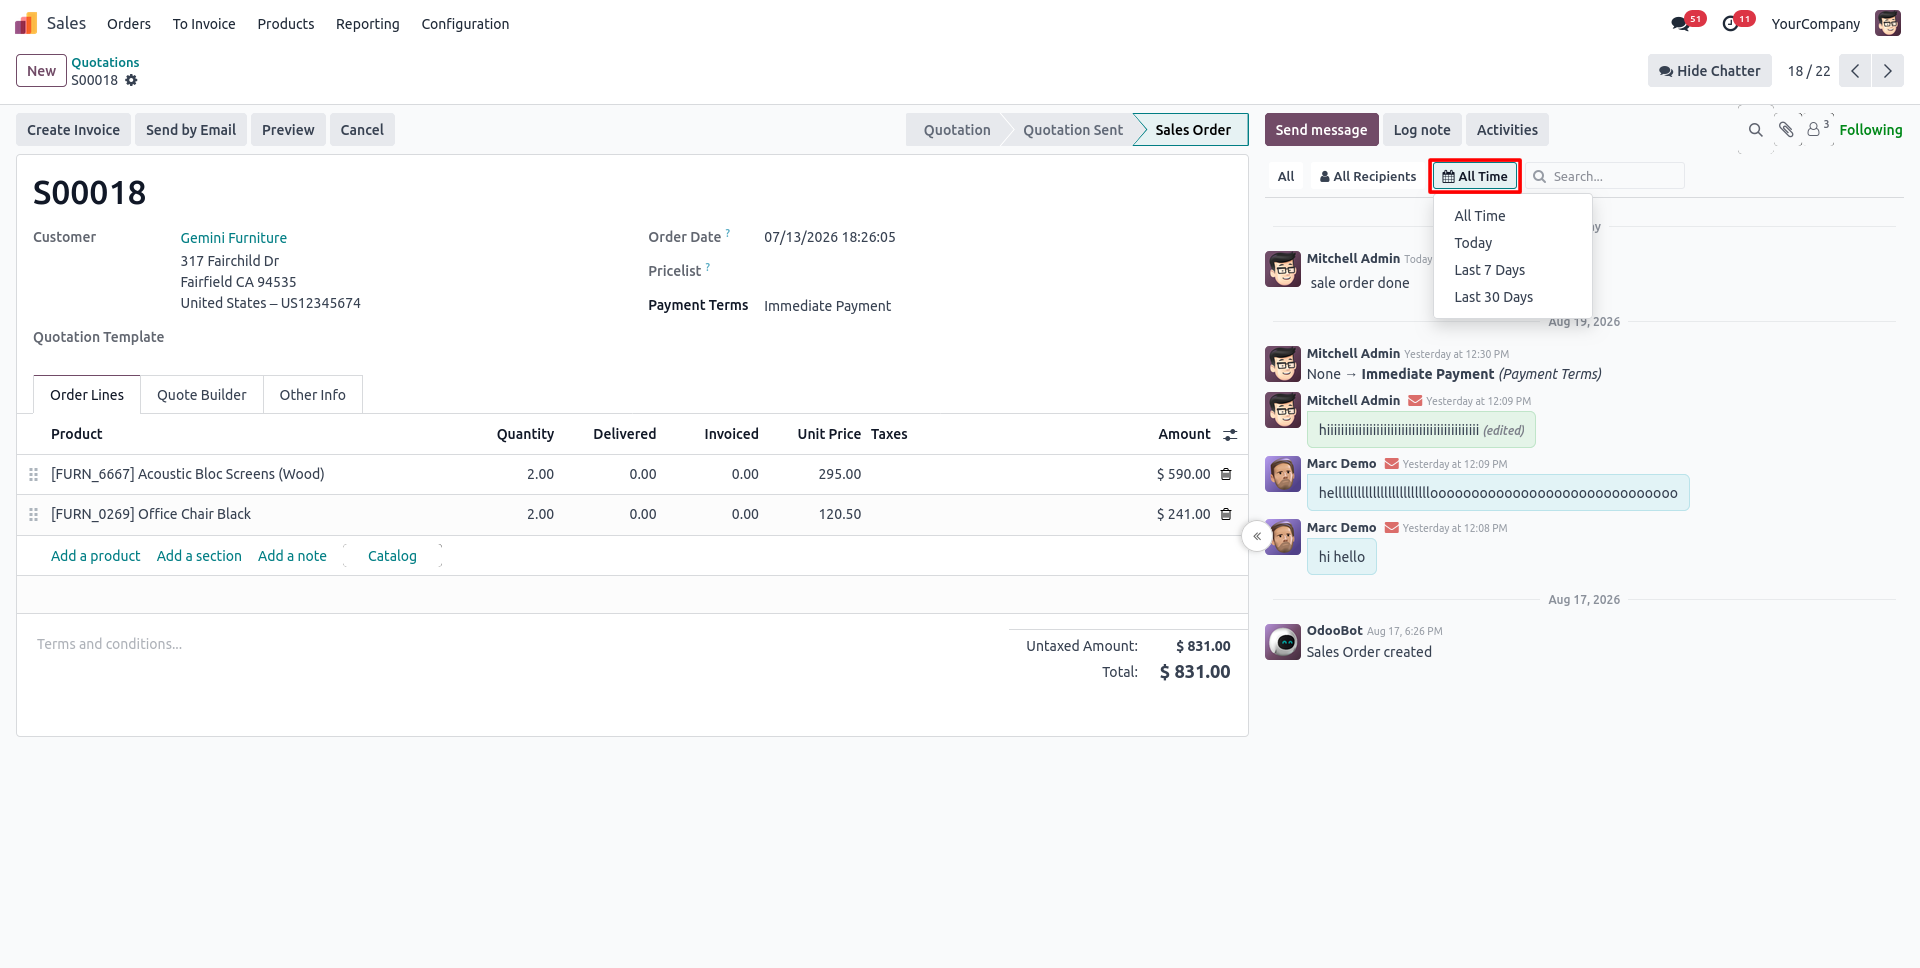
33. Click All Time to filter Chatter history by Today, Last 7 Days, or Last 30 Days.
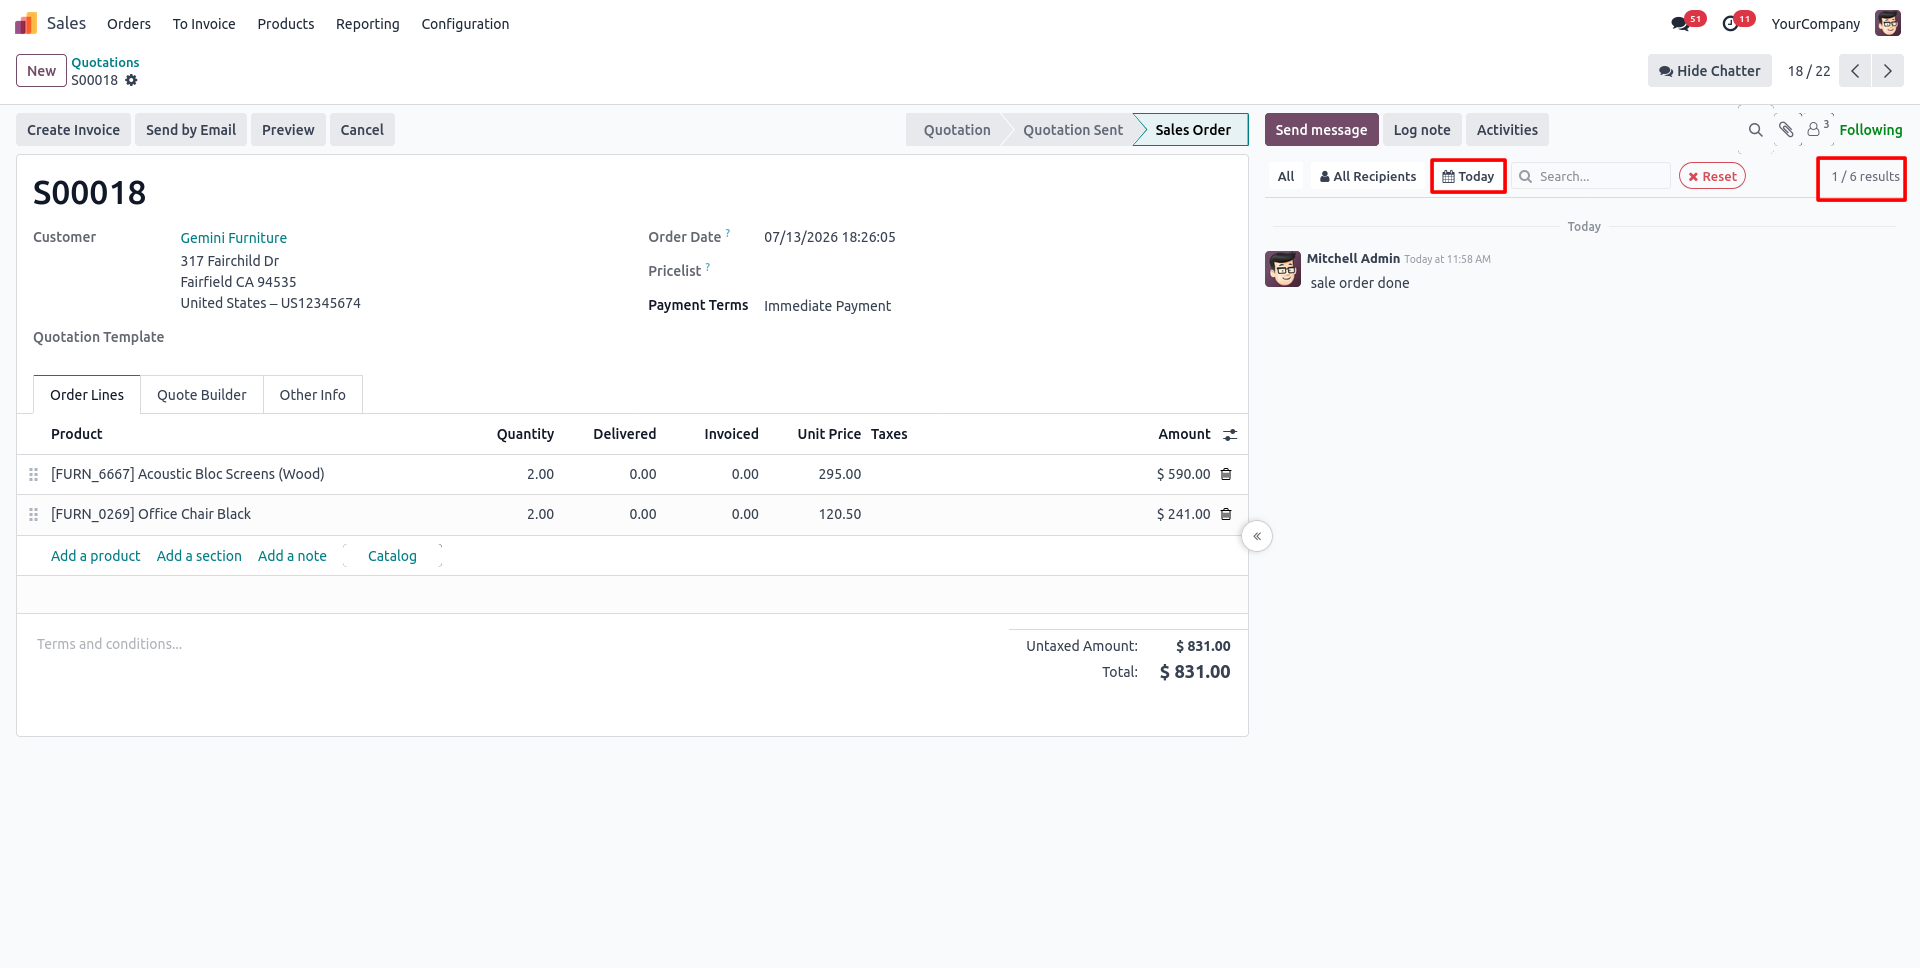
34. Select Today to instantly narrow down the Chatter to only today's entries.
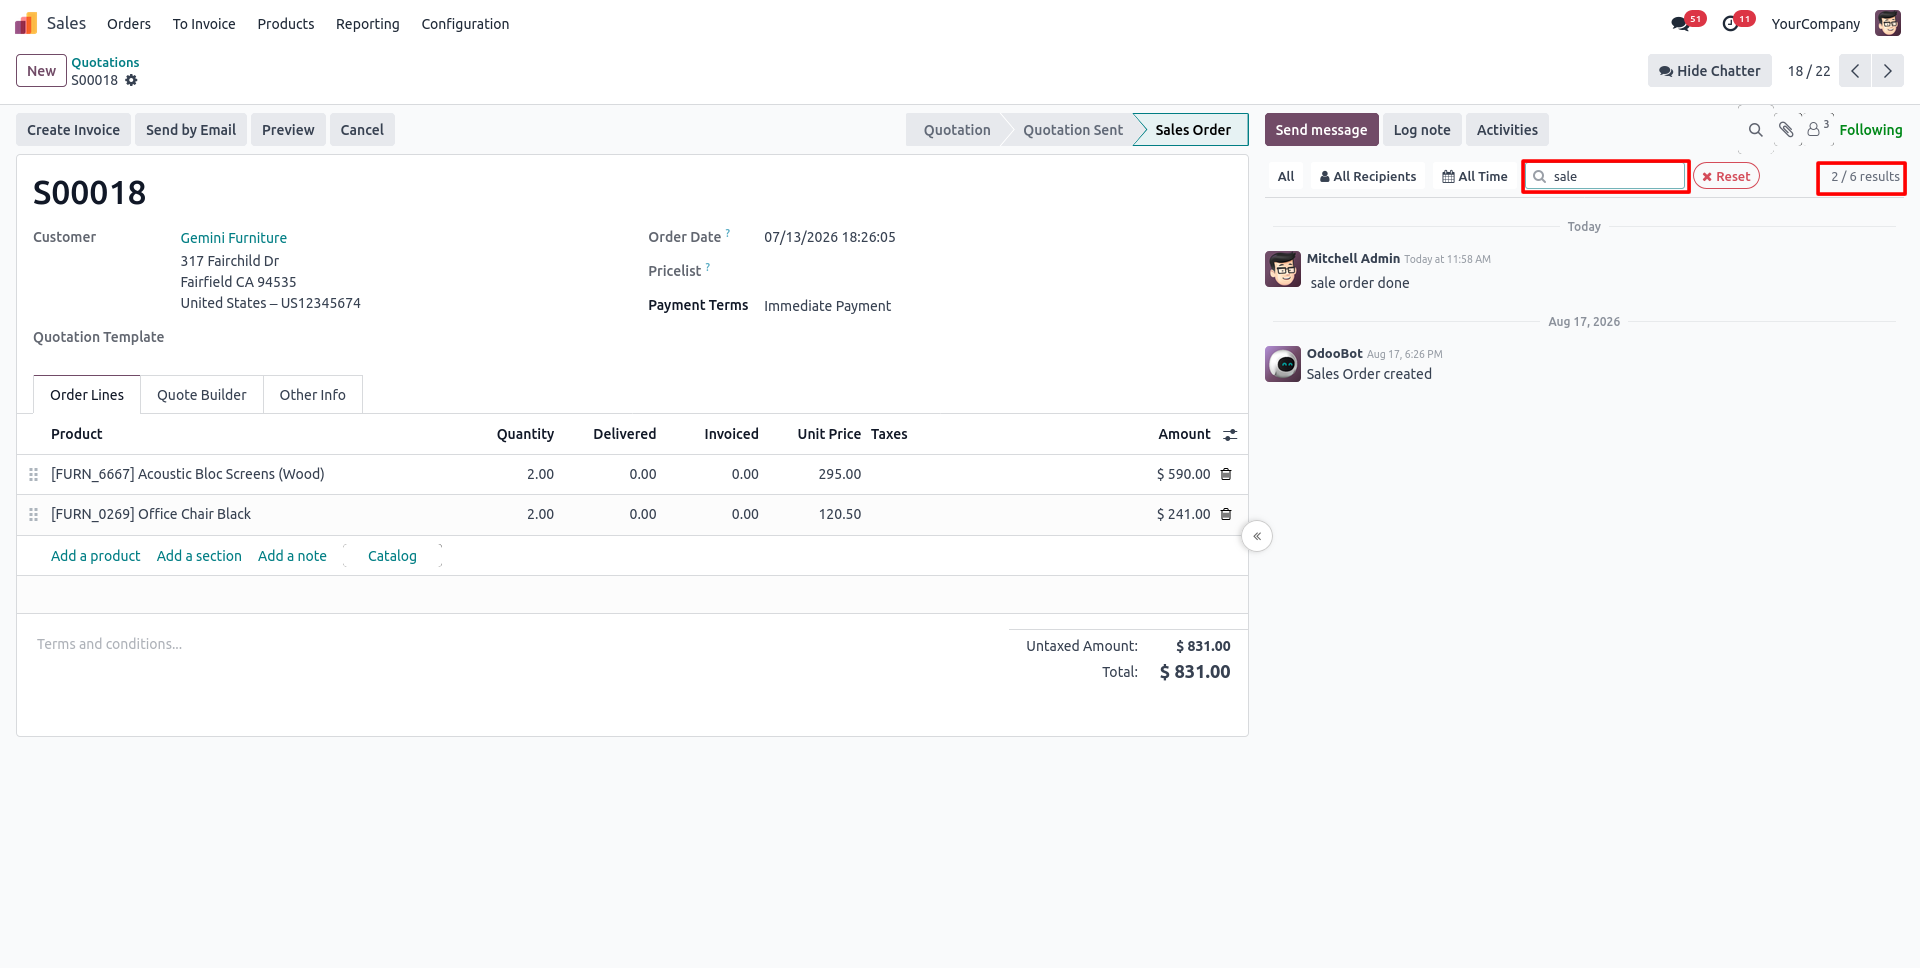
35. Use the Search field to find messages containing a specific word, like "sale", across the Chatter.
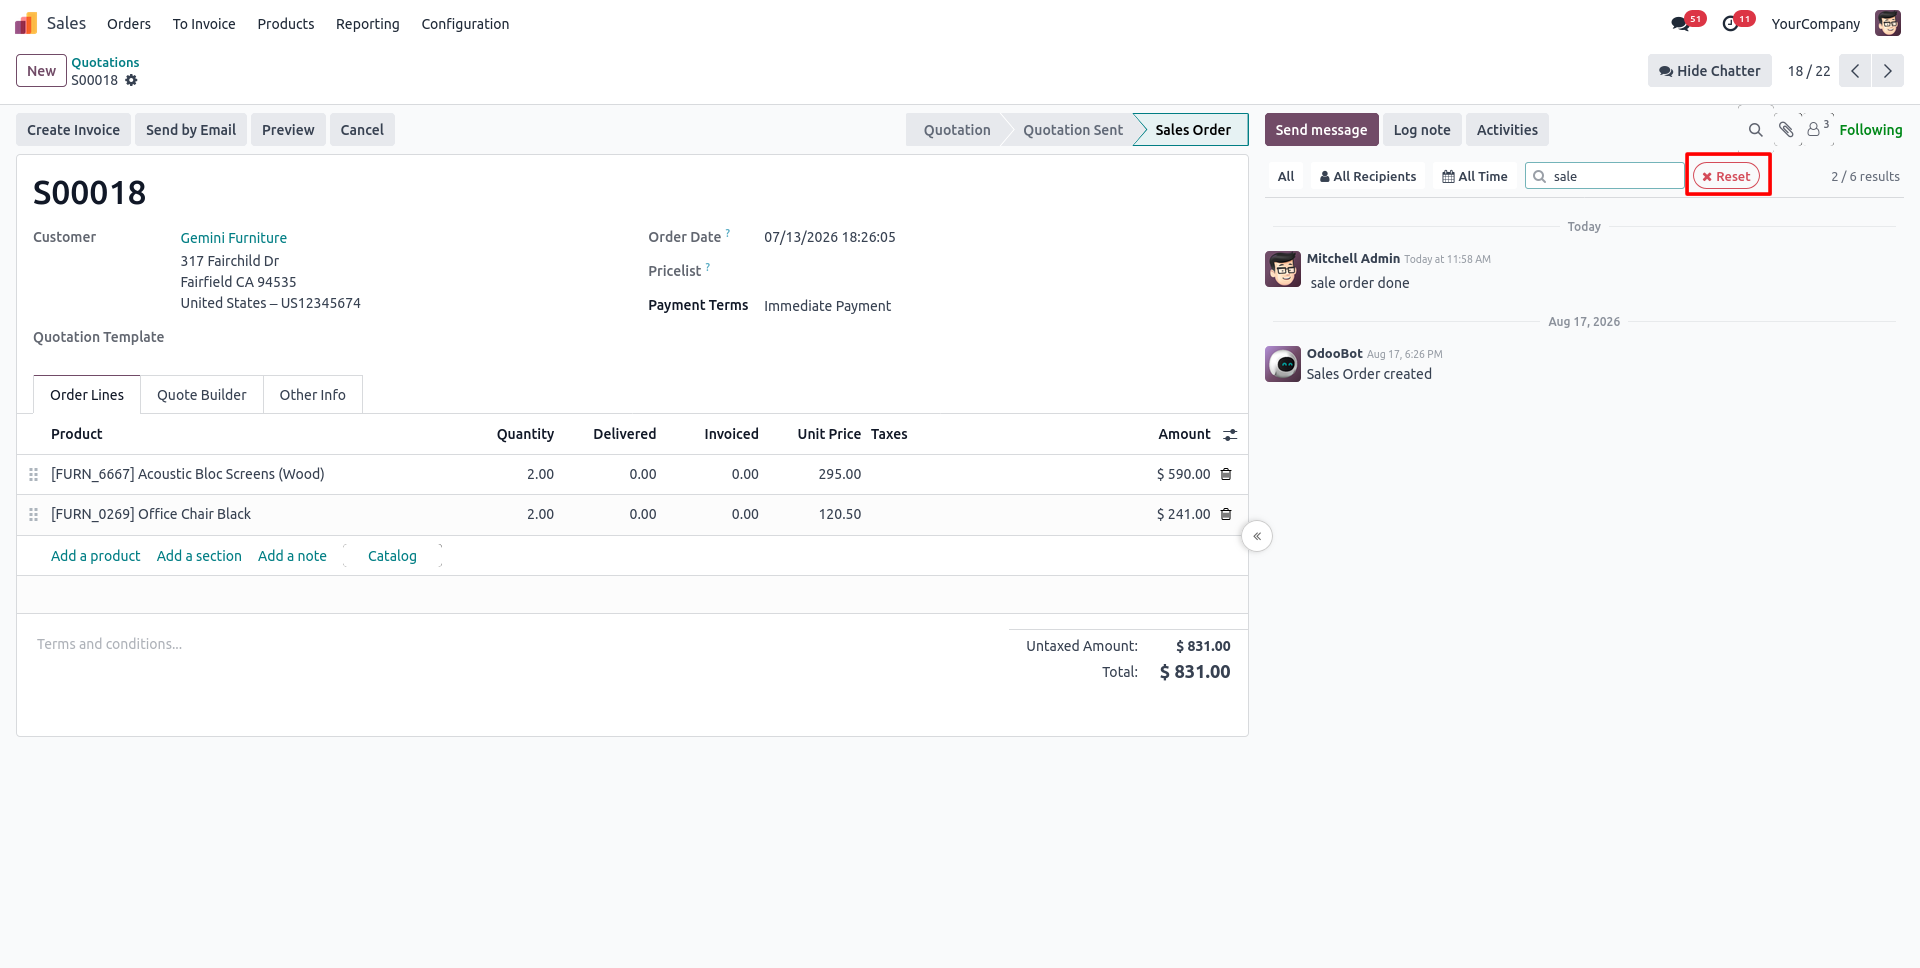
36. Click Reset anytime to instantly clear all applied filters and return to the full Chatter view.
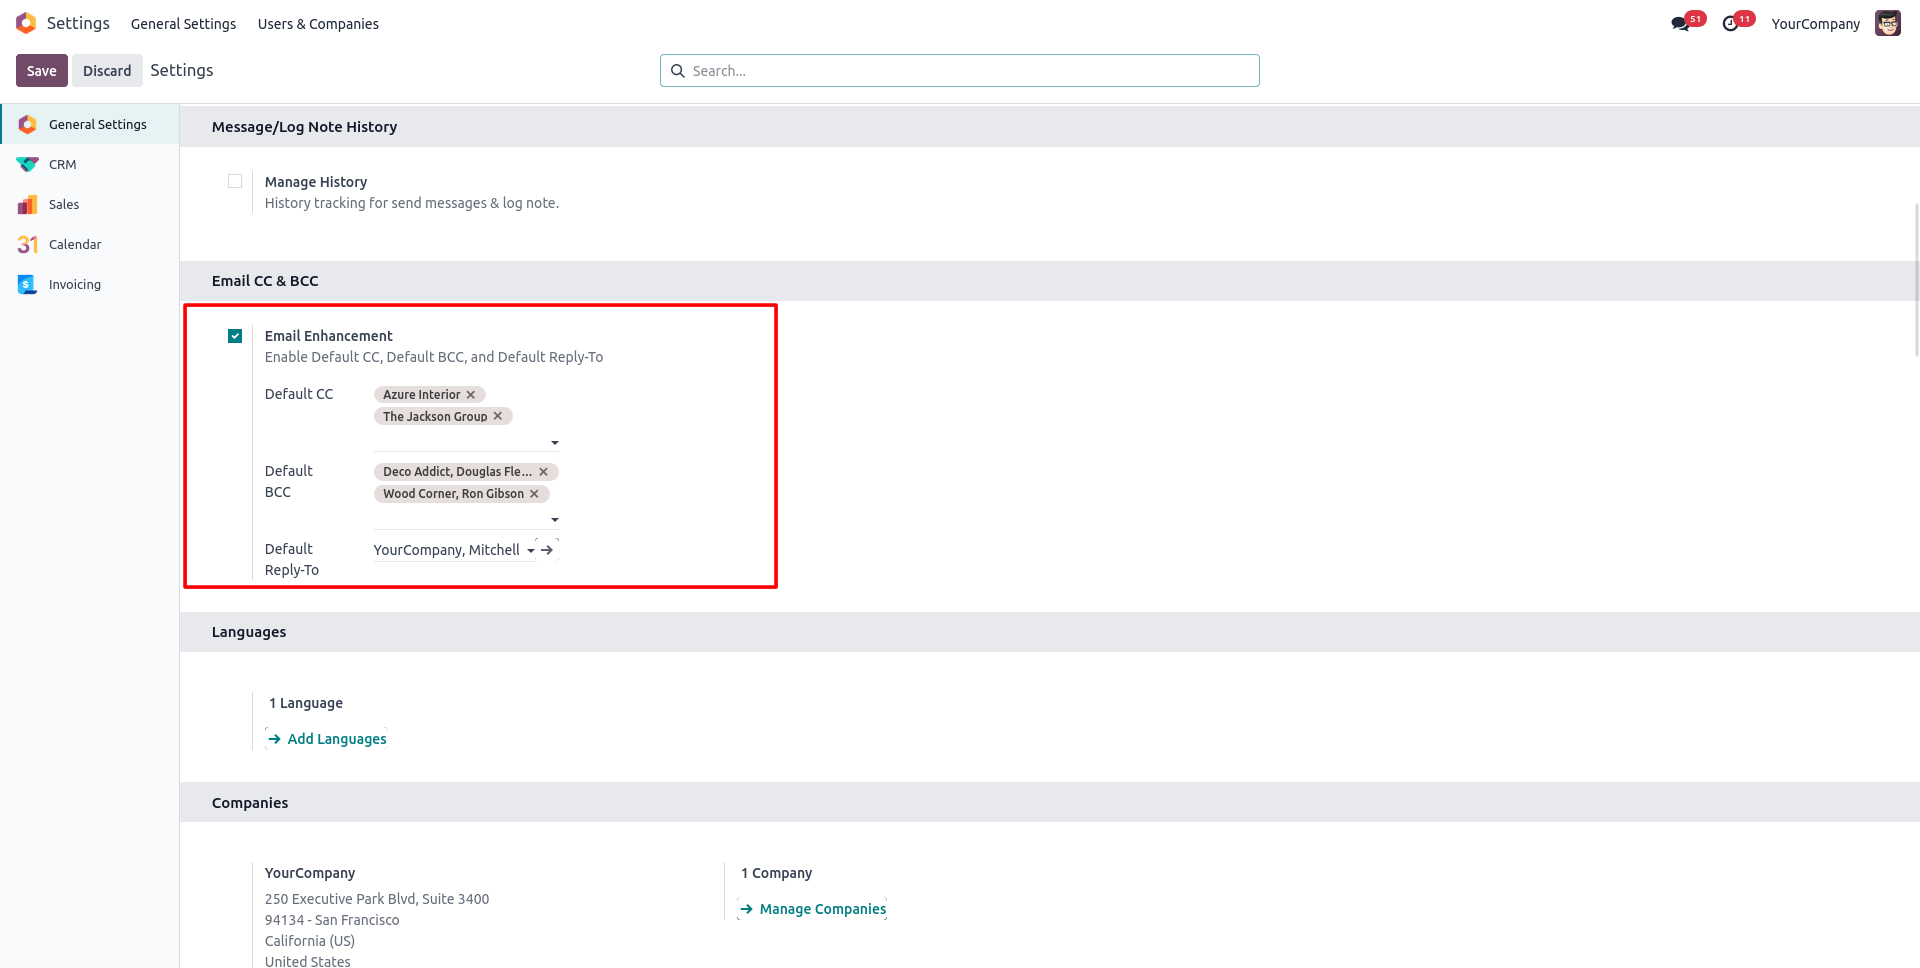
37. Go to Settings → General Settings and enable Email Enhancement to set default CC, BCC, and Reply-To addresses.
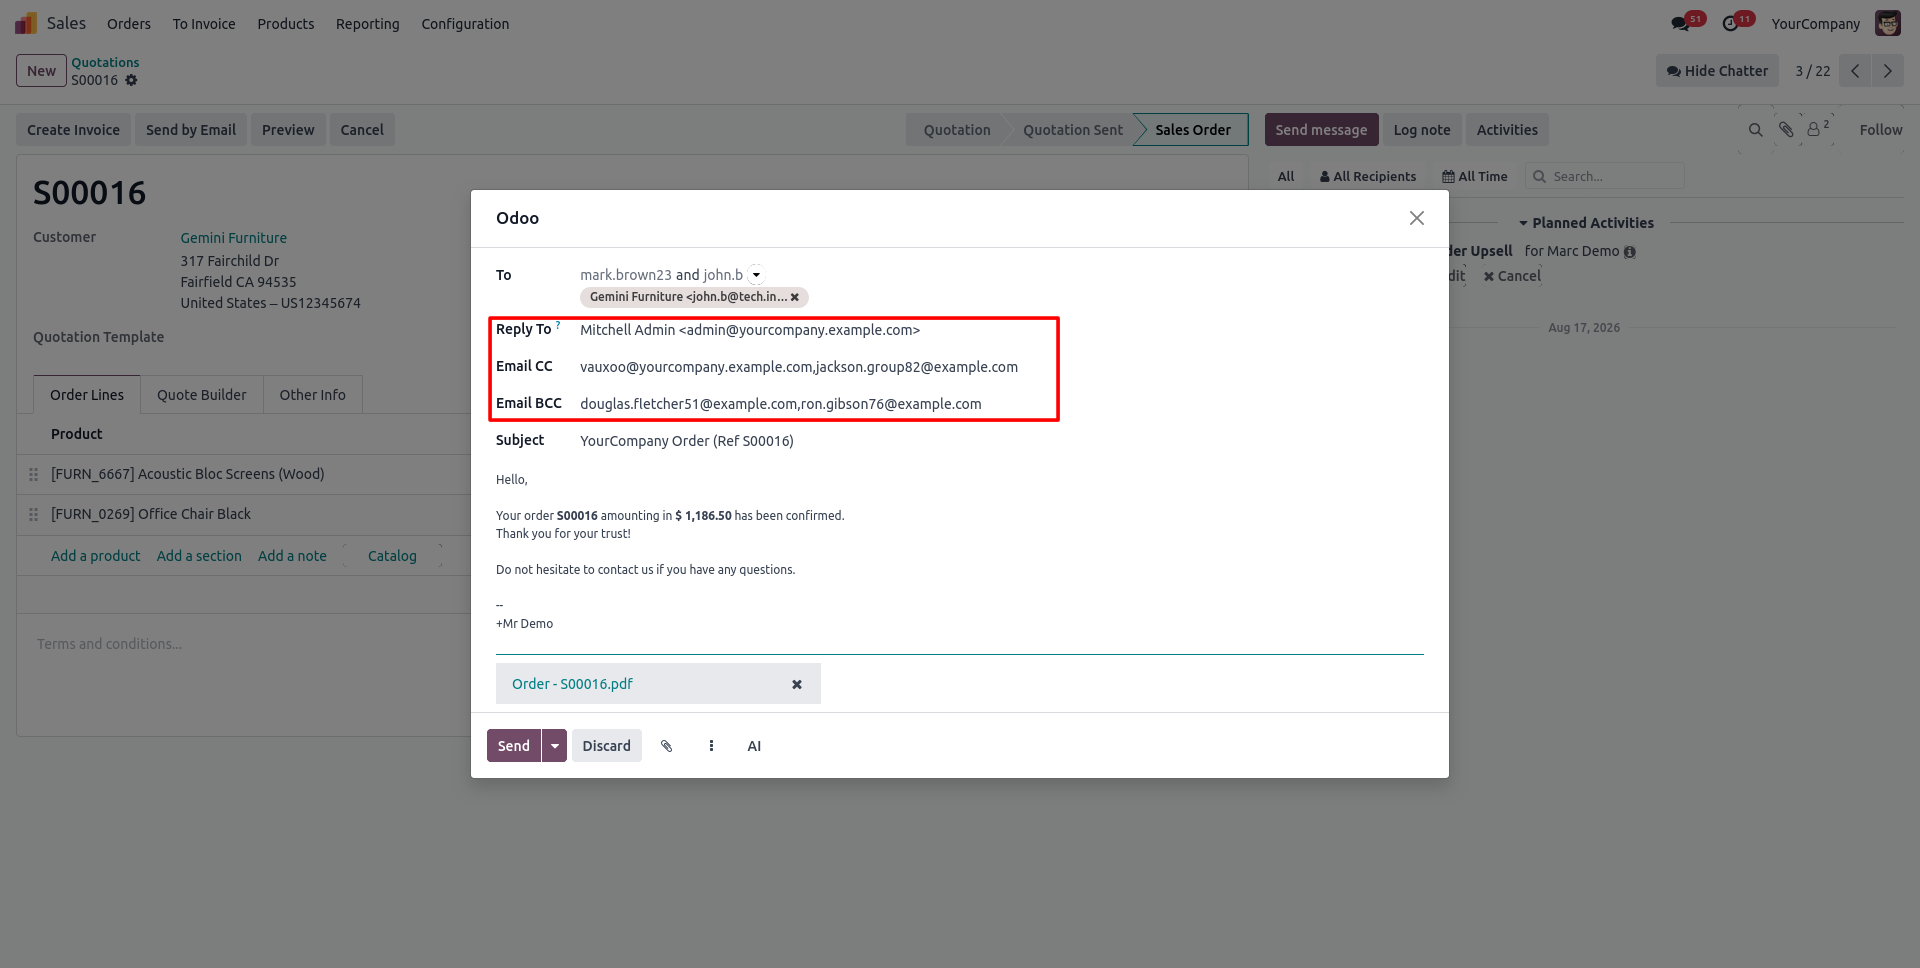
38. When composing an email from the Chatter, the Reply To, Email CC, and Email BCC fields are automatically pre-filled with your configured defaults.
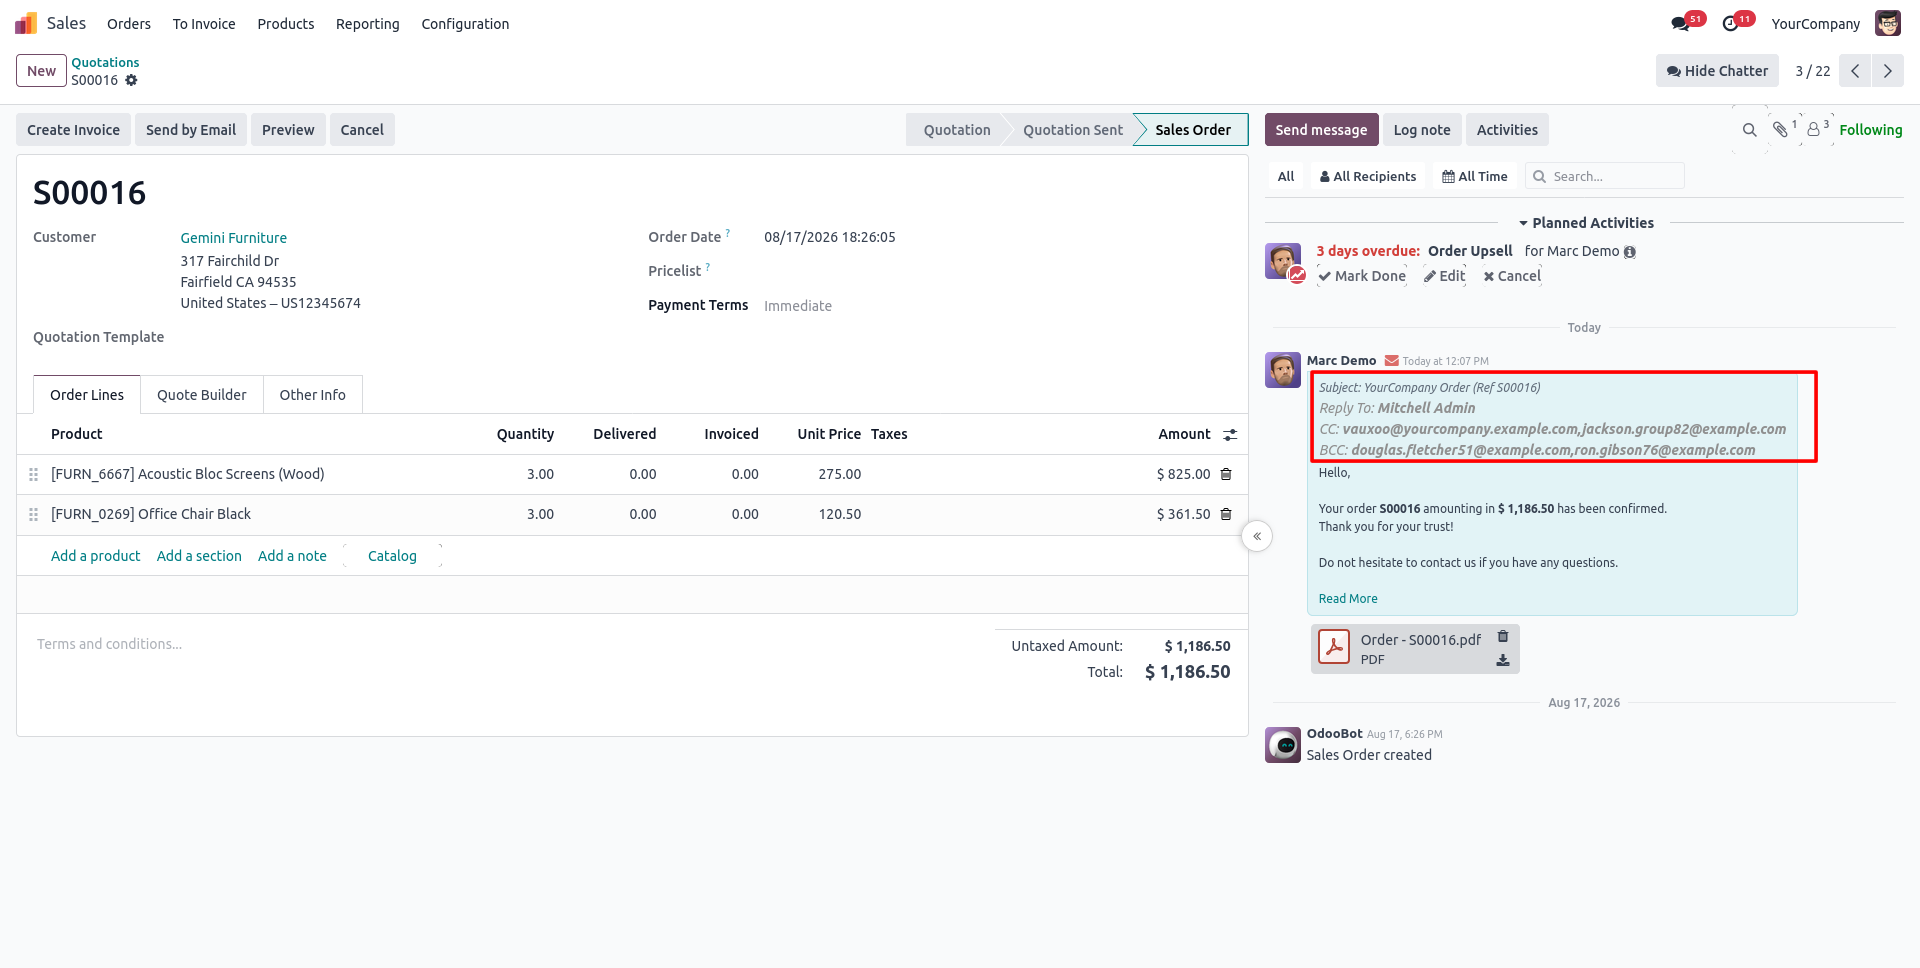
39. The sent email appears in the Chatter along with its Reply To, CC, and BCC details for full visibility.
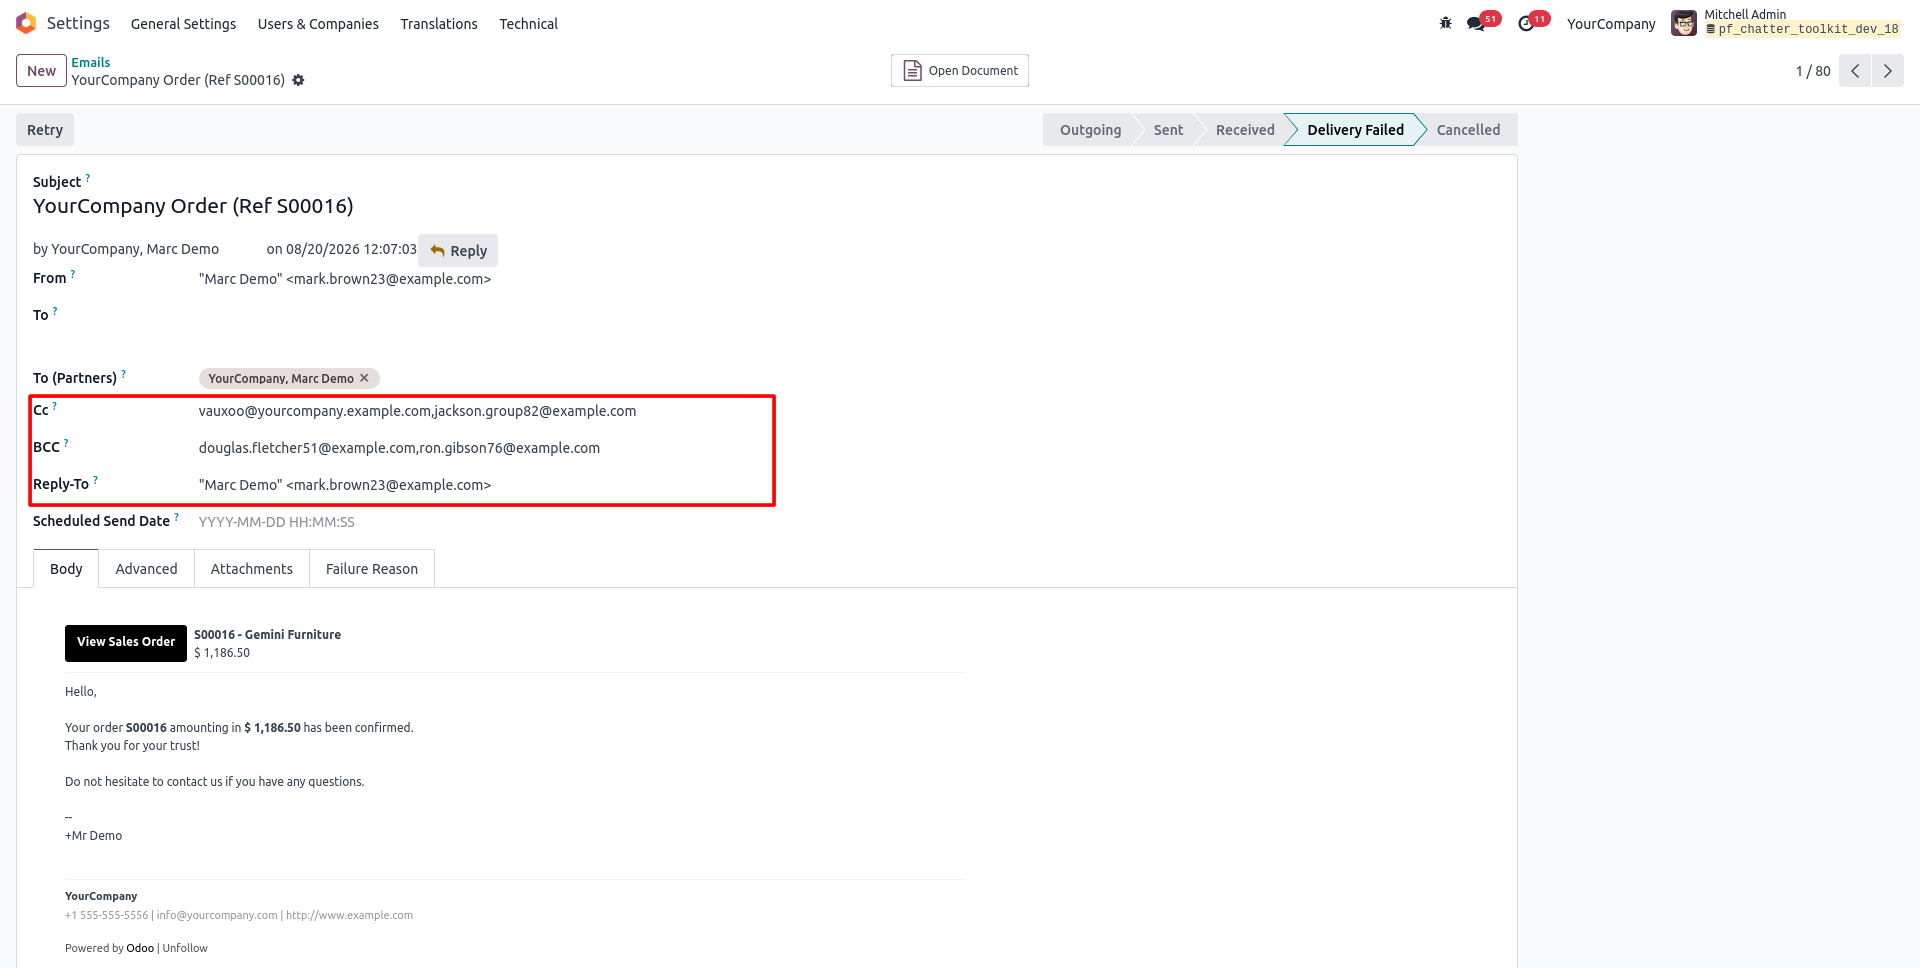
40. You can also view the CC, BCC, and Reply-To details directly from the corresponding email template record.
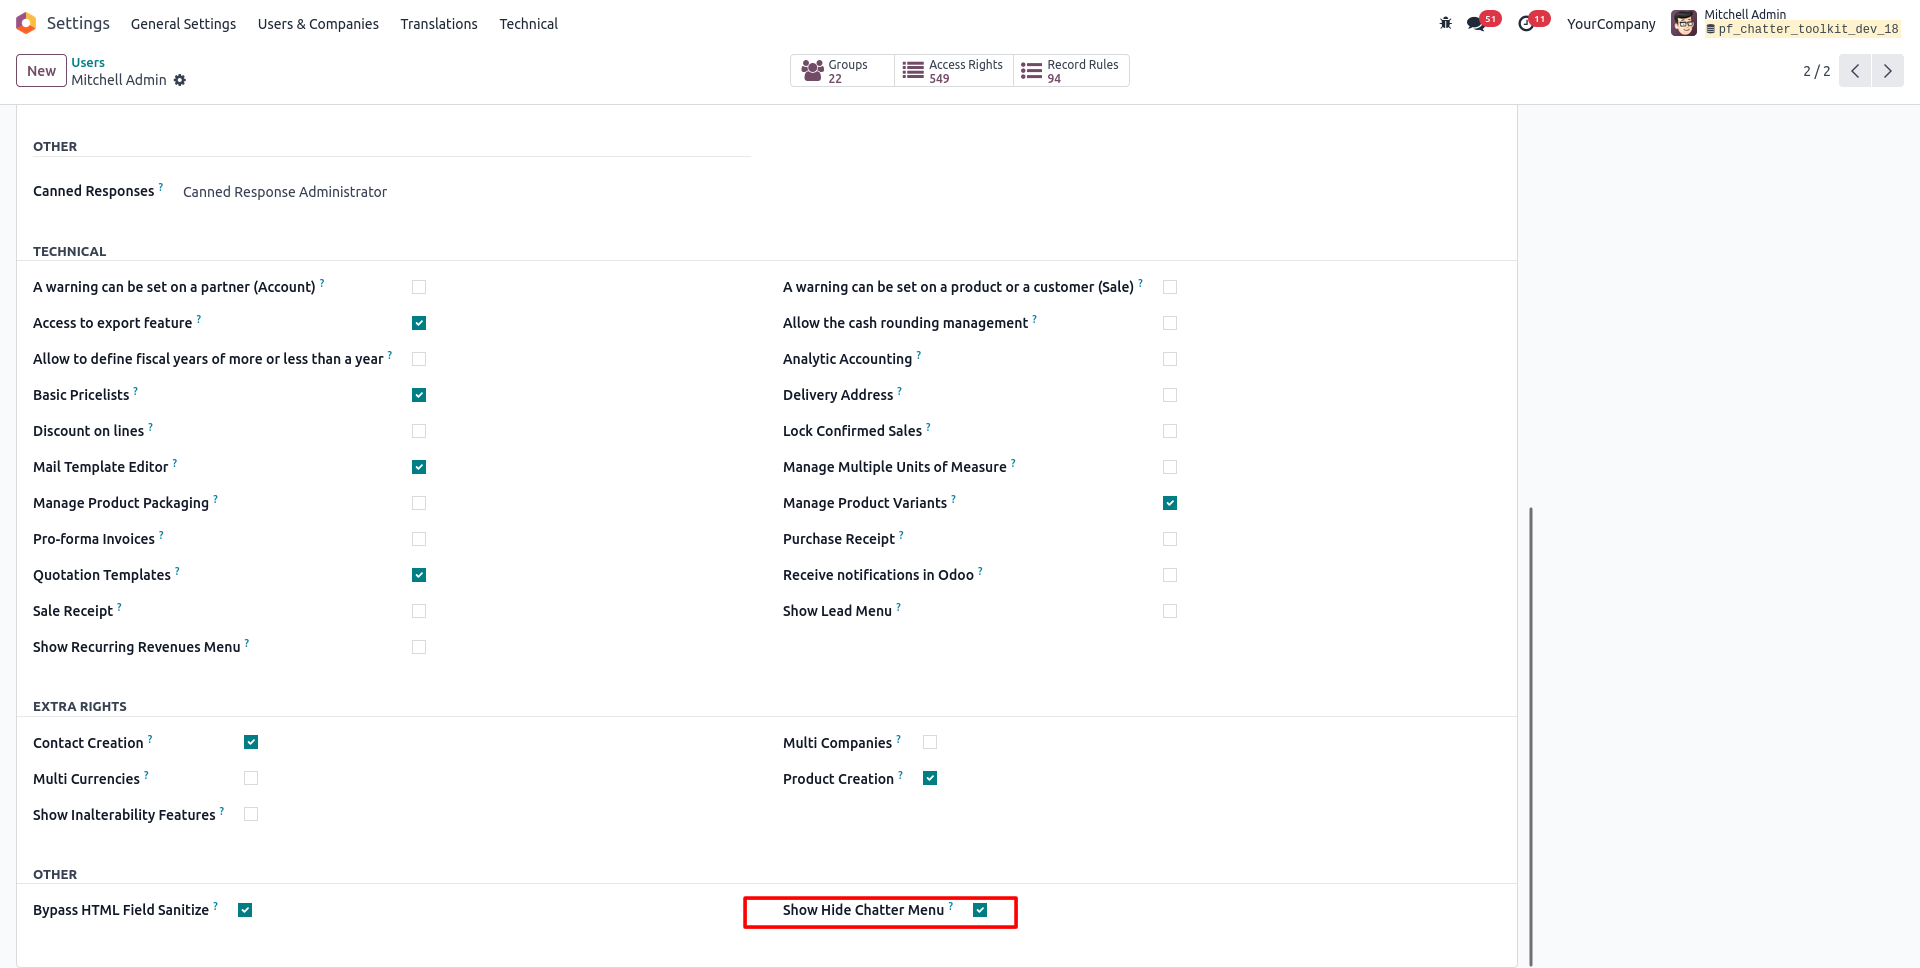
41. Enable Show Hide Chatter Menu under the user's Technical settings to grant access to the Hide Chatter configuration menu.
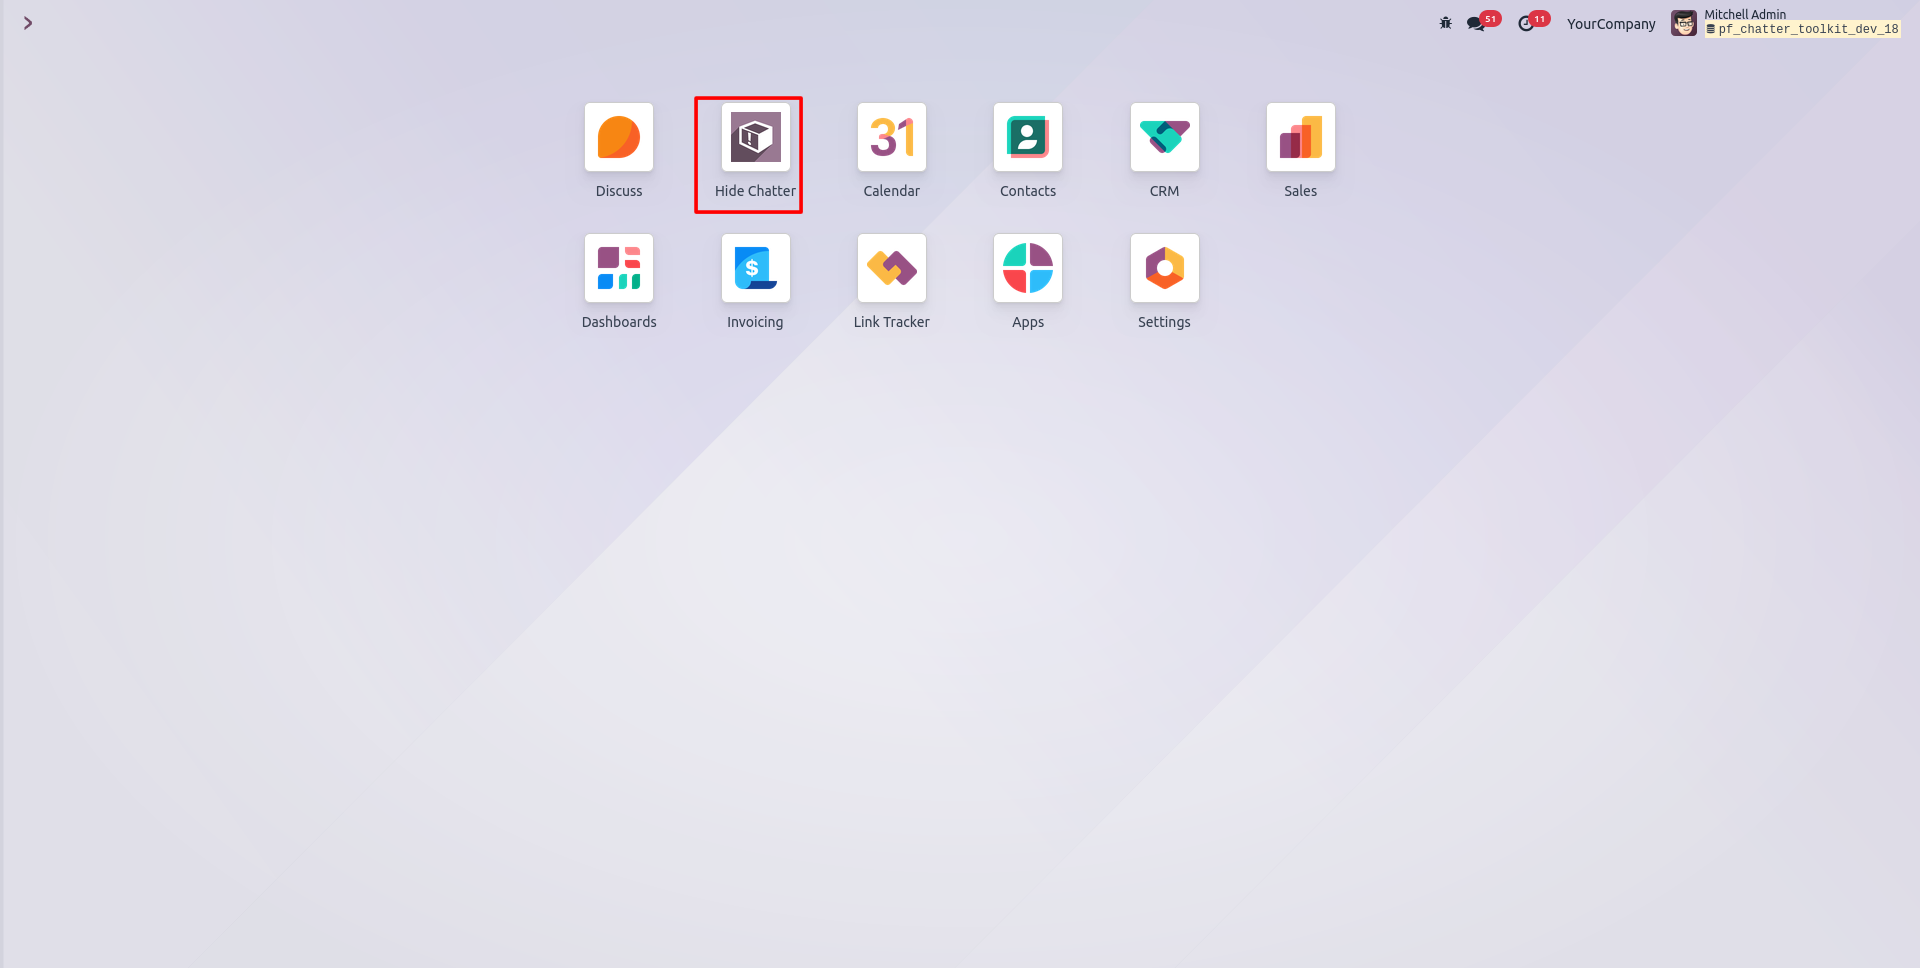
42. Open the Hide Chatter app from the main dashboard to start configuring restrictions.
43. Click New to create a Hide Chatter configuration record, such as "Sales Chatter hide".
44. Add a line to select specific Users and Models, then choose exactly what to restrict — Full Chatter, Send Message, Log Notes, Activity, Followers, or Attachments.
45. For the selected user and model, the Chatter panel is now completely hidden from the form view based on the configured restriction.
46. Go to Settings → General Settings and enable Enable Chatter Attachment Zip Download to allow downloading multiple attachments as one ZIP file.
47. Once enabled, a Download all as zip button appears in the Files section of the Chatter, letting you save every attachment at once.
48. Disable Enable Chatter Attachment Zip Download in General Settings whenever you want to turn off this feature.
49. Once disabled, the Download all as zip button is removed from the Chatter, keeping attachments downloadable one at a time only.
50. Go to Settings → General Settings and enable Enable Field Tracking under Chatter Field Tracking, then click Configure Fields to Track.
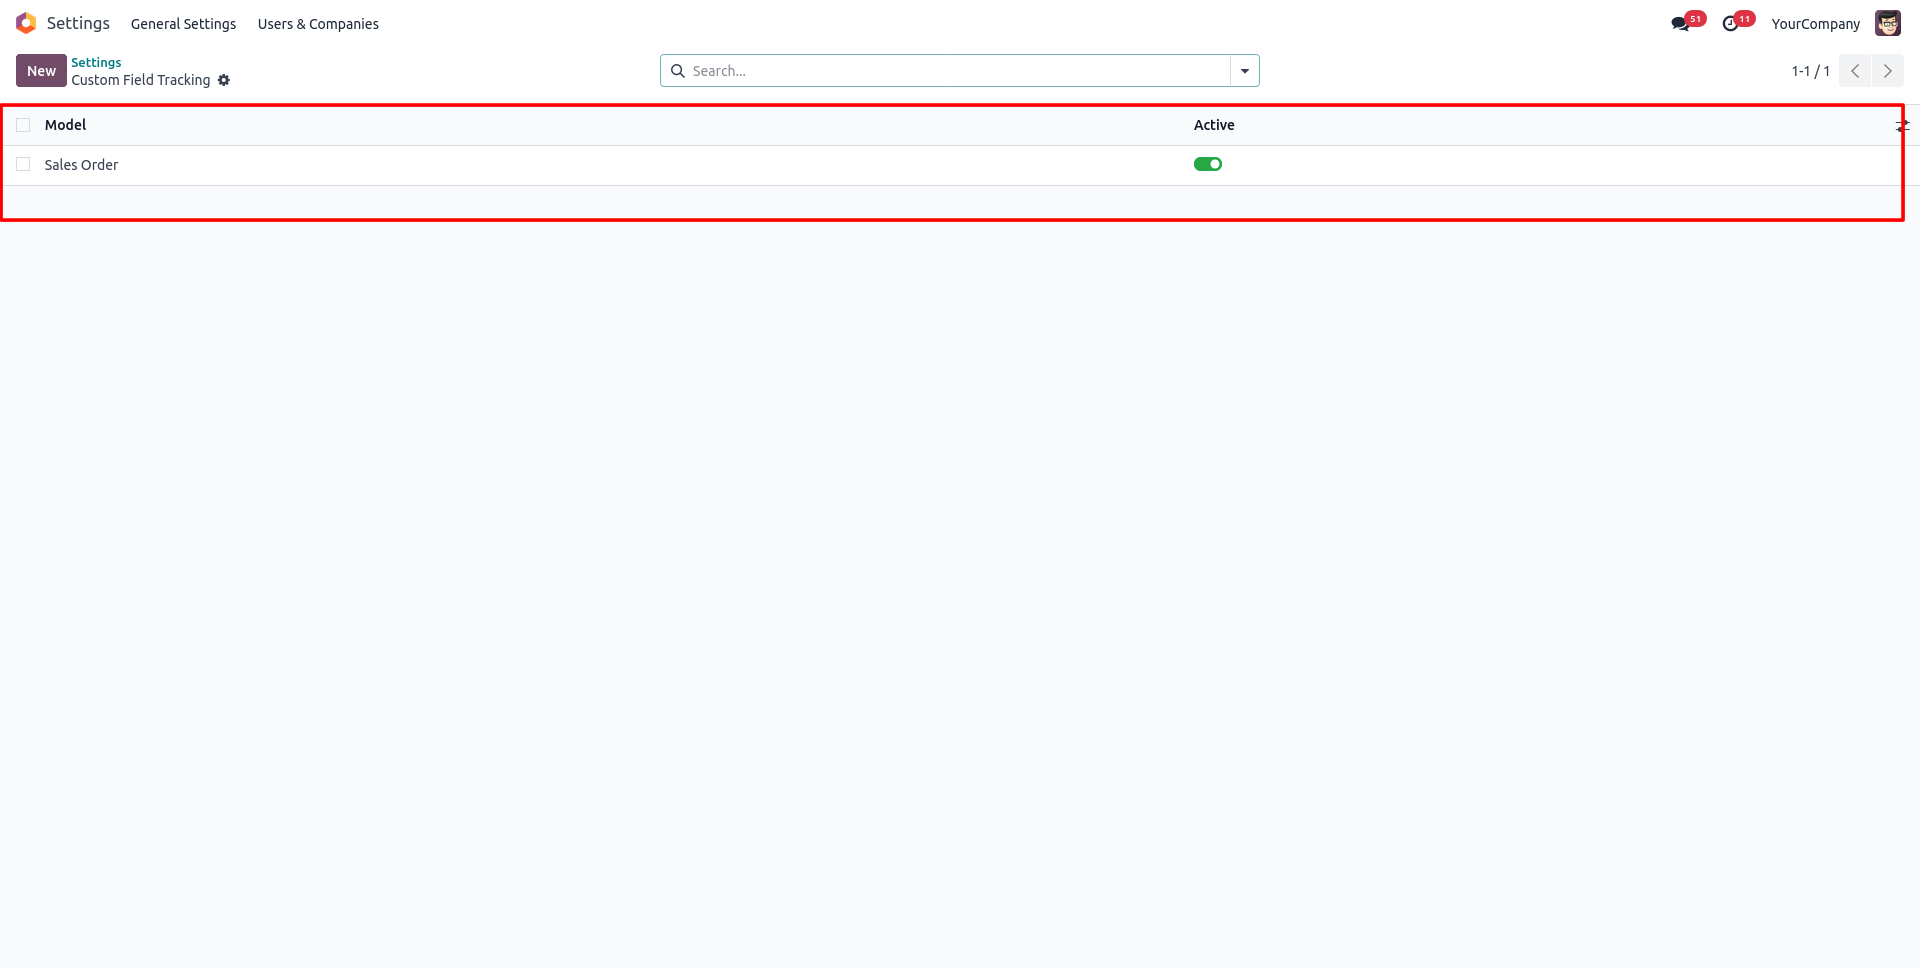
51. The Custom Field Tracking list opens, showing all models currently configured for field tracking.
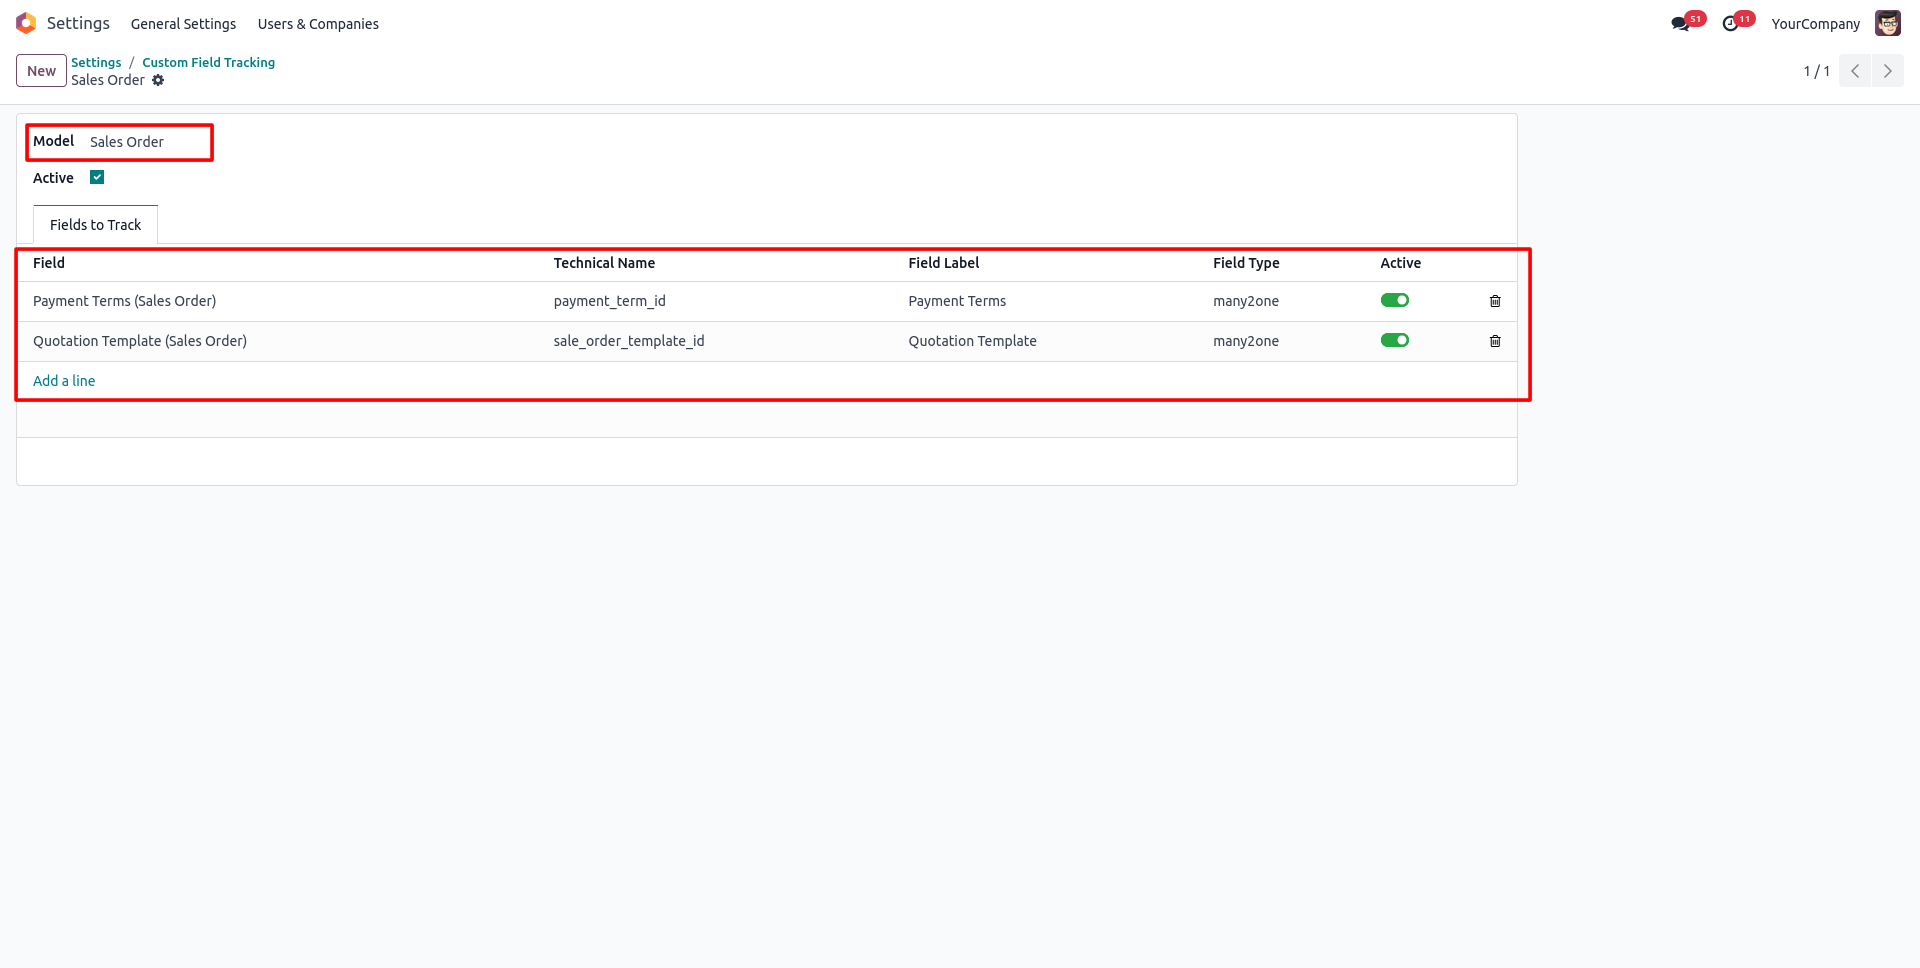
52. Select a Model, such as Sales Order, and add the fields you want to track — like Payment Terms and Quotation Template.
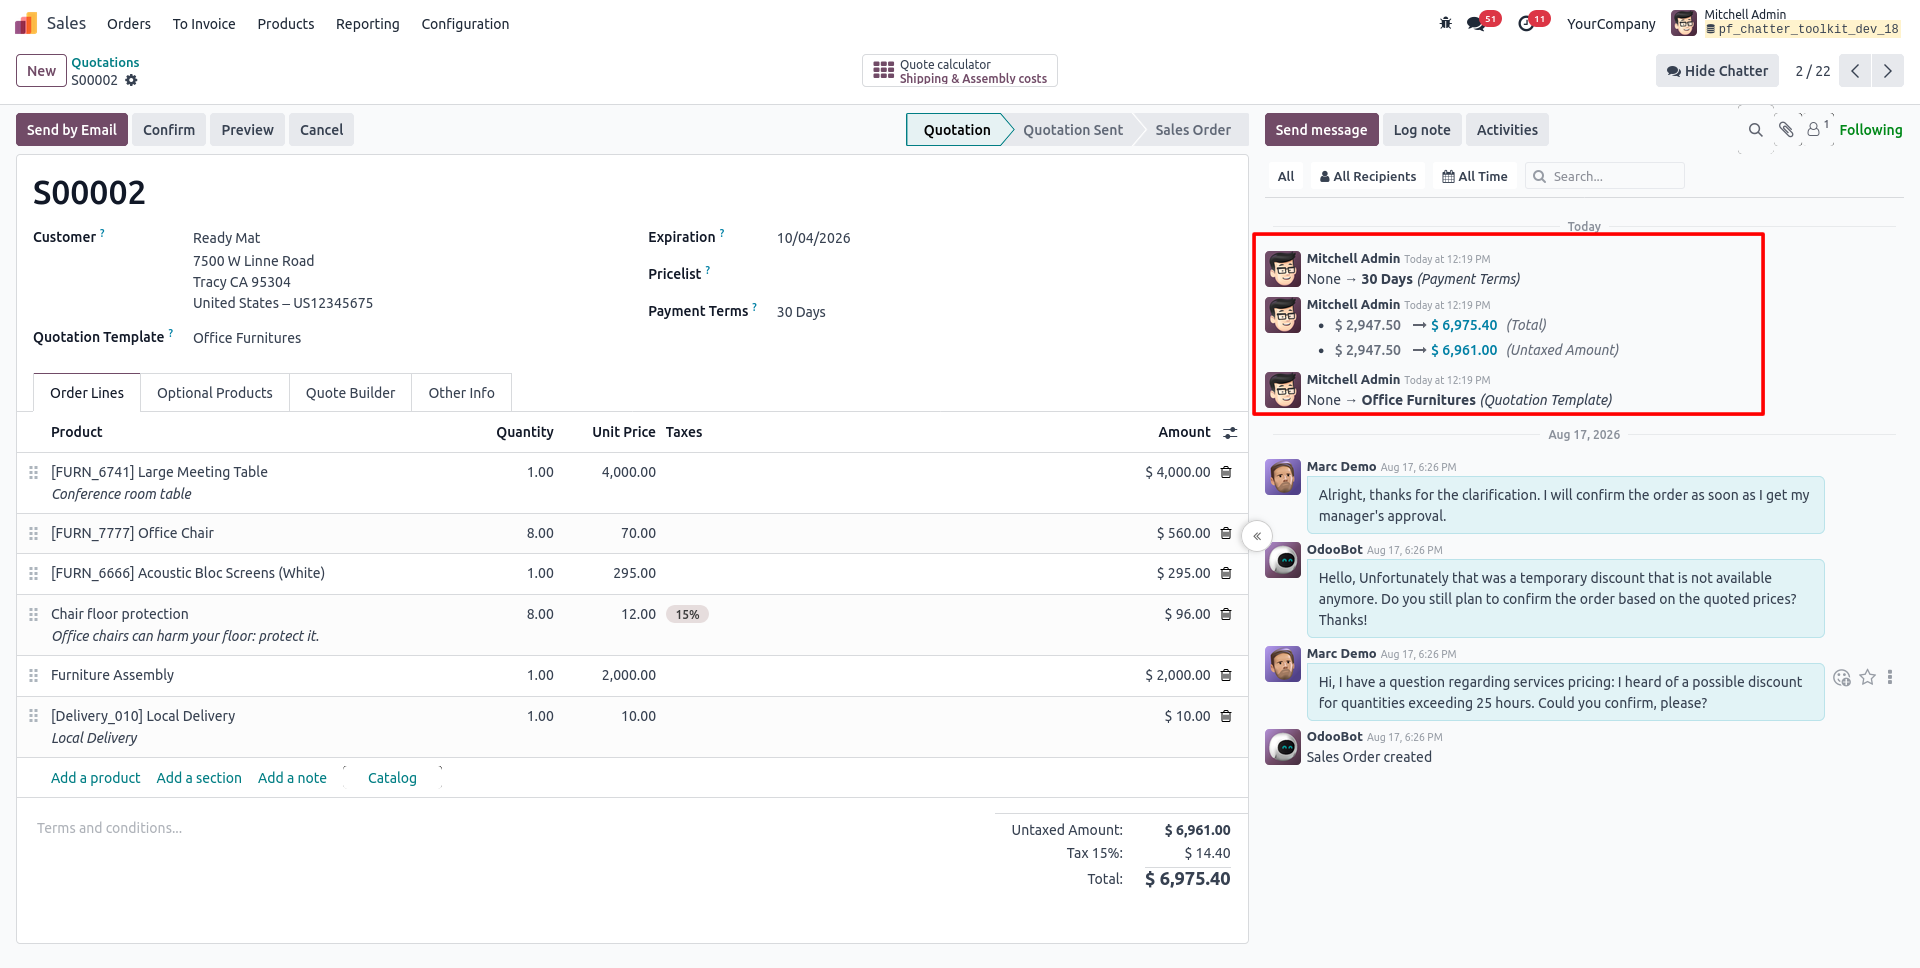
53. Any change made to a tracked field, like Payment Terms or Quotation Template, is automatically logged in the Chatter with old and new values.
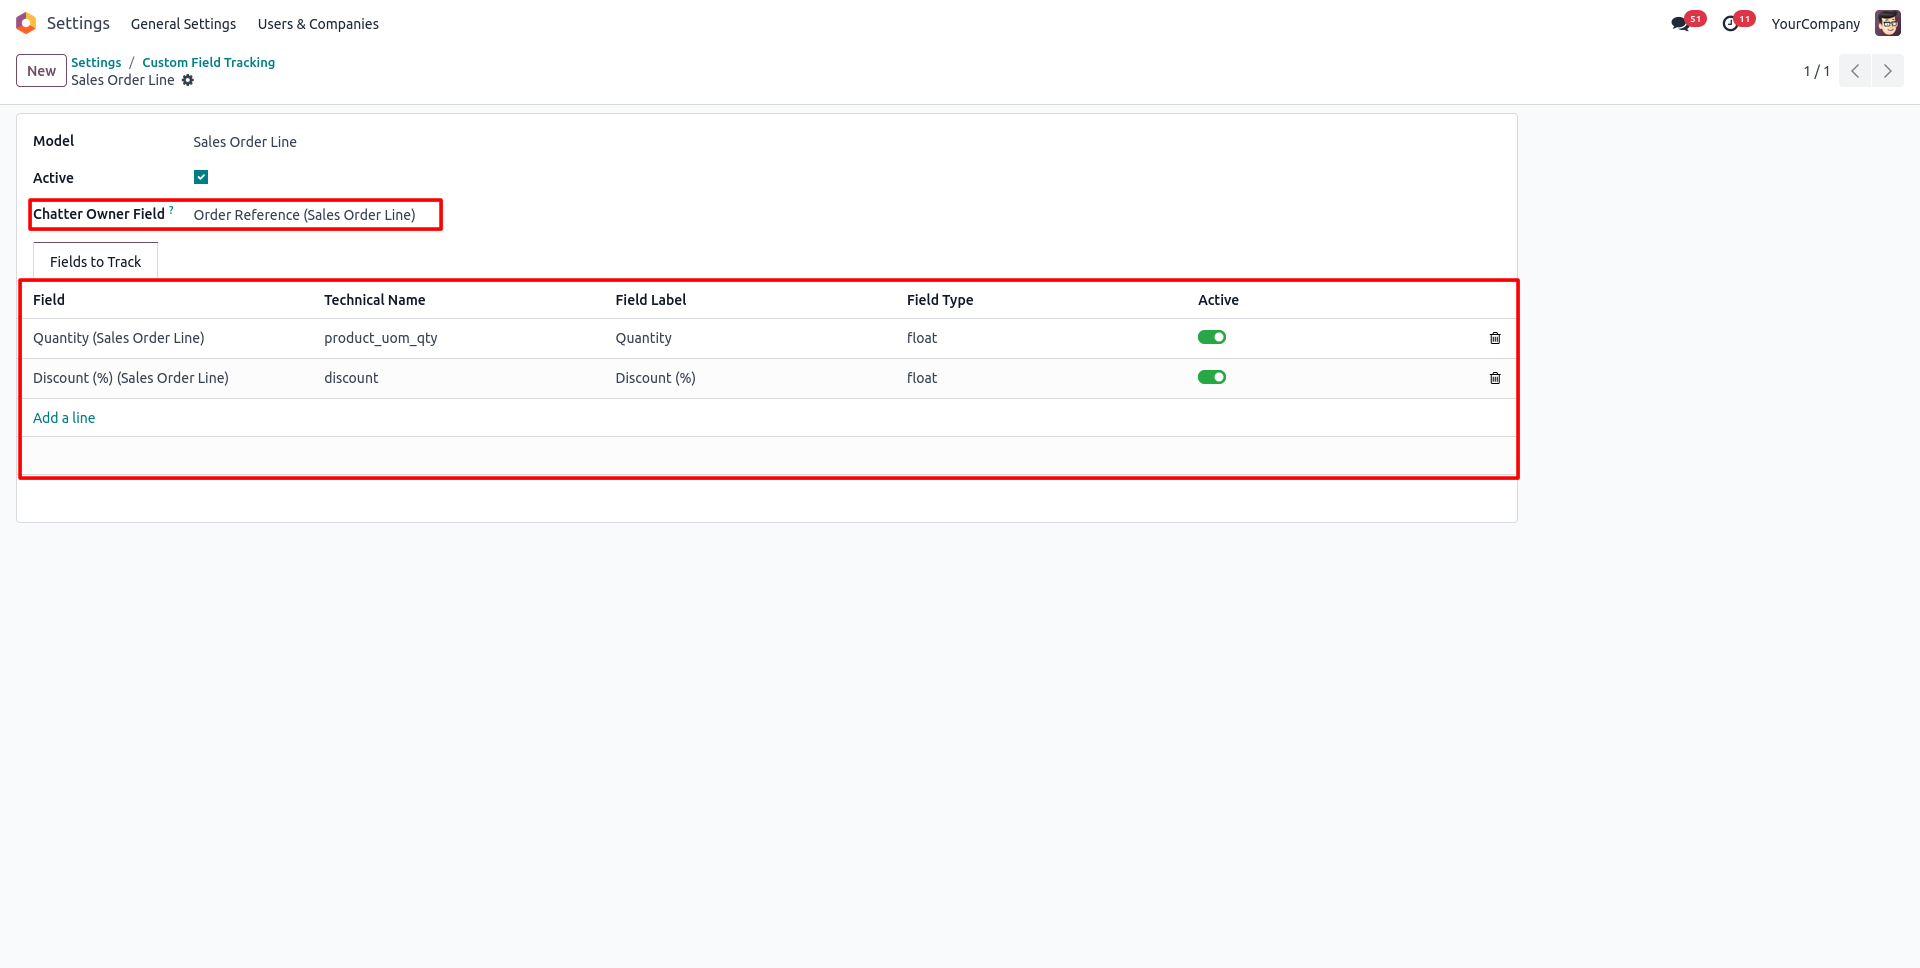
54. For related models like Sales Order Line, set the Chatter Owner Field and add fields such as Quantity and Discount (%) to track.
55. Changes to order line fields, such as Quantity or Discount, are also tracked and displayed directly in the Chatter of the parent record.
Our solutions focus on your problems
- Odoo Implementation
- Odoo Customization
- ERP Development and Implementation
- Odoo Ipass Cloud
- AI for Odoo
- Odoo Apps
- Aws Marketplace Products
- Business Engines
Our Pricing includes User Manual, 90 Days Support (Monday-Friday 10am to 7pm IST) and One time Setup
• Works & tested on standard installations of Odoo with no third party apps,
• Free support only for odoo installations with no third party apps,
• Paid support available for Odoo installations with third party apps.

Prefortune is a Odoo Official Partner, Odoo Development company. Our philosophy is to use Open Source tools and technologies to provide cost effective and green solutions for our customers.
Prefortune Technologies LLP is working on web development, Mobile development, and Odoo ERP.
If you need any help or want more additional features, you may contact us through:
Alternative Products
These other products might interest you
Specifications
| Version | 19.0, 18.0, 17.0 |